Створення таблиці
Aspose.Words дозволяє користувачам створювати таблиці в документі з нуля, а також надає кілька різних методів для цього. У статті представлено деталі щодо додавання форматованих таблиць до вашого документа за допомогою кожного методу, а також порівняння кожного методу в кінці статті.
За замовчуванням Стиль таблиці
Новий створений стіл дає значення за замовчуванням, аналогічні тим, хто використовується в Microsoft Word:
На продажу | За замовчуванням Aspose.Words |
---|---|
Border Style |
Single |
Border Width |
1/2 pt |
Прикордонний колір | Black |
Left and Right Padding |
5.4 pts |
AutoFit Mode |
AutoFit to Window |
Allow AutoFit |
True |
У таблиці можна ввімкнути, якщо вона щільно позиціонується, або плаваючи, якщо вона може розташовуватися в будь-якому місці на сторінці. За замовчуванням, Aspose.Words завжди створює вбудовані таблиці.
|
Створити таблицю з документобудуванням
У Aspose.Words, Користувачі можуть створити таблицю в документі за допомогою документа DocumentBuilderй Основні алгоритми створення таблиці:
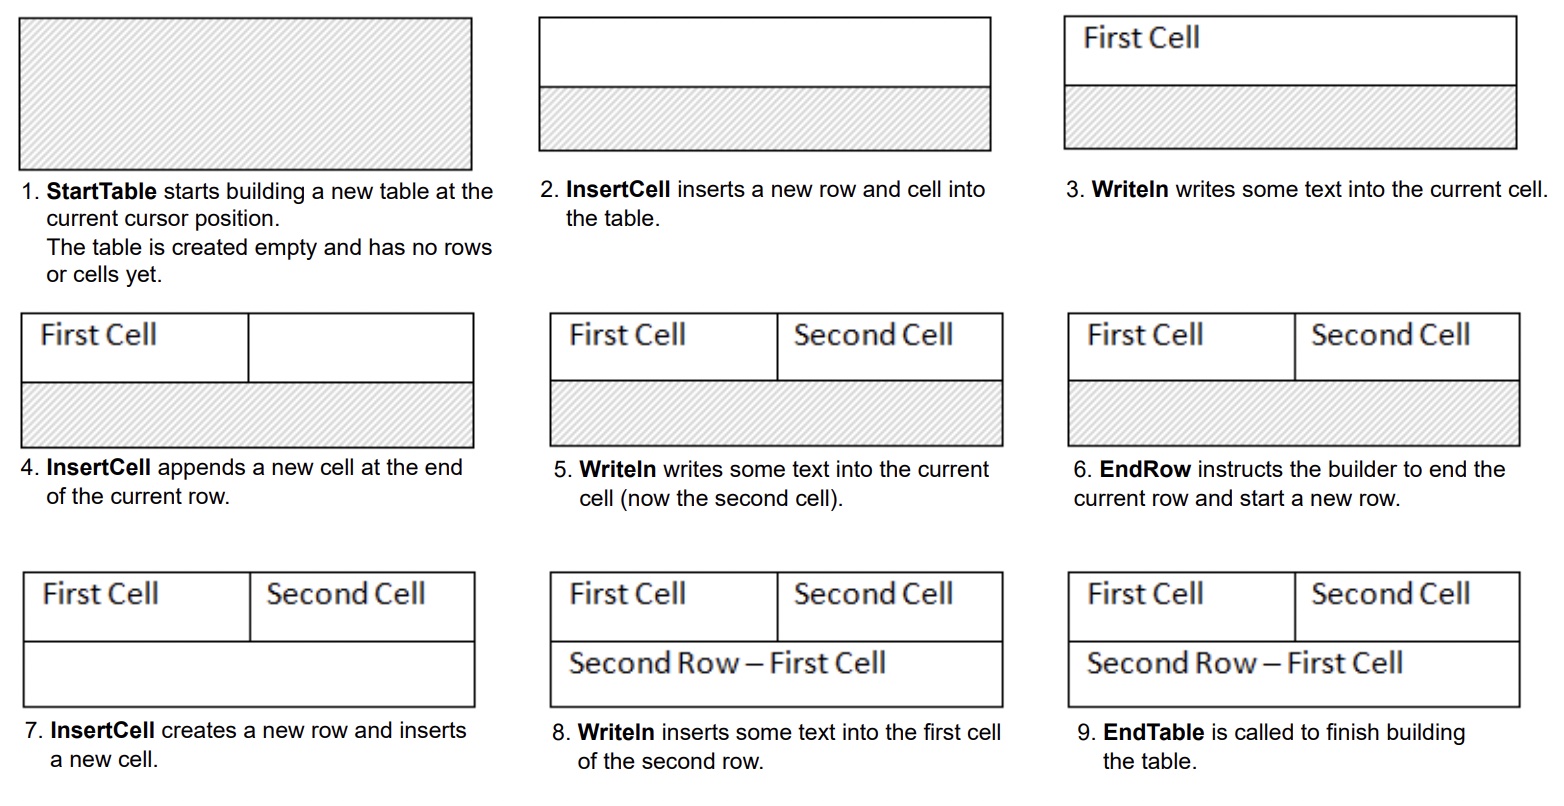
1,1 км Почати таблицю StartTable 2,2 км Додати клітинку до столу за допомогою InsertCell – це автоматично запускає новий ряд 3. У Додатково використовуйте CellFormat властивість вказати форматування комірок 4. У Вставте вміст комірки за допомогою відповідного DocumentBuilder методи, такі як Writeln, InsertImage, та інші 5. Умань Повторюємо кроки 2-4 до завершення ряду 6. Жнівень Дзякуй EndRow до кінця поточного ряду 7. Навігація Додатково використовуйте RowFormat властивість вказати форматування рядків 8. У Повторюємо кроки 2-7 до завершення таблиці 9. Навігація Дзякуй EndTable для завершення будівництва столу
Важливі деталі:
- до StartTable також можна назвати всередині комірки, в якому випадку він починає створення гніздового столу в комірці.
- Після виклику InsertCell, Створено нову клітинку, і будь-який контент, який ви додаєте за допомогою інших методів DocumentBuilder Клас буде додано в поточну комірку. Щоб створити нову клітинку на одному ряду, зателефонуйте InsertCell знову.
- Якщо InsertCell після EndRow і кінець ряду, стіл триватиме на новому ряду.
- У EndTable спосіб завершення таблиці слід назвати тільки після виклику EndRowй Дзвінки EndTable переміщує курсор з поточного осередку до положення відразу після столу.
Процес створення таблиці можна чітко побачити на наступному малюнку:
Приклад коду показує, як створити простий стіл за допомогою DocumentBuilder з форматуванням за замовчуванням:
// For complete examples and data files, please go to https://github.com/aspose-words/Aspose.Words-for-Java.git. | |
Document doc = new Document(); | |
DocumentBuilder builder = new DocumentBuilder(doc); | |
// Start building the table. | |
builder.startTable(); | |
builder.insertCell(); | |
builder.write("Row 1, Cell 1 Content."); | |
// Build the second cell. | |
builder.insertCell(); | |
builder.write("Row 1, Cell 2 Content."); | |
// Call the following method to end the row and start a new row. | |
builder.endRow(); | |
// Build the first cell of the second row. | |
builder.insertCell(); | |
builder.write("Row 2, Cell 1 Content"); | |
// Build the second cell. | |
builder.insertCell(); | |
builder.write("Row 2, Cell 2 Content."); | |
builder.endRow(); | |
// Signal that we have finished building the table. | |
builder.endTable(); | |
doc.save(getArtifactsDir() + "WorkingWithTables.CreateSimpleTable.docx"); |
Приклад коду показує, як створити форматований столик за допомогою DocumentBuilder:
// For complete examples and data files, please go to https://github.com/aspose-words/Aspose.Words-for-Java.git. | |
Document doc = new Document(); | |
DocumentBuilder builder = new DocumentBuilder(doc); | |
Table table = builder.startTable(); | |
builder.insertCell(); | |
// Table wide formatting must be applied after at least one row is present in the table. | |
table.setLeftIndent(20.0); | |
// Set height and define the height rule for the header row. | |
builder.getRowFormat().setHeight(40.0); | |
builder.getRowFormat().setHeightRule(HeightRule.AT_LEAST); | |
builder.getCellFormat().getShading().setBackgroundPatternColor(new Color((198), (217), (241))); | |
builder.getParagraphFormat().setAlignment(ParagraphAlignment.CENTER); | |
builder.getFont().setSize(16.0); | |
builder.getFont().setName("Arial"); | |
builder.getFont().setBold(true); | |
builder.getCellFormat().setWidth(100.0); | |
builder.write("Header Row,\n Cell 1"); | |
// We don't need to specify this cell's width because it's inherited from the previous cell. | |
builder.insertCell(); | |
builder.write("Header Row,\n Cell 2"); | |
builder.insertCell(); | |
builder.getCellFormat().setWidth(200.0); | |
builder.write("Header Row,\n Cell 3"); | |
builder.endRow(); | |
builder.getCellFormat().getShading().setBackgroundPatternColor(Color.WHITE); | |
builder.getCellFormat().setWidth(100.0); | |
builder.getCellFormat().setVerticalAlignment(CellVerticalAlignment.CENTER); | |
// Reset height and define a different height rule for table body. | |
builder.getRowFormat().setHeight(30.0); | |
builder.getRowFormat().setHeightRule(HeightRule.AUTO); | |
builder.insertCell(); | |
// Reset font formatting. | |
builder.getFont().setSize(12.0); | |
builder.getFont().setBold(false); | |
builder.write("Row 1, Cell 1 Content"); | |
builder.insertCell(); | |
builder.write("Row 1, Cell 2 Content"); | |
builder.insertCell(); | |
builder.getCellFormat().setWidth(200.0); | |
builder.write("Row 1, Cell 3 Content"); | |
builder.endRow(); | |
builder.insertCell(); | |
builder.getCellFormat().setWidth(100.0); | |
builder.write("Row 2, Cell 1 Content"); | |
builder.insertCell(); | |
builder.write("Row 2, Cell 2 Content"); | |
builder.insertCell(); | |
builder.getCellFormat().setWidth(200.0); | |
builder.write("Row 2, Cell 3 Content."); | |
builder.endRow(); | |
builder.endTable(); | |
doc.save(getArtifactsDir() + "WorkingWithTables.FormattedTable.docx"); |
Приклад наступного коду показує, як вставити вкладений стіл за допомогою DocumentBuilder:
// For complete examples and data files, please go to https://github.com/aspose-words/Aspose.Words-for-Java.git. | |
Document doc = new Document(); | |
DocumentBuilder builder = new DocumentBuilder(doc); | |
Cell cell = builder.insertCell(); | |
builder.writeln("Outer Table Cell 1"); | |
builder.insertCell(); | |
builder.writeln("Outer Table Cell 2"); | |
// This call is important to create a nested table within the first table. | |
// Without this call, the cells inserted below will be appended to the outer table. | |
builder.endTable(); | |
// Move to the first cell of the outer table. | |
builder.moveTo(cell.getFirstParagraph()); | |
// Build the inner table. | |
builder.insertCell(); | |
builder.writeln("Inner Table Cell 1"); | |
builder.insertCell(); | |
builder.writeln("Inner Table Cell 2"); | |
builder.endTable(); | |
doc.save(getArtifactsDir() + "WorkingWithTables.NestedTable.docx"); |
Створити таблицю через DOM (Українська)Document Object Modelй
Ви можете вставляти таблиці безпосередньо в DOM шляхом додавання нового Table вузол в певній позиції.
Будь ласка, зверніть увагу, що відразу після створення таблиці сама таблиця буде повністю порожньою, що вона ще не містить рядків і клітин. Щоб вставити ряди і клітини в таблицю, додайте відповідні Row і Cell дочірні вузли до DOMй
Приклад коду показує, як побудувати новий стіл з нуля, додавши відповідні дочірні вузли до дерева документа:
// For complete examples and data files, please go to https://github.com/aspose-words/Aspose.Words-for-Java.git. | |
Document doc = new Document(); | |
// We start by creating the table object. Note that we must pass the document object | |
// to the constructor of each node. This is because every node we create must belong | |
// to some document. | |
Table table = new Table(doc); | |
doc.getFirstSection().getBody().appendChild(table); | |
// Here we could call EnsureMinimum to create the rows and cells for us. This method is used | |
// to ensure that the specified node is valid. In this case, a valid table should have at least one Row and one cell. | |
// Instead, we will handle creating the row and table ourselves. | |
// This would be the best way to do this if we were creating a table inside an algorithm. | |
Row row = new Row(doc); | |
row.getRowFormat().setAllowBreakAcrossPages(true); | |
table.appendChild(row); | |
// We can now apply any auto fit settings. | |
table.autoFit(AutoFitBehavior.FIXED_COLUMN_WIDTHS); | |
Cell cell = new Cell(doc); | |
cell.getCellFormat().getShading().setBackgroundPatternColor(Color.BLUE); | |
cell.getCellFormat().setWidth(80.0); | |
cell.appendChild(new Paragraph(doc)); | |
cell.getFirstParagraph().appendChild(new Run(doc, "Row 1, Cell 1 Text")); | |
row.appendChild(cell); | |
// We would then repeat the process for the other cells and rows in the table. | |
// We can also speed things up by cloning existing cells and rows. | |
row.appendChild(cell.deepClone(false)); | |
row.getLastCell().appendChild(new Paragraph(doc)); | |
row.getLastCell().getFirstParagraph().appendChild(new Run(doc, "Row 1, Cell 2 Text")); | |
doc.save(getArtifactsDir() + "WorkingWithTables.InsertTableDirectly.docx"); |
Створення таблиці з HTML
Aspose.Words підтримує вставку вмісту в документ з джерела HTML за допомогою InsertHtml метод. Вхід може бути повним HTML-сторінок або просто частковим фрагментом.
Використання InsertHtml метод, користувачі можуть вставляти таблиці в документ через таблиці тегів, як <table>
, <tr>
, <td>
й
Приклад наступного коду показує, як вставити таблицю в документ з рядка, що містить HTML теги:
// For complete examples and data files, please go to https://github.com/aspose-words/Aspose.Words-for-Java.git. | |
Document doc = new Document(); | |
DocumentBuilder builder = new DocumentBuilder(doc); | |
// Note that AutoFitSettings does not apply to tables inserted from HTML. | |
builder.insertHtml("<table>" + | |
"<tr>" + | |
"<td>Row 1, Cell 1</td>" + | |
"<td>Row 1, Cell 2</td>" + | |
"</tr>" + | |
"<tr>" + | |
"<td>Row 2, Cell 2</td>" + | |
"</tr>" + | |
"</table>"); | |
doc.save(getArtifactsDir() + "WorkingWithTables.InsertTableFromHtml.docx"); |
Вставте Копію Existing Table
Часто необхідно створити таблицю на основі вже існуючого столу в документі. Найпростіший спосіб дублювання таблиці, зберігаючи всі форматування, щоб клонувати вузол таблиці за допомогою таблиці deepClone метод.
Така ж техніка можна використовувати для додавання копій існуючого ряду або комірки до столу.
Приклад коду показує, як дублювати таблицю за допомогою конструкторів вузлів:
// For complete examples and data files, please go to https://github.com/aspose-words/Aspose.Words-for-Java.git. | |
Document doc = new Document(getMyDir() + "Tables.docx"); | |
Table table = (Table) doc.getChild(NodeType.TABLE, 0, true); | |
// Clone the table and insert it into the document after the original. | |
Table tableClone = (Table) table.deepClone(true); | |
table.getParentNode().insertAfter(tableClone, table); | |
// Insert an empty paragraph between the two tables, | |
// or else they will be combined into one upon saving this has to do with document validation. | |
table.getParentNode().insertAfter(new Paragraph(doc), table); | |
doc.save(getArtifactsDir() + "WorkingWithTables.CloneCompleteTable.docx"); |
Наприклад, наступний код показує, як клонувати останній ряд таблиці і додавати його до таблиці:
// For complete examples and data files, please go to https://github.com/aspose-words/Aspose.Words-for-Java.git. | |
Document doc = new Document(getMyDir() + "Tables.docx"); | |
Table table = (Table) doc.getChild(NodeType.TABLE, 0, true); | |
Row clonedRow = (Row) table.getLastRow().deepClone(true); | |
// Remove all content from the cloned row's cells. This makes the row ready for new content to be inserted into. | |
for (Cell cell : (Iterable<Cell>) clonedRow.getCells()) | |
cell.removeAllChildren(); | |
table.appendChild(clonedRow); | |
doc.save(getArtifactsDir() + "WorkingWithTables.CloneLastRow.docx"); |
Якщо ви шукаєте створення таблиць у документі, що динамічно зростає з кожним записом з джерела даних, то вище метод не рекомендується. Замість бажаного виходу більш легко досягається за допомогою використання Mail merge з регіонами. Дізнатися більше про цю техніку можна в Mail Merge з регіонами секція.
Порівняйте способи створення таблиці
Aspose.Words надає декілька способів створення нових таблиць у документі. Кожен метод має свої переваги і недоліки, тому вибір яких часто залежить від конкретної ситуації.
Давайте розглянемо ці способи створення таблиць і порівняння їх плюсів і мінусів:
Мета | Переваги | Недоліки |
---|---|---|
Про нас DocumentBuilder |
Стандартний метод вставки таблиць та іншого вмісту документа | Іноді складно створити безліч сортів столів одночасно з тим же екземпляром будівель |
Про нас DOM | Підходить у краще з зовнішнім кодом, який створює і вставляє вершини безпосередньо в DOM без використання DocumentBuilder | Стіл створений “empty”: перед виконанням більшості операцій необхідно викликати EnsureMinimum створити будь-які відсутні дочірні вузли |
Від HTML | Може створити новий стіл з джерела HTML, використовуючи теги, такі як <table> , <tr> , <td> |
Не всі можливі Microsoft Word формати таблиці можна застосувати до HTML |
Слонування існуючого столу | Ви можете створити копію існуючого столу, зберігаючи всі рядки та форматування комірок | Для використання необхідно видалити відповідні дочірні вузли дитини до таблиці |