Analyzing your prompt, please hold on...
An error occurred while retrieving the results. Please refresh the page and try again.
表格的每个元素都可以应用不同的格式。例如,表格格式设置将应用于整个表格,行格式设置将仅应用于特定行,单元格格式设置将仅应用于某些单元格。
Aspose.Words 提供丰富的 API 来检索表格格式并将其应用到表格。您可以使用 Table、RowFormat 和 CellFormat 节点来设置格式。
在本文中,我们将讨论如何将格式应用于不同的表节点以及 Aspose.Words 支持哪些表格式设置。
在本节中,我们将研究如何将格式应用于各种表节点。
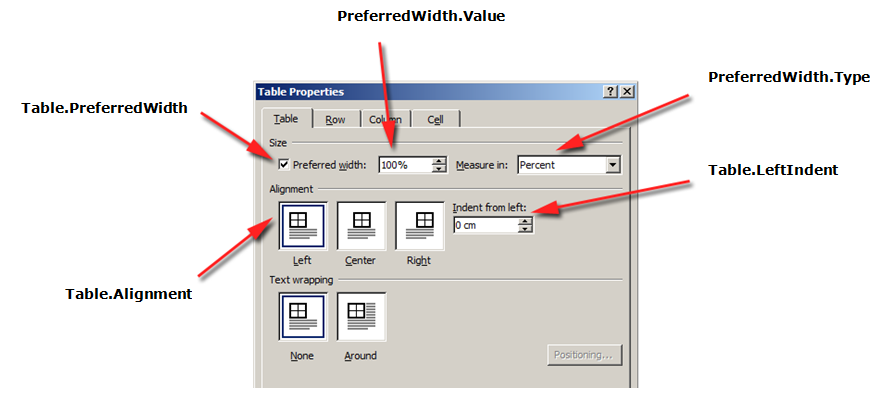
要将格式应用于表,您可以使用 Table、PreferredWidth 和 TableCollection 类的相应 Table 节点上可用的属性。
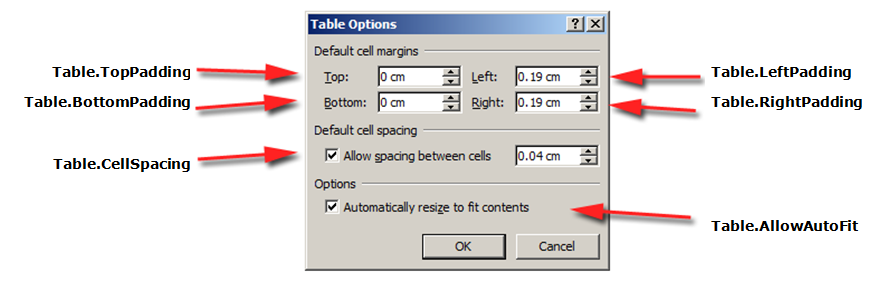
下图显示了 Microsoft Word 中的 Table 格式化功能及其在 Aspose.Words 中的相应属性。
以下代码示例演示如何将轮廓边框应用于表格:
以下代码示例显示如何构建启用所有边框的表格(网格):
行级 格式可以使用 Row、RowFormat 和 RowCollection 类进行控制。
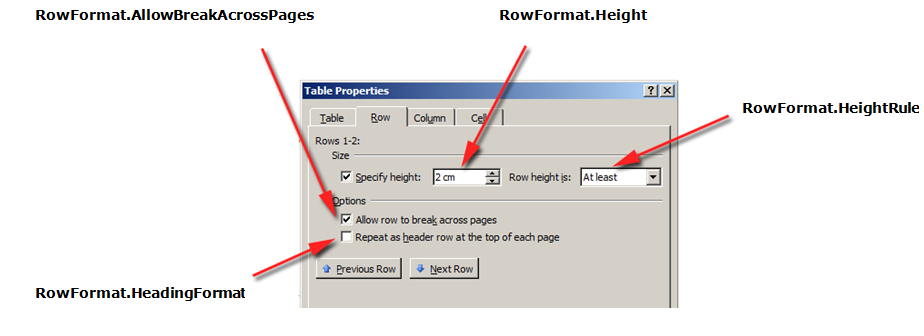
下图显示了 Microsoft Word 中的 Row 格式功能及其在 Aspose.Words 中的相应属性。
以下代码示例显示如何修改表行格式:
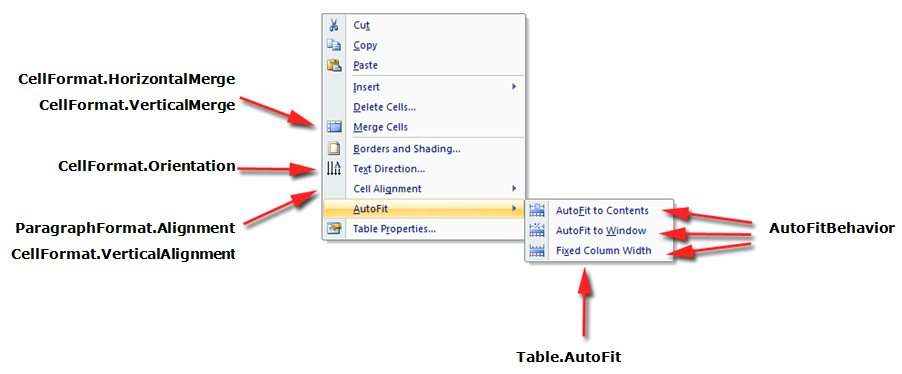
单元格级格式由 Cell、CellFormat 和 CellCollection 类控制。
请注意,Cell 只能是 Row 的子节点。同时,Cell 中必须至少有一个 Paragraph,以便可以对其应用格式。
除了 Paragraph 之外,您还可以将 Table 插入 Cell 中。
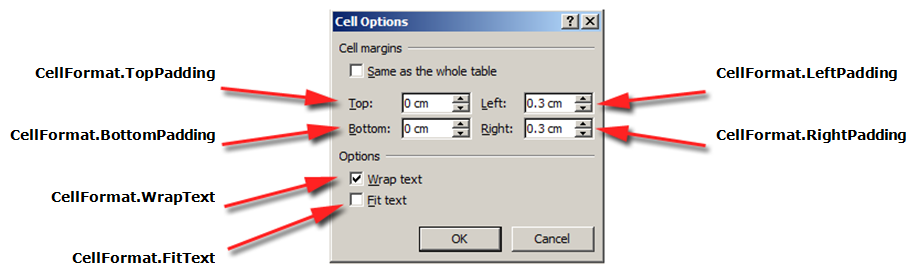
下图显示了 Microsoft Word 中的 Cell 格式功能及其在 Aspose.Words 中的相应属性。
以下代码示例显示如何修改表格单元格的格式:
以下代码示例演示如何设置添加到单元格内容的左侧/顶部/右侧/底部的空间量(以磅为单位):
设置行高的最简单方法是使用 DocumentBuilder。使用适当的 RowFormat 属性,您可以设置默认高度设置或为表中的每一行应用不同的高度。
在 Aspose.Words 中,表格行高由以下因素控制:
同时,可以为每行设置不同的高度 - 这使您可以广泛控制表格设置。
以下代码示例演示如何创建包含单个单元格的表格并应用行格式:
Microsoft Word 文档中的表格提供了几种不同的方法来调整表格和单个单元格的大小。这些属性允许对表的外观和行为进行大量控制,以便 Aspose.Words 支持表的行为,如 Microsoft Word 中一样。
重要的是要知道表格元素提供了几个不同的属性,这些属性可能会影响整个表格以及单个单元格的宽度的计算方式:
本文详细介绍了各种表格宽度计算属性的工作原理以及如何完全控制表格宽度计算。这是 在表格布局未按预期显示的情况下了解这一点尤其有用。
在大多数情况下,建议使用首选单元格而不是表格宽度。优选的单元格宽度更符合DOCX格式规范以及Aspose.Words模型。
单元格宽度实际上是 DOCX 格式的计算值。实际的单元宽度可能取决于很多因素。例如,更改页边距或首选表格宽度可能会影响实际的单元格宽度。
首选单元格宽度是存储在文档中的单元格属性。它不依赖于任何东西,并且当您更改表格或单元格的其他属性时不会更改。
表格或单个单元格的所需宽度是通过首选宽度属性定义的,该属性是元素努力适应的大小。也就是说,可以为整个表格或单个单元格指定首选宽度。在某些情况下,可能无法完全适合该宽度,但大多数情况下实际宽度会接近该值。
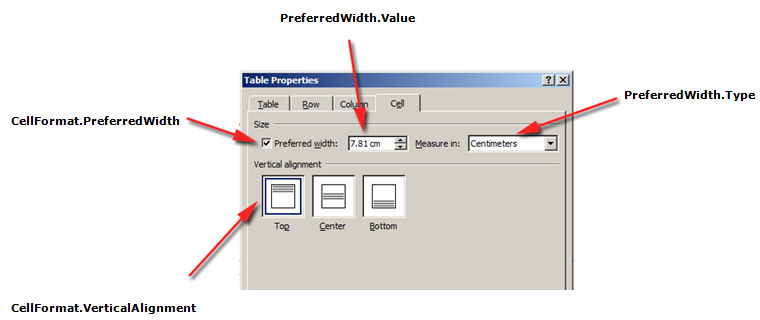
使用 PreferredWidth 类的方法设置适当的首选宽度类型和值:
下图显示了 Microsoft Word 中的首选宽度设置功能及其在 Aspose.Words 中的相应属性。
下图显示了如何将这些选项应用于文档中的真实表格的示例。
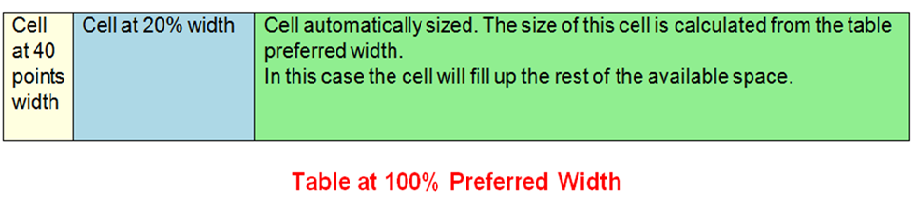
在 Aspose.Words 中,表格和单元格宽度是使用 Table.PreferredWidth 属性和 CellFormat.PreferredWidth 属性设置的,并在 PreferredWidthType 枚举中提供可用选项:
使用 Table.PreferredWidth 属性将调整其相对于其容器的首选宽度:页面、文本列或外部表格单元格(如果它是嵌套表格)。
以下代码示例演示如何将表格设置为自动适应页面宽度的 50%:
在给定单元格上使用 CellFormat.PreferredWidth 属性将调整其首选宽度。
以下代码示例显示如何设置不同的首选宽度设置:
您可以使用 Type 和 Value 属性来查找所需表格或单元格的首选宽度详细信息。
以下代码示例显示如何检索表格单元格的首选宽度类型:
AllowAutoFit 属性允许表中的单元格根据选定的标准增大和缩小。例如,您可以使用 自动适应窗口 选项使表格适合页面的宽度,并使用 自动适应内容 选项允许每个单元格根据其内容增大或缩小。
默认情况下,Aspose.Words 使用 自动适应窗口 插入新表。表格的大小将根据可用的页面宽度进行调整。要调整表的大小,您可以调用 AutoFit 方法。此方法接受 AutoFitBehavior 枚举,该枚举指定对表应用什么类型的自动调整。
重要的是要知道 autofit 方法实际上是一种同时将不同属性应用于表的快捷方式。这些属性实际上为表提供了观察到的行为。我们将讨论每个自动调整选项的这些属性。
以下代码示例显示如何设置表格以根据其内容缩小或增大每个单元格:
当自动适应窗口应用于表时,实际上在幕后执行以下操作:
以下代码示例演示如何使表格自动适应页面宽度:
当表格自动调整内容时,实际上在幕后执行以下步骤:
1.启用Table.AllowAutoFit属性,根据其内容自动调整每个单元格的大小
2.从Table.PreferredWidth中删除首选表格宽度,为每个表格单元格删除CellFormat.PreferredWidth
以下代码示例演示如何自动调整表格以适应其内容:
如果表禁用了自动调整并使用固定列宽,则执行以下步骤:
以下代码示例显示如何禁用自动调整并为指定表格启用固定宽度:
Aspose.Words 允许用户通过多个对象(包括 CellFormat)定义表格或单元格的宽度 - 它的 Width 属性大部分是以前版本遗留下来的,但是,它对于简化单元格宽度的设置仍然很有用。
重要的是要知道 CellFormat.Width 属性的工作方式有所不同,具体取决于表中已存在的其他宽度属性。
Aspose.Words 使用以下顺序来计算单元格宽度:
| 命令 | 财产 | 描述 |
|---|---|---|
| 1 | AllowAutoFit确定 | 如果启用 AutoFit: - 表格可能会增长超过首选宽度以容纳内容 - 它通常不会缩小到首选宽度以下 - 对 CellFormat.Width 值的任何更改都会被忽略,单元格将适合其内容 |
| 2 | 值为 Points 或 Percent 的 PreferredWidthType | CellFormat.Width 被忽略 |
| 3 | PreferredWidthType 值为 Auto | CellFormat.Width 中的值被复制并成为单元格的首选宽度(以磅为单位) |
您可以获取或设置表格单元格之间的任何附加空间,类似于 Microsoft Word 中的"Cell 间距"选项。这可以使用 AllowCellSpacing 属性来完成。
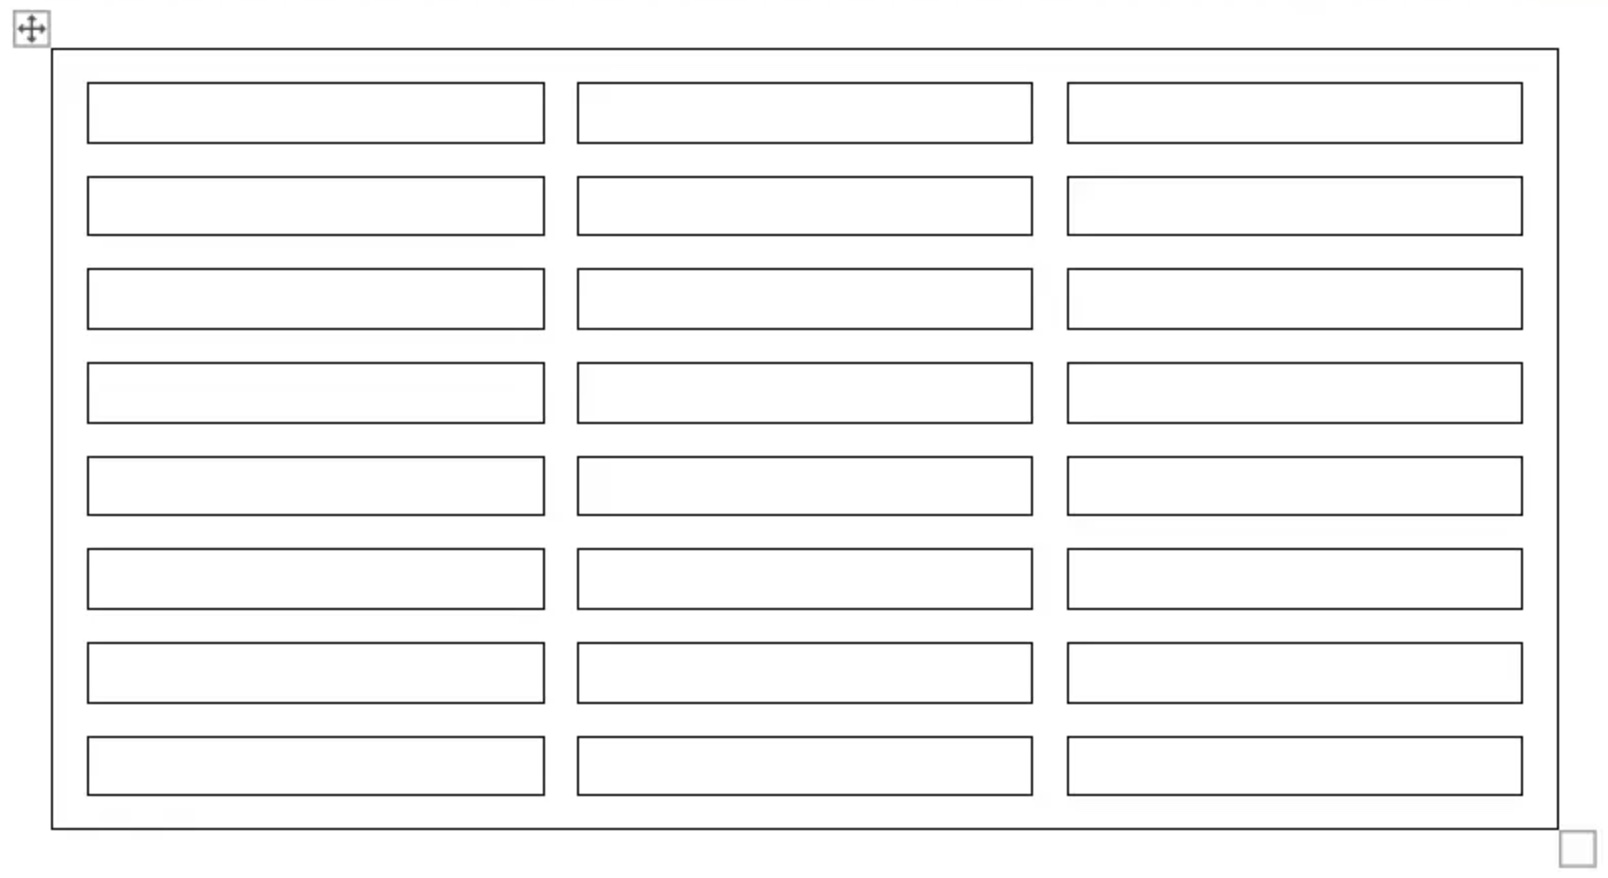
下图显示了如何将这些选项应用于文档中的真实表格的示例。
以下代码示例展示了如何设置单元格之间的间距:
边框和底纹可以使用 Table.SetBorder、Table.SetBorders 和 Table.SetShading 应用于整个表格,也可以使用 CellFormat.Borders 和 CellFormat.Shading 仅应用于特定单元格。此外,可以使用 RowFormat.Borders 设置行边框,但不能以这种方式应用阴影。
下图显示了 Microsoft Word 中的边框和阴影设置以及 Aspose.Words 中相应的属性。
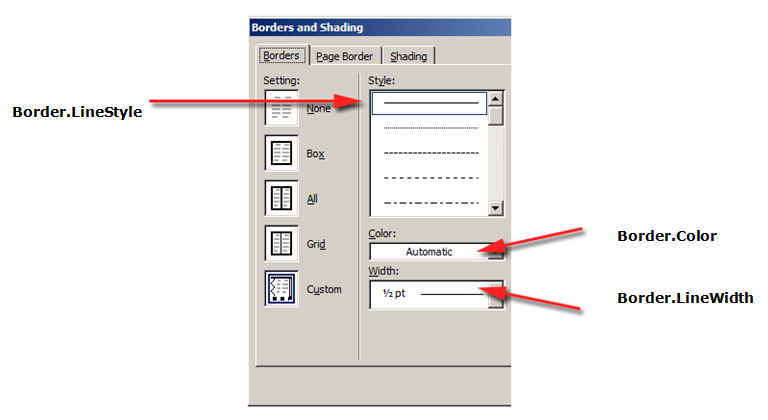
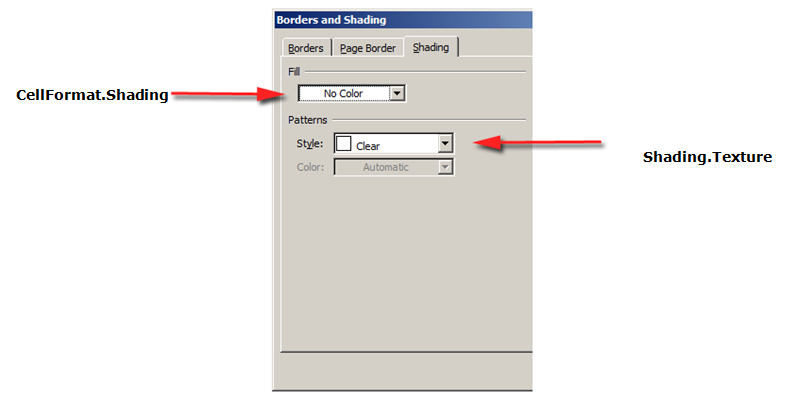
以下代码示例演示如何设置具有不同边框和底纹的表格和单元格的格式:
Analyzing your prompt, please hold on...
An error occurred while retrieving the results. Please refresh the page and try again.