Analyzing your prompt, please hold on...
An error occurred while retrieving the results. Please refresh the page and try again.
Aztec Code is a 2D matrix type that supports encoding both byte streams and alphanumeric characters. Aztec Code barcodes are depicted as square-grid modules with a unique pattern in the middle of a barcode image that facilitates barcode scanning and recognition. Moreover, it enables Reed-Solomon error correction to verify data integrity and recover encoded information. This symbology provides high data density and recognition accuracy.
Aztec Code includes the following subtypes:
To select the required generation mode for Aztec Code barcodes in Aspose.BarCode for .NET, it is necessary to initialize the AztecSymbolMode field of class AztecParameters. This property can take the following values:
Sample Aztec Code barcodes provided below have been created using different generation modes.
| Generation Mode | Auto | Compact | Full-Range | Rune |
|---|---|---|---|---|
 |
 |
 |
 |
The following code snippet illustrates how to set the required generation mode for Aztec Code.
using (BarcodeGenerator gen = new BarcodeGenerator(EncodeTypes.Aztec, "Åspóse.Barcóde©"))
{
    gen.Parameters.Barcode.XDimension.Pixels = 4;
    //set symbol mode Auto
    gen.CodeText = "Åspóse.Barcóde©";
    gen.Parameters.Barcode.Aztec.SymbolMode = AztecSymbolMode.Auto;
    gen.Save($"{path}AztecSymbolModeAuto.png", BarCodeImageFormat.Png);
    //set symbol mode FullRange
    gen.CodeText = "Åspóse.Barcóde©";
    gen.Parameters.Barcode.Aztec.SymbolMode = AztecSymbolMode.FullRange;
    gen.Save($"{path}AztecSymbolModeFullRange.png", BarCodeImageFormat.Png);
    //set symbol mode Compact
    gen.CodeText = "Åspóse.Barcóde©";
    gen.Parameters.Barcode.Aztec.SymbolMode = AztecSymbolMode.Compact;
    gen.Save($"{path}AztecSymbolModeCompact.png", BarCodeImageFormat.Png);
    //set symbol mode Auto
    gen.CodeText = "123";
    gen.Parameters.Barcode.Aztec.SymbolMode = AztecSymbolMode.Rune;
    gen.Save($"{path}AztecSymbolModeRune.png", BarCodeImageFormat.Png);
}The barcode library supports different encoding modes to generate Aztec barcodes. The required mode can be selected by setting the AztecEncodeMode property of class AztecParameters. The possible values are defined in the AztecEncodeMode enumeration. These modes are briefly described below:
In Auto mode, the CodeText is encoded with maximum data compactness. Unicode characters are re-encoded using the encoding specified in the ECIEncoding parameter, with an ECI identifier inserted. If a character is found that is not supported by the selected ECI encoding, an exception is thrown. By default, the ECIEncoding property is set to ECIEncodings.UTF8 (ECI ID:"\000026"). The following code sample shows how to generate Aztec barcode in the Auto mode.

using (BarcodeGenerator gen = new BarcodeGenerator(EncodeTypes.Aztec, "犬Right狗"))
{
    gen.Save($"{path}AztecEncodeModeAuto.png", BarCodeImageFormat.Png);
}
The Binary mode serves to encode byte streams. If a Unicode character is encountered, an exception is thrown. The code sample below explains how to work with this encoding mode.

byte[] encodedArr = { 0xFF, 0xFE, 0xFD, 0xFC, 0xFB, 0xFA, 0xF9 };
using (BarcodeGenerator gen = new BarcodeGenerator(EncodeTypes.Aztec))
{
    gen.SetCodeText(encodedArr);
    //set Aztec encode mode to Binary
    gen.Parameters.Barcode.Aztec.EncodeMode = AztecEncodeMode.Binary;
    gen.Save($"{path}AztecEncodeModeBinary.png", BarCodeImageFormat.Png);

}
The Extended Channel Interpretation (ECI) mode indicates that the encoded data is interpreted according to the ECI protocol defined by the AIM ECI Specifications. When the ECI mode is selected, the entire CodeText is re-encoded using the encoding specified in the ECIEncoding parameter, with an ECI identifier inserted. If a character is found that is not supported by the selected ECI encoding, an exception is thrown. By default, the ECIEncoding property is set to ECIEncodings.UTF8 (ECI ID:"\000026").
The following code sample demonstrates how to use the ECI mode.

// ECI mode, Latin/Greek alphabet encoding. ECI ID:"\000009"
var str = "ΑΒΓΔΕ";

using (var bg = new BarcodeGenerator(EncodeTypes.Aztec, str))
{
    bg.Parameters.Barcode.Aztec.EncodeMode = AztecEncodeMode.ECI;
    bg.Parameters.Barcode.Aztec.ECIEncoding = ECIEncodings.ISO_8859_7;
    var img = bg.GenerateBarCodeImage();
}
In the Extended Codetext mode, the input data passed to the Codetext property contains special control words in addition to main information. Such words activate extended controls over data encoding and enable storing textual parts with different encodings in a single barcode. To generate Aztec barcodes in this format, it is recommended to use class AztecExtCodetextBuilder.
The following code sample demonstrate how to use the Extended mode.

//create codetext
AztecExtCodetextBuilder textBuilder = new AztecExtCodetextBuilder();
textBuilder.AddECICodetext(ECIEncodings.Win1251, "Will");
textBuilder.AddECICodetext(ECIEncodings.UTF8, "犬Right狗");
textBuilder.AddECICodetext(ECIEncodings.UTF16BE, "犬Power狗");
textBuilder.AddPlainCodetext("Plain text");

//generate codetext
string codetext = textBuilder.GetExtendedCodetext();

//generate
using (BarcodeGenerator gen = new BarcodeGenerator(EncodeTypes.Aztec, codetext))
{
    gen.Parameters.Barcode.XDimension.Pixels = 15;
    //set encode mode to Extended
    gen.Parameters.Barcode.Aztec.EncodeMode = AztecEncodeMode.Extended;
    gen.Parameters.Barcode.CodeTextParameters.TwoDDisplayText = "Extended mode";
    gen.Save($"{path}AztecEncodeModeExtended.png", BarCodeImageFormat.Png);
}
By default, the size of the barcode will be automatically selected based on the data size. To manually determine the size of the barcode, it is necessary to initialize the LayersCount property of the AztecParameters class. This property can have values from 1 to 3 for Compact Aztec Code and from 1 to 32 for Full-Range Aztec Code. If the data size exceeds the capacity of the symbol with the specified size, an exception will be thrown.
The following code sample demonstrate how to set the layout for a generated Aztec Code barcode.
| Layers Count | Is Set to Auto | Is Set to 10 |
|---|---|---|
 |
 |
using (BarcodeGenerator gen = new BarcodeGenerator(EncodeTypes.Aztec, "Åspóse.Barcóde©"))
{
    gen.Parameters.Barcode.XDimension.Pixels = 4;

    //auto (by default)
    gen.Save($"{path}AztecLayersCountAuto.png", BarCodeImageFormat.Png);

    //set layers count to 10
    gen.Parameters.Barcode.Aztec.LayersCount = 10;
    gen.Save($"{path}AztecLayersCount10.png", BarCodeImageFormat.Png);
}In addition to the main barcode data, Aztec Code barcodes contain recovery information that can occupy from 5 to 95% of the entire encoded data stream. It is recommended to set this parameter to 23%. To select the required error correction level for Aztec Code in Aspose.BarCode for .NET, it is necessary to initialize the AztecErrorLevel property of class AztecParameters.
Sample barcodes demonstrated below have been generated with different error correction level settings.
| Error Correction Level | Is Set to 5 | Is Set to 50 |
|---|---|---|
 |
 |
The following code sample is given to explain how to set the required error correction level for Aztec Code.
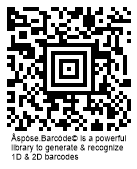
using (BarcodeGenerator gen = new BarcodeGenerator(EncodeTypes.Aztec, "Åspóse.Barcóde© is a powerful library to generate & recognize 1D & 2D barcodes"))
{
    gen.Parameters.Barcode.XDimension.Pixels = 4;
    gen.Parameters.Barcode.Aztec.SymbolMode = AztecSymbolMode.FullRange;
    //set error correction capacity to 5%
    gen.Parameters.Barcode.Aztec.ErrorLevel = 5;
    gen.Save($"{path}AztecErrorLevel5.png", BarCodeImageFormat.Png);
    //set error correction capacity to 50%
    gen.Parameters.Barcode.Aztec.ErrorLevel = 50;
    gen.Save($"{path}AztecErrorLevel50.png", BarCodeImageFormat.Png);
}Aspose.BarCode for .NET supports a special generation mode to create Aztec Code barcodes with a structured append. This mode allows combining up to 26 Aztec Code barcodes. To enable this generation mode, it is necessary to initialize the following properties:
The following code sample shows how to enable the Structured Append mode.

using (BarcodeGenerator gen = new BarcodeGenerator(EncodeTypes.Aztec, "Aspose"))
{
    gen.Parameters.Barcode.XDimension.Pixels = 15;
    //set Aztec structured append mode
    gen.Parameters.Barcode.Aztec.StructuredAppendBarcodeId = 3;
    gen.Parameters.Barcode.Aztec.StructuredAppendBarcodesCount = 5;
    gen.Parameters.Barcode.Aztec.StructuredAppendFileId = "ABCD";
    gen.Save($"{path}AztecStructuredAppendMode.png", BarCodeImageFormat.Png);
}To encode a special flag indicating that the data encoded in a Aztec Code barcode is intended to initialize a hardware reader, it is possible to set the IsReaderInitialization property. The following code sample shows how to enable this property.
using (BarcodeGenerator gen = new BarcodeGenerator(EncodeTypes.Aztec, "Aspose"))
{
    gen.Parameters.Barcode.XDimension.Pixels = 10;
    //set flag that indicates that data is encoded for reader initialization
    gen.Parameters.Barcode.Aztec.IsReaderInitialization = true;
    gen.Save($"{path}AztecReaderInitialization.png", BarCodeImageFormat.Png);
}
Aspect Ratio is the ratio between the height and the width of a barcode. To adjust barcode proportions using the X and Y coordinates in Aspose.BarCode for .NET, it is necessary to use the AspectRatio property of class AztecParameters. In Aspose.BarCode for .NET, it is defined as a relative coefficient to the value of XDimension. In most cases, the value of AspectRatio should be set to 1. However, if developers need to adjust the proportions of generated barcodes, it can be done using the AspectRatio parameter.
The barcode images demonstrated below have been created using different aspect ratio settings.
| Aspect Ratio | Is Set to 1 | Is Set to 0.5 |
|---|---|---|
 |
 |
The following code snippet shows how to manage aspect ratio settings for Aztec Code.
using (BarcodeGenerator gen = new BarcodeGenerator(EncodeTypes.Aztec, "Åspóse.Barcóde©"))
{
    gen.Parameters.Barcode.XDimension.Pixels = 4;
    //set aspect ratio 1
    gen.Parameters.Barcode.Aztec.AspectRatio = 1;
    gen.Save($"{path}AztecAspectRatio1.png", BarCodeImageFormat.Png);
    //set aspect ratio 0.5
    gen.Parameters.Barcode.Aztec.AspectRatio = 0.5f;
    gen.Save($"{path}AztecAspectRatio0.5.png", BarCodeImageFormat.Png);
}Analyzing your prompt, please hold on...
An error occurred while retrieving the results. Please refresh the page and try again.