Arbeiten mit Transparenz in XPS-Dateien | Python
Transparenz wird häufig verwendet, um visuelle Effekte wie das Überblenden, Verblassen oder Überlagern eines Bildes oder Grafikelements mit einem anderen zu erzeugen. Dies kann durch verschiedene Techniken erreicht werden, einschließlich der Anpassung der Deckkraft oder des Alphakanals eines Objekts, der Verwendung von Mischmodi oder der Anwendung von Masken oder Überlagerungen. Es ist ein wertvolles Werkzeug für Design, Illustration und digitale Komposition und ermöglicht die Erstellung vielschichtiger und komplexer visueller Kompositionen.
Transparentes Objekt zum XPS-Dokument hinzufügen
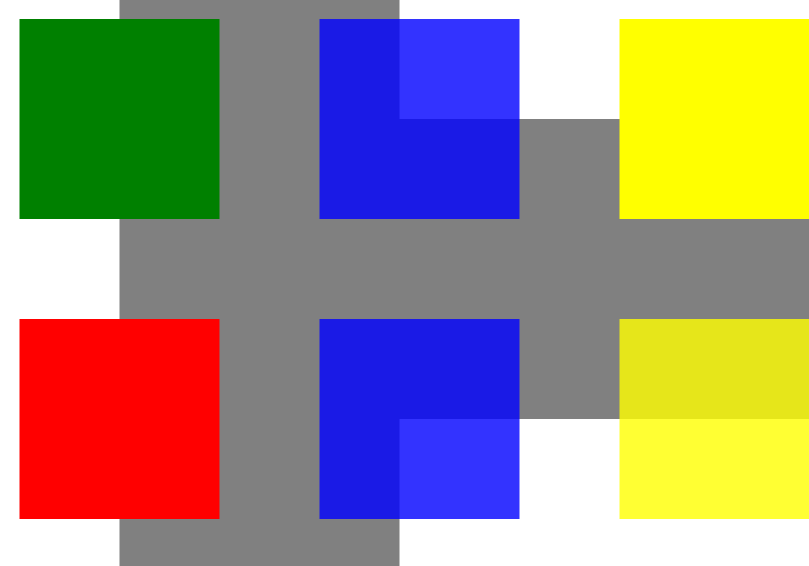
Aspose.Page für Python über .NET stellt die Klasse XpsPath bereit, mit der Sie transparente Objekte zu einem XPS-Dokument hinzufügen können. Um dies zu erreichen, müssen Sie eine PathGeometry angeben und diese dem XpsPath hinzufügen. Der folgende Codeausschnitt demonstriert die vollständige Funktionalität zum Hinzufügen eines transparenten Objekts zu einem XPS-Dokument:
 1# The path to the documents directory.
 2        data_dir = Util.get_data_dir_working_with_transparency()
 3        # Create new XPS Document
 4        doc = XpsDocument()
 5
 6        # Just to demonstrate transparency
 7        doc.add_path(doc.create_path_geometry("M120,0 H400 v1000 H120")).fill = doc.create_solid_color_brush(aspose.pydrawing.Color.gray)
 8        doc.add_path(doc.create_path_geometry("M300,120 h600 V420 h-600")).fill = doc.create_solid_color_brush(aspose.pydrawing.Color.gray)
 9
10        # Create the path with the closed rectangle geometry
11        path1: XpsPath = doc.create_path(doc.create_path_geometry("M20,20 h200 v200 h-200 z"))
12        # Set a blue solid brush to fill the path1
13        path1.fill = doc.create_solid_color_brush(aspose.pydrawing.Color.blue)
14        # Add it to the current page
15        path2: XpsPath = doc.add_path(path1)
16
17        # path1 and path2 are the same as soon as path1 hasn't been placed inside any other element
18        # (which means that path1 had no parent element).
19        # Because of that rectangle's color on the page effectively turns to green
20        path2.fill = doc.create_solid_color_brush(aspose.pydrawing.Color.green)
21
22        # Now add path2 once again. Now path2 has parent. So path3 won't be the same as path2.
23        # Thus a new rectangle is painted on the page ...
24        path3: XpsPath = doc.add_path(path2)
25        # ... and we shift it 300 units lower ...
26        path3.render_transform = doc.create_matrix(1, 0, 0, 1, 0, 300)
27        # ... and set red solid brush to fill it
28        path3.fill = doc.create_solid_color_brush(aspose.pydrawing.Color.red)
29
30        # Create a new path4 with path2's geometry ...
31        path4: XpsPath = doc.add_path(path2.data)
32        # ... shift it 300 units to the right ...
33        path4.render_transform = doc.create_matrix(1, 0, 0, 1, 300, 0)
34        # ... and set a blue solid fill
35        path4.fill = doc.create_solid_color_brush(aspose.pydrawing.Color.blue)
36
37        # Add path4 once again.
38        path5: XpsPath = doc.add_path(path4)
39        # path4 and path5 are not the same again ...
40        # (move path5 300 units lower)
41        path5.render_transform = path5.render_transform.clone() # to disconnect RenderTransform value from path4 (see next comment about Fill property)
42        path5.render_transform.translate(0, 300)
43        # ... but if we set the opacity of Fill property, it will take effect on both path5 and path4
44        # because brush is a complex property value which remains the same for path5 and path4
45        path5.fill.opacity = 0.8
46
47        # Create a new path6 with path2's geometry ...
48        path6: XpsPath = doc.add_path(path2.data)
49        # ... shift it 600 units to the right ...
50        path6.render_transform = doc.create_matrix(1, 0, 0, 1, 600, 0)
51        # ... and set a yellow solid fill
52        path6.fill = doc.create_solid_color_brush(aspose.pydrawing.Color.yellow)
53
54        # Now add path6's clone ...
55        path7: XpsPath = doc.add_path(path6.clone())
56        # (move path5 300 units lower)
57        path7.render_transform = path7.render_transform.clone()
58        path7.render_transform.translate(0, 300)
59        # ... and set the opacity for path7
60        path7.fill.opacity = 0.8
61        # Now opacity effects independantly as soon as property values are cloned along with the element
62
63        # The following code block is equivalent to the previous one.
64        # Add path6 itself. path6 and path7 are not the same. Although their Fill property values are the same
65        #XpsPath path7 = doc.add_path(path6);
66        #path7.RenderTransform = path7.RenderTransform.Clone();
67        #path7.RenderTransform.Translate(0, 300);
68        # To "disconnect" path7's Fill property from path6's Fill property reassign it to its clone (or path6's Fill clone)
69        #path7.Fill = ((XpsSolidColorBrush)path7.Fill).Clone();
70        #path7.Fill.Opacity = 0.8f;
71
72        # Save the resultant XPS document
73        doc.save(data_dir + "WorkingWithTransparency_out.xps")
Weitere Informationen finden Sie unter „Arbeiten mit Transparenz in XPS-Dokumenten“ in .NET, Java und C++.
Das Ergebnis

Legen Sie die Deckkraftmaske fest
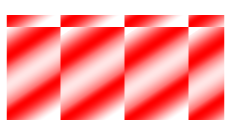
Die Lösung stellt die Eigenschaft set_opacity_mask() bereit, mit der eine Deckkraftmaske auf ein XPS-Dokument angewendet werden kann. Um dies zu erreichen, müssen Sie eine PathGeometry erstellen und diese dem XpsPath hinzufügen. Ein Bild kann als Deckkraftmaske verwendet werden, wobei die Alpha-Komponente jedes Pixels den Grad der Transparenz bestimmt, der auf die darunter liegende Füllung angewendet wird. Das resultierende XPS-Dokument zeigt schräge Verlaufsstreifen an, die über der Quellbilddatei liegen. Der folgende Codeausschnitt demonstriert die vollständige Funktionalität zum Festlegen einer Deckkraftmaske:
 1# The path to the documents directory.
 2data_dir = Util.get_data_dir_working_with_transparency()
 3# Create a new XPS Document
 4doc = XpsDocument()
 5#Add Canvas to the XpsDocument instance
 6canvas = doc.add_canvas()
 7# A rectangle with opacity masked by ImageBrush
 8path = canvas.add_path(doc.create_path_geometry("M 10,180 L 228,180 228,285 10,285"))
 9path.fill = doc.create_solid_color_brush(doc.create_color(1.0, 0.0, 0.0))
10imageBrush: XpsImageBrush = doc.create_image_brush(data_dir + "R08SY_NN.tif", aspose.pydrawing.RectangleF(0, 0, 128, 192),
11        aspose.pydrawing.RectangleF(0, 0, 64, 96))
12path.opacity_mask = imageBrush
13imageBrush.tile_mode = XpsTileMode.TILE
14# Save the resultant XPS document
15doc.save(data_dir + "OpacityMask_out.xps")
Weitere Informationen finden Sie unter „Arbeiten mit Transparenz in XPS-Dokumenten“ in .NET, Java und C++.
Das Ergebnis

Sie können Beispiele und Datendateien herunterladen von GitHub.