Working with Hatch Patterns in PS file | Python
Add Hatch Pattern in PS Document
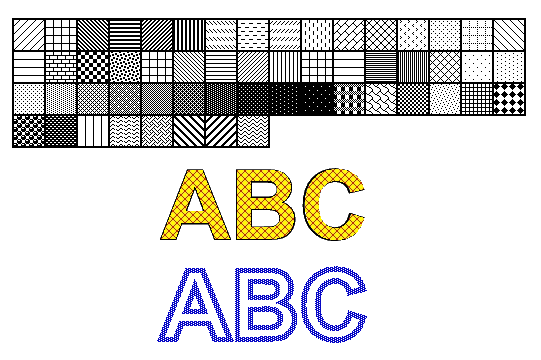
Hatch patterns, often comprising simple black-and-white images with various hatch designs, serve as texture tiling patterns. In Aspose.Page for Python via .NET, these patterns are represented by the aspose.pydrawing.drawing2d.HatchBrush class, derived from aspose.pydrawing.Brush. Unlike aspose.pydrawing.TextureBrush, HatchBrush offers named predefined styles, defining the image used for tiling. Aspose.Page for Python provides 53 hatch styles, all of which can be utilized for filling or stroking in PsDocument.
To paint graphics objects with a hatch pattern, create a HatchBrush with the desired hatch style and pass it into set_paint() or one of the fill_text() or fill_and_stroke_text() methods accepting aspose.pydrawing.Brush.
To outline graphics objects with a hatch pattern, set the hatch pattern as the current paint in PsDocument, create a new aspose.pydrawing.Pen, and pass it to set_stroke() or one of the outline_text() or fill_and_stroke_text() methods accepting aspose.pydrawing.Pen.
The example below demonstrates filling a shape with a hatch pattern, showcasing various hatch styles in Python, and filling and outlining text with a hatch pattern.
Here’s the algorithm for painting graphics objects with a hatch pattern in a new PS document:
- Create an output stream for the resulting PS file.
- Initiate PsSaveOptions.
- Create a PsDocument with the already created output stream and save options.
- Create the shape or a font in dependence on what object we are going to fill or outline.
- Create an object of aspose.pydrawing.drawing2d.HatchBrush with the desired style.
- Set the hatch paint as a current paint in the PsDocument
- Fill the shape with the current paint or fill the text. If we use one of the methods for filling the text that accepts aspose.pydrawing.Brush as a parameter, the previous step can be skipped.
- Close the page.
- Save the document.
If we need stroking (outlining) graphics objects with a hatch pattern instead of the last 4 steps will have the next look:
- Set the hatch paint as a current paint in PsDocument.
- Create aspose.pydrawing.Pen object.
- Set this stroke as current stroke in PsDocument.
- Outline the shape with the current paint and stroke or outline the text. If we use one of the methods for outlining the text that accepts aspose.pydrawing.Pen as a parameter, previous step can be ignored.
- Close the page.
- Save the document.
 1from aspose.page import *
 2from aspose.page.eps import *
 3from aspose.page.eps.device import *
 4import aspose.pydrawing
 5from util import Util
 6###############################################
 7###### Class and Method declaration here ######
 8###############################################
 9
10# The path to the documents directory.
11data_dir = Util.get_data_dir_working_with_hatches()
12
13# Create an output stream for the PostScript document
14with open(data_dir + "AddHatchPattern_outPS.ps", "wb") as out_ps_stream:
15    # Create the save options with A4 size
16    options = PsSaveOptions()
17
18    # Create a new 1-paged PS Document
19    document = PsDocument(out_ps_stream, options, False)
20
21    x0 = 20.
22    y0 = 100.
23    square_side = 32.
24    width = 500.
25    sum_x = 0.
26
27    # Restore a graphics state
28    document.write_graphics_save()
29
30    # Translate to initial point
31    document.translate(x0, y0)
32
33    # Create a rectngle path for every pattern square
34    path = aspose.pydrawing.drawing2d.GraphicsPath()
35    path.add_rectangle(aspose.pydrawing.RectangleF(0, 0, square_side, square_side))
36
37    # Create a pen for outlining the pattern square
38    pen = GraphicsFactory.create_pen_by_color_and_width(aspose.pydrawing.Color.black, 2)
39
40    # For every hatch pattern style
41    hatch_style = 0
42    while hatch_style <= 52:
43        # Set the paint with the current hatch brush style
44        document.set_paint(aspose.pydrawing.drawing2d.HatchBrush(aspose.pydrawing.drawing2d.HatchStyle(hatch_style),
45            aspose.pydrawing.Color.black, aspose.pydrawing.Color.white))
46
47        # Calculate the displacement not to go beyond the page bounds
48        x = square_side
49        y = 0
50        if sum_x >= width:
51            x = -(sum_x - square_side)
52            y += square_side
53        # Translate the current graphics state
54        document.translate(x, y)
55        # Fill the pattern square
56        document.fill(path)
57        # Set the stroke
58        document.set_stroke(pen)
59        # Draw the square outline
60        document.draw(path)
61
62        # Calculate the distance from X0
63        if sum_x >= width:
64            sum_x = square_side
65        else:
66            sum_x += x
67        hatch_style += 1
68
69    # Restore the graphics state
70    document.write_graphics_restore()
71
72    # Fill the text with the hatch pattern
73    brush = aspose.pydrawing.drawing2d.HatchBrush(aspose.pydrawing.drawing2d.HatchStyle.DIAGONAL_CROSS,
74    aspose.pydrawing.Color.red, aspose.pydrawing.Color.yellow)
75    font = ExternalFontCache.fetch_dr_font("Arial", 96, aspose.pydrawing.FontStyle.BOLD)
76    document.fill_and_stroke_text("ABC", font, 200, 300, brush, pen)
77
78    # Outline text with the hatch pattern
79    brush = aspose.pydrawing.drawing2d.HatchBrush(aspose.pydrawing.drawing2d.HatchStyle.PERCENT50,
80    aspose.pydrawing.Color.blue, aspose.pydrawing.Color.white)
81    document.outline_text("ABC", font, 200, 400, GraphicsFactory.create_pen_by_brush_and_width(brush, 5))
82
83
84    # Close the current page
85    document.close_page()
86
87    # Save the document
88 document.save()The result of running this code is
You can download examples and data files from GitHub.