Working with Textures in PS file | Python
Add Texture Tiling Pattern in PS Document
A texture tiling pattern refers to an image utilized for filling or drawing objects such as shapes or text. When the image’s size is smaller than that of the object, it’s repeated in both the X and Y directions to cover the required areas adequately.
This repetition of the image within graphics objects is known as tiling. To set paint or stroke in a PsDocument it’s necessary to provide an object of the aspose.pydrawing.Brush class for painting and an object of the aspose.pydrawing.Pen class for stroking in their respective methods.
Aspose.Page for Python via .NET library processes all important classes implemented by aspose.pydrawing.Brush that is offered by the Python platform. These are aspose.pydrawing.Color, aspose.pydrawing.TextureBrush, aspose.pydrawing.drawing2d.LinearGradientBrush, and aspose.pydrawing.drawing2d.PathGradientBrush. A stroke color in Python is assigned separately from the stroke properties in aspose.pydrawing.Pen object with using again aspose.pydrawing.Brush. Thus, Aspose.Page for Python via .NET library can also use a complete set of paint’s implementations for drawing lines and outlining shapes and text.
In order to paint graphics objects with a textured pattern in Aspose.Page for Python via .NET library it is enough to simply pass aspose.pydrawing.TextureBrush into set_paint() or one of the fill_text() or fill_and_stroke_text() methods that accept aspose.pydrawing.Brush as a parameter.
In order to outline graphics objects with a textured pattern you should pass aspose.pydrawing.TextureBrush object also into set_paint() or one of the outline_text() or fill_and_stroke_text() methods that accept stroke paint as a parameter.
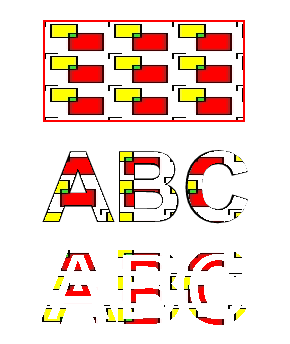
In the example below we demonstrate how to fill a shape and a text and outline a text with a texture tiling pattern.
Here is a description of steps of working with Texture Pattern and PsDocument:
- Create an output stream for the resulting PS file.
- Initiate a PsSaveOptions object with the default options.
- Create a 1-paged PsDocument with an already created output stream and save options.
- Create a new graphics state and translate it to the necessary position.
- Create aspose.pydrawing.Bitmap from an image file.
- Create aspose.pydrawing.TextureBrush from the image.
- Set the necessary transformation in the texture brush.
- Set the texture paint as a current paint in the current graphics state of the PsDocument.
- Create a rectangle path.
- Fill the rectangle with the texture paint.
- Save the current paint as a local variable for the future use.
- Set the current paint with a red color.
- Set a stroke with the 2-point width aspose.pydrawing.Pen
- Outline the rectangle with the current stroke.
- Exit from the current graphics state to the upper-level graphics state.
- Create system font.
- Fill and stroke (outline) text. For filling the texture paint is used, and for stroking black pen is used.
- Outline the text in the other position with the texture paint and a new aspose.pydrawing.Pen.
- Close the page.
- Save the document.
 1from aspose.page.eps import *
 2from aspose.page.eps.device import *
 3import aspose.pydrawing
 4from util import Util
 5###############################################
 6###### Class and Method declaration here ######
 7###############################################
 8
 9# The path to the documents directory.
10data_dir = Util.get_data_dir_working_with_textures()
11
12# Create an output stream for the PostScript document
13with open(data_dir + "AddTextureTilingPattern_outPS.ps", "wb") as out_ps_stream:
14    # Create the save options with the A4 size
15    options = PsSaveOptions()
16
17    # Create a new 1-paged PS Document
18    document = PsDocument(out_ps_stream, options, False)
19
20
21    document.write_graphics_save()
22    document.translate(200, 100)
23
24    #Create a Bitmap object from an image file
25    with aspose.pydrawing.Bitmap(data_dir + "TestTexture.bmp") as image:
26        # Create a texture brush from the image
27        brush = aspose.pydrawing.TextureBrush(image, aspose.pydrawing.drawing2d.WrapMode.TILE)
28
29        # Add scaling in the X direction to the mattern
30        transform = aspose.pydrawing.drawing2d.Matrix(float(2), float(0), float(0), float(1), float(0), float(0))
31        brush.transform = transform
32
33        # Set this texture brush as a current paint
34        document.set_paint(brush)
35
36    # Create a rectangle path
37    path = aspose.pydrawing.drawing2d.GraphicsPath()
38    path.add_rectangle(aspose.pydrawing.RectangleF(0, 0, 200, 100))
39
40    # Fill the rectangle
41    document.fill(path)
42
43    # Get the current paint
44    paint = document.get_paint()
45
46    # Set a red stroke
47    pen1 = aspose.pydrawing.Pen(aspose.pydrawing.Color.red)
48    pen1.width = float(2)
49    document.set_stroke(pen1)
50
51    # Stroke the rectangle
52    document.draw(path)
53
54    document.write_graphics_restore()
55
56    # Fill the text with the texture pattern
57    font = aspose.page.ExternalFontCache.create_font_by_family_name("Arial", 96, aspose.pydrawing.FontStyle.BOLD)
58    pen2 = aspose.pydrawing.Pen(aspose.pydrawing.Color.black)
59    pen2.width = float(2)
60    document.fill_and_stroke_text("ABC", font, 200, 300, paint, pen2)
61
62    # Outline the text with the texture pattern
63    pen3 = aspose.pydrawing.Pen(aspose.pydrawing.Color.black)
64    pen3.brush = paint
65    pen3.width = float(5)
66    document.outline_text("ABC", font, 200, 400, pen3)
67
68    # Close the current page
69    document.close_page()
70
71    # Save the document
72 document.save()The result of running this code is
You can download examples and data files from GitHub.