Python で PDF にテーブルを追加する方法
既存のPDF文書に表を追加することは、データ表示、構造化されたコンテンツ、およびレポートの一般的な要件です。**.NET 経由の Python 用 Aspose.PDF ** は、既存の PDF にテーブルを挿入したりフォーマットしたりするための実用的な API を提供します。
このガイドでは、表の作成、列のサイズ、境界線、行とセル、および変更された文書の保存の手順例を紹介します。また、セルの境界線、余白、パディング、動的なテーブルサイズの自動調整設定などの詳細オプションについても説明します。
このページは、既存の PDF に新しい表を追加し、Python でそのレイアウト動作を制御する必要がある場合に使用します。
基本テーブルの作成
テーブルの作成
この例は、境界線と複数の行があるPDF文書に表を作成する方法を示しています。
- 新しい PDF ドキュメントを作成します。
- 文書に空白ページを追加します。
- テーブルを初期化します。
- テーブル全体の境界線を設定します。
- 個々のセルの境界線を設定します。
- 行とセルを追加します。
- テーブルをページに挿入します。
- PDF を指定したパスに保存します。
import aspose.pdf as ap
from aspose.pdf import Color, HorizontalAlignment
from os import path
import sys

def create_table(outfile: str) -> None:
    # Create new PDF document
    document = ap.Document()
    page = document.pages.add()
    # Initializes a new instance of the Table
    table = ap.Table()
    # Set the table border color as LightGray
    table.border = ap.BorderInfo(ap.BorderSide.ALL, 5, ap.Color.light_gray)
    # Set the border for table cells
    table.default_cell_border = ap.BorderInfo(ap.BorderSide.ALL, 5, ap.Color.light_gray)
    # Create a loop to add 10 rows
    for row_count in range(10):
        # Add row to table
        row = table.rows.add()
        # Add table cells
        row.cells.add("Column (" + str(row_count) + ", 1)")
        row.cells.add("Column (" + str(row_count) + ", 2)")
        row.cells.add("Column (" + str(row_count) + ", 3)")
    # Add table object to first page of input document
    page.paragraphs.add(table)

    # Save updated document containing table object
    document.save(outfile)
表のセルへの画像の追加
このコードスニペットは、PDF ドキュメントの表セルに画像を挿入する方法を示しています。
- 新しい PDF ドキュメントを作成します。
- テーブルを初期化します。
- 列幅をポイント単位で設定します。
- テキストフラグメントが最初のセルに追加されます。
- 「AP.Image ()」インスタンスが 2 番目のセルに追加されます。
- イメージファイルへのパスを「img.file」で設定します。
- 「img.fix_width」と「img.fix_height」は、セル内のイメージサイズを制御します。
- 表を PDF ページに挿入します。
- PDF を保存します。
import aspose.pdf as ap
from aspose.pdf import Color, HorizontalAlignment
from os import path
import sys

def add_image(image: str, outfile: str) -> None:
    # Instantiate Document object
    document = ap.Document()
    page = document.pages.add()
    # Instantiate a table object
    table = ap.Table()
    # Set width for table cells
    table.column_widths = "200 100"

    # Create row object and add it to table instance
    row = table.rows.add()
    # Create cell object and add it to row instance
    cell = row.cells.add()
    # Add textfragment to paragraphs collection of cell object
    cell.paragraphs.add(ap.text.TextFragment(image))
    # Create an image instance
    img = ap.Image()
    # Set image type as SVG
    # Path for source file
    img.file = image
    # Set width for image instance
    img.fix_width = 50
    # Set height for image instance
    img.fix_height = 50
    # Add another cell to row object
    cell = row.cells.add()
    # Add SVG image to paragraphs collection of recently added cell instance
    cell.paragraphs.add(img)

    # Add table to paragraphs collection of page object
    page.paragraphs.add(table)
    # Save PDF file
    document.save(outfile)
PDF ドキュメントのテーブルセルに SVG 画像を追加できます。
import aspose.pdf as ap
from aspose.pdf import Color, HorizontalAlignment
from os import path
import sys

def add_svg_image(images: list[str], outfile: str) -> None:
    # Instantiate Document object
    document = ap.Document()
    page = document.pages.add()
    # Instantiate a table object
    table = ap.Table()
    # Set width for table cells
    table.column_widths = "200 100"
    for image in images:
        # Create row object and add it to table instance
        row = table.rows.add()
        # Create cell object and add it to row instance
        cell = row.cells.add()
        # Add textfragment to paragraphs collection of cell object
        cell.paragraphs.add(ap.text.TextFragment(image))
        # Create an image instance
        img = ap.Image()
        # Set image type as SVG
        img.file_type = ap.ImageFileType.SVG
        # Path for source file
        img.file = image
        # Set width for image instance
        img.fix_width = 50
        # Set height for image instance
        img.fix_height = 50
        # Add another cell to row object
        cell = row.cells.add()
        # Add SVG image to paragraphs collection of recently added cell instance
        cell.paragraphs.add(img)

    # Add table to paragraphs collection of page object
    page.paragraphs.add(table)
    # Save PDF file
    document.save(outfile)
テーブル内のコルスパンと行スパン
この例では、表のセルを縦と横に結合して複雑な表レイアウトを作成する方法を示します。
- テーブル全体の境界線を設定します。
- デフォルトのセル境界を設定します。
- 2 つのセルを水平方向に 1 つに結合します。
- セルを 2 行にわたって垂直方向に結合します。
- 行 5 は、マージされた列をスキップして行範囲を表します。
- テーブルをページに挿入します。
- PDF を保存します。
import aspose.pdf as ap
from aspose.pdf import Color, HorizontalAlignment
from os import path
import sys

def add_rowspan_or_colspan(outfile: str) -> None:
    # Create new PDF document
    document = ap.Document()
    page = document.pages.add()

    # Initializes a new instance of the Table
    table = ap.Table()
    # Set the table border color as LightGray
    table.border = ap.BorderInfo(ap.BorderSide.ALL, 0.5, ap.Color.black)
    # Set the border for table cells
    table.default_cell_border = ap.BorderInfo(ap.BorderSide.ALL, 0.5, ap.Color.black)
    # Add 1st row to table
    row1 = table.rows.add()
    for cell_count in range(1, 5):
        # Add table cells
        row1.cells.add("Test 1" + str(cell_count))

    # Add 2nd row to table
    row2 = table.rows.add()
    row2.cells.add("Test 2 1")
    cell = row2.cells.add("Test 2 2")
    cell.col_span = 2
    row2.cells.add("Test 2 4")

    # Add 3rd row to table
    row3 = table.rows.add()
    row3.cells.add("Test 3 1")
    row3.cells.add("Test 3 2")
    row3.cells.add("Test 3 3")
    row3.cells.add("Test 3 4")

    # Add 4th row to table
    row4 = table.rows.add()
    row4.cells.add("Test 4 1")
    cell = row4.cells.add("Test 4 2")
    cell.row_span = 2
    row4.cells.add("Test 4 3")
    row4.cells.add("Test 4 4")

    # Add 5th row to table
    row5 = table.rows.add()
    row5.cells.add("Test 5 1")
    row5.cells.add("Test 5 3")
    row5.cells.add("Test 5 4")

    # Add table object to first page of input document
    page.paragraphs.add(table)
    # Save updated document containing table object
    document.save(outfile)

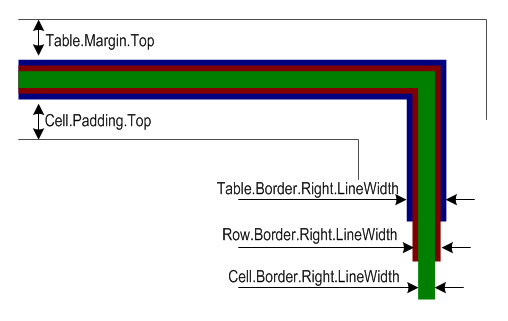
表とセルへの境界線の適用
この例は、セルの余白、表の余白を設定し、表のセル内のテキストの折り返しを制御する方法を示します。
- 列の幅を設定します。
- テーブルとセルの境界線を定義します。
- セルの内側にパディングを設定して、間隔を一定にします。
- デフォルトでは、すべてのセルにパディングを適用します。
- テキストの追加と折り返しの制御。
- 行とセルを追加します。
- PDF を保存します。
import aspose.pdf as ap
from aspose.pdf import Color, HorizontalAlignment
from os import path
import sys

def add_borders(outfile: str) -> None:
    # Create new PDF document
    document = ap.Document()
    page = document.pages.add()
    # Instantiate a table object
    tab1 = ap.Table()
    # Add the table in paragraphs collection of the desired section
    page.paragraphs.add(tab1)
    # Set with column widths of the table
    tab1.column_widths = "50 50 50"
    # Set default cell border using BorderInfo object
    tab1.default_cell_border = ap.BorderInfo(ap.BorderSide.ALL, 0.1)
    # Set table border using another customized BorderInfo object
    tab1.border = ap.BorderInfo(ap.BorderSide.ALL, 1)
    # Create MarginInfo object and set its left, bottom, right and top margins
    margin = ap.MarginInfo()
    margin.top = 5
    margin.left = 5
    margin.right = 5
    margin.bottom = 5
    # Set the default cell padding to the MarginInfo object
    tab1.default_cell_padding = margin
    # Create rows in the table and then cells in the rows
    row1 = tab1.rows.add()
    row1.cells.add("col1")
    row1.cells.add("col2")
    row1.cells.add()
    text = ap.text.TextFragment("col3 with large text string")
    row1.cells[2].paragraphs.add(text)
    row1.cells[2].is_word_wrapped = False
    row2 = tab1.rows.add()
    row2.cells.add("item1")
    row2.cells.add("item2")
    row2.cells.add("item3")
    # Save updated document containing table object
    document.save(outfile)

テーブルレイアウトとサイズ
列と行の自動調整
このコードスニペットは、表の列幅をページに合わせて自動的に調整する方法を示しています。 パラメータテーブルでは.column_widths =「50 50 50」がそのポイントであることに注意してください。ただし、センチメートル (cm)、インチ、または%を指定することもできます。
- 列幅の初期値を設定します。
- ページ幅に合わせて列を自動的に調整します。
- セルと表の境界線を定義します。
- 「テーブル.default_cell_padding」は、セル内の間隔を一定に保つために「marginInfo ()」を使用します。
- ’table.rows.add () ‘を使用して行を追加し、‘row.cells.add ()’ を使用してセルを追加します。
- PDF を保存します。
import aspose.pdf as ap
from aspose.pdf import Color, HorizontalAlignment
from os import path
import sys

def auto_fit(outfile: str) -> None:
    # Create new PDF document
    document = ap.Document()
    page = document.pages.add()
    # Instantiate a table object
    table = ap.Table()

    page.paragraphs.add(table)

    table.column_widths = "50 50 50"
    table.column_adjustment = ap.ColumnAdjustment.AUTO_FIT_TO_WINDOW

    table.default_cell_border = ap.BorderInfo(ap.BorderSide.ALL, 0.1)

    table.border = ap.BorderInfo(ap.BorderSide.ALL, 1)

    margin = ap.MarginInfo()
    margin.top = 5
    margin.left = 5
    margin.right = 5
    margin.bottom = 5

    table.default_cell_padding = margin

    row1 = table.rows.add()
    row1.cells.add("col1")
    row1.cells.add("col2")
    row1.cells.add("col3")
    row2 = table.rows.add()
    row2.cells.add("item1")
    row2.cells.add("item2")
    row2.cells.add("item3")

    document.save(outfile)
結合されたセルと繰り返し列を含む複雑な PDF テーブルの作成
Python と Aspose.PDF を使用して PDF に高度なテーブルを作成します。結合されたヘッダーセル、色付きの背景、繰り返し列、および大規模な構造化データセットが含まれます。このテーブルは、レポートスタイルのドキュメントの縦区切りや複雑なレイアウトを処理できるように構成されています。
import aspose.pdf as ap
from aspose.pdf import Color, HorizontalAlignment
from os import path
import sys

def add_table_hide_borders(outfile: str) -> None:
    # Create PDF document
    document = ap.Document()
    page = document.pages.add()

    # Instantiate a table object that will be nested inside outerTable that will break inside the same page
    table = ap.Table()
    table.broken = ap.TableBroken.VERTICAL
    table.default_cell_border = ap.BorderInfo(ap.BorderSide.ALL)
    table.repeating_columns_count = 2
    page.paragraphs.add(table)

    # Add header Row
    row = table.rows.add()
    cell = row.cells.add("header 1")
    cell.col_span = 2
    cell.background_color = ap.Color.light_gray
    row.cells.add("header 3")

    cell2 = row.cells.add("header 4")
    cell2.col_span = 2
    cell2.background_color = ap.Color.light_blue
    row.cells.add("header 6")

    cell3 = row.cells.add("header 7")
    cell3.col_span = 2
    cell3.background_color = ap.Color.light_green
    cell4 = row.cells.add("header 9")

    cell4.col_span = 3
    cell4.background_color = ap.Color.light_coral
    row.cells.add("header 12")
    row.cells.add("header 13")
    row.cells.add("header 14")
    row.cells.add("header 15")
    row.cells.add("header 16")
    row.cells.add("header 17")

    row_counter = 0
    while row_counter < 3:
        # Create rows in the table and then cells in the rows
        row1 = table.rows.add()
        row1.cells.add("col " + str(row_counter) + ", 1")
        row1.cells.add("col " + str(row_counter) + ", 2")
        row1.cells.add("col " + str(row_counter) + ", 3")
        row1.cells.add("col " + str(row_counter) + ", 4")
        row1.cells.add("col " + str(row_counter) + ", 5")
        row1.cells.add("col " + str(row_counter) + ", 6")
        row1.cells.add("col " + str(row_counter) + ", 7")
        row1.cells.add("col " + str(row_counter) + ", 8")
        row1.cells.add("col " + str(row_counter) + ", 9")
        row1.cells.add("col " + str(row_counter) + ", 10")
        row1.cells.add("col " + str(row_counter) + ", 11")
        row1.cells.add("col " + str(row_counter) + ", 12")
        row1.cells.add("col " + str(row_counter) + ", 13")
        row1.cells.add("col " + str(row_counter) + ", 14")
        row1.cells.add("col " + str(row_counter) + ", 15")
        row1.cells.add("col " + str(row_counter) + ", 16")
        row1.cells.add("col " + str(row_counter) + ", 17")
        row_counter += 1

    document.save(outfile)
スタイリングテーブルコーナー
Aspose.PDF for Python via .NET では、テーブルに角の丸みをつけて境界線の半径をカスタマイズする方法について説明しています。
- 新しいテーブルインスタンスを作成します。
- すべての辺のボーダーを初期化します。
- コーナー半径を設定します。
- 角の丸いスタイルを適用してください。
- 行とセルを追加します。
- 「page.paragraphs.add (テーブル)」を使用してテーブルを PDF ページに挿入します。
- PDF ドキュメントを保存します。
import aspose.pdf as ap
from aspose.pdf import Color, HorizontalAlignment
from os import path
import sys

def create_table_with_round_corner(outfile: str) -> None:
    # Create new PDF document
    document = ap.Document()
    page = document.pages.add()

    # Create a table
    table = ap.Table()

    # Create a blank BorderInfo object
    b_info = ap.BorderInfo(ap.BorderSide.ALL)

    # Set the border a rounded border where radius of round is 15
    b_info.rounded_border_radius = 15

    # Set the table corner style as Round
    table.corner_style = ap.BorderCornerStyle.ROUND

    # Set the table border information
    table.border = b_info

    # Create a loop to add 10 rows
    for row_count in range(0, 10):
        # Add row to table
        row = table.rows.add()
        # Add table cells
        row.cells.add("Column (" + str(row_count) + ", 1)")
        row.cells.add("Column (" + str(row_count) + ", 2)")
        row.cells.add("Column (" + str(row_count) + ", 3)")

    # Add table object to first page of input document
    page.paragraphs.add(table)
    # Save updated document containing table object
    document.save(outfile)
テーブルへのコンテンツの追加
セルでの HTML フラグメントの使用
この例は、HTML 形式のコンテンツを表のセルに挿入する方法を示します。
- テーブルとセルの境界線を定義します。
- HTML コンテンツを追加します。
- 行を追加します。ループは、各セルに HTML 形式のコンテンツを含む複数の行を追加します。
- 「page.paragraphs.add (テーブル)」を使用してテーブルを PDF ページに挿入します。
- PDF ドキュメントを保存します。
import aspose.pdf as ap
from aspose.pdf import Color, HorizontalAlignment
from os import path
import sys

def add_html_fragments(outfile: str) -> None:
    # Instantiate Document object
    document = ap.Document()
    page = document.pages.add()
    # Instantiate a table object
    table = ap.Table()

    # Set the table border color as LightGray
    table.border = ap.BorderInfo(ap.BorderSide.ALL, 0.5, ap.Color.light_gray)
    # Set the border for table cells
    table.default_cell_border = ap.BorderInfo(
        ap.BorderSide.ALL, 0.5, ap.Color.light_gray
    )
    # Create a loop to add 10 rows
    row_count = 1
    while row_count < 10:
        # Add row to table
        row = table.rows.add()
        # Add table cells
        cell = row.cells.add()
        cell.paragraphs.add(
            ap.HtmlFragment(f"Column <strong>({row_count}, 1)</strong>")
        )

        cell = row.cells.add()
        cell.paragraphs.add(
            ap.HtmlFragment(f"Column <span style='color:red'>({row_count}, 2)</span>")
        )

        cell = row.cells.add()
        cell.paragraphs.add(
            ap.HtmlFragment(
                f"Column <span style='text-decoration: underline'>({row_count}, 3)</span>"
            )
        )
        row_count += 1

    # Add table object to first page of input document
    page.paragraphs.add(table)
    # Save updated document containing table object
    document.save(outfile)
セルでの LaTeX フラグメントの使用
この例は、LaTeX 形式のコンテンツを表のセルに挿入して、数学式やスタイル付きの式を作成する方法を示します。
- テーブルとセルの境界線を定義します。
- LaTeX コンテンツを追加します。
- 行を追加します。ループは、各セルに LaTeX 形式のコンテンツを含む複数の行を追加します。
- 「page.paragraphs.add (テーブル)」を使用してテーブルを PDF ページに挿入します。
- PDF ドキュメントを保存します。
import aspose.pdf as ap
from aspose.pdf import Color, HorizontalAlignment
from os import path
import sys

def add_latex_fragments(outfile: str) -> None:
    # Instantiate Document object
    document = ap.Document()
    page = document.pages.add()
    # Instantiate a table object
    table = ap.Table()

    # Set the table border color as LightGray
    table.border = ap.BorderInfo(ap.BorderSide.ALL, 0.5, ap.Color.light_gray)
    # Set the border for table cells
    table.default_cell_border = ap.BorderInfo(
        ap.BorderSide.ALL, 0.5, ap.Color.light_gray
    )
    # Create a loop to add 10 rows
    row_count = 1
    while row_count < 10:
        # Add row to table
        row = table.rows.add()
        # Add table cells
        cell = row.cells.add()
        cell.paragraphs.add(ap.LatexFragment(f"Column $\\mathbf{{({row_count}, 1)}}$"))

        cell = row.cells.add()
        cell.paragraphs.add(
            ap.LatexFragment(f"Column $\\textcolor{{red}}{{({row_count}, 2)}}$")
        )

        cell = row.cells.add()
        cell.paragraphs.add(
            ap.LatexFragment(f"Column $\\underline{{({row_count}, 3)}}$")
        )
        row_count += 1

    # Add table object to first page of input document
    page.paragraphs.add(table)
    # Save updated document containing table object
    document.save(outfile)
高度なテーブル機能
PDF 表への自動改ページの挿入
Python と Aspose.PDF を使用して PDF に大きな表を作成し、特定の行数の後に自動的に改ページを行います。複数行の表を作成し、境界線を適用し、選択した行を強制的に新しいページから開始してレイアウト制御しやすくします。
import aspose.pdf as ap
from aspose.pdf import Color, HorizontalAlignment
from os import path
import sys

def insert_page_break(outfile: str) -> None:
    # Create PDF document
    document = ap.Document()

    # Add page
    page = document.pages.add()

    # Create table instance
    table = ap.Table()

    # Set border style for table
    table.border = ap.BorderInfo(ap.BorderSide.ALL, ap.Color.red)

    # Set default border style for table with border color as Red
    table.default_cell_border = ap.BorderInfo(ap.BorderSide.ALL, ap.Color.red)

    # Specify table columns width
    table.column_widths = "100 100"

    # Create a loop to add 200 rows for table
    for counter in range(201):
        row = ap.Row()
        table.rows.add(row)

        cell1 = ap.Cell()
        cell1.paragraphs.add(ap.text.TextFragment(f"Cell {counter}, 0"))
        row.cells.add(cell1)

        cell2 = ap.Cell()
        cell2.paragraphs.add(ap.text.TextFragment(f"Cell {counter}, 1"))
        row.cells.add(cell2)

        # When 10 rows are added, render new row in new page
        if counter % 10 == 0 and counter != 0:
            row.is_in_new_page = True

    # Add table to paragraphs collection of PDF file
    page.paragraphs.add(table)

    # Save PDF document
    document.save(outfile)
複数ページのヘッダー行の繰り返し
この例は、ヘッダー行を各ページに表示したまま、複数のページにまたがるテーブルを作成する方法を示しています。
- テーブルを初期化します。
- フォント、サイズ、色を含むヘッダー行を繰り返します。
- 列幅を設定し、テーブルに境界線を適用します。
- ヘッダー行を追加します。
- 複数のデータ行を追加して、複数のページにまたがるテーブルを強制します。
- 「page.paragraphs.add (テーブル)」を使用してテーブルを PDF ページに挿入します。
- PDF ドキュメントを保存します。
import aspose.pdf as ap
from aspose.pdf import Color, HorizontalAlignment
from os import path
import sys

def add_repeating_rows(outfile: str) -> None:
    # Create PDF document
    document = ap.Document()
    page = document.pages.add()

    # Instantiate a table object
    table = ap.Table()

    # Set the table to break across pages
    table.broken = ap.TableBroken.VERTICAL

    # Set number of repeating header rows
    table.repeating_rows_count = 2

    text_state = ap.text.TextState()
    text_state.font_size = 12
    text_state.font = ap.text.FontRepository.find_font("TimesNewRoman")
    text_state.foreground_color = ap.Color.red
    table.repeating_rows_style = text_state

    # Set column widths
    table.column_widths = "100 100 100"

    # Set borders
    table.default_cell_border = ap.BorderInfo(ap.BorderSide.ALL, 0.5, ap.Color.black)
    table.border = ap.BorderInfo(ap.BorderSide.ALL, 1, ap.Color.black)

    # Add header rows that will repeat on each page
    header_row1 = table.rows.add()
    header_row1.cells.add("Header 1-1")
    header_row1.cells.add("Header 1-2")
    header_row1.cells.add("Header 1-3")

    # Set background color for header rows
    for cell in header_row1.cells:
        cell.background_color = ap.Color.light_gray

    header_row2 = table.rows.add()
    header_row2.cells.add("Header 2-1")
    header_row2.cells.add("Header 2-2")
    header_row2.cells.add("Header 2-3")

    for cell in header_row2.cells:
        cell.background_color = ap.Color.light_blue

    # Add many data rows to force table across multiple pages
    for i in range(1, 101):
        row = table.rows.add()
        row.cells.add(f"Data {i}-1")
        row.cells.add(f"Data {i}-2")
        row.cells.add(f"Data {i}-3")

    # Add table to page
    page.paragraphs.add(table)

    # Save document
    document.save(outfile)
リピートカラム
関数「add_repeating_columns」は、繰り返し列を含むテーブルを含む PDF ドキュメントを作成します。境界付きテーブルを設定し、ヘッダーを追加し、データ行に入力し、生成された PDF ファイルを指定された場所に保存します。このプロパティを設定すると、表は列ごとに分割され、次のページの開始時に指定した列数が繰り返されます。
- 新しい PDF ドキュメントを初期化します。
- カスタムサイズのページを追加します。
- テーブルボーダースタイルを設定します。
- テーブルを初期化します。
- PDF ページに表を追加します。
- ヘッダー行を追加します。
- データ行を追加します。
- PDF ドキュメントを保存します。
import aspose.pdf as ap
from aspose.pdf import Color, HorizontalAlignment
from os import path
import sys

def add_repeating_columns(outfile: str) -> None:
    # Create PDF document
    document = ap.Document()

    # Add page
    page = document.pages.add()
    page.set_page_size(ap.PageSize.a5.height, ap.PageSize.a5.width)

    # Define border
    border = ap.BorderInfo(ap.BorderSide.ALL, 0.5, ap.Color.light_gray)

    # Create table
    table = ap.Table()
    table.broken = ap.TableBroken.VERTICAL_IN_SAME_PAGE
    table.column_adjustment = ap.ColumnAdjustment.AUTO_FIT_TO_CONTENT
    table.repeating_columns_count = 5
    table.border = border
    table.default_cell_border = border

    # Add table to page
    page.paragraphs.add(table)

    # Add header row
    row = table.rows.add()
    for i in range(1, 6):
        cell = row.cells.add(f"header {i}")
        cell.background_color = ap.Color.light_gray

    for i in range(6, 18):
        row.cells.add(f"header {i}")

    # Add data rows
    for row_counter in range(1, 6):
        row = table.rows.add()
        for i in range(1, 6):
            cell = row.cells.add(f"cell {row_counter},{i}")
            cell.background_color = ap.Color.light_gray
        for i in range(6, 18):
            row.cells.add(f"cell {row_counter},{i}")

    # Save PDF document
    document.save(outfile)
回転したテキストセルを含む PDF 表の作成
Python と Aspose.PDF を使用して、各セル内でテキストをさまざまな角度に回転させた表を PDF に作成します。縦型ヘッダー、クリエイティブなレイアウト、コンパクトなテーブル、カスタムレポートフォーマットなどに便利です。
import aspose.pdf as ap
from aspose.pdf import Color, HorizontalAlignment
from os import path
import sys

def rotated_text_table(outfile: str) -> None:
    # Create PDF document
    document = ap.Document()

    # Add page
    page = document.pages.add()

    # Initializes a new instance of the Table
    table = ap.Table()
    table.border = ap.BorderInfo(ap.BorderSide.ALL, 0.5, Color.black)
    table.default_cell_border = ap.BorderInfo(ap.BorderSide.ALL, 0.5, Color.black)

    # Add 1st row to table
    row1 = table.rows.add()
    row1.min_row_height = 200

    for cell_count in range(4):
        # Add table cells
        cell = row1.cells.add()

        tf = ap.text.TextFragment(f"Cell 1 {cell_count - 1}")
        tf.text_state.rotation = 90 * cell_count
        tf.horizontal_alignment = HorizontalAlignment.CENTER

        cell.paragraphs.add(tf)

    # Add table object to first page of input document
    page.paragraphs.add(table)

    # Save result
    document.save(outfile)