
Ajouter des tables au PDF en Python
Ajouter des tableaux aux documents PDF existants est une exigence courante pour la présentation des données, le contenu structuré et les rapports. Aspose.PDF for Python via .NET fournit une API pratique pour insérer et formater des tableaux dans des PDF existants.
Ce guide fournit des exemples pas à pas pour la création de tableaux, le dimensionnement des colonnes, les bordures, les lignes et les cellules, ainsi que l’enregistrement du document modifié. Il couvre également les options avancées telles que les bordures des cellules, les marges, le remplissage et les paramètres AutoFit pour le dimensionnement dynamique des tableaux.
Utilisez cette page lorsque vous devez ajouter de nouveaux tableaux aux PDF existants et contrôler leur comportement de mise en page en Python.
Création de tableaux de base
Création de tableau
Cet exemple montre comment créer une Table dans un document PDF avec des bordures et plusieurs lignes.
- Créer un nouveau document PDF.
- Ajoute une page blanche au document.
- Initialiser la Table.
- Définir la bordure globale du tableau.
- Définir la bordure des cellules individuelles.
- Ajouter des lignes et des cellules.
- Insérez le tableau dans la page.
- Enregistrez le PDF à l’emplacement spécifié.
import aspose.pdf as ap
from aspose.pdf import Color, HorizontalAlignment
from os import path
import sys

def create_table(outfile: str) -> None:
    # Create new PDF document
    document = ap.Document()
    page = document.pages.add()
    # Initializes a new instance of the Table
    table = ap.Table()
    # Set the table border color as LightGray
    table.border = ap.BorderInfo(ap.BorderSide.ALL, 5, ap.Color.light_gray)
    # Set the border for table cells
    table.default_cell_border = ap.BorderInfo(ap.BorderSide.ALL, 5, ap.Color.light_gray)
    # Create a loop to add 10 rows
    for row_count in range(10):
        # Add row to table
        row = table.rows.add()
        # Add table cells
        row.cells.add("Column (" + str(row_count) + ", 1)")
        row.cells.add("Column (" + str(row_count) + ", 2)")
        row.cells.add("Column (" + str(row_count) + ", 3)")
    # Add table object to first page of input document
    page.paragraphs.add(table)

    # Save updated document containing table object
    document.save(outfile)
Ajout d’images dans les cellules du tableau
Cet extrait de code montre comment insérer des images dans les cellules d’un tableau d’un document PDF.
- Créer un nouveau document PDF.
- Initialiser la Table.
- Définir les largeurs de colonne en points.
- Un fragment de texte est ajouté à la première cellule.
- Une instance ‘ap.Image()’ est ajoutée à la deuxième cellule.
- Définissez le chemin du fichier image avec ‘img.file’.
- Les ‘img.fix_width’ et ‘img.fix_height’ contrôlent la taille de l’image à l’intérieur de la cellule.
- Insérer le tableau dans la page PDF.
- Enregistrez le PDF.
import aspose.pdf as ap
from aspose.pdf import Color, HorizontalAlignment
from os import path
import sys

def add_image(image: str, outfile: str) -> None:
    # Instantiate Document object
    document = ap.Document()
    page = document.pages.add()
    # Instantiate a table object
    table = ap.Table()
    # Set width for table cells
    table.column_widths = "200 100"

    # Create row object and add it to table instance
    row = table.rows.add()
    # Create cell object and add it to row instance
    cell = row.cells.add()
    # Add textfragment to paragraphs collection of cell object
    cell.paragraphs.add(ap.text.TextFragment(image))
    # Create an image instance
    img = ap.Image()
    # Set image type as SVG
    # Path for source file
    img.file = image
    # Set width for image instance
    img.fix_width = 50
    # Set height for image instance
    img.fix_height = 50
    # Add another cell to row object
    cell = row.cells.add()
    # Add SVG image to paragraphs collection of recently added cell instance
    cell.paragraphs.add(img)

    # Add table to paragraphs collection of page object
    page.paragraphs.add(table)
    # Save PDF file
    document.save(outfile)
Vous pouvez ajouter des images SVG dans les cellules de tableau d’un document PDF :
import aspose.pdf as ap
from aspose.pdf import Color, HorizontalAlignment
from os import path
import sys

def add_svg_image(images: list[str], outfile: str) -> None:
    # Instantiate Document object
    document = ap.Document()
    page = document.pages.add()
    # Instantiate a table object
    table = ap.Table()
    # Set width for table cells
    table.column_widths = "200 100"
    for image in images:
        # Create row object and add it to table instance
        row = table.rows.add()
        # Create cell object and add it to row instance
        cell = row.cells.add()
        # Add textfragment to paragraphs collection of cell object
        cell.paragraphs.add(ap.text.TextFragment(image))
        # Create an image instance
        img = ap.Image()
        # Set image type as SVG
        img.file_type = ap.ImageFileType.SVG
        # Path for source file
        img.file = image
        # Set width for image instance
        img.fix_width = 50
        # Set height for image instance
        img.fix_height = 50
        # Add another cell to row object
        cell = row.cells.add()
        # Add SVG image to paragraphs collection of recently added cell instance
        cell.paragraphs.add(img)

    # Add table to paragraphs collection of page object
    page.paragraphs.add(table)
    # Save PDF file
    document.save(outfile)
ColSpan et RowSpan dans les tableaux
Cet exemple montre comment fusionner les cellules de tableau verticalement et horizontalement pour créer des mises en page de tableau complexes.
- Définir la bordure globale du tableau.
- Définir les bordures de cellule par défaut.
- Fusionner deux cellules horizontalement en une.
- Fusionner la cellule verticalement sur deux lignes.
- La ligne 5 tient compte du rowspan en sautant la colonne fusionnée.
- Insérez le tableau dans la page.
- Enregistrez le PDF.
import aspose.pdf as ap
from aspose.pdf import Color, HorizontalAlignment
from os import path
import sys

def add_rowspan_or_colspan(outfile: str) -> None:
    # Create new PDF document
    document = ap.Document()
    page = document.pages.add()

    # Initializes a new instance of the Table
    table = ap.Table()
    # Set the table border color as LightGray
    table.border = ap.BorderInfo(ap.BorderSide.ALL, 0.5, ap.Color.black)
    # Set the border for table cells
    table.default_cell_border = ap.BorderInfo(ap.BorderSide.ALL, 0.5, ap.Color.black)
    # Add 1st row to table
    row1 = table.rows.add()
    for cell_count in range(1, 5):
        # Add table cells
        row1.cells.add("Test 1" + str(cell_count))

    # Add 2nd row to table
    row2 = table.rows.add()
    row2.cells.add("Test 2 1")
    cell = row2.cells.add("Test 2 2")
    cell.col_span = 2
    row2.cells.add("Test 2 4")

    # Add 3rd row to table
    row3 = table.rows.add()
    row3.cells.add("Test 3 1")
    row3.cells.add("Test 3 2")
    row3.cells.add("Test 3 3")
    row3.cells.add("Test 3 4")

    # Add 4th row to table
    row4 = table.rows.add()
    row4.cells.add("Test 4 1")
    cell = row4.cells.add("Test 4 2")
    cell.row_span = 2
    row4.cells.add("Test 4 3")
    row4.cells.add("Test 4 4")

    # Add 5th row to table
    row5 = table.rows.add()
    row5.cells.add("Test 5 1")
    row5.cells.add("Test 5 3")
    row5.cells.add("Test 5 4")

    # Add table object to first page of input document
    page.paragraphs.add(table)
    # Save updated document containing table object
    document.save(outfile)

Appliquer des bordures aux tableaux et aux cellules
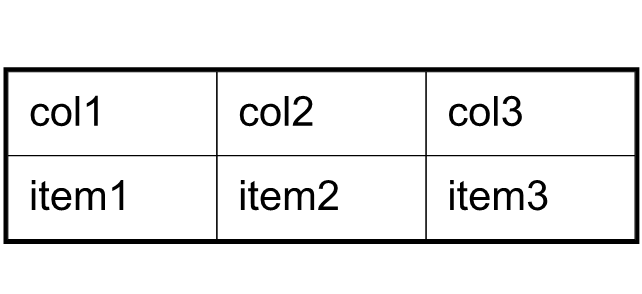
Cet exemple montre comment définir le remplissage des cellules, les marges du tableau et contrôler le retour à la ligne du texte dans les cellules du tableau.
- Définir les largeurs des colonnes.
- Définir les bordures du tableau et des cellules.
- Définir le remplissage à l’intérieur des cellules pour un espacement cohérent.
- Appliquer le remplissage à toutes les cellules par défaut.
- Ajouter du texte et contrôler le renvoi à la ligne.
- Ajouter des lignes et des cellules.
- Enregistrez le PDF.
import aspose.pdf as ap
from aspose.pdf import Color, HorizontalAlignment
from os import path
import sys

def add_borders(outfile: str) -> None:
    # Create new PDF document
    document = ap.Document()
    page = document.pages.add()
    # Instantiate a table object
    tab1 = ap.Table()
    # Add the table in paragraphs collection of the desired section
    page.paragraphs.add(tab1)
    # Set with column widths of the table
    tab1.column_widths = "50 50 50"
    # Set default cell border using BorderInfo object
    tab1.default_cell_border = ap.BorderInfo(ap.BorderSide.ALL, 0.1)
    # Set table border using another customized BorderInfo object
    tab1.border = ap.BorderInfo(ap.BorderSide.ALL, 1)
    # Create MarginInfo object and set its left, bottom, right and top margins
    margin = ap.MarginInfo()
    margin.top = 5
    margin.left = 5
    margin.right = 5
    margin.bottom = 5
    # Set the default cell padding to the MarginInfo object
    tab1.default_cell_padding = margin
    # Create rows in the table and then cells in the rows
    row1 = tab1.rows.add()
    row1.cells.add("col1")
    row1.cells.add("col2")
    row1.cells.add()
    text = ap.text.TextFragment("col3 with large text string")
    row1.cells[2].paragraphs.add(text)
    row1.cells[2].is_word_wrapped = False
    row2 = tab1.rows.add()
    row2.cells.add("item1")
    row2.cells.add("item2")
    row2.cells.add("item3")
    # Save updated document containing table object
    document.save(outfile)
Mise en page et dimensionnement du tableau
Ajustement automatique des colonnes et des lignes
Cet extrait de code montre comment ajuster automatiquement la largeur des colonnes du tableau pour qu’elle s’adapte à la page. Veuillez noter que dans le paramètre table.column_widths = “50 50 50” - il s’agit de points. Mais vous pouvez également spécifier des centimètres (cm), des pouces ou %.
- Définir les largeurs de colonne initiales.
- Ajuste automatiquement les colonnes à la largeur de la page.
- Définir les bordures des cellules et des tableaux.
- Le ’table.default_cell_padding’ utilise ‘MarginInfo()’ pour un espacement cohérent à l’intérieur des cellules.
- Ajoutez des lignes avec ’table.rows.add()’, et ajoutez des cellules avec ‘row.cells.add()’.
- Enregistrez le PDF.
import aspose.pdf as ap
from aspose.pdf import Color, HorizontalAlignment
from os import path
import sys

def auto_fit(outfile: str) -> None:
    # Create new PDF document
    document = ap.Document()
    page = document.pages.add()
    # Instantiate a table object
    table = ap.Table()

    page.paragraphs.add(table)

    table.column_widths = "50 50 50"
    table.column_adjustment = ap.ColumnAdjustment.AUTO_FIT_TO_WINDOW

    table.default_cell_border = ap.BorderInfo(ap.BorderSide.ALL, 0.1)

    table.border = ap.BorderInfo(ap.BorderSide.ALL, 1)

    margin = ap.MarginInfo()
    margin.top = 5
    margin.left = 5
    margin.right = 5
    margin.bottom = 5

    table.default_cell_padding = margin

    row1 = table.rows.add()
    row1.cells.add("col1")
    row1.cells.add("col2")
    row1.cells.add("col3")
    row2 = table.rows.add()
    row2.cells.add("item1")
    row2.cells.add("item2")
    row2.cells.add("item3")

    document.save(outfile)
Créer des tableaux PDF complexes avec des cellules fusionnées et des colonnes répétées
Créez un tableau avancé dans un PDF en utilisant Python et Aspose.PDF. Il comprend des cellules d’en-tête fusionnées, des arrière-plans colorés, des colonnes répétées et un grand jeu de données structuré. Le tableau est configuré pour gérer la rupture verticale et les mises en page complexes pour des documents de type rapport.
import aspose.pdf as ap
from aspose.pdf import Color, HorizontalAlignment
from os import path
import sys

def add_table_hide_borders(outfile: str) -> None:
    # Create PDF document
    document = ap.Document()
    page = document.pages.add()

    # Instantiate a table object that will be nested inside outerTable that will break inside the same page
    table = ap.Table()
    table.broken = ap.TableBroken.VERTICAL
    table.default_cell_border = ap.BorderInfo(ap.BorderSide.ALL)
    table.repeating_columns_count = 2
    page.paragraphs.add(table)

    # Add header Row
    row = table.rows.add()
    cell = row.cells.add("header 1")
    cell.col_span = 2
    cell.background_color = ap.Color.light_gray
    row.cells.add("header 3")

    cell2 = row.cells.add("header 4")
    cell2.col_span = 2
    cell2.background_color = ap.Color.light_blue
    row.cells.add("header 6")

    cell3 = row.cells.add("header 7")
    cell3.col_span = 2
    cell3.background_color = ap.Color.light_green
    cell4 = row.cells.add("header 9")

    cell4.col_span = 3
    cell4.background_color = ap.Color.light_coral
    row.cells.add("header 12")
    row.cells.add("header 13")
    row.cells.add("header 14")
    row.cells.add("header 15")
    row.cells.add("header 16")
    row.cells.add("header 17")

    row_counter = 0
    while row_counter < 3:
        # Create rows in the table and then cells in the rows
        row1 = table.rows.add()
        row1.cells.add("col " + str(row_counter) + ", 1")
        row1.cells.add("col " + str(row_counter) + ", 2")
        row1.cells.add("col " + str(row_counter) + ", 3")
        row1.cells.add("col " + str(row_counter) + ", 4")
        row1.cells.add("col " + str(row_counter) + ", 5")
        row1.cells.add("col " + str(row_counter) + ", 6")
        row1.cells.add("col " + str(row_counter) + ", 7")
        row1.cells.add("col " + str(row_counter) + ", 8")
        row1.cells.add("col " + str(row_counter) + ", 9")
        row1.cells.add("col " + str(row_counter) + ", 10")
        row1.cells.add("col " + str(row_counter) + ", 11")
        row1.cells.add("col " + str(row_counter) + ", 12")
        row1.cells.add("col " + str(row_counter) + ", 13")
        row1.cells.add("col " + str(row_counter) + ", 14")
        row1.cells.add("col " + str(row_counter) + ", 15")
        row1.cells.add("col " + str(row_counter) + ", 16")
        row1.cells.add("col " + str(row_counter) + ", 17")
        row_counter += 1

    document.save(outfile)

Stylisation des coins du tableau
Aspose.PDF for Python via .NET montre comment appliquer des coins arrondis à un tableau et personnaliser le rayon de la bordure.
- Créer une nouvelle instance de table.
- Initialisez une bordure pour tous les côtés.
- Définir le rayon du coin.
- Appliquer le style de coin arrondi.
- Ajouter des lignes et des cellules.
- Insérez le tableau dans la page PDF avec ‘page.paragraphs.add(table)’.
- Enregistrez le document PDF.
import aspose.pdf as ap
from aspose.pdf import Color, HorizontalAlignment
from os import path
import sys

def create_table_with_round_corner(outfile: str) -> None:
    # Create new PDF document
    document = ap.Document()
    page = document.pages.add()

    # Create a table
    table = ap.Table()

    # Create a blank BorderInfo object
    b_info = ap.BorderInfo(ap.BorderSide.ALL)

    # Set the border a rounded border where radius of round is 15
    b_info.rounded_border_radius = 15

    # Set the table corner style as Round
    table.corner_style = ap.BorderCornerStyle.ROUND

    # Set the table border information
    table.border = b_info

    # Create a loop to add 10 rows
    for row_count in range(0, 10):
        # Add row to table
        row = table.rows.add()
        # Add table cells
        row.cells.add("Column (" + str(row_count) + ", 1)")
        row.cells.add("Column (" + str(row_count) + ", 2)")
        row.cells.add("Column (" + str(row_count) + ", 3)")

    # Add table object to first page of input document
    page.paragraphs.add(table)
    # Save updated document containing table object
    document.save(outfile)
Ajout de contenu aux tableaux
Utilisation de fragments HTML dans les cellules
Cet exemple montre comment insérer du contenu formaté en HTML dans les cellules du tableau.
- Définir les bordures du tableau et des cellules.
- Ajouter du contenu HTML.
- Ajouter des lignes. Une boucle ajoute plusieurs lignes avec du contenu formaté en HTML dans chaque cellule.
- Insérez le tableau dans la page PDF avec ‘page.paragraphs.add(table)’.
- Enregistrez le document PDF.
import aspose.pdf as ap
from aspose.pdf import Color, HorizontalAlignment
from os import path
import sys

def add_html_fragments(outfile: str) -> None:
    # Instantiate Document object
    document = ap.Document()
    page = document.pages.add()
    # Instantiate a table object
    table = ap.Table()

    # Set the table border color as LightGray
    table.border = ap.BorderInfo(ap.BorderSide.ALL, 0.5, ap.Color.light_gray)
    # Set the border for table cells
    table.default_cell_border = ap.BorderInfo(
        ap.BorderSide.ALL, 0.5, ap.Color.light_gray
    )
    # Create a loop to add 10 rows
    row_count = 1
    while row_count < 10:
        # Add row to table
        row = table.rows.add()
        # Add table cells
        cell = row.cells.add()
        cell.paragraphs.add(
            ap.HtmlFragment(f"Column <strong>({row_count}, 1)</strong>")
        )

        cell = row.cells.add()
        cell.paragraphs.add(
            ap.HtmlFragment(f"Column <span style='color:red'>({row_count}, 2)</span>")
        )

        cell = row.cells.add()
        cell.paragraphs.add(
            ap.HtmlFragment(
                f"Column <span style='text-decoration: underline'>({row_count}, 3)</span>"
            )
        )
        row_count += 1

    # Add table object to first page of input document
    page.paragraphs.add(table)
    # Save updated document containing table object
    document.save(outfile)
Utilisation de fragments LaTeX dans les cellules
Cet exemple montre comment insérer du contenu formaté en LaTeX dans les cellules de tableau pour des expressions mathématiques ou stylisées.
- Définir les bordures du tableau et des cellules.
- Ajouter du contenu LaTeX.
- Ajouter des lignes. Une boucle ajoute plusieurs lignes avec du contenu au format LaTeX dans chaque cellule.
- Insérez le tableau dans la page PDF avec ‘page.paragraphs.add(table)’.
- Enregistrez le document PDF.
import aspose.pdf as ap
from aspose.pdf import Color, HorizontalAlignment
from os import path
import sys

def add_latex_fragments(outfile: str) -> None:
    # Instantiate Document object
    document = ap.Document()
    page = document.pages.add()
    # Instantiate a table object
    table = ap.Table()

    # Set the table border color as LightGray
    table.border = ap.BorderInfo(ap.BorderSide.ALL, 0.5, ap.Color.light_gray)
    # Set the border for table cells
    table.default_cell_border = ap.BorderInfo(
        ap.BorderSide.ALL, 0.5, ap.Color.light_gray
    )
    # Create a loop to add 10 rows
    row_count = 1
    while row_count < 10:
        # Add row to table
        row = table.rows.add()
        # Add table cells
        cell = row.cells.add()
        cell.paragraphs.add(ap.LatexFragment(f"Column $\\mathbf{{({row_count}, 1)}}$"))

        cell = row.cells.add()
        cell.paragraphs.add(
            ap.LatexFragment(f"Column $\\textcolor{{red}}{{({row_count}, 2)}}$")
        )

        cell = row.cells.add()
        cell.paragraphs.add(
            ap.LatexFragment(f"Column $\\underline{{({row_count}, 3)}}$")
        )
        row_count += 1

    # Add table object to first page of input document
    page.paragraphs.add(table)
    # Save updated document containing table object
    document.save(outfile)
Fonctionnalités avancées des tables
Insérer des sauts de page automatiques dans un tableau PDF
Créer un grand tableau dans un PDF en utilisant Python et Aspose.PDF, avec des sauts de page automatiques après un nombre spécifique de lignes. Il crée un tableau à plusieurs lignes, applique des bordures et force les lignes sélectionnées à commencer sur une nouvelle page pour un meilleur contrôle de la mise en page.
import aspose.pdf as ap
from aspose.pdf import Color, HorizontalAlignment
from os import path
import sys

def insert_page_break(outfile: str) -> None:
    # Create PDF document
    document = ap.Document()

    # Add page
    page = document.pages.add()

    # Create table instance
    table = ap.Table()

    # Set border style for table
    table.border = ap.BorderInfo(ap.BorderSide.ALL, ap.Color.red)

    # Set default border style for table with border color as Red
    table.default_cell_border = ap.BorderInfo(ap.BorderSide.ALL, ap.Color.red)

    # Specify table columns width
    table.column_widths = "100 100"

    # Create a loop to add 200 rows for table
    for counter in range(201):
        row = ap.Row()
        table.rows.add(row)

        cell1 = ap.Cell()
        cell1.paragraphs.add(ap.text.TextFragment(f"Cell {counter}, 0"))
        row.cells.add(cell1)

        cell2 = ap.Cell()
        cell2.paragraphs.add(ap.text.TextFragment(f"Cell {counter}, 1"))
        row.cells.add(cell2)

        # When 10 rows are added, render new row in new page
        if counter % 10 == 0 and counter != 0:
            row.is_in_new_page = True

    # Add table to paragraphs collection of PDF file
    page.paragraphs.add(table)

    # Save PDF document
    document.save(outfile)
Répéter les lignes d’en-tête sur plusieurs pages
Cet exemple montre comment créer un tableau qui s’étend sur plusieurs pages tout en conservant les lignes d’en-tête visibles sur chaque page.
- Initialiser la Table.
- Répéter les lignes d’en-tête incluant la police, la taille et la couleur.
- Définir les largeurs des colonnes et appliquer des bordures au tableau.
- Ajouter des lignes d’en-tête.
- Ajoutez de nombreuses lignes de données pour forcer le tableau à s’étendre sur plusieurs pages.
- Insérez le tableau dans la page PDF avec ‘page.paragraphs.add(table)’.
- Enregistrez le document PDF.
import aspose.pdf as ap
from aspose.pdf import Color, HorizontalAlignment
from os import path
import sys

def add_repeating_rows(outfile: str) -> None:
    # Create PDF document
    document = ap.Document()
    page = document.pages.add()

    # Instantiate a table object
    table = ap.Table()

    # Set the table to break across pages
    table.broken = ap.TableBroken.VERTICAL

    # Set number of repeating header rows
    table.repeating_rows_count = 2

    text_state = ap.text.TextState()
    text_state.font_size = 12
    text_state.font = ap.text.FontRepository.find_font("TimesNewRoman")
    text_state.foreground_color = ap.Color.red
    table.repeating_rows_style = text_state

    # Set column widths
    table.column_widths = "100 100 100"

    # Set borders
    table.default_cell_border = ap.BorderInfo(ap.BorderSide.ALL, 0.5, ap.Color.black)
    table.border = ap.BorderInfo(ap.BorderSide.ALL, 1, ap.Color.black)

    # Add header rows that will repeat on each page
    header_row1 = table.rows.add()
    header_row1.cells.add("Header 1-1")
    header_row1.cells.add("Header 1-2")
    header_row1.cells.add("Header 1-3")

    # Set background color for header rows
    for cell in header_row1.cells:
        cell.background_color = ap.Color.light_gray

    header_row2 = table.rows.add()
    header_row2.cells.add("Header 2-1")
    header_row2.cells.add("Header 2-2")
    header_row2.cells.add("Header 2-3")

    for cell in header_row2.cells:
        cell.background_color = ap.Color.light_blue

    # Add many data rows to force table across multiple pages
    for i in range(1, 101):
        row = table.rows.add()
        row.cells.add(f"Data {i}-1")
        row.cells.add(f"Data {i}-2")
        row.cells.add(f"Data {i}-3")

    # Add table to page
    page.paragraphs.add(table)

    # Save document
    document.save(outfile)
Colonnes répétées
La fonction ‘add_repeating_columns’ crée un document PDF avec une table comportant des colonnes répétées. Elle configure une table bordée, ajoute des en‑têtes, remplit les lignes de données et enregistre le fichier PDF généré à l’emplacement spécifié. La définition de cette propriété provoquera le passage de la table à la page suivante colonne par colonne et répétera le nombre de colonnes indiqué au début de la page suivante.
- Initialise un nouveau document PDF.
- Ajoute une page avec des dimensions personnalisées.
- Définir le style de bordure du tableau.
- Initialiser le tableau.
- Ajouter un tableau à la page PDF.
- Ajouter la ligne d’en-tête.
- Ajouter des lignes de données.
- Enregistrer le PDF Document.
import aspose.pdf as ap
from aspose.pdf import Color, HorizontalAlignment
from os import path
import sys

def add_repeating_columns(outfile: str) -> None:
    # Create PDF document
    document = ap.Document()

    # Add page
    page = document.pages.add()
    page.set_page_size(ap.PageSize.a5.height, ap.PageSize.a5.width)

    # Define border
    border = ap.BorderInfo(ap.BorderSide.ALL, 0.5, ap.Color.light_gray)

    # Create table
    table = ap.Table()
    table.broken = ap.TableBroken.VERTICAL_IN_SAME_PAGE
    table.column_adjustment = ap.ColumnAdjustment.AUTO_FIT_TO_CONTENT
    table.repeating_columns_count = 5
    table.border = border
    table.default_cell_border = border

    # Add table to page
    page.paragraphs.add(table)

    # Add header row
    row = table.rows.add()
    for i in range(1, 6):
        cell = row.cells.add(f"header {i}")
        cell.background_color = ap.Color.light_gray

    for i in range(6, 18):
        row.cells.add(f"header {i}")

    # Add data rows
    for row_counter in range(1, 6):
        row = table.rows.add()
        for i in range(1, 6):
            cell = row.cells.add(f"cell {row_counter},{i}")
            cell.background_color = ap.Color.light_gray
        for i in range(6, 18):
            row.cells.add(f"cell {row_counter},{i}")

    # Save PDF document
    document.save(outfile)
Créer un tableau PDF avec des cellules de texte tournées
Créez un tableau dans un PDF en utilisant Python et Aspose.PDF avec du texte tourné à différents angles dans chaque cellule. C’est utile pour les en‑têtes verticales, les mises en page créatives, les tableaux compacts et la mise en forme personnalisée des rapports.
import aspose.pdf as ap
from aspose.pdf import Color, HorizontalAlignment
from os import path
import sys

def rotated_text_table(outfile: str) -> None:
    # Create PDF document
    document = ap.Document()

    # Add page
    page = document.pages.add()

    # Initializes a new instance of the Table
    table = ap.Table()
    table.border = ap.BorderInfo(ap.BorderSide.ALL, 0.5, Color.black)
    table.default_cell_border = ap.BorderInfo(ap.BorderSide.ALL, 0.5, Color.black)

    # Add 1st row to table
    row1 = table.rows.add()
    row1.min_row_height = 200

    for cell_count in range(4):
        # Add table cells
        cell = row1.cells.add()

        tf = ap.text.TextFragment(f"Cell 1 {cell_count - 1}")
        tf.text_state.rotation = 90 * cell_count
        tf.horizontal_alignment = HorizontalAlignment.CENTER

        cell.paragraphs.add(tf)

    # Add table object to first page of input document
    page.paragraphs.add(table)

    # Save result
    document.save(outfile)