파이썬에서 PDF에 표 추가
기존 PDF 문서에 표를 추가하는 것은 데이터 표시, 구조화된 콘텐츠 및 보고에 대한 일반적인 요구 사항입니다..NET을 통한 Python용 Aspose.pdf는 기존 PDF에 표를 삽입하고 형식을 지정할 수 있는 실용적인 API를 제공합니다.
이 안내서는 테이블 작성, 열 크기 조정, 테두리, 행 및 셀, 수정된 문서 저장에 대한 단계별 예제를 제공합니다.또한 셀 테두리, 여백, 패딩, 동적 표 크기 조정을 위한 AutoFit 설정과 같은 고급 옵션에 대해서도 설명합니다.
기존 PDF에 새 테이블을 추가하고 Python에서 레이아웃 동작을 제어해야 할 때 이 페이지를 사용하십시오.
기본 테이블 생성
테이블 생성
이 예제에서는 테두리와 여러 행이 있는 PDF 문서에서 표를 만드는 방법을 보여줍니다.
- 새 PDF 문서 만들기
- 문서에 빈 페이지를 추가합니다.
- 테이블을 초기화합니다.
- 전체 테이블 테두리를 설정합니다.
- 개별 셀의 테두리를 설정합니다.
- 행과 셀을 추가합니다.
- 페이지에 표를 삽입합니다.
- PDF를 지정된 경로에 저장합니다.
import aspose.pdf as ap
from aspose.pdf import Color, HorizontalAlignment
from os import path
import sys

def create_table(outfile: str) -> None:
    # Create new PDF document
    document = ap.Document()
    page = document.pages.add()
    # Initializes a new instance of the Table
    table = ap.Table()
    # Set the table border color as LightGray
    table.border = ap.BorderInfo(ap.BorderSide.ALL, 5, ap.Color.light_gray)
    # Set the border for table cells
    table.default_cell_border = ap.BorderInfo(ap.BorderSide.ALL, 5, ap.Color.light_gray)
    # Create a loop to add 10 rows
    for row_count in range(10):
        # Add row to table
        row = table.rows.add()
        # Add table cells
        row.cells.add("Column (" + str(row_count) + ", 1)")
        row.cells.add("Column (" + str(row_count) + ", 2)")
        row.cells.add("Column (" + str(row_count) + ", 3)")
    # Add table object to first page of input document
    page.paragraphs.add(table)

    # Save updated document containing table object
    document.save(outfile)
표 셀에 이미지 추가
이 코드 스니펫은 PDF 문서의 표 셀에 이미지를 삽입하는 방법을 보여줍니다.
- 새 PDF 문서 만들기
- 테이블을 초기화합니다.
- 열 너비를 포인트 단위로 설정합니다.
- 텍스트 조각이 첫 번째 셀에 추가됩니다.
- ‘ap.image () ‘인스턴스가 두 번째 셀에 추가됩니다.
- ‘img.file’을 사용하여 이미지 파일의 경로를 설정합니다.
- ‘img.fix_width’와 ‘img.fix_높이’는 셀 내부의 이미지 크기를 제어합니다.
- 표를 PDF 페이지에 삽입합니다.
- PDF를 저장합니다.
import aspose.pdf as ap
from aspose.pdf import Color, HorizontalAlignment
from os import path
import sys

def add_image(image: str, outfile: str) -> None:
    # Instantiate Document object
    document = ap.Document()
    page = document.pages.add()
    # Instantiate a table object
    table = ap.Table()
    # Set width for table cells
    table.column_widths = "200 100"

    # Create row object and add it to table instance
    row = table.rows.add()
    # Create cell object and add it to row instance
    cell = row.cells.add()
    # Add textfragment to paragraphs collection of cell object
    cell.paragraphs.add(ap.text.TextFragment(image))
    # Create an image instance
    img = ap.Image()
    # Set image type as SVG
    # Path for source file
    img.file = image
    # Set width for image instance
    img.fix_width = 50
    # Set height for image instance
    img.fix_height = 50
    # Add another cell to row object
    cell = row.cells.add()
    # Add SVG image to paragraphs collection of recently added cell instance
    cell.paragraphs.add(img)

    # Add table to paragraphs collection of page object
    page.paragraphs.add(table)
    # Save PDF file
    document.save(outfile)
SVG 이미지를 PDF 문서의 표 셀에 추가할 수 있습니다.
import aspose.pdf as ap
from aspose.pdf import Color, HorizontalAlignment
from os import path
import sys

def add_svg_image(images: list[str], outfile: str) -> None:
    # Instantiate Document object
    document = ap.Document()
    page = document.pages.add()
    # Instantiate a table object
    table = ap.Table()
    # Set width for table cells
    table.column_widths = "200 100"
    for image in images:
        # Create row object and add it to table instance
        row = table.rows.add()
        # Create cell object and add it to row instance
        cell = row.cells.add()
        # Add textfragment to paragraphs collection of cell object
        cell.paragraphs.add(ap.text.TextFragment(image))
        # Create an image instance
        img = ap.Image()
        # Set image type as SVG
        img.file_type = ap.ImageFileType.SVG
        # Path for source file
        img.file = image
        # Set width for image instance
        img.fix_width = 50
        # Set height for image instance
        img.fix_height = 50
        # Add another cell to row object
        cell = row.cells.add()
        # Add SVG image to paragraphs collection of recently added cell instance
        cell.paragraphs.add(img)

    # Add table to paragraphs collection of page object
    page.paragraphs.add(table)
    # Save PDF file
    document.save(outfile)
테이블의 열 범위와 행 범위
이 예제에서는 테이블 셀을 세로 및 가로로 병합하여 복잡한 테이블 레이아웃을 만드는 방법을 보여줍니다.
- 전체 테이블 테두리를 설정합니다.
- 기본 셀 테두리를 설정합니다.
- 두 셀을 가로로 하나로 병합합니다.
- 셀을 두 행에 수직으로 병합합니다.
- 5행은 병합된 열을 건너뛰어 행 범위를 고려합니다.
- 페이지에 표를 삽입합니다.
- PDF를 저장합니다.
import aspose.pdf as ap
from aspose.pdf import Color, HorizontalAlignment
from os import path
import sys

def add_rowspan_or_colspan(outfile: str) -> None:
    # Create new PDF document
    document = ap.Document()
    page = document.pages.add()

    # Initializes a new instance of the Table
    table = ap.Table()
    # Set the table border color as LightGray
    table.border = ap.BorderInfo(ap.BorderSide.ALL, 0.5, ap.Color.black)
    # Set the border for table cells
    table.default_cell_border = ap.BorderInfo(ap.BorderSide.ALL, 0.5, ap.Color.black)
    # Add 1st row to table
    row1 = table.rows.add()
    for cell_count in range(1, 5):
        # Add table cells
        row1.cells.add("Test 1" + str(cell_count))

    # Add 2nd row to table
    row2 = table.rows.add()
    row2.cells.add("Test 2 1")
    cell = row2.cells.add("Test 2 2")
    cell.col_span = 2
    row2.cells.add("Test 2 4")

    # Add 3rd row to table
    row3 = table.rows.add()
    row3.cells.add("Test 3 1")
    row3.cells.add("Test 3 2")
    row3.cells.add("Test 3 3")
    row3.cells.add("Test 3 4")

    # Add 4th row to table
    row4 = table.rows.add()
    row4.cells.add("Test 4 1")
    cell = row4.cells.add("Test 4 2")
    cell.row_span = 2
    row4.cells.add("Test 4 3")
    row4.cells.add("Test 4 4")

    # Add 5th row to table
    row5 = table.rows.add()
    row5.cells.add("Test 5 1")
    row5.cells.add("Test 5 3")
    row5.cells.add("Test 5 4")

    # Add table object to first page of input document
    page.paragraphs.add(table)
    # Save updated document containing table object
    document.save(outfile)

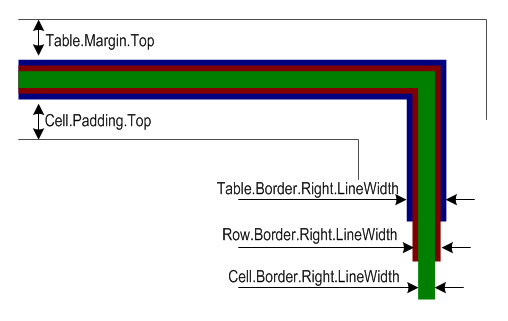
표 및 셀에 테두리 적용
이 예제에서는 표 셀의 텍스트에 대해 셀 패딩, 표 여백 및 제어 단어 줄 바꿈을 설정하는 방법을 보여줍니다.
- 열 너비를 설정합니다.
- 표와 셀 테두리를 정의합니다.
- 일정한 간격을 유지하도록 셀 내부 패딩을 설정합니다.
- 기본적으로 모든 셀에 패딩을 적용합니다.
- 텍스트 추가 및 줄 바꿈 제어
- 행과 셀을 추가합니다.
- PDF를 저장합니다.
import aspose.pdf as ap
from aspose.pdf import Color, HorizontalAlignment
from os import path
import sys

def add_borders(outfile: str) -> None:
    # Create new PDF document
    document = ap.Document()
    page = document.pages.add()
    # Instantiate a table object
    tab1 = ap.Table()
    # Add the table in paragraphs collection of the desired section
    page.paragraphs.add(tab1)
    # Set with column widths of the table
    tab1.column_widths = "50 50 50"
    # Set default cell border using BorderInfo object
    tab1.default_cell_border = ap.BorderInfo(ap.BorderSide.ALL, 0.1)
    # Set table border using another customized BorderInfo object
    tab1.border = ap.BorderInfo(ap.BorderSide.ALL, 1)
    # Create MarginInfo object and set its left, bottom, right and top margins
    margin = ap.MarginInfo()
    margin.top = 5
    margin.left = 5
    margin.right = 5
    margin.bottom = 5
    # Set the default cell padding to the MarginInfo object
    tab1.default_cell_padding = margin
    # Create rows in the table and then cells in the rows
    row1 = tab1.rows.add()
    row1.cells.add("col1")
    row1.cells.add("col2")
    row1.cells.add()
    text = ap.text.TextFragment("col3 with large text string")
    row1.cells[2].paragraphs.add(text)
    row1.cells[2].is_word_wrapped = False
    row2 = tab1.rows.add()
    row2.cells.add("item1")
    row2.cells.add("item2")
    row2.cells.add("item3")
    # Save updated document containing table object
    document.save(outfile)

테이블 레이아웃 및 크기
열 및 행 자동 맞춤
이 코드 스니펫은 페이지에 맞게 테이블 열 너비를 자동으로 조정하는 방법을 보여줍니다. 매개 변수 테이블에서.column_widths = “50 50 50" - 포인트가 있다는 점에 유의하십시오.하지만 센티미터 (cm), 인치 또는 %도 지정할 수 있습니다.
- 초기 열 너비를 설정합니다.
- 페이지 너비에 맞게 열을 자동으로 조정합니다.
- 셀 및 테이블 테두리를 정의합니다.
- ’table.default_cell_padding’은 셀 내부의 일정한 간격을 위해 ‘MarginInfo () ‘를 사용합니다.
- ’table.rows.add () ‘를 사용하여 행을 추가하고 ‘row.cells.add () ‘를 사용하여 셀을 추가합니다.
- PDF를 저장합니다.
import aspose.pdf as ap
from aspose.pdf import Color, HorizontalAlignment
from os import path
import sys

def auto_fit(outfile: str) -> None:
    # Create new PDF document
    document = ap.Document()
    page = document.pages.add()
    # Instantiate a table object
    table = ap.Table()

    page.paragraphs.add(table)

    table.column_widths = "50 50 50"
    table.column_adjustment = ap.ColumnAdjustment.AUTO_FIT_TO_WINDOW

    table.default_cell_border = ap.BorderInfo(ap.BorderSide.ALL, 0.1)

    table.border = ap.BorderInfo(ap.BorderSide.ALL, 1)

    margin = ap.MarginInfo()
    margin.top = 5
    margin.left = 5
    margin.right = 5
    margin.bottom = 5

    table.default_cell_padding = margin

    row1 = table.rows.add()
    row1.cells.add("col1")
    row1.cells.add("col2")
    row1.cells.add("col3")
    row2 = table.rows.add()
    row2.cells.add("item1")
    row2.cells.add("item2")
    row2.cells.add("item3")

    document.save(outfile)
셀이 병합되고 열이 반복되는 복잡한 PDF 표 만들기
파이썬과 Aspose.PDF 를 사용하여 PDF로 고급 테이블을 만들 수 있습니다.여기에는 병합된 헤더 셀, 색상이 지정된 배경, 반복되는 열, 구조화된 대규모 데이터세트가 포함됩니다.테이블은 보고서 스타일 문서의 수직 분할 및 복잡한 레이아웃을 처리하도록 구성되어 있습니다.
import aspose.pdf as ap
from aspose.pdf import Color, HorizontalAlignment
from os import path
import sys

def add_table_hide_borders(outfile: str) -> None:
    # Create PDF document
    document = ap.Document()
    page = document.pages.add()

    # Instantiate a table object that will be nested inside outerTable that will break inside the same page
    table = ap.Table()
    table.broken = ap.TableBroken.VERTICAL
    table.default_cell_border = ap.BorderInfo(ap.BorderSide.ALL)
    table.repeating_columns_count = 2
    page.paragraphs.add(table)

    # Add header Row
    row = table.rows.add()
    cell = row.cells.add("header 1")
    cell.col_span = 2
    cell.background_color = ap.Color.light_gray
    row.cells.add("header 3")

    cell2 = row.cells.add("header 4")
    cell2.col_span = 2
    cell2.background_color = ap.Color.light_blue
    row.cells.add("header 6")

    cell3 = row.cells.add("header 7")
    cell3.col_span = 2
    cell3.background_color = ap.Color.light_green
    cell4 = row.cells.add("header 9")

    cell4.col_span = 3
    cell4.background_color = ap.Color.light_coral
    row.cells.add("header 12")
    row.cells.add("header 13")
    row.cells.add("header 14")
    row.cells.add("header 15")
    row.cells.add("header 16")
    row.cells.add("header 17")

    row_counter = 0
    while row_counter < 3:
        # Create rows in the table and then cells in the rows
        row1 = table.rows.add()
        row1.cells.add("col " + str(row_counter) + ", 1")
        row1.cells.add("col " + str(row_counter) + ", 2")
        row1.cells.add("col " + str(row_counter) + ", 3")
        row1.cells.add("col " + str(row_counter) + ", 4")
        row1.cells.add("col " + str(row_counter) + ", 5")
        row1.cells.add("col " + str(row_counter) + ", 6")
        row1.cells.add("col " + str(row_counter) + ", 7")
        row1.cells.add("col " + str(row_counter) + ", 8")
        row1.cells.add("col " + str(row_counter) + ", 9")
        row1.cells.add("col " + str(row_counter) + ", 10")
        row1.cells.add("col " + str(row_counter) + ", 11")
        row1.cells.add("col " + str(row_counter) + ", 12")
        row1.cells.add("col " + str(row_counter) + ", 13")
        row1.cells.add("col " + str(row_counter) + ", 14")
        row1.cells.add("col " + str(row_counter) + ", 15")
        row1.cells.add("col " + str(row_counter) + ", 16")
        row1.cells.add("col " + str(row_counter) + ", 17")
        row_counter += 1

    document.save(outfile)
스타일링 테이블 코너
.NET을 통한 파이썬용 Aspose.PDF 함수는 둥근 모서리를 테이블에 적용하고 테두리 반경을 사용자 지정하는 방법을 보여줍니다.
- 새 테이블 인스턴스를 생성합니다.
- 모든 면의 테두리를 초기화합니다.
- 모서리 반경을 설정합니다.
- 둥근 모서리 스타일을 적용합니다.
- 행과 셀을 추가합니다.
- ‘페이지.단락.add (표) ‘를 사용하여 PDF 페이지에 표를 삽입합니다.
- PDF 문서를 저장합니다.
import aspose.pdf as ap
from aspose.pdf import Color, HorizontalAlignment
from os import path
import sys

def create_table_with_round_corner(outfile: str) -> None:
    # Create new PDF document
    document = ap.Document()
    page = document.pages.add()

    # Create a table
    table = ap.Table()

    # Create a blank BorderInfo object
    b_info = ap.BorderInfo(ap.BorderSide.ALL)

    # Set the border a rounded border where radius of round is 15
    b_info.rounded_border_radius = 15

    # Set the table corner style as Round
    table.corner_style = ap.BorderCornerStyle.ROUND

    # Set the table border information
    table.border = b_info

    # Create a loop to add 10 rows
    for row_count in range(0, 10):
        # Add row to table
        row = table.rows.add()
        # Add table cells
        row.cells.add("Column (" + str(row_count) + ", 1)")
        row.cells.add("Column (" + str(row_count) + ", 2)")
        row.cells.add("Column (" + str(row_count) + ", 3)")

    # Add table object to first page of input document
    page.paragraphs.add(table)
    # Save updated document containing table object
    document.save(outfile)
테이블에 내용 추가
셀에서 HTML 프래그먼트 사용
이 예제에서는 HTML 형식의 내용을 표 셀에 삽입하는 방법을 보여줍니다.
- 표 및 셀 테두리를 정의합니다.
- HTML 콘텐츠를 추가합니다.
- 행 추가.루프는 각 셀에 HTML 형식의 내용이 포함된 여러 행을 추가합니다.
- ‘페이지.단락.add (표) ‘를 사용하여 PDF 페이지에 표를 삽입합니다.
- PDF 문서를 저장합니다.
import aspose.pdf as ap
from aspose.pdf import Color, HorizontalAlignment
from os import path
import sys

def add_html_fragments(outfile: str) -> None:
    # Instantiate Document object
    document = ap.Document()
    page = document.pages.add()
    # Instantiate a table object
    table = ap.Table()

    # Set the table border color as LightGray
    table.border = ap.BorderInfo(ap.BorderSide.ALL, 0.5, ap.Color.light_gray)
    # Set the border for table cells
    table.default_cell_border = ap.BorderInfo(
        ap.BorderSide.ALL, 0.5, ap.Color.light_gray
    )
    # Create a loop to add 10 rows
    row_count = 1
    while row_count < 10:
        # Add row to table
        row = table.rows.add()
        # Add table cells
        cell = row.cells.add()
        cell.paragraphs.add(
            ap.HtmlFragment(f"Column <strong>({row_count}, 1)</strong>")
        )

        cell = row.cells.add()
        cell.paragraphs.add(
            ap.HtmlFragment(f"Column <span style='color:red'>({row_count}, 2)</span>")
        )

        cell = row.cells.add()
        cell.paragraphs.add(
            ap.HtmlFragment(
                f"Column <span style='text-decoration: underline'>({row_count}, 3)</span>"
            )
        )
        row_count += 1

    # Add table object to first page of input document
    page.paragraphs.add(table)
    # Save updated document containing table object
    document.save(outfile)
세포에서 LaTeX 단편 사용
이 예제에서는 수학 또는 스타일 표현식의 테이블 셀에 LaTex 형식의 내용을 삽입하는 방법을 보여줍니다.
- 표 및 셀 테두리를 정의합니다.
- 라텍스 콘텐츠를 추가합니다.
- 행 추가.루프는 각 셀에 라텍스 형식의 콘텐츠가 포함된 여러 행을 추가합니다.
- ‘페이지.단락.add (표) ‘를 사용하여 PDF 페이지에 표를 삽입합니다.
- PDF 문서를 저장합니다.
import aspose.pdf as ap
from aspose.pdf import Color, HorizontalAlignment
from os import path
import sys

def add_latex_fragments(outfile: str) -> None:
    # Instantiate Document object
    document = ap.Document()
    page = document.pages.add()
    # Instantiate a table object
    table = ap.Table()

    # Set the table border color as LightGray
    table.border = ap.BorderInfo(ap.BorderSide.ALL, 0.5, ap.Color.light_gray)
    # Set the border for table cells
    table.default_cell_border = ap.BorderInfo(
        ap.BorderSide.ALL, 0.5, ap.Color.light_gray
    )
    # Create a loop to add 10 rows
    row_count = 1
    while row_count < 10:
        # Add row to table
        row = table.rows.add()
        # Add table cells
        cell = row.cells.add()
        cell.paragraphs.add(ap.LatexFragment(f"Column $\\mathbf{{({row_count}, 1)}}$"))

        cell = row.cells.add()
        cell.paragraphs.add(
            ap.LatexFragment(f"Column $\\textcolor{{red}}{{({row_count}, 2)}}$")
        )

        cell = row.cells.add()
        cell.paragraphs.add(
            ap.LatexFragment(f"Column $\\underline{{({row_count}, 3)}}$")
        )
        row_count += 1

    # Add table object to first page of input document
    page.paragraphs.add(table)
    # Save updated document containing table object
    document.save(outfile)
고급 테이블 기능
PDF 표에 자동 페이지 나누기 삽입
Python과 Aspose.PDF 를 사용하여 PDF로 큰 표를 만들 수 있습니다. 이때 특정 행 수가 지나면 자동으로 페이지 나누기가 발생합니다.여러 행으로 구성된 테이블을 만들고, 테두리를 적용하고, 선택한 행을 새 페이지에서 강제로 시작하도록 하여 레이아웃을 더 효과적으로 제어할 수 있습니다.
import aspose.pdf as ap
from aspose.pdf import Color, HorizontalAlignment
from os import path
import sys

def insert_page_break(outfile: str) -> None:
    # Create PDF document
    document = ap.Document()

    # Add page
    page = document.pages.add()

    # Create table instance
    table = ap.Table()

    # Set border style for table
    table.border = ap.BorderInfo(ap.BorderSide.ALL, ap.Color.red)

    # Set default border style for table with border color as Red
    table.default_cell_border = ap.BorderInfo(ap.BorderSide.ALL, ap.Color.red)

    # Specify table columns width
    table.column_widths = "100 100"

    # Create a loop to add 200 rows for table
    for counter in range(201):
        row = ap.Row()
        table.rows.add(row)

        cell1 = ap.Cell()
        cell1.paragraphs.add(ap.text.TextFragment(f"Cell {counter}, 0"))
        row.cells.add(cell1)

        cell2 = ap.Cell()
        cell2.paragraphs.add(ap.text.TextFragment(f"Cell {counter}, 1"))
        row.cells.add(cell2)

        # When 10 rows are added, render new row in new page
        if counter % 10 == 0 and counter != 0:
            row.is_in_new_page = True

    # Add table to paragraphs collection of PDF file
    page.paragraphs.add(table)

    # Save PDF document
    document.save(outfile)
여러 페이지의 헤더 행 반복
이 예제에서는 각 페이지에 머리글 행을 표시하면서 여러 페이지에 걸쳐 있는 테이블을 만드는 방법을 보여줍니다.
- 테이블을 초기화합니다.
- 글꼴, 크기 및 색상을 포함하여 헤더 행을 반복합니다.
- 열 너비를 설정하고 테이블에 테두리를 적용합니다.
- 헤더 행을 추가합니다.
- 여러 페이지에 테이블을 강제 적용하려면 많은 데이터 행을 추가합니다.
- ‘페이지.단락.add (표) ‘를 사용하여 PDF 페이지에 표를 삽입합니다.
- PDF 문서를 저장합니다.
import aspose.pdf as ap
from aspose.pdf import Color, HorizontalAlignment
from os import path
import sys

def add_repeating_rows(outfile: str) -> None:
    # Create PDF document
    document = ap.Document()
    page = document.pages.add()

    # Instantiate a table object
    table = ap.Table()

    # Set the table to break across pages
    table.broken = ap.TableBroken.VERTICAL

    # Set number of repeating header rows
    table.repeating_rows_count = 2

    text_state = ap.text.TextState()
    text_state.font_size = 12
    text_state.font = ap.text.FontRepository.find_font("TimesNewRoman")
    text_state.foreground_color = ap.Color.red
    table.repeating_rows_style = text_state

    # Set column widths
    table.column_widths = "100 100 100"

    # Set borders
    table.default_cell_border = ap.BorderInfo(ap.BorderSide.ALL, 0.5, ap.Color.black)
    table.border = ap.BorderInfo(ap.BorderSide.ALL, 1, ap.Color.black)

    # Add header rows that will repeat on each page
    header_row1 = table.rows.add()
    header_row1.cells.add("Header 1-1")
    header_row1.cells.add("Header 1-2")
    header_row1.cells.add("Header 1-3")

    # Set background color for header rows
    for cell in header_row1.cells:
        cell.background_color = ap.Color.light_gray

    header_row2 = table.rows.add()
    header_row2.cells.add("Header 2-1")
    header_row2.cells.add("Header 2-2")
    header_row2.cells.add("Header 2-3")

    for cell in header_row2.cells:
        cell.background_color = ap.Color.light_blue

    # Add many data rows to force table across multiple pages
    for i in range(1, 101):
        row = table.rows.add()
        row.cells.add(f"Data {i}-1")
        row.cells.add(f"Data {i}-2")
        row.cells.add(f"Data {i}-3")

    # Add table to page
    page.paragraphs.add(table)

    # Save document
    document.save(outfile)
반복 컬럼
‘add_repeating_colums’ 함수는 반복되는 열이 있는 테이블이 포함된 PDF 문서를 만듭니다.테두리가 있는 테이블을 설정하고, 머리글을 추가하고, 데이터 행을 채우고, 생성된 PDF 파일을 지정된 위치에 저장합니다.이 속성을 설정하면 테이블이 열 단위로 다음 페이지로 나뉘고 다음 페이지가 시작될 때 지정된 열 수를 반복합니다.
- 새 PDF 문서를 초기화합니다.
- 사용자 지정 크기가 있는 페이지를 추가합니다.
- 테이블 테두리 스타일을 설정합니다.
- 테이블을 초기화합니다.
- PDF 페이지에 표를 추가합니다.
- 헤더 행을 추가합니다.
- 데이터 행을 추가합니다.
- PDF 문서를 저장합니다.
import aspose.pdf as ap
from aspose.pdf import Color, HorizontalAlignment
from os import path
import sys

def add_repeating_columns(outfile: str) -> None:
    # Create PDF document
    document = ap.Document()

    # Add page
    page = document.pages.add()
    page.set_page_size(ap.PageSize.a5.height, ap.PageSize.a5.width)

    # Define border
    border = ap.BorderInfo(ap.BorderSide.ALL, 0.5, ap.Color.light_gray)

    # Create table
    table = ap.Table()
    table.broken = ap.TableBroken.VERTICAL_IN_SAME_PAGE
    table.column_adjustment = ap.ColumnAdjustment.AUTO_FIT_TO_CONTENT
    table.repeating_columns_count = 5
    table.border = border
    table.default_cell_border = border

    # Add table to page
    page.paragraphs.add(table)

    # Add header row
    row = table.rows.add()
    for i in range(1, 6):
        cell = row.cells.add(f"header {i}")
        cell.background_color = ap.Color.light_gray

    for i in range(6, 18):
        row.cells.add(f"header {i}")

    # Add data rows
    for row_counter in range(1, 6):
        row = table.rows.add()
        for i in range(1, 6):
            cell = row.cells.add(f"cell {row_counter},{i}")
            cell.background_color = ap.Color.light_gray
        for i in range(6, 18):
            row.cells.add(f"cell {row_counter},{i}")

    # Save PDF document
    document.save(outfile)
회전된 텍스트 셀이 있는 PDF 표 만들기
Python과 Aspose.PDF 를 사용하여 각 셀 내에서 다른 각도로 회전된 텍스트를 사용하여 PDF로 테이블을 만듭니다.세로 머리글, 창의적인 레이아웃, 간결한 표 및 사용자 지정 보고서 서식 지정에 유용합니다.
import aspose.pdf as ap
from aspose.pdf import Color, HorizontalAlignment
from os import path
import sys

def rotated_text_table(outfile: str) -> None:
    # Create PDF document
    document = ap.Document()

    # Add page
    page = document.pages.add()

    # Initializes a new instance of the Table
    table = ap.Table()
    table.border = ap.BorderInfo(ap.BorderSide.ALL, 0.5, Color.black)
    table.default_cell_border = ap.BorderInfo(ap.BorderSide.ALL, 0.5, Color.black)

    # Add 1st row to table
    row1 = table.rows.add()
    row1.min_row_height = 200

    for cell_count in range(4):
        # Add table cells
        cell = row1.cells.add()

        tf = ap.text.TextFragment(f"Cell 1 {cell_count - 1}")
        tf.text_state.rotation = 90 * cell_count
        tf.horizontal_alignment = HorizontalAlignment.CENTER

        cell.paragraphs.add(tf)

    # Add table object to first page of input document
    page.paragraphs.add(table)

    # Save result
    document.save(outfile)