
قالببندی متن ارائه در .NET
نمای کلی
این مقاله نشان میدهد که چگونه متن را در ارائههای PowerPoint و OpenDocument با استفاده از Aspose.Slides برای .NET قالببندی کنید. این مقاله شامل رنگهای پسزمینه، شفافیت، فاصله بین حروف، ویژگیهای قلم، چرخش، فاصلهبندی پاراگراف، رفتار خودتنظیم، لنگرگذاری متن، توقفهای تب و تنظیمات زبان میشود.
مگر اینکه خلاف آن ذکر شود، مثالها از sample.pptx استفاده میکنند. اولین شکل در اولین اسلاید یک جعبه متن است و اولین پاراگراف آن شامل متنی است که در زیر نشان داده شده است. هر دو اندیس اسلاید و شکل از صفر شروع میشوند. مثالهایی که بخشهای بولد را انتخاب میکنند از قالببندی مؤثر، از جمله قالببندی بولد به ارثرسیده، استفاده میکنند:

برای یافتن و برجستهسازی متن صریح یا تطبیقهای عبارات منظم، به جستجو و جایگزینی متن مراجعه کنید.
تنظیم رنگ پسزمینه متن
از IParagraphFormat.DefaultPortionFormat برای تنظیم رنگ برجسته پیشفرض برای یک پاراگراف استفاده کنید، یا از IBasePortionFormat.HighlightColor برای قسمتهای متنی جداگانه استفاده کنید.
مثال زیر یک هایلایت خاکستری روشن را بهعنوان پیشفرض برای اولین پاراگراف تنظیم میکند. رنگهای برجسته صریح در قسمتهای فردی نسبت به این پیشفرض اولویت دارند:
using System.Drawing;
using Aspose.Slides;
using Aspose.Slides.Export;

using var presentation = new Presentation("sample.pptx");
var slide = presentation.Slides[0];

var autoShape = (IAutoShape)slide.Shapes[0];
var paragraph = autoShape.TextFrame.Paragraphs[0];

// رنگ برجسته را برای کل پاراگراف تنظیم کنید.

presentation.Save("gray_paragraph.pptx", SaveFormat.Pptx);
نتیجه:

مثال کدی زیر نشان میدهد که چگونه رنگ پسزمینه را برای قسمتهای متنی با قلم بولد تنظیم کنید:
using System.Drawing;
using Aspose.Slides;
using Aspose.Slides.Export;

using var presentation = new Presentation("sample.pptx");
var slide = presentation.Slides[0];

var autoShape = (IAutoShape)slide.Shapes[0];
var paragraph = autoShape.TextFrame.Paragraphs[0];

foreach (var portion in paragraph.Portions)
{
    if (portion.PortionFormat.GetEffective().FontBold)
    {
        // رنگ برجسته را برای قسمت متن تنظیم کنید.
        portion.PortionFormat.HighlightColor.Color = Color.LightGray;
    }
}

presentation.Save("gray_text_portions.pptx", SaveFormat.Pptx);
نتیجه:

تراز پاراگرافهای متن
از IParagraphFormat.Alignment برای تنظیم تراز پاراگراف در داخل یک قاب متن استفاده کنید. مقدار میتواند وسطچین، چپچین، راستچین، تراز شده و … باشد.
مثال کد زیر نشان میدهد که چگونه پاراگراف را به مرکز تراز کنید:
using Aspose.Slides;
using Aspose.Slides.Export;

using var presentation = new Presentation("sample.pptx");
var slide = presentation.Slides[0];

var autoShape = (IAutoShape)slide.Shapes[0];
var paragraph = autoShape.TextFrame.Paragraphs[0];

// تراز پاراگراف را به مرکز تنظیم کنید.
paragraph.ParagraphFormat.Alignment = TextAlignment.Center;

presentation.Save("aligned_paragraph.pptx", SaveFormat.Pptx);
نتیجه:

تراز قلمها درون یک خط
از IParagraphFormat.FontAlignment برای تراز عمودی قسمتهای متنی با اندازههای قلم متفاوت در یک خط استفاده کنید. این تنظیم برای کل پاراگراف اعمال میشود و تراز در هر یک از خطوط آن را کنترل میکند.
مثال مستقل زیر چهار جعبه متن برچسبدار را در یک اسلاید ایجاد میکند. هر پاراگراف متن یکسانی با اندازههای ۱۸، ۳۶ و ۵۴ پوینت دارد که با تراز قلم مختلفی تنظیم شدهاند. از قلم Arial استفاده میکند، خودتنظیم و بسته شدن متن را غیرفعال میکند و قابهای متن را به اندازهای بزرگ میگذارد که یک خط را در خود جای دهد.
using System.Drawing;
using Aspose.Slides;
using Aspose.Slides.Export;

using var presentation = new Presentation();
var slide = presentation.Slides[0];

var alignments = new[] { FontAlignment.Baseline, FontAlignment.Top, FontAlignment.Center, FontAlignment.Bottom };
var fontSizes = new[] { 18f, 36f, 54f };

for (var i = 0; i < alignments.Length; i++)
{
    var shape = slide.Shapes.AddAutoShape(ShapeType.Rectangle, 30, 20 + i * 130, 660, 120);
    shape.FillFormat.FillType = FillType.NoFill;
    shape.LineFormat.FillFormat.FillType = FillType.NoFill;

    var textFrame = shape.TextFrame;
    textFrame.TextFrameFormat.AnchoringType = TextAnchorType.Top;
    textFrame.TextFrameFormat.AutofitType = TextAutofitType.None;
    textFrame.TextFrameFormat.WrapText = NullableBool.False;

    var label = textFrame.Paragraphs[0];
    label.Text = alignments[i].ToString();
    label.ParagraphFormat.Alignment = TextAlignment.Left;
    label.ParagraphFormat.DefaultPortionFormat.FontHeight = 14;
    label.ParagraphFormat.DefaultPortionFormat.LatinFont = new FontData("Arial");
    label.ParagraphFormat.DefaultPortionFormat.FillFormat.FillType = FillType.Solid;
    label.ParagraphFormat.DefaultPortionFormat.FillFormat.SolidFillColor.Color = Color.Gray;

    var paragraph = new Paragraph();
    paragraph.ParagraphFormat.FontAlignment = alignments[i];
    paragraph.ParagraphFormat.Alignment = TextAlignment.Left;
    paragraph.ParagraphFormat.DefaultPortionFormat.LatinFont = new FontData("Arial");
    paragraph.ParagraphFormat.DefaultPortionFormat.FillFormat.FillType = FillType.Solid;
    paragraph.ParagraphFormat.DefaultPortionFormat.FillFormat.SolidFillColor.Color = Color.Black;

    foreach (var fontSize in fontSizes)
    {
        var portion = new Portion("Ag ");
        portion.PortionFormat.FontHeight = fontSize;
        paragraph.Portions.Add(portion);
    }

    textFrame.Paragraphs.Add(paragraph);
}

presentation.Save("font_alignment.pptx", SaveFormat.Pptx);
نتیجه:
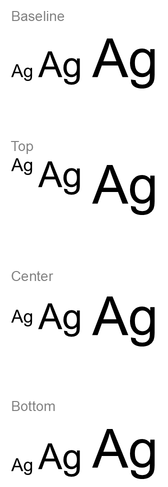
تراز قلم از متریکهای قلم استفاده میکند، بنابراین لبههای قابل مشاهده حروف جداگانه لزوماً دقیقاً همسطح نیستند. این مثال شامل یک حرف بزرگ و یک نویسه پایینرونده است تا تفاوت بین تراز پایه و تراز پایین نشان داده شود. در دسترس بودن قلم و جایگزینی آن، حروف استفاده شده و تفاوت در اندازههای قلم بر نتیجه تأثیر میگذارند. ابعاد قاب، حاشیهها، فاصله بین خطوط، بسته شدن متن و خودتنظیم نیز بر چیدمان اثر میگذارند؛ هنگام مقایسه حالتها از قلمها و تنظیمات چیدمان یکسان استفاده کنید.
این تنظیم متفاوت از IParagraphFormat.Alignment است که تراز افقی پاراگراف را کنترل میکند، و از ITextFrameFormat.AnchoringType که بلوک متن را به صورت عمودی داخل شکل موقعیت میدهد. قالببندی فوقنویس و زیرنویس از طریق IBasePortionFormat.Escapement قسمتهای فردی را نسبت به خط پایه جابجا میکند به جای تنظیم تراز قلم برای خطوط پاراگراف.
تنظیم شفافیت برای متن
شفافیت متن از طریق مؤلفه آلفای رنگ اختصاص داده شده به IBasePortionFormat.FillFormat کنترل میشود. در مثالهای زیر، alpha = 50 یک مقدار کانال آلفای ARGB در مقیاس ۰ تا ۲۵۵ است، نه درصد شفافیت.
مثال کد زیر نشان میدهد که چگونه شفافیت را به کل پاراگراف اعمال کنید:
using System.Drawing;
using Aspose.Slides;
using Aspose.Slides.Export;

var alpha = 50;

using var presentation = new Presentation("sample.pptx");
var slide = presentation.Slides[0];

var autoShape = (IAutoShape)slide.Shapes[0];
var paragraph = autoShape.TextFrame.Paragraphs[0];

// رنگ پرکننده مشکی نیمه شفاف برای متن تنظیم کنید.
paragraph.ParagraphFormat.DefaultPortionFormat.FillFormat.FillType = FillType.Solid;
paragraph.ParagraphFormat.DefaultPortionFormat.FillFormat.SolidFillColor.Color = Color.FromArgb(alpha, Color.Black);

presentation.Save("transparent_paragraph.pptx", SaveFormat.Pptx);
نتیجه:

مثال کد زیر نشان میدهد که چگونه شفافیت را به قسمتهای متنی با قلم بولد اعمال کنید:
using System.Drawing;
using Aspose.Slides;
using Aspose.Slides.Export;

var alpha = 50;

using var presentation = new Presentation("sample.pptx");
var slide = presentation.Slides[0];

var autoShape = (IAutoShape)slide.Shapes[0];
var paragraph = autoShape.TextFrame.Paragraphs[0];

foreach (var portion in paragraph.Portions)
{
    if (portion.PortionFormat.GetEffective().FontBold)
    {
        // شفافیت قسمت متن را تنظیم کنید.
        portion.PortionFormat.FillFormat.FillType = FillType.Solid;
        portion.PortionFormat.FillFormat.SolidFillColor.Color = Color.FromArgb(alpha, Color.Black);
    }
}

presentation.Save("transparent_text_portions.pptx", SaveFormat.Pptx);
نتیجه:

تنظیم فاصله بین حروف برای متن
از IBasePortionFormat.Spacing برای افزایش یا فشردهسازی فاصله بین حروف در یک جعبه متن استفاده کنید. در مثالها ۳ پوینت فاصله اضافه میشود؛ مقادیر منفی متن را فشرده میکنند.
کد C# زیر نشان میدهد که چگونه فاصله بین حروف را در کل پاراگراف گسترش دهید:
using Aspose.Slides;
using Aspose.Slides.Export;
using var presentation = new Presentation("sample.pptx");
var slide = presentation.Slides[0];
var autoShape = (IAutoShape)slide.Shapes[0];
var paragraph = autoShape.TextFrame.Paragraphs[0];
// نکته: برای فشردهکردن فاصله بین حروف از مقادیر منفی استفاده کنید.
paragraph.ParagraphFormat.DefaultPortionFormat.Spacing = 3; // فاصله بین حروف را گسترش دهید.
presentation.Save("character_spacing_in_paragraph.pptx", SaveFormat.Pptx);
نتیجه:

مثال کد زیر نشان میدهد که چگونه فاصله بین حروف را در قسمتهای متنی با قلم بولد گسترش دهید:
using Aspose.Slides;
using Aspose.Slides.Export;
using var presentation = new Presentation("sample.pptx");
var slide = presentation.Slides[0];
var autoShape = (IAutoShape)slide.Shapes[0];
var paragraph = autoShape.TextFrame.Paragraphs[0];
foreach (var portion in paragraph.Portions)
{
if (portion.PortionFormat.GetEffective().FontBold)
{
// نکته: برای فشردهکردن فاصله بین حروف از مقادیر منفی استفاده کنید.
portion.PortionFormat.Spacing = 3; // فاصله بین حروف را گسترش دهید.
}
}
presentation.Save("character_spacing_in_text_portions.pptx", SaveFormat.Pptx);
نتیجه:

غیرفعال کردن کرنینگ برای قلمهای خاص
در برخی موارد، متنی که توسط Aspose.Slides رندر میشود ممکن است کمی فشردهتر از همان متن در PowerPoint به نظر برسد. این میتواند به این دلیل باشد که PowerPoint ممکن است دادههای کرنینگ را برای برخی قلمها نادیده بگیرد، حتی اگر قلم دارای اطلاعات کرنینگ معتبر باشد و کرنینگ در تنظیمات PowerPoint فعال باشد.
برای نزدیکتر کردن خروجی رندر شده به PowerPoint در این موارد، میتوانید کرنینگ را برای قسمتهای متنی که از قلم مورد نظر استفاده میکنند غیرفعال کنید. مقدار IBasePortionFormat.KerningMinimalSize را بزرگتر از اندازه واقعی قلم تنظیم کنید. این مثال نیاز به «presentation.pptx» دارد که یک جعبه متن بهعنوان اولین شکل در اولین اسلاید داشته باشد. این مثال نامهای قلم مؤثر، از جمله قلمهای ارثبرده را بررسی میکند و آستانه ۱۰۰ پوینت برای قسمتهایی که از Roboto استفاده میکنند تنظیم مینماید. این کار کرنینگ را برای قسمتهای مطابق با اندازه قلم زیر ۱۰۰ پوینت غیرفعال میکند:
using Aspose.Slides;
using Aspose.Slides.Export;

using var presentation = new Presentation("presentation.pptx");
var slide = presentation.Slides[0];

var autoShape = (IAutoShape)slide.Shapes[0];
var targetFont = "Roboto";

foreach (var paragraph in autoShape.TextFrame.Paragraphs)
{
    foreach (var portion in paragraph.Portions)
    {
        var textFormat = portion.PortionFormat.GetEffective();

        var usesTargetFont = textFormat.LatinFont?.FontName == targetFont ||
            textFormat.EastAsianFont?.FontName == targetFont ||
            textFormat.ComplexScriptFont?.FontName == targetFont;

        if (usesTargetFont)
        {
            portion.PortionFormat.KerningMinimalSize = 100;
        }
    }
}

presentation.Save("output.pptx", SaveFormat.Pptx);
برای متنی که زیر آستانه باشد، این تنظیم از کرنینگ جلوگیری میکند و میتواند به همراستایی رندر Aspose.Slides با خروجی بصری PowerPoint برای قلمهای تحت تأثیر این رفتار خاص PowerPoint کمک کند.
مدیریت ویژگیهای فونت متن
ویژگیهای قلم میتوانند در سطح پاراگراف از طریق IParagraphFormat.DefaultPortionFormat یا در قسمتهای جداگانه از طریق IPortionFormat تنظیم شوند.
مثال زیر قلم پیشفرض اولین پاراگراف را به Times New Roman ۱۲ پوینت با قالببندی بولد، ایتالیک و خط زیر نقطهدار تنظیم میکند. قالببندی صریح در قسمتهای جداگانه بر این پیشفرضها ارجحیت دارد:
using Aspose.Slides;
using Aspose.Slides.Export;
using var presentation = new Presentation("sample.pptx");
var slide = presentation.Slides[0];
var autoShape = (IAutoShape)slide.Shapes[0];
var paragraph = autoShape.TextFrame.Paragraphs[0];
// قالببندی قلم را برای پاراگراف تنظیم کنید.
var portionFormat = paragraph.ParagraphFormat.DefaultPortionFormat;
portionFormat.FontHeight = 12;
portionFormat.FontBold = NullableBool.True;
portionFormat.FontItalic = NullableBool.True;
portionFormat.FontUnderline = TextUnderlineType.Dotted;
portionFormat.LatinFont = new FontData("Times New Roman");
presentation.Save("font_properties_for_paragraph.pptx", SaveFormat.Pptx);
نتیجه:

مثال زیر Times New Roman ۱۳ پوینت، قالببندی ایتالیک و خط زیر نقطهدار را به قسمتهایی که قالببندی مؤثر آنها بولد است اعمال میکند:
using Aspose.Slides;
using Aspose.Slides.Export;
using var presentation = new Presentation("sample.pptx");
var slide = presentation.Slides[0];
var autoShape = (IAutoShape)slide.Shapes[0];
var paragraph = autoShape.TextFrame.Paragraphs[0];
foreach (var portion in paragraph.Portions)
{
if (portion.PortionFormat.GetEffective().FontBold)
{
// قالببندی قلم را برای قسمت متن تنظیم کنید.
portion.PortionFormat.FontHeight = 13;
portion.PortionFormat.FontItalic = NullableBool.True;
portion.PortionFormat.FontUnderline = TextUnderlineType.Dotted;
portion.PortionFormat.LatinFont = new FontData("Times New Roman");
}
}
presentation.Save("font_properties_for_text_portions.pptx", SaveFormat.Pptx);
نتیجه:

تنظیم چرخش متن
از ITextFrameFormat.TextVerticalType برای تنظیم یک جهتیابی متنی از پیش تعریفشده در داخل یک شکل استفاده کنید.
مثال کد زیر جهت متن را در شکل به TextVerticalType.Vertical270 تنظیم میکند که متن را ۹۰ درجه مخالف جهت عقربههای ساعت میچرخاند:
using Aspose.Slides;
using Aspose.Slides.Export;

using var presentation = new Presentation("sample.pptx");
var slide = presentation.Slides[0];

var autoShape = (IAutoShape)slide.Shapes[0];
autoShape.TextFrame.TextFrameFormat.TextVerticalType = TextVerticalType.Vertical270;

presentation.Save("text_rotation.pptx", SaveFormat.Pptx);
نتیجه:

تنظیم چرخش سفارشی برای قابهای متنی
از ITextFrameFormat.RotationAngle برای تنظیم یک زاویه چرخش سفارشی برای یک ITextFrame استفاده کنید.
مثال کد زیر قاب متن را به میزان ۳ درجه در جهت ساعت در داخل شکل میچرخاند:
using Aspose.Slides;
using Aspose.Slides.Export;

using var presentation = new Presentation("sample.pptx");
var slide = presentation.Slides[0];

var autoShape = (IAutoShape)slide.Shapes[0];
autoShape.TextFrame.TextFrameFormat.RotationAngle = 3;

presentation.Save("custom_text_rotation.pptx", SaveFormat.Pptx);
نتیجه:

تنظیم فاصله خط پاراگرافها
Aspose.Slides IParagraphFormat.SpaceAfter، IParagraphFormat.SpaceBefore و IParagraphFormat.SpaceWithin را برای کنترل فاصله پاراگراف ارائه میدهد. این ویژگیها به صورت زیر استفاده میشوند:
- از مقدار مثبت برای تعیین فاصله خط به صورت درصدی از ارتفاع خط استفاده کنید.
- از مقدار منفی برای تعیین فاصله خط به پوینت استفاده کنید.
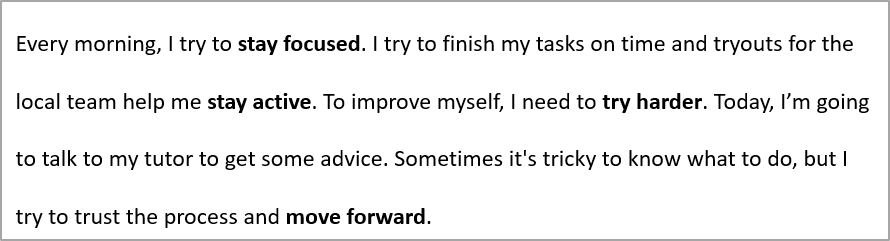
مثال زیر فاصله داخل اولین پاراگراف را به ۲۰۰٪ از ارتفاع خط (دو برابر) تنظیم میکند:
using Aspose.Slides;
using Aspose.Slides.Export;

using var presentation = new Presentation("sample.pptx");
var slide = presentation.Slides[0];

var autoShape = (IAutoShape)slide.Shapes[0];
var paragraph = autoShape.TextFrame.Paragraphs[0];

paragraph.ParagraphFormat.SpaceWithin = 200;

presentation.Save("line_spacing.pptx", SaveFormat.Pptx);
نتیجه:
کنترل شکستن خط
قواعد شکستن خط پاراگراف در بلوکهای متنی باریک و ارائههایی که متن لاتین و شرق آسیایی ترکیب میشوند مفید هستند. ویژگیهای زیر متعلق به IParagraphFormat هستند، بنابراین بر کل پاراگراف اعمال میشوند:
- LatinLineBreak قوانین شکستن خط لاتین را کنترل میکند. در متن ترکیبی، تغییر آن میتواند مکان بسته شدن متن و نقطهگذاری شرق آسیایی مجاور را نیز تغییر دهد.
- EastAsianLineBreak قوانین شکستن خط شرق آسیایی را کنترل میکند، از جمله محدودیتهای حروف در ابتدا و انتهای خط.
این قواعد جایگزین ITextFrameFormat.WrapText نمیشوند، که بسته شدن خودکار داخل یک قاب متن را فعال میسازد. این قواعد هنگام بسته شدن بر چیدمان تأثیر میگذارند؛ آنها کاراکترهای شکستن خطی را وارد نمیکنند. یک شکستن خط صریح، یک خط جدید را در داخل پاراگراف بدون توجه به عرض موجود ایجاد میکند.
مثال مستقل زیر یک بلوک متن باریک شامل متن چینی و لاتین ایجاد میکند. هر دو ویژگی شکستن خط را بهصورت صریح تنظیم میکند و «line_breaking.pptx» را ذخیره مینماید. برای آزمایش هر یک از قواعد، مقدار آن ویژگی را تغییر دهید در حالی که تنظیمات دیگر ثابت میمانند. مثال از Arial ۲۴ پوینت و SimSun با عرض قاب ۱۶۰ پوینت و حاشیه افقی صفر استفاده میکند. مقدار ITextFrameFormat.AutofitType به TextAutofitType.None تنظیم شده است تا اندازه متن و ابعاد قاب ثابت بمانند.
using System.Drawing;
using Aspose.Slides;
using Aspose.Slides.Export;

using var presentation = new Presentation();
var slide = presentation.Slides[0];

var shape = slide.Shapes.AddAutoShape(ShapeType.Rectangle, 50, 50, 160, 300);
shape.FillFormat.FillType = FillType.NoFill;

var textFrame = shape.TextFrame;
textFrame.TextFrameFormat.WrapText = NullableBool.True;
textFrame.TextFrameFormat.AutofitType = TextAutofitType.None;
textFrame.TextFrameFormat.MarginLeft = 0;
textFrame.TextFrameFormat.MarginRight = 0;

var paragraph = textFrame.Paragraphs[0];
paragraph.Text = "中文排版测试,PowerPoint 中文演示。";

var format = paragraph.ParagraphFormat;
format.Alignment = TextAlignment.Left;
format.DefaultPortionFormat.FontHeight = 24;
format.DefaultPortionFormat.LatinFont = new FontData("Arial");
format.DefaultPortionFormat.EastAsianFont = new FontData("SimSun");
format.DefaultPortionFormat.FillFormat.FillType = FillType.Solid;
format.DefaultPortionFormat.FillFormat.SolidFillColor.Color = Color.Black;
format.LatinLineBreak = NullableBool.False;
format.EastAsianLineBreak = NullableBool.True;

presentation.Save("line_breaking.pptx", SaveFormat.Pptx);
کنترل نقطهگذاری معلق
IParagraphFormat.HangingPunctuation به نقطهگذاریهای مجاز امکان میدهد تا از لبه راست خط متن فراتر روند بهجای اینکه در خط بعدی قرار بگیرند. این تنظیم برای کل پاراگراف اعمال میشود و متفاوت از تورفتگی معلق است.
مثال مستقل زیر نقطهگذاری معلق را در یک قاب متن با عرض ۱۰۰ پوینت فعال میکند و «hanging_punctuation.pptx» را ذخیره مینماید. با Arial ۲۴ پوینت و حاشیه افقی صفر، نقطهی نهایی پس از «جمله» میماند و از لبه راست متن فراتر میرود. برای مقایسه مقدار ویژگی را به NullableBool.False تنظیم کنید: با این تنظیمات، نقطه یک خط جداگانه را اشغال میکند. بسته شدن فعال و خودتنظیم غیرفعال است تا عرض موجود ثابت بماند.
using System.Drawing;
using Aspose.Slides;
using Aspose.Slides.Export;

using var presentation = new Presentation();
var slide = presentation.Slides[0];

var shape = slide.Shapes.AddAutoShape(ShapeType.Rectangle, 50, 50, 100, 200);
shape.FillFormat.FillType = FillType.NoFill;

var textFrame = shape.TextFrame;
textFrame.TextFrameFormat.WrapText = NullableBool.True;
textFrame.TextFrameFormat.AutofitType = TextAutofitType.None;
textFrame.TextFrameFormat.MarginLeft = 0;
textFrame.TextFrameFormat.MarginRight = 0;

var paragraph = textFrame.Paragraphs[0];
paragraph.Text = "Simple text, next sentence.";

var format = paragraph.ParagraphFormat;
format.Alignment = TextAlignment.Left;
format.DefaultPortionFormat.FontHeight = 24;
format.DefaultPortionFormat.LatinFont = new FontData("Arial");
format.DefaultPortionFormat.FillFormat.FillType = FillType.Solid;
format.DefaultPortionFormat.FillFormat.SolidFillColor.Color = Color.Black;
format.HangingPunctuation = NullableBool.True;

presentation.Save("hanging_punctuation.pptx", SaveFormat.Pptx);
هر نقطهگذاریای نمیتواند معلق باشد. شرایط قلم و چیدمان توضیح دادهشده در بالا نیز در این مقایسه اعمال میشود: تغییر قلم، عرض موجود، حاشیهها یا تنظیمات خودتنظیم میتواند تفاوت قابل مشاهده را از بین ببرد.
تنظیم نوع خودتنظیم برای قابهای متنی
ITextFrameFormat.AutofitType تعیین میکند که متن وقتی از مرزهای محفظه خود فراتر میرود چگونه رفتار کند. از آن برای کنترل اینکه آیا متن کوچک شود، overflow کند یا بهطور خودکار شکل را تغییر اندازه دهد استفاده کنید. مثال زیر شکل را طوری پیکربندی میکند که برای متن خود تغییر اندازه دهد و نتیجه را در «autofit_type.pptx» ذخیره میکند.
using Aspose.Slides;
using Aspose.Slides.Export;

using var presentation = new Presentation("sample.pptx");
var slide = presentation.Slides[0];

var autoShape = (IAutoShape)slide.Shapes[0];
autoShape.TextFrame.TextFrameFormat.AutofitType = TextAutofitType.Shape;

presentation.Save("autofit_type.pptx", SaveFormat.Pptx);
برای شمارش خطوط پس از بسته شدن خودکار و مشاهده اینکه چگونه عرض متن یا شکل نتیجه را تغییر میدهد، به Count Rendered Lines مراجعه کنید. تنها شمارش خطوط نشان نمیدهد که متن از محفظه خود overflow میکند یا نه.
تنظیم لنگر قابهای متنی
ITextFrameFormat.AnchoringType تعیین میکند که متن بهصورت عمودی داخل یک شکل چگونه موقعیتیابی شود، برای مثال در بالا، وسط یا پایین. مثال زیر متن را به پایین اولین شکل لنگر میدهد و نتیجه را در «text_anchor.pptx» ذخیره میکند.
using Aspose.Slides;
using Aspose.Slides.Export;

using var presentation = new Presentation("sample.pptx");
var slide = presentation.Slides[0];

var autoShape = (IAutoShape)slide.Shapes[0];
autoShape.TextFrame.TextFrameFormat.AnchoringType = TextAnchorType.Bottom;

presentation.Save("text_anchor.pptx", SaveFormat.Pptx);
تنظیم تببندی متن
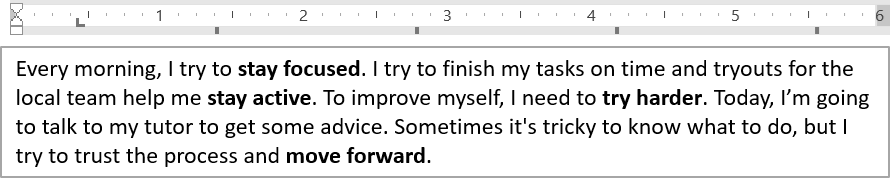
از IParagraphFormat.DefaultTabSize و IParagraphFormat.Tabs برای پیکربندی توقفهای تب در یک پاراگراف استفاده کنید. مثال زیر فاصله تب پیشفرض را به ۱۰۰ پوینت تنظیم میکند و یک توقف تب چپچین در ۳۰ پوینت اضافه میکند. این تنظیمات بر متنی که شامل کاراکترهای تب است، تأثیر میگذارد.
using Aspose.Slides;
using Aspose.Slides.Export;

using var presentation = new Presentation("sample.pptx");
var slide = presentation.Slides[0];

var autoShape = (IAutoShape)slide.Shapes[0];
var paragraph = autoShape.TextFrame.Paragraphs[0];
paragraph.ParagraphFormat.DefaultTabSize = 100;
paragraph.ParagraphFormat.Tabs.Add(30, TabAlignment.Left);

presentation.Save("paragraph_tabs.pptx", SaveFormat.Pptx);
نتیجه:
تنظیم زبان بررسی
Aspose.Slides IBasePortionFormat.LanguageId را فراهم میکند که به شما امکان میدهد زبان بررسی (proofing) برای یک قسمت متن را تنظیم کنید. زبان بررسی تعیین میکند که برای بررسی املایی و گرامری در PowerPoint از چه زبانی استفاده شود.
مثال زیر نیاز به «presentation.pptx» دارد که یک جعبه متن بهعنوان اولین شکل در اولین اسلاید و حداقل یک پاراگراف داشته باشد. این مثال محتویات اولین پاراگراف را به «1。」» تغییر میدهد، قلم SimSun را تنظیم میکند و زبان بررسی چینی ساده (zh-CN) را اختصاص میدهد. سپس نتیجه را در «proofing_language.pptx» ذخیره میکند:
using Aspose.Slides;
using Aspose.Slides.Export;

using var presentation = new Presentation("presentation.pptx");
var slide = presentation.Slides[0];

var autoShape = (IAutoShape)slide.Shapes[0];
var paragraph = autoShape.TextFrame.Paragraphs[0];
paragraph.Portions.Clear();

var font = new FontData("SimSun");

var textPortion = new Portion();
textPortion.PortionFormat.ComplexScriptFont = font;
textPortion.PortionFormat.EastAsianFont = font;
textPortion.PortionFormat.LatinFont = font;

// زبان بررسی را به چینی ساده تنظیم کنید.
textPortion.PortionFormat.LanguageId = "zh-CN";

textPortion.Text = "1。";
paragraph.Portions.Add(textPortion);

presentation.Save("proofing_language.pptx", SaveFormat.Pptx);
تنظیم زبان پیشفرض
از LoadOptions.DefaultTextLanguage برای تعریف زبان پیشفرض متنی که هنگام بارگذاری یا ایجاد یک ارائه ساخته میشود استفاده کنید. مثال زیر یک ارائه با زبان متن پیشفرض انگلیسی ایالات متحده ایجاد میکند، یک جعبه متن اضافه میکند و برای اولین قسمت متن آن en-US را چاپ میکند.
using System;
using Aspose.Slides;

var loadOptions = new LoadOptions();
loadOptions.DefaultTextLanguage = "en-US";

using var presentation = new Presentation(loadOptions);
var slide = presentation.Slides[0];

// یک شکل مستطیل جدید با متن اضافه کنید.
var shape = slide.Shapes.AddAutoShape(ShapeType.Rectangle, 20, 20, 150, 50);
shape.TextFrame.Text = "Sample text";

// زبان اولین قسمت را بررسی کنید.
var portion = shape.TextFrame.Paragraphs[0].Portions[0];
Console.WriteLine(portion.PortionFormat.LanguageId);
تنظیم سبک پیشفرض متن
برای اعمال قالببندی پیشفرض متن در سطح ارائه، از IPresentation.DefaultTextStyle استفاده کنید.
مثال زیر قلم بولد ۱۴ پوینت را بهعنوان پیشفرض برای پاراگرافهای سطح بالایی در یک ارائه جدید تنظیم میکند و آن را در «default_text_style.pptx» ذخیره مینماید. متن میتواند این پیشفرضها را به ارث ببرد مگر اینکه قالببندی خاصتری آنها را لغو کند.
using Aspose.Slides;
using Aspose.Slides.Export;

using var presentation = new Presentation();
// دریافت قالب پاراگراف سطح بالایی.
var paragraphFormat = presentation.DefaultTextStyle.GetLevel(0);

if (paragraphFormat != null)
{
    paragraphFormat.DefaultPortionFormat.FontHeight = 14;
    paragraphFormat.DefaultPortionFormat.FontBold = NullableBool.True;
}

presentation.Save("default_text_style.pptx", SaveFormat.Pptx);
استخراج متن با اثر تمام حروف بزرگ
در PowerPoint، اعمال اثر قلم All Caps باعث میشود متن بر روی اسلاید به صورت حروف بزرگ نمایش داده شود حتی اگر ابتدا با حروف کوچک وارد شده باشد. وقتی چنین بخشی از متن را با Aspose.Slides بازیابی میکنید، کتابخانه متن را دقیقاً همانگونه که وارد شده بود برمیگرداند. برای تطبیق با متن نمایش دادهشده، TextCapType را بررسی کرده و وقتی مقدار All باشد، رشته برگرداندهشده را به حروف بزرگ تبدیل کنید.
این مثال نیاز به «sample2.pptx» دارد که یک جعبه متن بهعنوان اولین شکل در اولین اسلاید داشته باشد. اولین قسمت اولین پاراگراف آن شامل «Hello, Aspose!» با اثر All Caps اعمالشده است، همانطور که در زیر نشان داده شده:
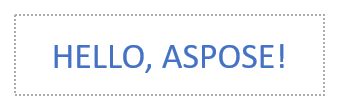
مثال کد زیر نشان میدهد که چگونه متن را با اثر All Caps استخراج کنید:
using System;
using Aspose.Slides;

using var presentation = new Presentation("sample2.pptx");
var slide = presentation.Slides[0];

var autoShape = (IAutoShape)slide.Shapes[0];
var textPortion = autoShape.TextFrame.Paragraphs[0].Portions[0];

Console.WriteLine($"Original text: {textPortion.Text}");

var textFormat = textPortion.PortionFormat.GetEffective();
if (textFormat.TextCapType == TextCapType.All)
{
    var text = textPortion.Text.ToUpper();
    Console.WriteLine($"All-Caps effect: {text}");
}
Output:
Original text: Hello, Aspose!
All-Caps effect: HELLO, ASPOSE!
سوالات متداول
چگونه میتوان متن در یک جدول روی اسلاید را اصلاح کرد؟
برای اصلاح متن در یک جدول روی اسلاید، از ITable استفاده کنید. در سلولها پیمایش کنید و هر سلول را از طریق ICell.TextFrame و قالببندی پاراگراف از طریق IParagraph.ParagraphFormat بهروزرسانی کنید.
چگونه میتوان رنگ گرادیان را به متن روی اسلاید PowerPoint اعمال کرد؟
برای اعمال رنگ گرادیان به متن، از IBasePortionFormat.FillFormat استفاده کنید. مقدار IFillFormat.FillType را به FillType.Gradient تنظیم کنید و نقاط توقف گرادیان، جهت و شفافیت را پیکربندی کنید.