
จัดรูปแบบข้อความการนำเสนอใน .NET
ภาพรวม
บทความนี้แสดงวิธีจัดรูปแบบข้อความในงานนำเสนอ PowerPoint และ OpenDocument โดยใช้ Aspose.Slides สำหรับ .NET รวมถึงสีพื้นหลัง, ความโปร่งใส, ระยะห่างระหว่างอักขระ, คุณสมบัติการ์ต, การหมุน, ระยะห่างระหว่างย่อหน้า, พฤติกรรม autofit, การยึดข้อความ, จุดหยุดแท็บ, และการตั้งค่าภาษา
หากไม่ได้ระบุเป็นอย่างอื่น ตัวอย่างจะใช้ sample.pptx พารากราฟแรกของสไลด์แรกเป็นกล่องข้อความ และพารากราฟแรกของมันมีข้อความที่แสดงด้านล่าง ดัชนีของสไลด์และรูปร่างเริ่มจากศูนย์ ตัวอย่างที่เลือกส่วนที่เป็นตัวหนาจะใช้การจัดรูปแบบที่มีผล รวมถึงการจัดรูปแบบตัวหนาที่สืบทอดมาด้วย:

เพื่อค้นหาและไฮไลท์ข้อความตัวอักษรหรือตรงกับการจับคู่แบบ regular-expression ให้ดูที่ ค้นหาและแทนที่ข้อความ
ตั้งค่าสีพื้นหลังของข้อความ
ใช้ IParagraphFormat.DefaultPortionFormat เพื่อกำหนดสีไฮไลท์เริ่มต้นสำหรับย่อหน้า หรือใช้ IBasePortionFormat.HighlightColor สำหรับส่วนข้อความแต่ละส่วน
ตัวอย่างต่อไปนี้ตั้งค่าสีไฮไลท์สีเทาอ่อนเป็นค่าเริ่มต้นสำหรับย่อหน้าแรก สีไฮไลท์ที่ระบุโดยตรงในส่วนแต่ละส่วนจะมีลำดับความสำคัญเหนือค่านี้:
using System.Drawing;
using Aspose.Slides;
using Aspose.Slides.Export;

using var presentation = new Presentation("sample.pptx");
var slide = presentation.Slides[0];

var autoShape = (IAutoShape)slide.Shapes[0];
var paragraph = autoShape.TextFrame.Paragraphs[0];

// ตั้งค่าสีไฮไลท์สำหรับย่อหน้าทั้งหมด.
paragraph.ParagraphFormat.DefaultPortionFormat.HighlightColor.Color = Color.LightGray;

presentation.Save("gray_paragraph.pptx", SaveFormat.Pptx);
ผลลัพธ์:

ตัวอย่างโค้ดด้านล่างแสดงวิธีตั้งค่าสีพื้นหลังสำหรับ ส่วนข้อความที่มีแบบอักษรตัวหนา:
using System.Drawing;
using Aspose.Slides;
using Aspose.Slides.Export;

using var presentation = new Presentation("sample.pptx");
var slide = presentation.Slides[0];

var autoShape = (IAutoShape)slide.Shapes[0];
var paragraph = autoShape.TextFrame.Paragraphs[0];

foreach (var portion in paragraph.Portions)
{
    if (portion.PortionFormat.GetEffective().FontBold)
    {
        // ตั้งค่าสีไฮไลท์สำหรับส่วนข้อความ.
        portion.PortionFormat.HighlightColor.Color = Color.LightGray;
    }
}

presentation.Save("gray_text_portions.pptx", SaveFormat.Pptx);
ผลลัพธ์:

จัดแนวย่อหน้าข้อความ
ใช้ IParagraphFormat.Alignment เพื่อกำหนดการจัดแนวย่อหน้าในกรอบข้อความ ค่าอาจเป็นการจัดกึ่งกลาง, จัดซ้าย, จัดขวา, จัดชิดขอบ, เป็นต้น
ตัวอย่างโค้ดต่อไปนี้แสดงวิธีจัดแนวย่อหน้าไปที่ กึ่งกลาง:
using Aspose.Slides;
using Aspose.Slides.Export;

using var presentation = new Presentation("sample.pptx");
var slide = presentation.Slides[0];

var autoShape = (IAutoShape)slide.Shapes[0];
var paragraph = autoShape.TextFrame.Paragraphs[0];

// ตั้งค่าการจัดแนวของย่อหน้าเป็นกึ่งกลาง.
paragraph.ParagraphFormat.Alignment = TextAlignment.Center;

presentation.Save("aligned_paragraph.pptx", SaveFormat.Pptx);
ผลลัพธ์:

จัดแนวฟอนต์ภายในบรรทัด
ใช้ IParagraphFormat.FontAlignment เพื่อจัดแนวแนวตั้งของส่วนข้อความที่มีขนาดฟอนต์ต่างกันภายในบรรทัด การตั้งค่านี้ใช้กับย่อหน้าทั้งหมดและกำหนดการจัดแนวภายในแต่ละบรรทัดของมัน
ตัวอย่างอิสระต่อไปนี้สร้างกล่องข้อความที่มีป้ายกำกับสี่อันบนสไลด์เดียว แต่ละย่อหน้ามีข้อความเดียวกันที่ขนาด 18, 36, และ 54 จุด พร้อมการจัดแนวฟอนต์ที่ต่างกัน ใช้ Arial ปิดการทำ autofit และการห่อข้อความ และทำให้กรอบข้อความใหญ่พอสำหรับบรรทัดเดียว
using System.Drawing;
using Aspose.Slides;
using Aspose.Slides.Export;

using var presentation = new Presentation();
var slide = presentation.Slides[0];

var alignments = new[] { FontAlignment.Baseline, FontAlignment.Top, FontAlignment.Center, FontAlignment.Bottom };
var fontSizes = new[] { 18f, 36f, 54f };

for (var i = 0; i < alignments.Length; i++)
{
    var shape = slide.Shapes.AddAutoShape(ShapeType.Rectangle, 30, 20 + i * 130, 660, 120);
    shape.FillFormat.FillType = FillType.NoFill;
    shape.LineFormat.FillFormat.FillType = FillType.NoFill;

    var textFrame = shape.TextFrame;
    textFrame.TextFrameFormat.AnchoringType = TextAnchorType.Top;
    textFrame.TextFrameFormat.AutofitType = TextAutofitType.None;
    textFrame.TextFrameFormat.WrapText = NullableBool.False;

    var label = textFrame.Paragraphs[0];
    label.Text = alignments[i].ToString();
    label.ParagraphFormat.Alignment = TextAlignment.Left;
    label.ParagraphFormat.DefaultPortionFormat.FontHeight = 14;
    label.ParagraphFormat.DefaultPortionFormat.LatinFont = new FontData("Arial");
    label.ParagraphFormat.DefaultPortionFormat.FillFormat.FillType = FillType.Solid;
    label.ParagraphFormat.DefaultPortionFormat.FillFormat.SolidFillColor.Color = Color.Gray;

    var paragraph = new Paragraph();
    paragraph.ParagraphFormat.FontAlignment = alignments[i];
    paragraph.ParagraphFormat.Alignment = TextAlignment.Left;
    paragraph.ParagraphFormat.DefaultPortionFormat.LatinFont = new FontData("Arial");
    paragraph.ParagraphFormat.DefaultPortionFormat.FillFormat.FillType = FillType.Solid;
    paragraph.ParagraphFormat.DefaultPortionFormat.FillFormat.SolidFillColor.Color = Color.Black;

    foreach (var fontSize in fontSizes)
    {
        var portion = new Portion("Ag ");
        portion.PortionFormat.FontHeight = fontSize;
        paragraph.Portions.Add(portion);
    }

    textFrame.Paragraphs.Add(paragraph);
}

presentation.Save("font_alignment.pptx", SaveFormat.Pptx);
ผลลัพธ์:
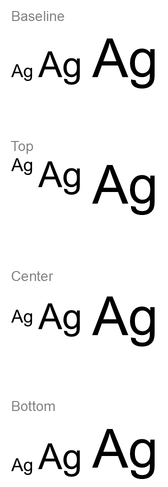
การจัดแนวฟอนต์ใช้เมตริกฟอนต์ ดังนั้นขอบของแต่ละอักษรอาจไม่ได้เสมอเท่ากัน ตัวอย่างรวมอักษรพิมพ์ใหญ่และตัวหางเพื่อแสดงความแตกต่างระหว่างการจัดแนว baseline กับ bottom การใช้ฟอนต์และการทดแทน, อักขระที่ใช้, และความต่างของขนาดฟอนต์ส่งผลต่อผลลัพธ์ ขนาดกรอบ, ระยะขอบ, ระยะห่างบรรทัด, การห่อและ autofit ก็มีผลต่อการจัดวาง; ควรใช้ฟอนต์และการตั้งค่าเลเอาต์เดียวกันเมื่อเปรียบเทียบโหมดต่าง ๆ
การตั้งค่านี้แตกต่างจาก IParagraphFormat.Alignment ที่ควบคุมการจัดแนวแนวนอนของย่อหน้า, และ ITextFrameFormat.AnchoringType ที่วางบล็อกข้อความในแนวตั้งภายในรูปร่าง การจัดรูปแบบ superscript และ subscript ผ่าน IBasePortionFormat.Escapement จะย้ายส่วนแต่ละส่วนสัมพันธ์กับ baseline แทนการตั้งค่าการจัดแนวฟอนต์สำหรับบรรทัดของย่อหน้า
ตั้งค่าความโปร่งใสสำหรับข้อความ
ความโปร่งใสของข้อความถูกควบคุมผ่านส่วนประกอบอัลฟาของสีที่กำหนดให้กับ IBasePortionFormat.FillFormat. ในตัวอย่างด้านล่าง alpha = 50 คือค่าแชนแนลอัลฟา ARGB ในช่วง 0–255 ไม่ใช่เปอร์เซ็นต์ความโปร่งใส
ตัวอย่างโค้ดด้านล่างแสดงวิธีใช้ความโปร่งใสกับ ย่อหน้าทั้งหมด:
using System.Drawing;
using Aspose.Slides;
using Aspose.Slides.Export;

var alpha = 50;

using var presentation = new Presentation("sample.pptx");
var slide = presentation.Slides[0];

var autoShape = (IAutoShape)slide.Shapes[0];
var paragraph = autoShape.TextFrame.Paragraphs[0];

// ตั้งค่าการเติมสีดำกึ่งโปร่งใสสำหรับข้อความ.
paragraph.ParagraphFormat.DefaultPortionFormat.FillFormat.FillType = FillType.Solid;
paragraph.ParagraphFormat.DefaultPortionFormat.FillFormat.SolidFillColor.Color = Color.FromArgb(alpha, Color.Black);

presentation.Save("transparent_paragraph.pptx", SaveFormat.Pptx);
ผลลัพธ์:

ตัวอย่างโค้ดต่อไปนี้แสดงวิธีใช้ความโปร่งใสกับ ส่วนข้อความที่มีแบบอักษรตัวหนา:
using System.Drawing;
using Aspose.Slides;
using Aspose.Slides.Export;

var alpha = 50;

using var presentation = new Presentation("sample.pptx");
var slide = presentation.Slides[0];

var autoShape = (IAutoShape)slide.Shapes[0];
var paragraph = autoShape.TextFrame.Paragraphs[0];

foreach (var portion in paragraph.Portions)
{
    if (portion.PortionFormat.GetEffective().FontBold)
    {
        // ตั้งค่าความโปร่งใสของส่วนข้อความ.
        portion.PortionFormat.FillFormat.FillType = FillType.Solid;
        portion.PortionFormat.FillFormat.SolidFillColor.Color = Color.FromArgb(alpha, Color.Black);
    }
}

presentation.Save("transparent_text_portions.pptx", SaveFormat.Pptx);
ผลลัพธ์:

ตั้งค่าระยะห่างอักขระสำหรับข้อความ
ใช้ IBasePortionFormat.Spacing เพื่อขยายหรือบีบระยะห่างระหว่างอักขระในกล่องข้อความ ตัวอย่างเพิ่มระยะห่าง 3 จุด; ค่าติดลบจะบีบข้อความ
โค้ด C# ด้านล่างแสดงวิธีขยายระยะห่างอักขระใน ย่อหน้าทั้งหมด:
using Aspose.Slides;
using Aspose.Slides.Export;

using var presentation = new Presentation("sample.pptx");
var slide = presentation.Slides[0];

var autoShape = (IAutoShape)slide.Shapes[0];
var paragraph = autoShape.TextFrame.Paragraphs[0];

// หมายเหตุ: ใช้ค่าติดลบเพื่อบีบอักขระให้แคบลง.
paragraph.ParagraphFormat.DefaultPortionFormat.Spacing = 3;  // ขยายระยะห่างอักขระ.

presentation.Save("character_spacing_in_paragraph.pptx", SaveFormat.Pptx);
ผลลัพธ์:

ตัวอย่างโค้ดด้านล่างแสดงวิธีขยายระยะห่างอักขระใน ส่วนข้อความที่มีแบบอักษรตัวหนา:
using Aspose.Slides;
using Aspose.Slides.Export;

using var presentation = new Presentation("sample.pptx");
var slide = presentation.Slides[0];

var autoShape = (IAutoShape)slide.Shapes[0];
var paragraph = autoShape.TextFrame.Paragraphs[0];

foreach (var portion in paragraph.Portions)
{
    if (portion.PortionFormat.GetEffective().FontBold)
    {
        // หมายเหตุ: ใช้ค่าติดลบเพื่อบีบระยะห่างอักขระให้แคบลง.
        portion.PortionFormat.Spacing = 3;  // ขยายระยะห่างอักขระ.
    }
}

presentation.Save("character_spacing_in_text_portions.pptx", SaveFormat.Pptx);
ผลลัพธ์:

ปิดการ Kerning สำหรับฟอนต์เฉพาะ
ในบางกรณีข้อความที่แสดงโดย Aspose.Slides อาจดูแคบกว่าข้อความเดียวกันที่แสดงใน PowerPoint นี่อาจเกิดจาก PowerPoint เพิกเฉยต่อข้อมูล kerning สำหรับฟอนต์บางตัว แม้ฟอนต์นั้นจะมีข้อมูล kerning ที่ถูกต้องและเปิดใช้งาน kerning ในการตั้งค่า PowerPoint
เพื่อให้ผลลัพธ์ที่แสดงใกล้เคียงกับ PowerPoint มากขึ้น คุณสามารถปิดการ kerning สำหรับส่วนข้อความที่ใช้ฟอนต์ที่ได้รับผลกระทบ ตั้งค่า IBasePortionFormat.KerningMinimalSize เป็นค่าที่มากกว่าขนาดฟอนต์จริง ตัวอย่างนี้ต้องการไฟล์ “presentation.pptx” ที่มีกล่องข้อความเป็นรูปร่างแรกบนสไลด์แรก ตรวจสอบชื่อฟอนต์ที่มีผลรวมถึงฟอนต์ที่สืบทอด และตั้งค่าขีดจำกัดที่ 100 จุดสำหรับส่วนที่ใช้ Roboto นี้จะปิดการ kerning สำหรับส่วนที่ใช้ฟอนต์ขนาดต่ำกว่า 100 จุด:
using Aspose.Slides;
using Aspose.Slides.Export;

using var presentation = new Presentation("presentation.pptx");
var slide = presentation.Slides[0];

var autoShape = (IAutoShape)slide.Shapes[0];
var targetFont = "Roboto";

foreach (var paragraph in autoShape.TextFrame.Paragraphs)
{
    foreach (var portion in paragraph.Portions)
    {
        var textFormat = portion.PortionFormat.GetEffective();

        var usesTargetFont = textFormat.LatinFont?.FontName == targetFont ||
            textFormat.EastAsianFont?.FontName == targetFont ||
            textFormat.ComplexScriptFont?.FontName == targetFont;

        if (usesTargetFont)
        {
            portion.PortionFormat.KerningMinimalSize = 100;
        }
    }
}

presentation.Save("output.pptx", SaveFormat.Pptx);
สำหรับข้อความที่ตรงกับขีดจำกัดที่ต่ำกว่า การตั้งค่านี้จะป้องกัน kerning และช่วยให้การเรนเดอร์ของ Aspose.Slides สอดคล้องกับการแสดงผลของ PowerPoint สำหรับฟอนต์ที่ได้รับผลจากพฤติกรรมเฉพาะของ PowerPoint นี้
จัดการคุณสมบัติฟอนต์ของข้อความ
คุณสมบัติการ์ตสามารถกำหนดได้ระดับย่อหน้าผ่าน IParagraphFormat.DefaultPortionFormat หรือบนส่วนข้อความแต่ละส่วนผ่าน IPortionFormat
ตัวอย่างต่อไปนี้ตั้งค่าแบบอักษรเริ่มต้นของย่อหน้าแรกเป็น Times New Roman ขนาด 12 จุด พร้อมการกำหนดเป็นตัวหนา, ตัวเอียง, และขีดเส้นใต้แบบจุด จุดกำหนดรูปแบบโดยตรงบนส่วนข้อความแต่ละส่วนจะมีลำดับความสำคัญเหนือค่าเริ่มต้นเหล่านี้:
using Aspose.Slides;
using Aspose.Slides.Export;

using var presentation = new Presentation("sample.pptx");
var slide = presentation.Slides[0];

var autoShape = (IAutoShape)slide.Shapes[0];
var paragraph = autoShape.TextFrame.Paragraphs[0];

// ตั้งค่าคุณสมบัติฟอนต์สำหรับย่อหน้า.
var portionFormat = paragraph.ParagraphFormat.DefaultPortionFormat;
portionFormat.FontHeight = 12;
portionFormat.FontBold = NullableBool.True;
portionFormat.FontItalic = NullableBool.True;
portionFormat.FontUnderline = TextUnderlineType.Dotted;
portionFormat.LatinFont = new FontData("Times New Roman");

presentation.Save("font_properties_for_paragraph.pptx", SaveFormat.Pptx);
ผลลัพธ์:

ตัวอย่างต่อไปนี้ใช้ Times New Roman ขนาด 13 จุด, การจัดรูปแบบเป็นตัวเอียง, และขีดเส้นใต้แบบจุดกับส่วนข้อความที่มีการจัดรูปแบบผลลัพธ์เป็นตัวหนา:
using Aspose.Slides;
using Aspose.Slides.Export;

using var presentation = new Presentation("sample.pptx");
var slide = presentation.Slides[0];

var autoShape = (IAutoShape)slide.Shapes[0];
var paragraph = autoShape.TextFrame.Paragraphs[0];

foreach (var portion in paragraph.Portions)
{
    if (portion.PortionFormat.GetEffective().FontBold)
    {
        // ตั้งค่าคุณสมบัติฟอนต์สำหรับส่วนข้อความ.
        portion.PortionFormat.FontHeight = 13;
        portion.PortionFormat.FontItalic = NullableBool.True;
        portion.PortionFormat.FontUnderline = TextUnderlineType.Dotted;
        portion.PortionFormat.LatinFont = new FontData("Times New Roman");
    }
}

presentation.Save("font_properties_for_text_portions.pptx", SaveFormat.Pptx);
ผลลัพธ์:

ตั้งค่าการหมุนข้อความ
ใช้ ITextFrameFormat.TextVerticalType เพื่อกำหนดการจัดแนวข้อความที่กำหนดไว้ล่วงหน้าในรูปทรง
ตัวอย่างโค้ดด้านล่างตั้งค่าการจัดแนวข้อความในรูปร่างเป็น TextVerticalType.Vertical270, ซึ่งทำให้ข้อความ หมุน 90 องศาตรงข้ามเข็มนาฬิกา:
using Aspose.Slides;
using Aspose.Slides.Export;

using var presentation = new Presentation("sample.pptx");
var slide = presentation.Slides[0];

var autoShape = (IAutoShape)slide.Shapes[0];
autoShape.TextFrame.TextFrameFormat.TextVerticalType = TextVerticalType.Vertical270;

presentation.Save("text_rotation.pptx", SaveFormat.Pptx);
ผลลัพธ์:

ตั้งค่าการหมุนแบบกำหนดเองสำหรับกรอบข้อความ
ใช้ ITextFrameFormat.RotationAngle เพื่อตั้งมุมการหมุนแบบกำหนดเองสำหรับ ITextFrame
ตัวอย่างโค้ดด้านล่างหมุนกรอบข้อความโดย 3 องศาตามเข็มนาฬิกาในรูปร่าง:
using Aspose.Slides;
using Aspose.Slides.Export;

using var presentation = new Presentation("sample.pptx");
var slide = presentation.Slides[0];

var autoShape = (IAutoShape)slide.Shapes[0];
autoShape.TextFrame.TextFrameFormat.RotationAngle = 3;

presentation.Save("custom_text_rotation.pptx", SaveFormat.Pptx);
ผลลัพธ์:

ตั้งค่าระยะห่างบรรทัดของย่อหน้า
Aspose.Slides มี IParagraphFormat.SpaceAfter, IParagraphFormat.SpaceBefore, และ IParagraphFormat.SpaceWithin เพื่อควบคุมระยะห่างของย่อหน้า คุณสมบัติเหล่านี้ใช้ดังต่อไปนี้:
- ใช้ค่าบวกเพื่อระบุระยะห่างบรรทัดเป็นเปอร์เซ็นต์ของความสูงบรรทัด
- ใช้ค่าลบเพื่อระบุระยะห่างบรรทัดเป็นหน่วยจุด
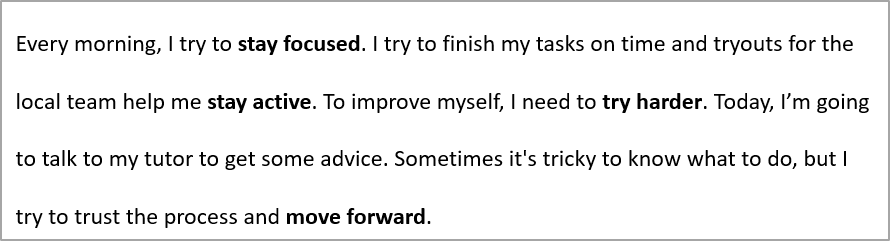
ตัวอย่างต่อไปนี้ตั้งค่าการเว้นระยะภายในย่อหน้าแรกเป็น 200% ของความสูงบรรทัด (เว้นระยะสองเท่า):
using Aspose.Slides;
using Aspose.Slides.Export;

using var presentation = new Presentation("sample.pptx");
var slide = presentation.Slides[0];

var autoShape = (IAutoShape)slide.Shapes[0];
var paragraph = autoShape.TextFrame.Paragraphs[0];

paragraph.ParagraphFormat.SpaceWithin = 200;

presentation.Save("line_spacing.pptx", SaveFormat.Pptx);
ผลลัพธ์:
ควบคุมการตัดบรรทัด
กฎการตัดบรรทัดของย่อหน้ามีประโยชน์ในบล็อกข้อความแคบและการนำเสนอที่ผสมข้อความละตินและเอเชียตะวันออก คุณสมบัติดังต่อไปนี้เป็นของ IParagraphFormat, จึงใช้กับย่อหน้าทั้งหมด:
- LatinLineBreak ควบคุมกฎการตัดบรรทัดของข้อความละติน ในข้อความผสม การเปลี่ยนแปลงอาจทำให้ตำแหน่งการตัดบรรทัดของข้อความและเครื่องหมายวรรคตอนเอเชียตะวันออกที่อยู่ใกล้เคียงเปลี่ยนไป
- EastAsianLineBreak ควบคุมกฎการตัดบรรทัดของข้อความเอเชียตะวันออก รวมถึงข้อจำกัดของอักขระที่ตำแหน่งเริ่มต้นและสิ้นสุดของบรรทัด
กฎเหล่านี้ไม่ได้แทนที่ ITextFrameFormat.WrapText, ซึ่งเปิดใช้การห่อข้อความอัตโนมัติภายในกรอบข้อความ พวกมันมีผลต่อการจัดวางเมื่อเกิดการห่อข้อความ; ไม่ได้แทรกอักขระตัดบรรทัด การตัดบรรทัดอย่างชัดเจนบังคับให้ขึ้นบรรทัดใหม่ภายในย่อหน้าโดยไม่ขึ้นกับความกว้างที่มีอยู่
ตัวอย่างอิสระต่อไปนี้สร้างบล็อกข้อความแคบที่มีข้อความจีนและละติน ตั้งค่าคุณสมบัติการตัดบรรทัดทั้งสองอย่างชัดเจนและบันทึกเป็น “line_breaking.pptx”. เพื่อทดลองกับแต่ละกฎ ให้เปลี่ยนค่าคุณสมบัตินั้น ๆ ขณะรักษาการตั้งค่าอื่นให้คงที่ ตัวอย่างใช้ Arial ขนาด 24 จุดและ SimSun พร้อมความกว้างกรอบ 160 จุดและไม่มีระยะขอบแนวนอนของกรอบข้อความ ITextFrameFormat.AutofitType ถูกตั้งเป็น TextAutofitType.None เพื่อให้ขนาดข้อความและมิติกรอบคงที่
using System.Drawing;
using Aspose.Slides;
using Aspose.Slides.Export;

using var presentation = new Presentation();
var slide = presentation.Slides[0];

var shape = slide.Shapes.AddAutoShape(ShapeType.Rectangle, 50, 50, 160, 300);
shape.FillFormat.FillType = FillType.NoFill;

var textFrame = shape.TextFrame;
textFrame.TextFrameFormat.WrapText = NullableBool.True;
textFrame.TextFrameFormat.AutofitType = TextAutofitType.None;
textFrame.TextFrameFormat.MarginLeft = 0;
textFrame.TextFrameFormat.MarginRight = 0;

var paragraph = textFrame.Paragraphs[0];
paragraph.Text = "中文排版测试,PowerPoint 中文演示。";

var format = paragraph.ParagraphFormat;
format.Alignment = TextAlignment.Left;
format.DefaultPortionFormat.FontHeight = 24;
format.DefaultPortionFormat.LatinFont = new FontData("Arial");
format.DefaultPortionFormat.EastAsianFont = new FontData("SimSun");
format.DefaultPortionFormat.FillFormat.FillType = FillType.Solid;
format.DefaultPortionFormat.FillFormat.SolidFillColor.Color = Color.Black;
format.LatinLineBreak = NullableBool.False;
format.EastAsianLineBreak = NullableBool.True;

presentation.Save("line_breaking.pptx", SaveFormat.Pptx);
ควบคุมการลอยเครื่องหมายวรรคตอน
IParagraphFormat.HangingPunctuation อนุญาตให้เครื่องหมายวรรคตอนที่ตรงตามเงื่อนไขขยายออกนอกขอบขวาของบรรทัดข้อความแทนที่จะอยู่ในบรรทัดถัดไป ใช้กับย่อหน้าทั้งหมดและแตกต่างจากการเยื้องแบบ hanging
ตัวอย่างอิสระต่อไปนี้เปิดใช้การลอยเครื่องหมายวรรคตอนในกรอบข้อความกว้าง 100 จุดและบันทึกเป็น “hanging_punctuation.pptx”. ด้วย Arial ขนาด 24 จุดและไม่มีระยะขอบแนวนอนของกรอบข้อความ จุดสุดท้ายจะอยู่หลังคำ “sentence” และขยายออกไปเหนือขอบขวาของข้อความ ตั้งค่าคุณสมบัตินี้เป็น NullableBool.False เพื่อเปรียบเทียบ: กับการตั้งค่านี้ จุดสุดท้ายจะอยู่ในบรรทัดแยกออก การห่อข้อความเปิดใช้งานและ autofit ปิดเพื่อคงความกว้างที่มีอยู่คงที่
using System.Drawing;
using Aspose.Slides;
using Aspose.Slides.Export;

using var presentation = new Presentation();
var slide = presentation.Slides[0];

var shape = slide.Shapes.AddAutoShape(ShapeType.Rectangle, 50, 50, 100, 200);
shape.FillFormat.FillType = FillType.NoFill;

var textFrame = shape.TextFrame;
textFrame.TextFrameFormat.WrapText = NullableBool.True;
textFrame.TextFrameFormat.AutofitType = TextAutofitType.None;
textFrame.TextFrameFormat.MarginLeft = 0;
textFrame.TextFrameFormat.MarginRight = 0;

var paragraph = textFrame.Paragraphs[0];
paragraph.Text = "Simple text, next sentence.";

var format = paragraph.ParagraphFormat;
format.Alignment = TextAlignment.Left;
format.DefaultPortionFormat.FontHeight = 24;
format.DefaultPortionFormat.LatinFont = new FontData("Arial");
format.DefaultPortionFormat.FillFormat.FillType = FillType.Solid;
format.DefaultPortionFormat.FillFormat.SolidFillColor.Color = Color.Black;
format.HangingPunctuation = NullableBool.True;

presentation.Save("hanging_punctuation.pptx", SaveFormat.Pptx);
ไม่ใช่ทุกเครื่องหมายวรรคตอนจะสามารถลอยได้ เงื่อนไขของฟอนต์และการจัดวางที่อธิบายด้านบน (ควบคุมการตัดบรรทัด) ก็ใช้กับการเปรียบเทียบนี้: การเปลี่ยนฟอนต์, ความกว้างที่มี, ระยะขอบ, หรือการตั้งค่า autofit สามารถทำให้ความแตกต่างที่มองเห็นหายไป
ตั้งค่าชนิด Autofit สำหรับกรอบข้อความ
ITextFrameFormat.AutofitType กำหนดว่าข้อความจะทำอย่างไรเมื่อเกินขอบเขตของคอนเทนเนอร์ ใช้เพื่อควบคุมว่าข้อความจะหด, ล้น, หรือปรับขนาดรูปร่างโดยอัตโนมัติ ตัวอย่างต่อไปนี้กำหนดให้รูปร่างปรับขนาดให้พอดีกับข้อความและบันทึกผลลัพธ์เป็น “autofit_type.pptx”
using Aspose.Slides;
using Aspose.Slides.Export;

using var presentation = new Presentation("sample.pptx");
var slide = presentation.Slides[0];

var autoShape = (IAutoShape)slide.Shapes[0];
autoShape.TextFrame.TextFrameFormat.AutofitType = TextAutofitType.Shape;

presentation.Save("autofit_type.pptx", SaveFormat.Pptx);
เพื่อให้นับบรรทัดหลังจากการห่ออัตโนมัติและดูว่าขนาดข้อความหรือความกว้างรูปร่างเปลี่ยนผลลัพธ์อย่างไร ดูที่ นับบรรทัดที่เรนเดอร์. จำนวนบรรทัดเพียงอย่างเดียวไม่ได้บ่งบอกว่าข้อความล้นคอนเทนเนอร์หรือไม่
ตั้งค่าตำแหน่งยึดของกรอบข้อความ
ITextFrameFormat.AnchoringType กำหนดว่าข้อความจะอยู่ในตำแหน่งแนวตั้งภายในรูปร่างอย่างไร เช่น อยู่ด้านบน, กลาง, หรือด้านล่าง ตัวอย่างต่อไปนี้ยึดข้อความไว้ที่ด้านล่างของรูปร่างแรกและบันทึกผลลัพธ์เป็น “text_anchor.pptx”
using Aspose.Slides;
using Aspose.Slides.Export;

using var presentation = new Presentation("sample.pptx");
var slide = presentation.Slides[0];

var autoShape = (IAutoShape)slide.Shapes[0];
autoShape.TextFrame.TextFrameFormat.AnchoringType = TextAnchorType.Bottom;

presentation.Save("text_anchor.pptx", SaveFormat.Pptx);
ตั้งค่าการแท็บข้อความ
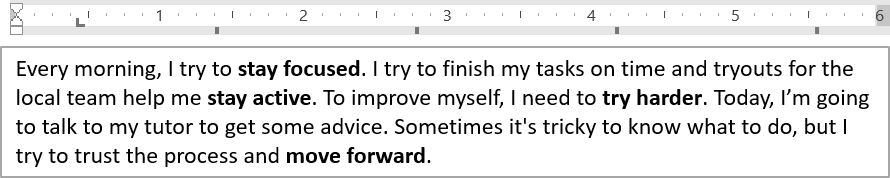
ใช้ IParagraphFormat.DefaultTabSize และ IParagraphFormat.Tabs เพื่อกำหนดจุดหยุดแท็บในย่อหน้า ตัวอย่างต่อไปนี้ตั้งค่าช่วงแท็บเริ่มต้นเป็น 100 จุดและเพิ่มจุดหยุดแท็บซ้ายที่ 30 จุด การตั้งค่าเหล่านี้มีผลต่อข้อความที่มีอักขระแท็บ
using Aspose.Slides;
using Aspose.Slides.Export;

using var presentation = new Presentation("sample.pptx");
var slide = presentation.Slides[0];

var autoShape = (IAutoShape)slide.Shapes[0];
var paragraph = autoShape.TextFrame.Paragraphs[0];
paragraph.ParagraphFormat.DefaultTabSize = 100;
paragraph.ParagraphFormat.Tabs.Add(30, TabAlignment.Left);

presentation.Save("paragraph_tabs.pptx", SaveFormat.Pptx);
ผลลัพธ์:
ตั้งค่าภาษาการตรวจสอบ
Aspose.Slides มี IBasePortionFormat.LanguageId, ซึ่งให้คุณตั้งค่าภาษาการตรวจสอบสำหรับส่วนข้อความ ภาษาการตรวจสอบกำหนดภาษาที่ใช้สำหรับการตรวจสอบการสะกดและไวยากรณ์ใน PowerPoint
ตัวอย่างต่อไปนี้ต้องการไฟล์ “presentation.pptx” ที่มีกล่องข้อความเป็นรูปร่างแรกบนสไลด์แรกและอย่างน้อยหนึ่งย่อหน้า แทนที่เนื้อหาของย่อหน้าแรกด้วย “1。”, ตั้งค่า SimSun เป็นฟอนต์ และกำหนดภาษาการตรวจสอบ Simplified Chinese (zh-CN). บันทึกผลลัพธ์เป็น “proofing_language.pptx”:
using Aspose.Slides;
using Aspose.Slides.Export;

using var presentation = new Presentation("presentation.pptx");
var slide = presentation.Slides[0];

var autoShape = (IAutoShape)slide.Shapes[0];
var paragraph = autoShape.TextFrame.Paragraphs[0];
paragraph.Portions.Clear();

var font = new FontData("SimSun");

var textPortion = new Portion();
textPortion.PortionFormat.ComplexScriptFont = font;
textPortion.PortionFormat.EastAsianFont = font;
textPortion.PortionFormat.LatinFont = font;

// ตั้งค่าภาษาการตรวจสอบเป็นภาษาจีน Simplified.
textPortion.PortionFormat.LanguageId = "zh-CN";

textPortion.Text = "1。";
paragraph.Portions.Add(textPortion);

presentation.Save("proofing_language.pptx", SaveFormat.Pptx);
ตั้งค่าภาษาเริ่มต้น
ใช้ LoadOptions.DefaultTextLanguage เพื่อกำหนดภาษาข้อความเริ่มต้นสำหรับข้อความที่สร้างขณะโหลดหรือสร้างงานนำเสนอ ตัวอย่างต่อไปนี้สร้างงานนำเสนอที่ใช้ภาษาอังกฤษสหรัฐเป็นภาษาข้อความเริ่มต้น, เพิ่มกล่องข้อความ, และพิมพ์ en-US สำหรับส่วนข้อความแรก
using System;
using Aspose.Slides;

var loadOptions = new LoadOptions();
loadOptions.DefaultTextLanguage = "en-US";

using var presentation = new Presentation(loadOptions);
var slide = presentation.Slides[0];

// เพิ่มรูปร่างสี่เหลี่ยมใหม่ที่มีข้อความ.
var shape = slide.Shapes.AddAutoShape(ShapeType.Rectangle, 20, 20, 150, 50);
shape.TextFrame.Text = "Sample text";

// ตรวจสอบภาษาของส่วนข้อความแรก.
var portion = shape.TextFrame.Paragraphs[0].Portions[0];
Console.WriteLine(portion.PortionFormat.LanguageId);
ตั้งค่าสไตล์ข้อความเริ่มต้น
เพื่อใช้การจัดรูปแบบข้อความเริ่มต้นในระดับงานนำเสนอ ให้ใช้ IPresentation.DefaultTextStyle
ตัวอย่างต่อไปนี้ตั้งค่าแบบอักษรหนาขนาด 14 จุดเป็นค่าเริ่มต้นสำหรับย่อหน้าระดับบนในงานนำเสนอใหม่และบันทึกเป็น “default_text_style.pptx”. ข้อความสามารถสืบทอดค่าเริ่มต้นเหล่านี้ได้ เว้นแต่การจัดรูปแบบที่เจาะจงจะทับซ้อน
using Aspose.Slides;
using Aspose.Slides.Export;

using var presentation = new Presentation();
// รับรูปแบบย่อหน้าระดับบนสุด.
var paragraphFormat = presentation.DefaultTextStyle.GetLevel(0);

if (paragraphFormat != null)
{
    paragraphFormat.DefaultPortionFormat.FontHeight = 14;
    paragraphFormat.DefaultPortionFormat.FontBold = NullableBool.True;
}

presentation.Save("default_text_style.pptx", SaveFormat.Pptx);
ดึงข้อความพร้อมเอฟเฟกต์ All-Caps
ใน PowerPoint การใช้เอฟเฟกต์ฟอนต์ All Caps ทำให้ข้อความปรากฏเป็นอักษรใหญ่ทั้งหมดบนสไลด์ แม้ว่าจะพิมพ์เป็นอักษรเล็กไว้เดิม เมื่อคุณดึงส่วนข้อความเช่นนั้นด้วย Aspose.Slides ไลบรารีจะคืนข้อความตามที่พิมพ์ไว้เดิม เพื่อให้ตรงกับข้อความที่แสดง ให้ตรวจสอบ TextCapType และแปลงสตริงที่คืนเป็นอักษรใหญ่เมื่อค่าคือ All
ตัวอย่างนี้ต้องการไฟล์ “sample2.pptx” ที่มีกล่องข้อความเป็นรูปร่างแรกบนสไลด์แรก ย่อหน้าที่หนึ่งของย่อหน้าแรกมีส่วนแรกที่มีข้อความ “Hello, Aspose!” พร้อมเอฟเฟกต์ All Caps ตามที่แสดงด้านล่าง

ตัวอย่างโค้ดด้านล่างแสดงวิธีดึงข้อความพร้อมเอฟเฟกต์ All Caps ที่ใช้:
using System;
using Aspose.Slides;

using var presentation = new Presentation("sample2.pptx");
var slide = presentation.Slides[0];

var autoShape = (IAutoShape)slide.Shapes[0];
var textPortion = autoShape.TextFrame.Paragraphs[0].Portions[0];

Console.WriteLine($"Original text: {textPortion.Text}");

var textFormat = textPortion.PortionFormat.GetEffective();
if (textFormat.TextCapType == TextCapType.All)
{
    var text = textPortion.Text.ToUpper();
    Console.WriteLine($"All-Caps effect: {text}");
}
Output:
Original text: Hello, Aspose!
All-Caps effect: HELLO, ASPOSE!
คำถามที่พบบ่อย
ฉันจะแก้ไขข้อความในตารางบนสไลด์ได้อย่างไร?
เพื่อแก้ไขข้อความในตารางบนสไลด์ ให้ใช้ ITable. ทำการวนลูปผ่านเซลล์และอัปเดตแต่ละเซลล์ผ่าน ICell.TextFrame และจัดรูปแบบย่อหน้าผ่าน IParagraph.ParagraphFormat
ฉันจะใช้สีไล่ระดับบนข้อความในสไลด์ PowerPoint ได้อย่างไร?
เพื่อใช้สีไล่ระดับบนข้อความ ให้ใช้ IBasePortionFormat.FillFormat. ตั้งค่า IFillFormat.FillType เป็น FillType.Gradient และกำหนดจุดหยุดไล่ระดับ, ทิศทาง, และความโปร่งใส.