使用 .NET 在演示文稿中创建 3D 效果
概述
Aspose.Slides for .NET 可以创建、编辑、保留并渲染 PowerPoint 风格的形状和文本的 3D 格式化。本文章涵盖旋转、挤出、斜面、灯光、材质、渐变或图片填充以及 3D 文本等 3D 效果。
3D 格式化概念
使用 IShape.ThreeDFormat 属性为形状应用 3D 格式化。该属性公开 IThreeDFormat,用于控制该形状的 3D 场景。
对于文本,使用 ITextFrameFormat.ThreeDFormat 属性。这会将 3D 格式化应用于文本框,而不是形状主体。
最重要的属性如下:
| 属性 | 控制内容 | 何时使用 |
|---|---|---|
| Camera | 视点、预设相机类型、旋转、缩放和透视。 | 在 3D 空间中旋转对象或匹配 PowerPoint 的 3D 旋转预设。 |
| LightRig | 灯光预设、方向和灯光旋转。 | 更改 3D 表面上高光和阴影的呈现方式。 |
| Material | 表面材质,如平面、哑光、塑料或金属。 | 让相同的几何体看起来更平坦、柔和、光亮或金属感。 |
| ExtrusionHeight | 形状从正面向后延伸的距离。 | 将平面形状变为可见的厚实 3D 对象。 |
| ExtrusionColor | 挤出侧面的颜色。 | 显示深度或使侧面颜色与正面填充保持一致。 |
| Depth | PowerPoint 3D 格式化使用的额外深度。 | 在形状或文本上微调深度,尤其与斜面和材质设置配合使用时。 |
| BevelTop 和 BevelBottom | 正面和背面的提升或圆角边缘。 | 为对象添加柔化或模具化的边缘,而不是锐利的平面。 |
| ContourColor 和 ContourWidth | 3D 对象的轮廓线。 | 在渲染输出中强调对象边界。 |
创建 3D 形状
形状在看起来像真的 3D 之前,通常需要四类设置:
- 相机设置,因为默认的正面视图可能会隐藏挤出效果。
- 灯光设置,因为光照使各面和侧面可读。
- 材质设置,因为表面影响光的渲染方式。
- 挤出或深度设置,因为平面形状需要厚度。
下面的示例创建一个矩形,在其正面添加文本,应用 3D 格式化,将演示文稿保存为 PPTX,并将幻灯片渲染为 PNG 图像。
const float imageScale = 2;

using var presentation = new Presentation();

var slide = presentation.Slides[0];
var shape = slide.Shapes.AddAutoShape(ShapeType.Rectangle, 200, 150, 200, 200);
shape.TextFrame.Text = "3D";
shape.TextFrame.Paragraphs[0].ParagraphFormat.DefaultPortionFormat.FontHeight = 64;

shape.FillFormat.FillType = FillType.Solid;
shape.FillFormat.SolidFillColor.Color = Color.CornflowerBlue;

shape.ThreeDFormat.Camera.CameraType = CameraPresetType.OrthographicFront;
shape.ThreeDFormat.Camera.SetRotation(20, 30, 40);
shape.ThreeDFormat.LightRig.LightType = LightRigPresetType.Flat;
shape.ThreeDFormat.LightRig.Direction = LightingDirection.Top;
shape.ThreeDFormat.Material = MaterialPresetType.Flat;
shape.ThreeDFormat.ExtrusionHeight = 100;
shape.ThreeDFormat.ExtrusionColor.Color = Color.Blue;

using var thumbnail = slide.GetImage(imageScale, imageScale);
thumbnail.Save("shape_3d.png");

presentation.Save("shape_3d.pptx", SaveFormat.Pptx);
渲染后的幻灯片图像显示矩形为一个厚实的 3D 块:

使用相机旋转形状
在 PowerPoint 中,3D 旋转通过 “3-D 旋转” 面板配置。X、Y、Z 旋转值对应通过相机 API 设置的旋转。
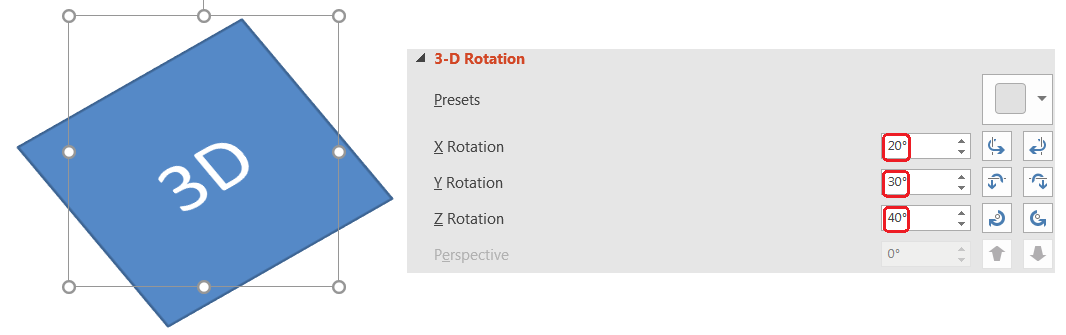
在 Aspose.Slides 中,通过 IThreeDFormat.Camera 设置相机类型和旋转:
shape.ThreeDFormat.Camera.CameraType = CameraPresetType.OrthographicFront;
shape.ThreeDFormat.Camera.SetRotation(20, 30, 40);
当需要改变观察者看到对象的方式时使用相机。它不会改变幻灯片上 2D 形状的几何结构,只会改变 PowerPoint 与 Aspose.Slides 在渲染时使用的 3D 视点。
添加挤出和深度
挤出通过在正面后方延伸形状来实现厚度。在 PowerPoint 中,深度控制可见厚度,颜色控制侧面颜色。
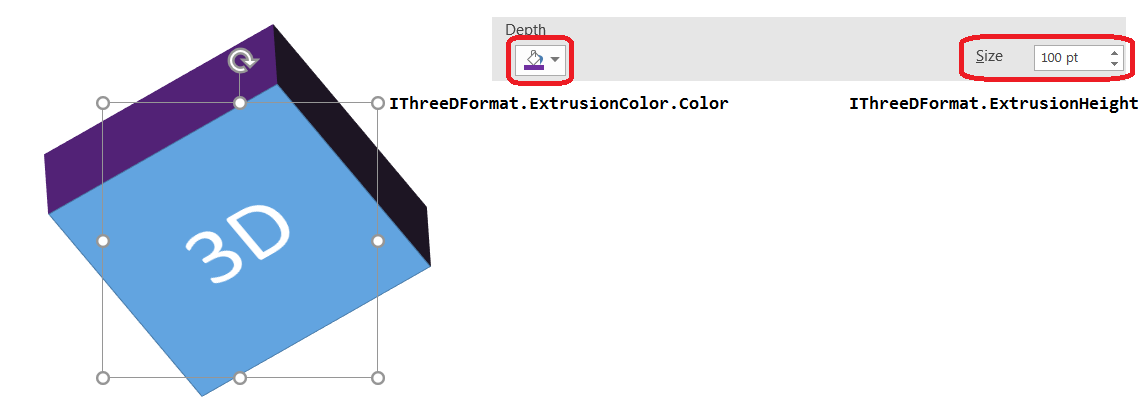
使用 IThreeDFormat.ExtrusionHeight 设置厚度,使用 IThreeDFormat.ExtrusionColor 设置侧面颜色:
shape.ThreeDFormat.Camera.SetRotation(20, 30, 40);
shape.ThreeDFormat.ExtrusionHeight = 100;
shape.ThreeDFormat.ExtrusionColor.Color = Color.Purple;
当需要直接使用 PowerPoint 的深度值,或将深度与斜面、材质和文本效果组合时,使用 IThreeDFormat.Depth。在多数形状场景中,ExtrusionHeight 更直观,因为它直接表达可见的挤出厚度。
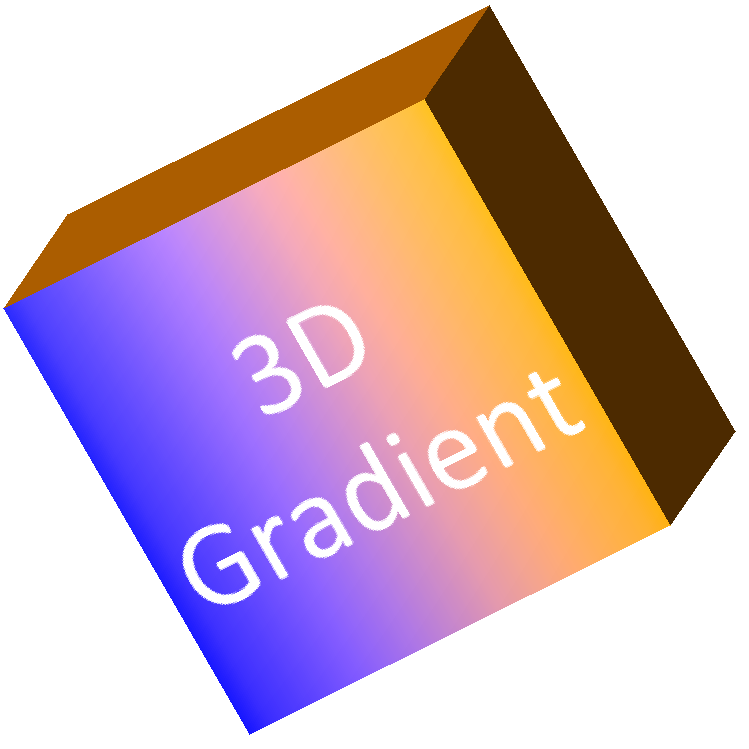
在 3D 效果中使用渐变或图片填充
3D 格式化与形状填充独立。您可以对正面使用纯色、渐变、图案或图片填充,同时保持相同的相机、灯光、材质和挤出设置。
下面的示例对形状使用渐变填充,并对侧面使用较暗的挤出颜色:
const float imageScale = 2;

using var presentation = new Presentation();

var slide = presentation.Slides[0];
var shape = slide.Shapes.AddAutoShape(ShapeType.Rectangle, 200, 150, 250, 250);
shape.TextFrame.Text = "3D Gradient";
shape.TextFrame.Paragraphs[0].ParagraphFormat.DefaultPortionFormat.FontHeight = 64;

shape.FillFormat.FillType = FillType.Gradient;
shape.FillFormat.GradientFormat.GradientStops.Add(0, Color.Blue);
shape.FillFormat.GradientFormat.GradientStops.Add(100, Color.Orange);

shape.ThreeDFormat.Camera.CameraType = CameraPresetType.OrthographicFront;
shape.ThreeDFormat.Camera.SetRotation(10, 20, 30);
shape.ThreeDFormat.LightRig.LightType = LightRigPresetType.Flat;
shape.ThreeDFormat.LightRig.Direction = LightingDirection.Top;
shape.ThreeDFormat.Material = MaterialPresetType.Flat;
shape.ThreeDFormat.ExtrusionHeight = 150;
shape.ThreeDFormat.ExtrusionColor.Color = Color.DarkOrange;

using var thumbnail = slide.GetImage(imageScale, imageScale);
thumbnail.Save("gradient_3d.png");
渲染输出保留了正面的渐变,并单独渲染挤出侧面:
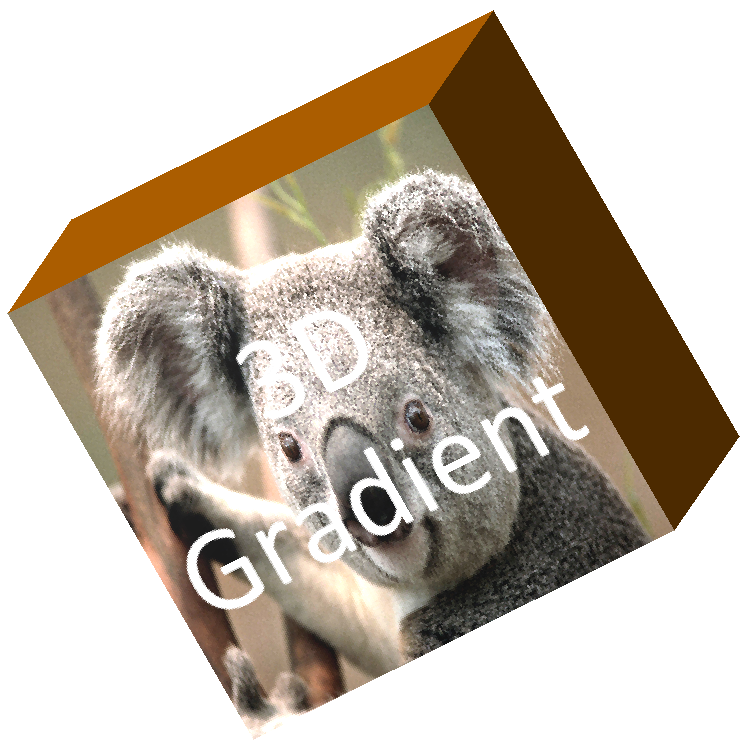
要使用图片填充,只需将图像添加到演示文稿并分配给形状填充:
var imageData = File.ReadAllBytes("image.jpg");
var image = presentation.Images.AddImage(imageData);

shape.FillFormat.FillType = FillType.Picture;
shape.FillFormat.PictureFillFormat.Picture.Image = image;
shape.FillFormat.PictureFillFormat.PictureFillMode = PictureFillMode.Stretch;

shape.ThreeDFormat.Camera.SetRotation(10, 20, 30);
shape.ThreeDFormat.ExtrusionHeight = 150;
shape.ThreeDFormat.ExtrusionColor.Color = Color.DarkOrange;
图片在正面渲染,挤出作为 3D 侧面表面渲染:
对文本应用 3D 格式化
形状的 3D 格式化影响形状主体,文本的 3D 格式化影响文本框。这在需要对字母本身进行挤出、材质、灯光和相机设置的 WordArt 类效果时非常有用。
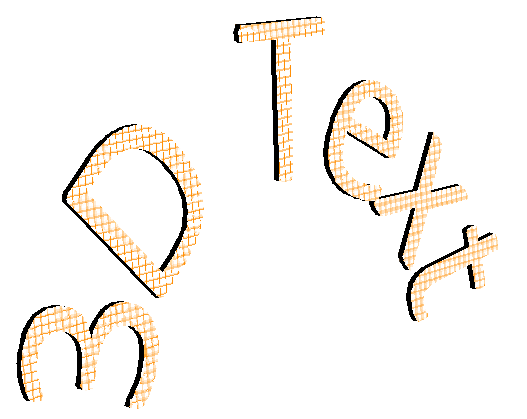
下面的示例创建带图案填充的文本,应用 WordArt 变换,并在 ITextFrameFormat 上配置 3D 设置:
const float imageScale = 2;

using var presentation = new Presentation();

var slide = presentation.Slides[0];
var shape = slide.Shapes.AddAutoShape(ShapeType.Rectangle, 200, 150, 250, 250);
shape.FillFormat.FillType = FillType.NoFill;
shape.LineFormat.FillFormat.FillType = FillType.NoFill;
shape.TextFrame.Text = "3D Text";

var portion = shape.TextFrame.Paragraphs[0].Portions[0];
portion.PortionFormat.FillFormat.FillType = FillType.Pattern;
portion.PortionFormat.FillFormat.PatternFormat.ForeColor.Color = Color.DarkOrange;
portion.PortionFormat.FillFormat.PatternFormat.BackColor.Color = Color.White;
portion.PortionFormat.FillFormat.PatternFormat.PatternStyle = PatternStyle.LargeGrid;

shape.TextFrame.Paragraphs[0].ParagraphFormat.DefaultPortionFormat.FontHeight = 128;

var textFrameFormat = shape.TextFrame.TextFrameFormat;
textFrameFormat.Transform = TextShapeType.ArchUp;
textFrameFormat.ThreeDFormat.ExtrusionHeight = 3.5f;
textFrameFormat.ThreeDFormat.Depth = 3;
textFrameFormat.ThreeDFormat.Material = MaterialPresetType.Plastic;
textFrameFormat.ThreeDFormat.LightRig.Direction = LightingDirection.Top;
textFrameFormat.ThreeDFormat.LightRig.LightType = LightRigPresetType.Balanced;
textFrameFormat.ThreeDFormat.LightRig.SetRotation(0, 0, 40);
textFrameFormat.ThreeDFormat.Camera.CameraType = CameraPresetType.PerspectiveContrastingRightFacing;

using var thumbnail = slide.GetImage(imageScale, imageScale);
thumbnail.Save("text_3d.png");

presentation.Save("text_3d.pptx", SaveFormat.Pptx);
文本呈现为弧形、挤出的 3D 字母:
导出和渲染行为
Aspose.Slides 在保存为 PPTX 等 PowerPoint 格式时会保留 3D 格式化。渲染或导出为固定布局格式时,3D 场景会被光栅化或绘制为 2D 结果。这适用于将幻灯片渲染为 PNG、导出为 PDF、导出为 HTML,或为 视频转换 生成帧。
需要注意的要点:
- 导出的图像和 PDF 不具备交互性。导出后用户无法旋转对象。
- 最终外观取决于相机、灯光、材质、挤出、填充以及幻灯片缩放的组合。
- 若需检查继承或主题驱动的格式化值,请读取 有效形状属性。
- 某些输出格式无法存储可编辑的 PowerPoint 3D 格式化。在这些格式中,只会渲染出视觉结果,而不是保留可编辑的 3D 设置。
常见问题
Aspose.Slides 能创建交互式 3D 演示文稿吗?
Aspose.Slides 创建并渲染 PowerPoint 对形状和文本的 3D 效果。它不会使导出的图像、PDF 或 HTML 页面成为可交互的 3D 场景,供观众旋转。在 PPTX 中,3D 格式化仍可在支持该格式的 PowerPoint 中编辑。
3D 模型和 3D 效果有什么区别?
3D 模型是插入到演示文稿中的独立 3D 对象。3D 效果是对普通 PowerPoint 形状或文本应用的格式化,如旋转、挤出、斜面、灯光和材质。本文只讨论 3D 效果。
显示可见 3D 形状需要哪些设置?
至少需要设置相机旋转以及挤出或深度。实际使用中,通常还会设置灯光和材质,以便渲染出的面具有清晰的高光和阴影。
我可以同时对形状和文本应用 3D 效果吗?
可以。对形状主体使用 IShape.ThreeDFormat,对文本使用 ITextFrameFormat.ThreeDFormat。
导出为图像、PDF、HTML 或视频帧时会出现 3D 效果吗?
会。Aspose.Slides 在生成幻灯片图像、PDF、HTML 和用于视频转换的帧时会渲染 3D 效果。导出的输出包含渲染后的外观,而不是可编辑的 3D 对象。
我可以读取在继承和主题设置后得到的最终 3D 值吗?
可以。使用在 形状有效属性 中描述的有效格式化 API,读取最终的相机、灯光、斜面及相关 3D 值。