
Create 3D Effects in Presentations Using .NET
Overview
Aspose.Slides for .NET can create, edit, preserve, and render PowerPoint-style 3D formatting for shapes and text. This article covers 3D effects such as rotation, extrusion, bevels, lighting, material, gradient or picture fills, and 3D text.
Note
This article is about 3D formatting effects on PowerPoint shapes and text. It is not about inserting or editing standalone 3D model files. When you export a slide to an image, PDF, or HTML, Aspose.Slides renders those 3D effects into the exported 2D output.3D Formatting Concepts
Use the IShape.ThreeDFormat property to apply 3D formatting to a shape. The property exposes IThreeDFormat, which controls the 3D scene for that shape.
For text, use the ITextFrameFormat.ThreeDFormat property. This applies 3D formatting to the text frame instead of the shape body.
The most important properties are:
| Property | What it controls | When to use it |
|---|---|---|
| Camera | Viewpoint, preset camera type, rotation, zoom, and perspective. | Rotate the object in 3D space or match a PowerPoint 3D rotation preset. |
| LightRig | Light preset, direction, and light rotation. | Change how highlights and shadows appear on the 3D surface. |
| Material | Surface material, such as flat, matte, plastic, or metal. | Make the same geometry look flatter, softer, glossy, or metallic. |
| ExtrusionHeight | How far the shape extends backward from its front face. | Turn a flat shape into a visibly thick 3D object. |
| ExtrusionColor | Color of the extruded sides. | Make depth visible or coordinate the side color with the front fill. |
| Depth | Additional 3D depth used by PowerPoint 3D formatting. | Fine-tune depth for shapes or text, especially together with bevel and material settings. |
| BevelTop and BevelBottom | Raised or rounded edges on the front and back faces. | Add a softened or molded edge instead of a sharp flat face. |
| ContourColor and ContourWidth | Outline around the 3D object. | Emphasize the object boundary in rendered output. |
Create a 3D Shape
A shape usually needs four kinds of settings before it looks convincingly 3D:
- Camera settings, because the default front view may hide the extrusion.
- Light settings, because lighting makes the faces and sides readable.
- Material settings, because the surface affects how light is rendered.
- Extrusion or depth settings, because a flat shape needs thickness.
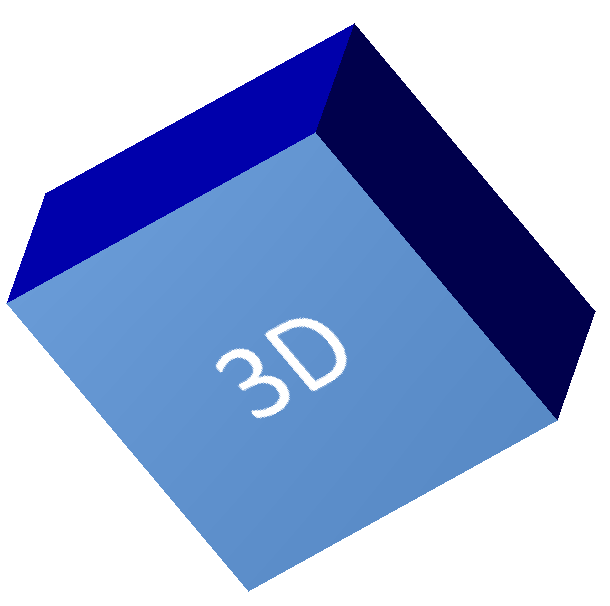
The following example creates a rectangle, adds text to its front face, and applies 3D formatting. The camera rotation values are in degrees, and the extrusion height is 100 points. The example renders the slide to a PNG image at twice its default dimensions and saves the presentation as PPTX.
using System.Drawing;
using Aspose.Slides;
using Aspose.Slides.Export;

const float imageScale = 2;

using var presentation = new Presentation();
var slide = presentation.Slides[0];

var shape = slide.Shapes.AddAutoShape(ShapeType.Rectangle, 200, 150, 200, 200);
shape.TextFrame.Text = "3D";
shape.TextFrame.Paragraphs[0].ParagraphFormat.DefaultPortionFormat.FontHeight = 64;

shape.FillFormat.FillType = FillType.Solid;
shape.FillFormat.SolidFillColor.Color = Color.CornflowerBlue;

shape.ThreeDFormat.Camera.CameraType = CameraPresetType.OrthographicFront;
shape.ThreeDFormat.Camera.SetRotation(20, 30, 40);
shape.ThreeDFormat.LightRig.LightType = LightRigPresetType.Flat;
shape.ThreeDFormat.LightRig.Direction = LightingDirection.Top;
shape.ThreeDFormat.Material = MaterialPresetType.Flat;
shape.ThreeDFormat.ExtrusionHeight = 100;
shape.ThreeDFormat.ExtrusionColor.Color = Color.Blue;

using var thumbnail = slide.GetImage(imageScale, imageScale);
thumbnail.Save("shape_3d.png");

presentation.Save("shape_3d.pptx", SaveFormat.Pptx);
The rendered slide image shows the rectangle as a thick 3D block:
Rotate a Shape with the Camera
In PowerPoint, 3D rotation is configured from the 3-D Rotation pane. The X, Y, and Z rotation values correspond to the rotation you set through the camera API.
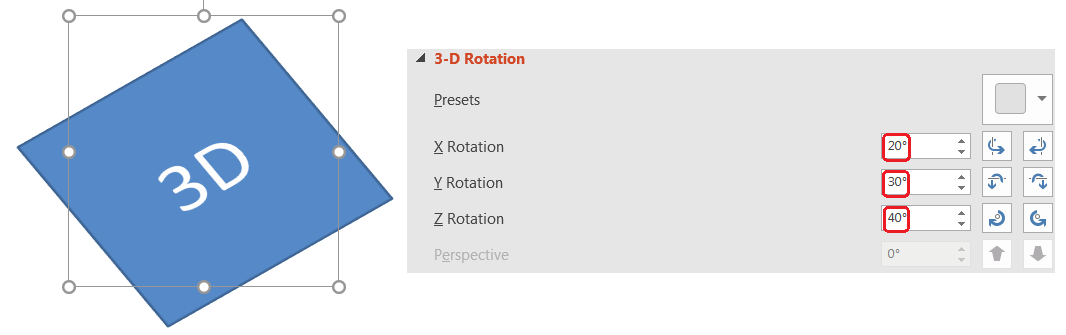
In Aspose.Slides, access the camera through IThreeDFormat.Camera. This example creates a rectangle, selects an orthographic front view, and sets its X, Y, and Z rotations to 20, 30, and 40 degrees, respectively. It configures the shape in memory without saving a file:
using Aspose.Slides;

using var presentation = new Presentation();
var slide = presentation.Slides[0];

var shape = slide.Shapes.AddAutoShape(ShapeType.Rectangle, 200, 150, 200, 200);

shape.ThreeDFormat.Camera.CameraType = CameraPresetType.OrthographicFront;
shape.ThreeDFormat.Camera.SetRotation(20, 30, 40);
Use the camera when you need to change how the viewer sees the object. It does not change the 2D shape geometry on the slide. It changes the 3D viewpoint used by PowerPoint and by Aspose.Slides when rendering.
Add Extrusion and Depth
Extrusion makes a shape look thick by extending it behind the front face. In PowerPoint, the depth control sets this visible thickness, and the color control sets the color of the side faces.
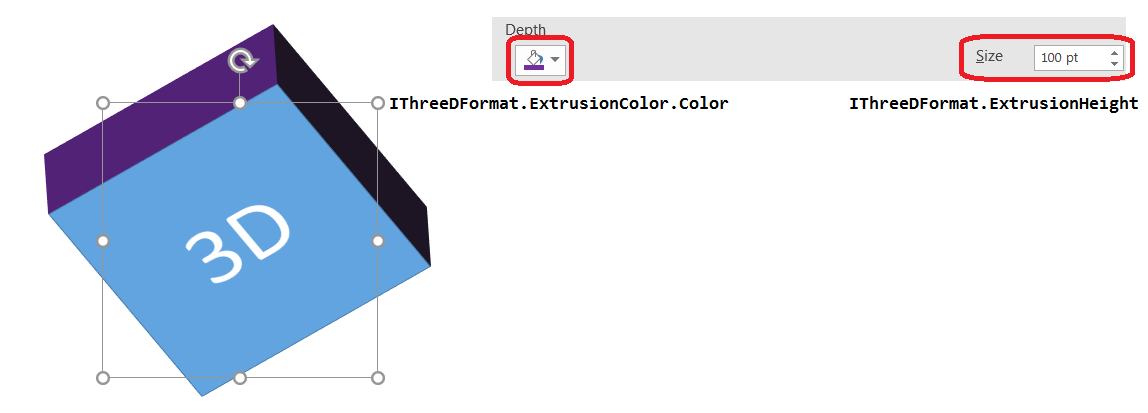
Set IThreeDFormat.ExtrusionHeight for the thickness and IThreeDFormat.ExtrusionColor for the side color. This example gives a rectangle a 100-point extrusion with purple sides and rotates the camera to reveal its thickness. It configures the shape in memory without saving a file:
using System.Drawing;
using Aspose.Slides;

using var presentation = new Presentation();
var slide = presentation.Slides[0];

var shape = slide.Shapes.AddAutoShape(ShapeType.Rectangle, 200, 150, 200, 200);

shape.ThreeDFormat.Camera.CameraType = CameraPresetType.OrthographicFront;
shape.ThreeDFormat.Camera.SetRotation(20, 30, 40);
shape.ThreeDFormat.LightRig.LightType = LightRigPresetType.Flat;
shape.ThreeDFormat.LightRig.Direction = LightingDirection.Top;
shape.ThreeDFormat.Material = MaterialPresetType.Flat;
shape.ThreeDFormat.ExtrusionHeight = 100;
shape.ThreeDFormat.ExtrusionColor.Color = Color.Purple;
The IThreeDFormat.Depth property sets the depth of a 3D shape. The ExtrusionHeight property controls the height of the extrusion effect, as shown in this example.
Use Gradient or Picture Fills with 3D Effects
3D formatting is independent of the shape fill. You can apply a solid color, gradient, pattern, or picture fill to the front face and still use the same camera, light, material, and extrusion settings.
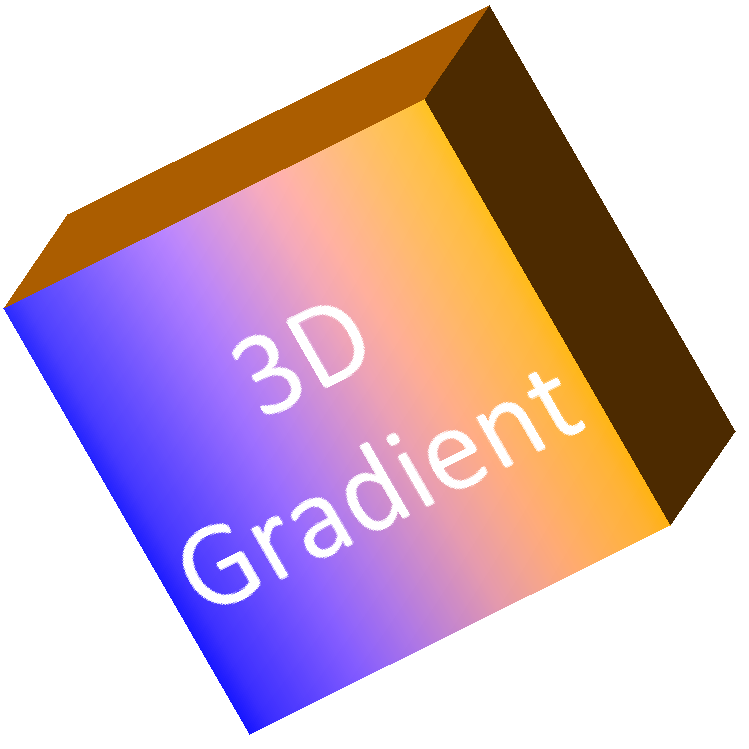
This example applies a blue-to-orange gradient to the front face and a dark orange color to the 150-point extrusion. The gradient stops at 0 and 100 mark the start and end of the gradient. The camera rotation values are in degrees. The slide is rendered to a PNG image at twice its default dimensions:
using System.Drawing;
using Aspose.Slides;

const float imageScale = 2;

using var presentation = new Presentation();
var slide = presentation.Slides[0];

var shape = slide.Shapes.AddAutoShape(ShapeType.Rectangle, 200, 150, 250, 250);
shape.TextFrame.Text = "3D Gradient";
shape.TextFrame.Paragraphs[0].ParagraphFormat.DefaultPortionFormat.FontHeight = 64;

shape.FillFormat.FillType = FillType.Gradient;
shape.FillFormat.GradientFormat.GradientStops.Add(0, Color.Blue);
shape.FillFormat.GradientFormat.GradientStops.Add(100, Color.Orange);

shape.ThreeDFormat.Camera.CameraType = CameraPresetType.OrthographicFront;
shape.ThreeDFormat.Camera.SetRotation(10, 20, 30);
shape.ThreeDFormat.LightRig.LightType = LightRigPresetType.Flat;
shape.ThreeDFormat.LightRig.Direction = LightingDirection.Top;
shape.ThreeDFormat.Material = MaterialPresetType.Flat;
shape.ThreeDFormat.ExtrusionHeight = 150;
shape.ThreeDFormat.ExtrusionColor.Color = Color.DarkOrange;

using var thumbnail = slide.GetImage(imageScale, imageScale);
thumbnail.Save("gradient_3d.png");
The rendered output keeps the gradient on the front face and renders the extrusion separately:
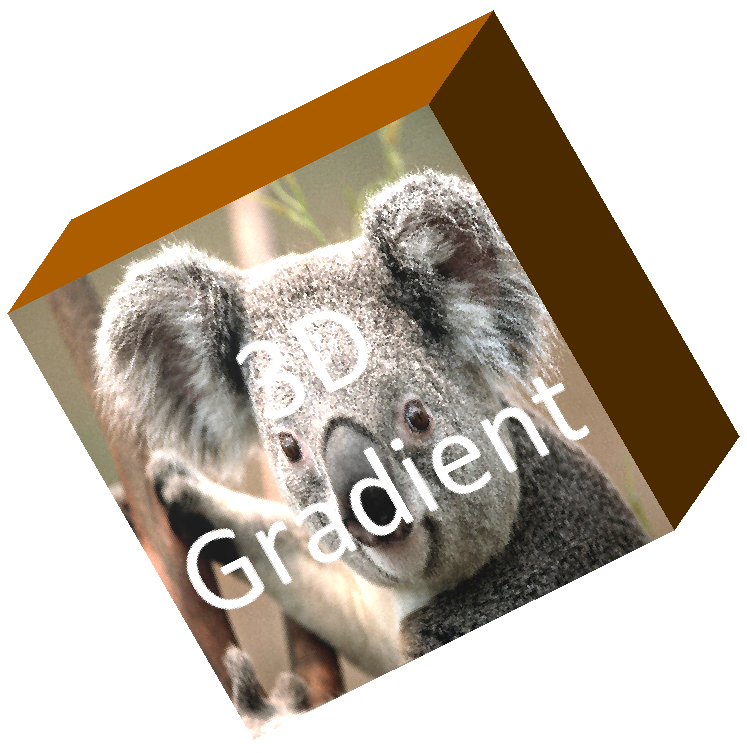
To use a picture fill instead, add the image to the presentation and assign it to the shape fill. This example requires an existing file named “image.jpg” in the working directory. It stretches the picture to fill the rectangle, applies a 150-point extrusion, and sets the camera rotation in degrees. It configures the shape in memory without saving or rendering a file:
using System.Drawing;
using System.IO;
using Aspose.Slides;

using var presentation = new Presentation();
var slide = presentation.Slides[0];

var shape = slide.Shapes.AddAutoShape(ShapeType.Rectangle, 200, 150, 250, 250);

var imageData = File.ReadAllBytes("image.jpg");
var image = presentation.Images.AddImage(imageData);

shape.FillFormat.FillType = FillType.Picture;
shape.FillFormat.PictureFillFormat.Picture.Image = image;
shape.FillFormat.PictureFillFormat.PictureFillMode = PictureFillMode.Stretch;

shape.ThreeDFormat.Camera.CameraType = CameraPresetType.OrthographicFront;
shape.ThreeDFormat.Camera.SetRotation(10, 20, 30);
shape.ThreeDFormat.LightRig.LightType = LightRigPresetType.Flat;
shape.ThreeDFormat.LightRig.Direction = LightingDirection.Top;
shape.ThreeDFormat.Material = MaterialPresetType.Flat;
shape.ThreeDFormat.ExtrusionHeight = 150;
shape.ThreeDFormat.ExtrusionColor.Color = Color.DarkOrange;
The picture is rendered on the front face, while the extrusion is rendered as the 3D side surface:
Apply 3D Formatting to Text
Shape 3D formatting affects the shape body. Text 3D formatting affects the text frame. This is useful for WordArt-like effects where the letters themselves need extrusion, material, lighting, and camera settings.
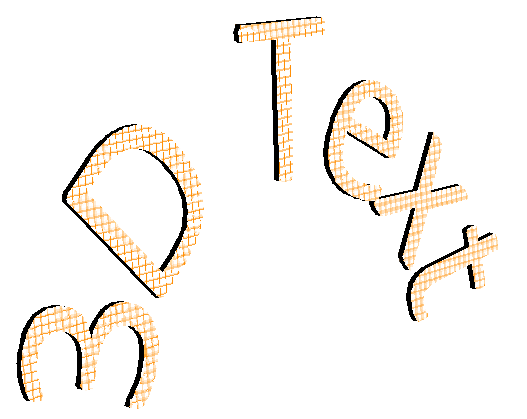
The following example creates text with an orange-and-white grid pattern, applies an upward arch, and configures 3D settings through ITextFrameFormat.ThreeDFormat. The extrusion height and depth are in points, and the light rotation is in degrees. The shape fill and outline are hidden so that only the text is visible. The example renders a PNG image at twice the default slide dimensions and saves the presentation as PPTX:
using System.Drawing;
using Aspose.Slides;
using Aspose.Slides.Export;

const float imageScale = 2;

using var presentation = new Presentation();
var slide = presentation.Slides[0];

var shape = slide.Shapes.AddAutoShape(ShapeType.Rectangle, 200, 150, 250, 250);
shape.FillFormat.FillType = FillType.NoFill;
shape.LineFormat.FillFormat.FillType = FillType.NoFill;
shape.TextFrame.Text = "3D Text";

var portion = shape.TextFrame.Paragraphs[0].Portions[0];
portion.PortionFormat.FillFormat.FillType = FillType.Pattern;
portion.PortionFormat.FillFormat.PatternFormat.ForeColor.Color = Color.DarkOrange;
portion.PortionFormat.FillFormat.PatternFormat.BackColor.Color = Color.White;
portion.PortionFormat.FillFormat.PatternFormat.PatternStyle = PatternStyle.LargeGrid;

shape.TextFrame.Paragraphs[0].ParagraphFormat.DefaultPortionFormat.FontHeight = 128;

var textFrameFormat = shape.TextFrame.TextFrameFormat;
textFrameFormat.Transform = TextShapeType.ArchUp;
textFrameFormat.ThreeDFormat.ExtrusionHeight = 3.5f;
textFrameFormat.ThreeDFormat.Depth = 3;
textFrameFormat.ThreeDFormat.Material = MaterialPresetType.Plastic;
textFrameFormat.ThreeDFormat.LightRig.Direction = LightingDirection.Top;
textFrameFormat.ThreeDFormat.LightRig.LightType = LightRigPresetType.Balanced;
textFrameFormat.ThreeDFormat.LightRig.SetRotation(0, 0, 40);
textFrameFormat.ThreeDFormat.Camera.CameraType = CameraPresetType.PerspectiveContrastingRightFacing;

using var thumbnail = slide.GetImage(imageScale, imageScale);
thumbnail.Save("text_3d.png");

presentation.Save("text_3d.pptx", SaveFormat.Pptx);
The text is rendered as curved, extruded 3D lettering:
Keep Text Flat on a 3D Shape
To keep text readable while preserving a shape’s 3D appearance, set ITextFrameFormat.KeepTextFlat through ITextFrame.TextFrameFormat. When the value is true, the text stays out of the 3D scene. When it is false, the text participates in the scene and follows its 3D orientation.
This setting does not remove the shape’s 3D formatting: its camera, lighting, material, and extrusion remain configured through IShape.ThreeDFormat. It is also different from ordinary rotation. IShape.Rotation rotates the shape in the slide plane, while ITextFrameFormat.RotationAngle controls the text’s custom rotation within its bounding box. Keeping text out of the 3D scene does not reset either of those angles.
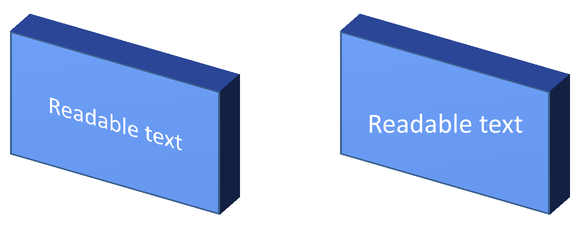
The following self-contained example creates a blue rectangle with text and clones it beside the original. Both shapes have the same 3D formatting; only the text setting differs: false on the left and true on the right. The camera angles are in degrees, and the extrusion height is 40 points. The example saves the presentation as PPTX and renders the comparison slide to PNG at twice its default dimensions.
using System.Drawing;
using Aspose.Slides;
using Aspose.Slides.Export;

using var presentation = new Presentation();
var slide = presentation.Slides[0];

var shape = slide.Shapes.AddAutoShape(ShapeType.Rectangle, 70, 160, 240, 140);

shape.TextFrame.Text = "Readable text";
shape.TextFrame.Paragraphs[0].ParagraphFormat.DefaultPortionFormat.FontHeight = 28;
shape.TextFrame.Paragraphs[0].ParagraphFormat.Alignment = TextAlignment.Center;
shape.TextFrame.TextFrameFormat.AnchoringType = TextAnchorType.Center;
shape.FillFormat.FillType = FillType.Solid;
shape.FillFormat.SolidFillColor.Color = Color.CornflowerBlue;

shape.ThreeDFormat.Camera.CameraType = CameraPresetType.OrthographicFront;
shape.ThreeDFormat.Camera.SetRotation(30, 30, 0);
shape.ThreeDFormat.LightRig.LightType = LightRigPresetType.Flat;
shape.ThreeDFormat.LightRig.Direction = LightingDirection.Top;
shape.ThreeDFormat.Material = MaterialPresetType.Flat;
shape.ThreeDFormat.ExtrusionHeight = 40;
shape.ThreeDFormat.ExtrusionColor.Color = Color.RoyalBlue;
shape.TextFrame.TextFrameFormat.KeepTextFlat = false;

var flatTextShape = (IAutoShape)slide.Shapes.AddClone(shape, 400, 160);
flatTextShape.TextFrame.TextFrameFormat.KeepTextFlat = true;

presentation.Save("keep_text_flat.pptx", SaveFormat.Pptx);
using var image = slide.GetImage(2, 2);
image.Save("keep_text_flat.png");
On the left, the text follows the 3D orientation. On the right, it stays flat and easier to read. Both rectangles retain the same visible extrusion and 3D orientation.
Export and Rendering Behavior
Aspose.Slides preserves 3D formatting when saving to PowerPoint formats such as PPTX. When rendering or exporting to fixed-layout formats, the 3D scene is rasterized or drawn into the output as a 2D result. This applies when you render slides to PNG, export to PDF, export to HTML, or generate frames for video conversion.
Keep these points in mind:
- Exported images and PDFs are not interactive. The object cannot be rotated by the viewer after export.
- The final appearance depends on the combination of camera, light rig, material, extrusion, fill, and slide scaling.
- If you need to inspect inherited or theme-based formatting values, read the effective shape properties.
- Some output formats cannot store editable PowerPoint 3D formatting. In those formats, the visual result is rendered rather than preserved as editable 3D settings.
FAQ
Can Aspose.Slides create interactive 3D presentations?
Aspose.Slides creates and renders PowerPoint 3D effects for shapes and text. It does not make exported images, PDFs, or HTML pages interactive 3D scenes that a viewer can rotate. In PPTX, the 3D formatting remains editable in PowerPoint where the format supports it.
What is the difference between a 3D model and a 3D effect?
A 3D model is a separate 3D object inserted into a presentation. A 3D effect is formatting applied to a regular PowerPoint shape or text, such as rotation, extrusion, bevel, lighting, and material. This article covers 3D effects.
Which settings are required for a visible 3D shape?
At minimum, set a camera rotation and either extrusion or depth. In practice, also set a light rig and material so the rendered faces have clear highlights and shadows.
Can I apply 3D effects to both shapes and text?
Yes. Use IShape.ThreeDFormat for the shape body and ITextFrameFormat.ThreeDFormat for text.
Will 3D effects appear when exporting to images, PDF, HTML, or video frames?
Yes. Aspose.Slides renders 3D effects when producing slide images, PDF output, HTML output, and frames used for video conversion. The exported output contains the rendered appearance, not an editable 3D object.
Can I read the final 3D values after inheritance and theme settings are applied?
Yes. Use the effective formatting APIs described in Shape Effective Properties to read final camera, light rig, bevel, and related 3D values.