4. Standard LaTeX fonts
This article contains a brief introduction to the standard text fonts distributed together with LaTeX. Then it covers LaTeX’s standard support for input and font encodings. The article concludes with a description of a package for tracing LaTeX’s font processing and another package for displaying glyph charts.
4.1. Computer Modern Roman
A family of fonts called Computer Modern was developed by Donald Knuth along with TeX. Until the early 1990s, only these fonts were mostly usable with TeX and, consequently, with LaTeX. Each of these fonts contains only 128 glyphs, so they cannot include accented characters as individual glyphs. Therefore, using these fonts means that accented characters have to be produced with TeX’s \accent primitive, which, in turn, means that automatic hyphenation of words with accented characters is impossible. Although this restriction is acceptable with English documents, it is an obvious disadvantage for other languages.
These deficiencies were of great concern to the TeX users in Europe and eventually led to a reimplementation of TeX in 1989 to support 8-bit characters internally and externally. A standard 8-bit encoding for text fonts (T1) was developed in 1990. It contains many diacritical characters and allows typesetting in more than 30 languages based on the Latin alphabet. Then, the Computer Modern font families were reimplemented, and additional characters were designed so that the resulting fonts completely conform to this encoding scheme.
4.2. Selecting the input encoding: the inputenc package
If you can type accented characters either via single keystrokes or by some other input method (e.g., by pressing ` and then a to get ‘a-grave’), and your computer displays them correctly in the editor…

… then ideally you would use such a text directly with LaTeX instead of having to type \`a, \^e, etc.
With languages such as French and German, the latter approach is feasible. However, for languages like Russian and Greek, the potential for direct input is necessary, as nearly every character in these languages has a command name as its internal LaTeX form. For example, the default Russian definition for \reftextafter contains the following text (which means “on the next page”):
1\cyrn\cyra\ \cyrs\cyrl\cyre\cyrd\cyru\cyryu\cyrshch\cyre\cyrishrt
2\ \cyrs\cyrt\cyrr\cyra\cyrn\cyri\cyrc\cyre
It is unlikely that someone would want to type such things on a regular basis. Nevertheless, it has the advantage of being universally portable, so that it can be correctly interpreted on any LaTeX installation. On the other hand, typing

on an appropriate keyboard is clearly preferable, if it is possible to make LaTeX understand this input. The problem is that what is stored in a file is not the characters we see in the above sequence, but rather octets that represent the characters. In different circumstances (using different encodings), the same octets might represent different characters.
As long as everything happens on a single computer and all programs interpret octets in files in the same manner, everything is usually fine. If so, it makes sense to activate an automatic translation mechanism that is built into some recent TeX implementations. But when a file produced in such an environment is sent to a different computer, processing is likely to fail or, even worse, may appear to succeed, but will in fact produce wrong results by displaying incorrect characters.
The inputenc package was created to cope with this issue. Its main purpose is to inform LaTeX of the encoding used in the document or in a part of the document. This is done by loading the package with the encoding name as an option. For example:
1\usepackage[cp1252]{inputenc} % Windows 1252 (Western Europe) code pageFrom that point onward, LaTeX knows how to interpret the octets in the remainder of the document on any installation, regardless of the encoding used for other purposes on that computer.
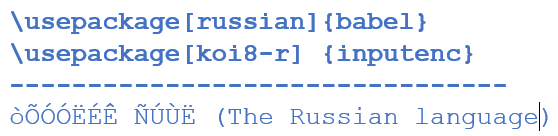
A typical example is shown below. It is a short text written in the koi8-r encoding, which is popular in Russia. The source code shows what the text looks like on a computer using a Latin 1 encoding (e.g., in Germany). The output demonstrates that LaTeX was still able to interpret the text correctly because it was told which input encoding was being used.

The list of encodings currently supported by inputenc is provided below. The interface is well-documented, and support for new encodings can easily be added. Therefore, it is worth consulting the inputenc package documentation if the encoding used by your computer is not listed here. You can also search the Internet for encoding files for inputenc created by other authors. For example, encodings related to Cyrillic languages are distributed along with other font support packages for Cyrillic languages.
The ISO-8859 standard defines a number of important single-byte encodings. The encodings related to the Latin alphabet are supported by inputenc. For the Windows operating system, a number of single-byte encodings have been defined by Microsoft. Additionally, some encodings defined by other computer vendors are available.
latin1This is the ISO-8859-1 encoding (a.k.a. Latin 1). It can represent most Western European languages, including Albanian, Catalan, Danish, Dutch, English, Faroese, Finnish, French, Galician, German, Icelandic, Irish, Italian, Norwegian, Portuguese, Spanish, and Swedish.latin2The ISO Latin 2 encoding (ISO-8859-2) supports the Slavic languages of Central Europe that use the Latin alphabet. It can be used for the following languages: Croatian, Czech, German, Hungarian, Polish, Romanian, Slovak, and Slovenian.latin3This character set (ISO-8859-3) is used for Esperanto, Galician, Maltese, and Turkish.latin4The ISO Latin 4 encoding (ISO-8859-4) can represent languages such as Estonian, Latvian, and Lithuanian.latin5The ISO Latin 5 encoding (ISO 8859-9) is closely related to Latin 1 and replaces the rarely used Icelandic letters from Latin 1 with Turkish letters.latin9Latin 9 (or ISO-8859-15) is another small variation on Latin 1 that adds the euro currency sign as well as a few other characters, such as the\AEligature, that were missing in French and Finnish. It is becoming increasingly popular as a replacement for Latin 1.cp437IBM 437 code page (MS-DOS Latin but containing many graphical characters to draw boxes).cp850IBM 850 code page (MS-DOS multilingual, similar to latin1).cp852IBM 852 code page (MS-DOS multilingual, similar to latin2).cp858IBM 858 code page (IBM 850 with the euro symbol added).cp865IBM 865 code page (MS-DOS Norway).cp1250Windows 1250 (Central and Eastern Europe) code page.cp1252Windows 1252 (Western Europe) code page.cp1257Windows 1257 (Baltic) code page.ansinewWindows 3.1 ANSI encoding; a synonym for cp1252.decmultiDEC Multinational Character Set encoding.applemacMacintosh (standard) encoding.macceMacintosh Central European code page.nextNext Computer encoding.utf8Unicode’s UTF8 encoding support.
Most TeX installations accept 8-bit characters by default. Nevertheless, without further adjustments, like those performed by inpuenc, the results can be unpredictable: some characters may disappear, or you may get whatever character is present in the current font at the octet location referred to, which may or may not be the desired glyph. This behavior was the default for a long time, so it was not changed in LaTeX2e because some people rely on it. However, to ensure that such mistakes can be caught, inputenc offers the option ascii, which makes any character outside the range 32-126 illegal.
1\inputencoding{encoding}Originally, the inputenc package was designed to specify the encoding used for a document as a whole - hence the use of options in the preamble. However, it is possible to change the encoding in the middle of a document by using the command \inputencoding. This command takes the name of an encoding as its argument.
When inputenc was developed, most LaTeX installations were on computers that used single-byte encodings like the ones discussed in this section. However, today another encoding is popular as systems provide support for Unicode: UTF8. This variable-length encoding represents Unicode characters in one to four octets. Encoding support was added to inputenc via the option utf8. Technically, it does not provide a full UTF8 implementation. Only Unicode characters that have some representation in standard LaTeX fonts are mapped (i.e., mainly Latin and Cyrillic character sets): all others will result in a suitable error message. In addition, Unicode combining characters are not supported, although that particular omission should not be a problem in practice.
1\usepackage[utf8]{inputenc}
2\usepackage{textcomp} % for Latin interpretation
3-----------------------------------------------
4German umlauts in UTF-8: ^^c3^^a4^^c3^^b6^^c3^^bc
5\par\inputencoding{latin1}% switch to Latin 1
6But interpreted as Latin 1: ^^c3^^a4^^c3^^b6^^c3^^bc
In UTF8, ASCII characters represent themselves, and most Latin characters are represented by two bytes. In the source code of the example, the two-byte representations of the German umlauts in UTF8 are shown in TeX’s hexadecimal notation, that is with each octet preceded by ^^. In an editor that does not understand UTF8, on would probably see them as similar to the output that is produced when they are interpreted as Latin 1 characters.
A package with more comprehensive UTF8 support (including support for Korean, Chinese, and Japanese characters), though consequently more complex in its set-up, is the ucs package written by Dominique Unruh. You may try it if the inputenc solution does not cover your needs.
4.3. Selecting font encodings with the fontenc package
To enable a text font encoding for use with LaTeX, the encoding has to be loaded in the preamble or the document class. More precisely, the definitions to access the glyphs in fonts with a certain encoding have to be loaded. The canonical way to do this is via the fontenc package, which takes a comma-separated list of font encodings as a package option. The last of these encodings is automatically made the default document encoding. If Cyrillic encodings are loaded, the list of commands affected by \MakeUppercase and \MakeLowercase is automatically extended. For example,
1\usepackage[T2A,T1]{fontenc}will load all necessary definitions for the Cyrillic T2A and the T1 encodings and set the latter to be the default document encoding.
Unlike normal package behavior, one can load this package multiple times with different options to the \usepackage command. This is necessary to allow a document class to load a certain set of encodings and enable the user to load still more encodings in the preamble. Loading encodings more than once is performed without side effects other than potentially changing the document default font encoding.
If language support packages (e.g., those coming with the babel system) are used in the document, it is often the case that the necessary font encodings are already loaded by the support package.
4.4. How to trace the font selection with the tracefnt package
To detect problems in the font selection system, you can use the tracefnt package. It supports several options that allow customizing the amount of information displayed by NFSS on the screen and in the transcript file.
errorshowThis option suppresses all warnings and information messages on the terminal; they will be written to the transcript file only. Only real errors will be shown. You should carefully study the transcript file before printing an important publication because warnings about font substitutions and so on can mean that the final result will be incorrect.warningshowWhen this option is specified, warnings and errors are shown on the terminal. This setting gives you as detailed information as LaTeX2e does without thetracefntpackage loaded.infoshowThis option is the default when you load thetracefntpackage. Extra information, which is normally only written to the transcript file, is now also displayed on your terminal.debugshowThis option additionally shows information about changes to the text font and the restoration of such fonts at the end of a brace group or the end of an environment. Be careful when you turn on this option because it can produce very large transcript files.pausingThis option turns all warnings into errors to help the detection of problems in important publications.loadingThis option shows the loading of external fonts. However, if the format or document class you use has already loaded some fonts, then these will not be shown by this option.
4.5. How to display font tables and samples with nfssfont.tex
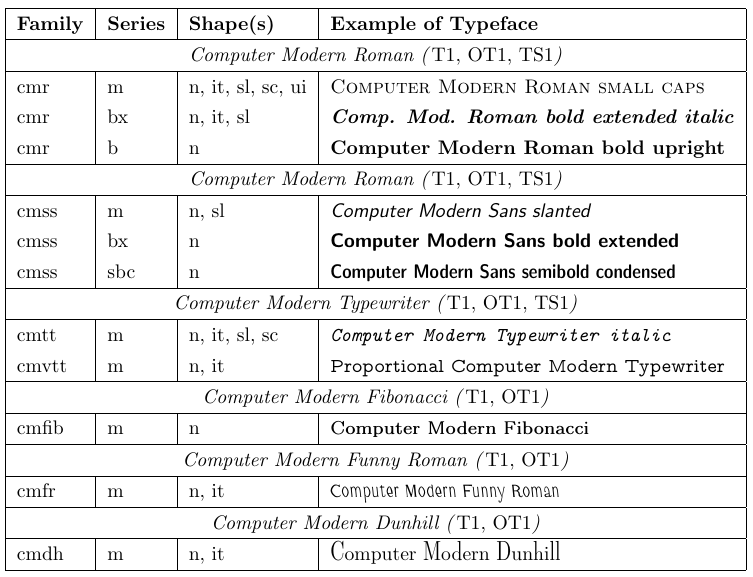
The file called nfssfont.tex can be used to test new fonts, produce font tables showing all characters, and perform other operations related to fonts. You can find this file in any LaTeX distribution. When you run this file through LaTeX, you will be prompted for the name of the font to test. The answer may be either the external font name without an extension - such as cmr10 (Computer Modern Roman 10pt) - if you know it, or an empty font name. In the latter case, you will be prompted for an NFSS font specification: an encoding name (default T1), a font family name (default cmr), a font series (default m), a font shape (default n), and a font size (default 10pt). The program then loads the external file corresponding to that classification.
Next, you will be asked to enter a command. The most important one is probably \table, which produces a font chart like the one below. The command \text is also interesting as it produces a longer text sample. To switch to a new test font, type \init; to finish the test, type \bye or \stop; and to learn about all other available tests, type \help.
 1**********************************************
 2* NFSS font test program version <v2.2b>
 3*
 4* Follow the instructions
 5**********************************************
 6
 7Input external font name, e.g., cmr10
 8(or <enter> for NFSS classification of font):
 9
10\currfontname=cmr10
11Now type a test command (\help for help):)
12*\table
13
14*\newpage
15*\init
16Input external font name, e.g., cmr10
17(or <enter> for NFSS classification of font):
18
19\currfontname=
20*** NFSS classification ***
21
22Font encoding [T1]:
23
24\encoding=OT1
25(ot1enc.def)
26Font family [cmr]:
27
28\family=cmdh
29Font series [m]:
30
31\series=m
32Font shape [n]:
33
34\shape=n
35Font size [10pt]:
36
37\size=10
38(ot1cmdh.fd) Now type a test command (\help for help):
39*\text
40
41*\bye
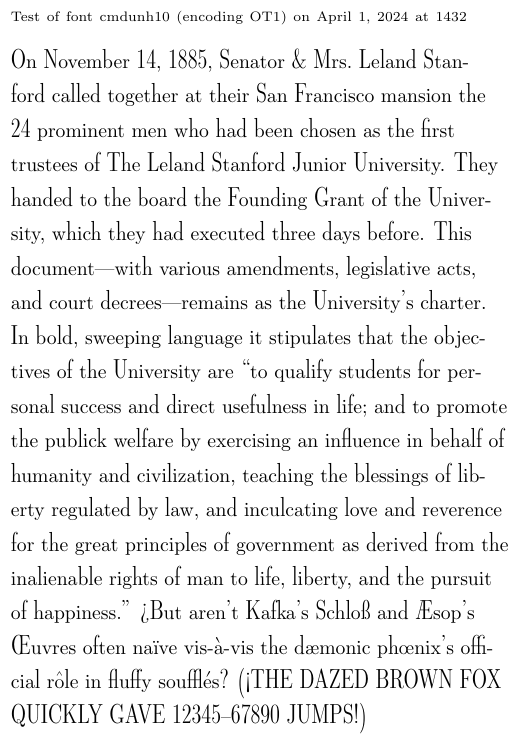
There are two points to be aware of. First, the
nfssfont.texprogram issues an implicit\initcommand, so the first line of input should either contain a font name or be completely empty to indicate that an NFSS classification follows. Second, the input to\initmust appear on individual lines with nothing else (not even a comment) because the line ending indicates the end of the response to a prompt likeFont encoding[T1]: \encoding=that you will get.