Utwórz tabelę

Aspose.Words umożliwia użytkownikom tworzenie tabel w dokumencie od podstaw i udostępnia kilka różnych metod, aby to zrobić. W tym artykule przedstawiono szczegółowe informacje na temat dodawania sformatowanych tabel do dokumentu przy użyciu każdej metody, a także porównanie każdej metody na końcu artykułu.

Domyślne style tabeli

Nowo utworzona tabela otrzymuje wartości domyślne podobne do tych używanych w Microsoft Word:

Właściwość tabeli Domyślnie w Aspose.Words
Border Style Single
Border Width 1/2 pt
Border Color Black
Left and Right Padding 5.4 pts
AutoFit Mode AutoFit to Window
Allow AutoFit True

Utwórz tabelę za pomocą DocumentBuilder

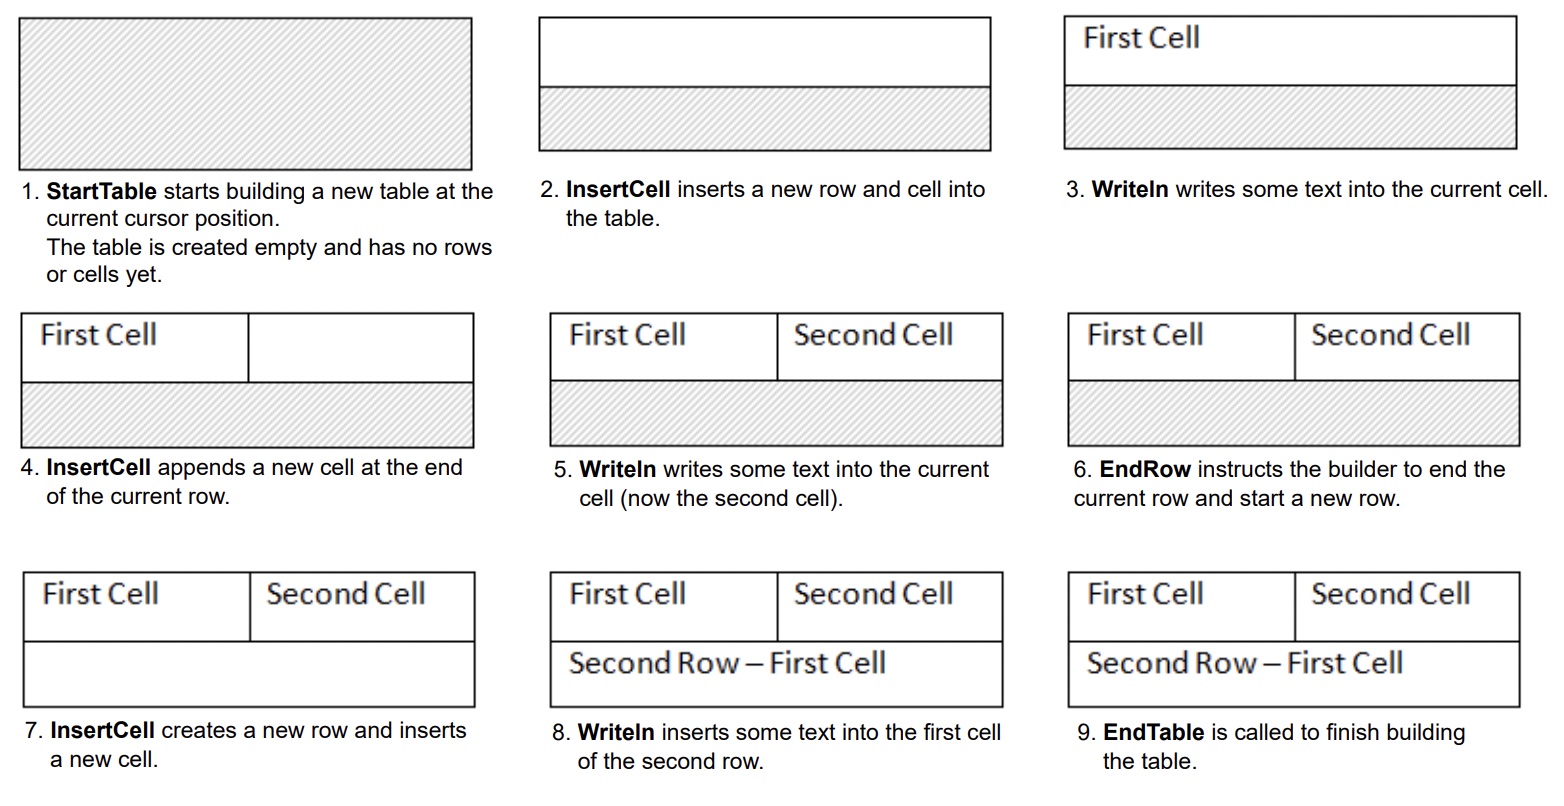
W Aspose.Words użytkownicy mogą tworzyć tabele w dokumencie za pomocą DocumentBuilder. Podstawowy algorytm tworzenia tabeli jest następujący:

  1. Uruchom tabelę za pomocą StartTable
  2. Dodaj komórkę do tabeli za pomocą InsertCell – spowoduje to automatyczne rozpoczęcie nowego wiersza
  3. Opcjonalnie użyj właściwości CellFormat, aby określić formatowanie komórki
  4. Wstaw zawartość komórki, korzystając z odpowiednich metod DocumentBuilder, takich jak Writeln, InsertImage i inne
  5. Powtarzaj kroki 2-4, aż rząd będzie kompletny
  6. Wywołaj EndRow, aby zakończyć bieżący wiersz
  7. Opcjonalnie użyj właściwości RowFormat, aby określić formatowanie wierszy
  8. Powtarzaj kroki 2-7, aż tabela będzie kompletna
  9. Zadzwoń do EndTable, aby zakończyć tworzenie tabeli

Proces tworzenia tabeli można wyraźnie zobaczyć na poniższym obrazku:

creating-table-process

Poniższy przykład kodu pokazuje, jak utworzyć prostą tabelę przy użyciu formatu DocumentBuilder z domyślnym formatowaniem:

// For complete examples and data files, please go to https://github.com/aspose-words/Aspose.Words-for-.NET.git.
Document doc = new Document();
DocumentBuilder builder = new DocumentBuilder(doc);
// Start building the table.
builder.StartTable();
builder.InsertCell();
builder.Write("Row 1, Cell 1 Content.");
// Build the second cell.
builder.InsertCell();
builder.Write("Row 1, Cell 2 Content.");
// Call the following method to end the row and start a new row.
builder.EndRow();
// Build the first cell of the second row.
builder.InsertCell();
builder.Write("Row 2, Cell 1 Content");
// Build the second cell.
builder.InsertCell();
builder.Write("Row 2, Cell 2 Content.");
builder.EndRow();
// Signal that we have finished building the table.
builder.EndTable();
doc.Save(ArtifactsDir + "WorkingWithTables.CreateSimpleTable.docx");

Poniższy przykład kodu pokazuje, jak utworzyć sformatowaną tabelę za pomocą narzędzia DocumentBuilder:

// For complete examples and data files, please go to https://github.com/aspose-words/Aspose.Words-for-.NET.git.
Document doc = new Document();
DocumentBuilder builder = new DocumentBuilder(doc);
Table table = builder.StartTable();
builder.InsertCell();
// Table wide formatting must be applied after at least one row is present in the table.
table.LeftIndent = 20.0;
// Set height and define the height rule for the header row.
builder.RowFormat.Height = 40.0;
builder.RowFormat.HeightRule = HeightRule.AtLeast;
builder.CellFormat.Shading.BackgroundPatternColor = Color.FromArgb(198, 217, 241);
builder.ParagraphFormat.Alignment = ParagraphAlignment.Center;
builder.Font.Size = 16;
builder.Font.Name = "Arial";
builder.Font.Bold = true;
builder.CellFormat.Width = 100.0;
builder.Write("Header Row,\n Cell 1");
// We don't need to specify this cell's width because it's inherited from the previous cell.
builder.InsertCell();
builder.Write("Header Row,\n Cell 2");
builder.InsertCell();
builder.CellFormat.Width = 200.0;
builder.Write("Header Row,\n Cell 3");
builder.EndRow();
builder.CellFormat.Shading.BackgroundPatternColor = Color.White;
builder.CellFormat.Width = 100.0;
builder.CellFormat.VerticalAlignment = CellVerticalAlignment.Center;
// Reset height and define a different height rule for table body.
builder.RowFormat.Height = 30.0;
builder.RowFormat.HeightRule = HeightRule.Auto;
builder.InsertCell();
// Reset font formatting.
builder.Font.Size = 12;
builder.Font.Bold = false;
builder.Write("Row 1, Cell 1 Content");
builder.InsertCell();
builder.Write("Row 1, Cell 2 Content");
builder.InsertCell();
builder.CellFormat.Width = 200.0;
builder.Write("Row 1, Cell 3 Content");
builder.EndRow();
builder.InsertCell();
builder.CellFormat.Width = 100.0;
builder.Write("Row 2, Cell 1 Content");
builder.InsertCell();
builder.Write("Row 2, Cell 2 Content");
builder.InsertCell();
builder.CellFormat.Width = 200.0;
builder.Write("Row 2, Cell 3 Content.");
builder.EndRow();
builder.EndTable();
doc.Save(ArtifactsDir + "WorkingWithTables.FormattedTable.docx");

Poniższy przykład kodu pokazuje, jak wstawić zagnieżdżoną tabelę za pomocą narzędzia DocumentBuilder:

// For complete examples and data files, please go to https://github.com/aspose-words/Aspose.Words-for-.NET.git.
Document doc = new Document();
DocumentBuilder builder = new DocumentBuilder(doc);
Cell cell = builder.InsertCell();
builder.Writeln("Outer Table Cell 1");
builder.InsertCell();
builder.Writeln("Outer Table Cell 2");
// This call is important to create a nested table within the first table.
// Without this call, the cells inserted below will be appended to the outer table.
builder.EndTable();
// Move to the first cell of the outer table.
builder.MoveTo(cell.FirstParagraph);
// Build the inner table.
builder.InsertCell();
builder.Writeln("Inner Table Cell 1");
builder.InsertCell();
builder.Writeln("Inner Table Cell 2");
builder.EndTable();
doc.Save(ArtifactsDir + "WorkingWithTables.NestedTable.docx");
view raw nested-table.cs hosted with ❤ by GitHub

Utwórz tabelę za pomocą DOM (Document Object Model)

Możesz wstawiać tabele bezpośrednio do DOM, dodając nowy węzeł Table w określonej pozycji.

Należy pamiętać, że zaraz po utworzeniu węzła tabeli sama tabela będzie całkowicie pusta, czyli nie będzie jeszcze zawierać wierszy i komórek. Aby wstawić wiersze i komórki do tabeli, dodaj odpowiednie węzły podrzędne Row i Cell do pliku DOM.

Poniższy przykład kodu pokazuje, jak zbudować od podstaw nową tabelę, dodając odpowiednie węzły podrzędne do drzewa dokumentu:

// For complete examples and data files, please go to https://github.com/aspose-words/Aspose.Words-for-.NET.git.
Document doc = new Document();
// We start by creating the table object. Note that we must pass the document object
// to the constructor of each node. This is because every node we create must belong
// to some document.
Table table = new Table(doc);
doc.FirstSection.Body.AppendChild(table);
// Here we could call EnsureMinimum to create the rows and cells for us. This method is used
// to ensure that the specified node is valid. In this case, a valid table should have at least one Row and one cell.
// Instead, we will handle creating the row and table ourselves.
// This would be the best way to do this if we were creating a table inside an algorithm.
Row row = new Row(doc);
row.RowFormat.AllowBreakAcrossPages = true;
table.AppendChild(row);
Cell cell = new Cell(doc);
cell.CellFormat.Shading.BackgroundPatternColor = Color.LightBlue;
cell.CellFormat.Width = 80;
cell.AppendChild(new Paragraph(doc));
cell.FirstParagraph.AppendChild(new Run(doc, "Row 1, Cell 1 Text"));
row.AppendChild(cell);
// We would then repeat the process for the other cells and rows in the table.
// We can also speed things up by cloning existing cells and rows.
row.AppendChild(cell.Clone(false));
row.LastCell.AppendChild(new Paragraph(doc));
row.LastCell.FirstParagraph.AppendChild(new Run(doc, "Row 1, Cell 2 Text"));
// We can now apply any auto fit settings.
table.AutoFit(AutoFitBehavior.FixedColumnWidths);
doc.Save(ArtifactsDir + "WorkingWithTables.InsertTableDirectly.docx");

Utwórz tabelę z HTML

Aspose.Words obsługuje wstawianie treści do dokumentu ze źródła HTML przy użyciu metody InsertHtml. Dane wejściowe mogą być kompletną stroną HTML lub tylko częściowym fragmentem.

Korzystając z metody InsertHtml, użytkownicy mogą wstawiać tabele do dokumentu za pomocą znaczników tabel, takich jak <table>, <tr>, <td>.

Poniższy przykład kodu pokazuje, jak wstawić tabelę do dokumentu z ciągu zawierającego znaczniki HTML:

// For complete examples and data files, please go to https://github.com/aspose-words/Aspose.Words-for-.NET.git.
Document doc = new Document();
DocumentBuilder builder = new DocumentBuilder(doc);
// Note that AutoFitSettings does not apply to tables inserted from HTML.
builder.InsertHtml("<table>" +
"<tr>" +
"<td>Row 1, Cell 1</td>" +
"<td>Row 1, Cell 2</td>" +
"</tr>" +
"<tr>" +
"<td>Row 2, Cell 2</td>" +
"</tr>" +
"</table>");
doc.Save(ArtifactsDir + "WorkingWithTables.InsertTableFromHtml.docx");

Wstaw kopię istniejącej tabeli

Często zdarza się, że trzeba utworzyć tabelę w oparciu o tabelę już istniejącą w dokumencie. Najłatwiejszym sposobem powielenia tabeli przy zachowaniu całego formatowania jest sklonowanie węzła tabeli przy użyciu metody Clone.

Tej samej techniki można użyć do dodania kopii istniejącego wiersza lub komórki do tabeli.

Poniższy przykład kodu pokazuje, jak powielić tabelę za pomocą konstruktorów węzłów:

// For complete examples and data files, please go to https://github.com/aspose-words/Aspose.Words-for-.NET.git.
Document doc = new Document(MyDir + "Tables.docx");
Table table = (Table) doc.GetChild(NodeType.Table, 0, true);
// Clone the table and insert it into the document after the original.
Table tableClone = (Table) table.Clone(true);
table.ParentNode.InsertAfter(tableClone, table);
// Insert an empty paragraph between the two tables,
// or else they will be combined into one upon saving this has to do with document validation.
table.ParentNode.InsertAfter(new Paragraph(doc), table);
doc.Save(ArtifactsDir + "WorkingWithTables.CloneCompleteTable.docx");

Poniższy przykład kodu pokazuje, jak sklonować ostatni wiersz tabeli i dołączyć go do tabeli:

// For complete examples and data files, please go to https://github.com/aspose-words/Aspose.Words-for-.NET.git.
Document doc = new Document(MyDir + "Tables.docx");
Table table = (Table) doc.GetChild(NodeType.Table, 0, true);
Row clonedRow = (Row) table.LastRow.Clone(true);
// Remove all content from the cloned row's cells. This makes the row ready for new content to be inserted into.
foreach (Cell cell in clonedRow.Cells)
cell.RemoveAllChildren();
table.AppendChild(clonedRow);
doc.Save(ArtifactsDir + "WorkingWithTables.CloneLastRow.docx");

Jeśli planujesz utworzyć w dokumencie tabele, które rosną dynamicznie wraz z każdym rekordem ze źródła danych, powyższa metoda nie jest zalecana. Zamiast tego żądany wynik można łatwiej osiągnąć, używając Mail merge z regionami. Więcej o tej technice możesz dowiedzieć się w dziale Mail Merge z regionami.

Porównaj sposoby tworzenia tabeli

Aspose.Words udostępnia kilka metod tworzenia nowych tabel w dokumencie. Każda metoda ma swoje zalety i wady, dlatego wybór często zależy od konkretnej sytuacji.

Przyjrzyjmy się bliżej tym sposobom tworzenia tabel i porównajmy ich zalety i wady:

metoda Zalety Niedogodności
Za pośrednictwem DocumentBuilder Standardowa metoda wstawiania tabel i innej zawartości dokumentu Czasami trudno jest utworzyć wiele odmian tabel jednocześnie za pomocą tej samej instancji konstruktora
Za pośrednictwem DOM Lepiej pasuje do otaczającego kodu, który tworzy i wstawia węzły bezpośrednio do DOM bez użycia DocumentBuilder Tabela jest tworzona jako “pusta”: przed wykonaniem większości operacji należy wywołać EnsureMinimum, aby utworzyć brakujące węzły podrzędne
Z HTMLa Można utworzyć nową tabelę ze źródła HTML przy użyciu tagów takich jak <table>, <tr>, <td> Nie wszystkie możliwe formaty tabel Microsoft Word można zastosować do HTML
Klonowanie istniejącej tabeli Można utworzyć kopię istniejącej tabeli, zachowując całe formatowanie wierszy i komórek Zanim tabela będzie gotowa do użycia, należy usunąć odpowiednie węzły podrzędne