
مدیریت پاراگرافهای متنی پاورپوینت در JavaScript
مرور کلی
Aspose.Slides برای Node.js از طریق Java متن را بهعنوان یک سلسلهمراتب از فریمهای متنی (TextFrame)، پاراگرافها (Paragraph) و بخشها (Portion) نمایش میدهد:
- TextFrame نمایانگر مخزن متن در یک شکل است و دسترسی به مجموعه پاراگرافهای آن را فراهم میکند.
- Paragraph نمایانگر یک پاراگراف در یک فریم متنی است و دسترسی به بخشها و قالببندی سطح پاراگراف را فراهم میکند.
- Portion نمایانگر یک بخش متن درون یک پاراگراف است. هر بخش میتواند متن و قالببندی سطح کاراکتر خود را داشته باشد.
بنابراین، یک پاراگراف میتواند متن با فونتها، رنگها، اندازهها و سایر قالببندیهای مختلف را با استفاده از چندین بخش (Portion) داشته باشد.
ایجاد و قالببندی پاراگرافها
ایجاد پاراگرافها با چندین بخش
مراحل زیر یک فریم متنی با سه پاراگراف ایجاد میکند که هر یک شامل سه بخش هستند:
- یک نمونه از کلاس Presentation ایجاد کنید.
- اسلاید مربوطه را از طریق شاخص آن دسترسی پیدا کنید.
- یک AutoShape مستطیلی به اسلاید اضافه کنید.
- به TextFrame شکل دسترسی پیدا کنید.
- از پاراگراف پیشفرض استفاده کنید و دو شیء دیگر از نوع Paragraph به فریم متنی اضافه کنید.
- به اندازه کافی شیء Portion برای هر پاراگراف اضافه کنید تا شامل سه بخش شود. پاراگراف پیشفرض از پیش یک بخش خالی دارد.
- متن هر بخش را تنظیم کنید.
- قالببندی سطح کاراکتر را از طریق Portion.getPortionFormat اعمال کنید.
- ارائه (Presentation) تغییر یافته را ذخیره کنید.
این مثال JavaScript مراحل را اجرا میکند:
var aspose = aspose || {};
aspose.slides = require("aspose.slides.via.java");
const java = require("java");

const presentation = new aspose.slides.Presentation();
try {
    const slide = presentation.getSlides().get_Item(0);
    const shape = slide.getShapes().addAutoShape(aspose.slides.ShapeType.Rectangle, 50, 150, 300, 150);
    const textFrame = shape.getTextFrame();

    const firstParagraph = textFrame.getParagraphs().get_Item(0);
    firstParagraph.getPortions().add(new aspose.slides.Portion());
    firstParagraph.getPortions().add(new aspose.slides.Portion());

    const secondParagraph = new aspose.slides.Paragraph();
    secondParagraph.getPortions().add(new aspose.slides.Portion());
    secondParagraph.getPortions().add(new aspose.slides.Portion());
    secondParagraph.getPortions().add(new aspose.slides.Portion());
    textFrame.getParagraphs().add(secondParagraph);

    const thirdParagraph = new aspose.slides.Paragraph();
    thirdParagraph.getPortions().add(new aspose.slides.Portion());
    thirdParagraph.getPortions().add(new aspose.slides.Portion());
    thirdParagraph.getPortions().add(new aspose.slides.Portion());
    textFrame.getParagraphs().add(thirdParagraph);

    const paragraphCount = textFrame.getParagraphs().getCount();
    for (let paragraphIndex = 0; paragraphIndex < paragraphCount; paragraphIndex++) {
        const paragraph = textFrame.getParagraphs().get_Item(paragraphIndex);
        const portionCount = paragraph.getPortions().getCount();
        for (let portionIndex = 0; portionIndex < portionCount; portionIndex++) {
            const portion = paragraph.getPortions().get_Item(portionIndex);
            portion.setText("Portion " + (paragraphIndex + 1) + "." + (portionIndex + 1));

            if (portionIndex === 0) {
                portion.getPortionFormat().getFillFormat().setFillType(java.newByte(aspose.slides.FillType.Solid));
                portion.getPortionFormat().getFillFormat().getSolidFillColor().setColor(java.getStaticFieldValue("java.awt.Color", "RED"));
                portion.getPortionFormat().setFontBold(java.newByte(aspose.slides.NullableBool.True));
                portion.getPortionFormat().setFontHeight(15);
            } else if (portionIndex === 1) {
                portion.getPortionFormat().getFillFormat().setFillType(java.newByte(aspose.slides.FillType.Solid));
                portion.getPortionFormat().getFillFormat().getSolidFillColor().setColor(java.getStaticFieldValue("java.awt.Color", "BLUE"));
                portion.getPortionFormat().setFontItalic(java.newByte(aspose.slides.NullableBool.True));
                portion.getPortionFormat().setFontHeight(18);
            }
        }
    }

    presentation.save("paragraphs_with_portions.pptx", aspose.slides.SaveFormat.Pptx);
} finally {
    presentation.dispose();
}
ایجاد فهرستهای بولتدار و شمارهدار
ایجاد یک فهرست بولتدار یا شمارهدار
بولتها و شمارهگذاری موارد مرتبط را برای اسکن آسانتر میکند. در Aspose.Slides، تنظیمات فهرست از طریق BulletFormat تعریف میشود.
- یک نمونه از کلاس Presentation ایجاد کنید.
- اسلاید مربوطه را از طریق شاخص آن دسترسی پیدا کنید.
- یک AutoShape به اسلاید انتخاب شده اضافه کنید.
- به TextFrame شکل دسترسی پیدا کنید.
- پاراگراف پیشفرض را از فریم متنی حذف کنید.
- یک Paragraph برای یک بولت نماد ایجاد کنید.
- متد BulletFormat.setType را به BulletType.Symbol تنظیم کنید و کاراکتر بولت را مشخص کنید.
- متن پاراگراف، تورفتگی، رنگ بولت و ارتفاع بولت را تنظیم کنید.
- پاراگراف را به فریم متنی اضافه کنید.
- پاراگراف دوم را ایجاد کنید و BulletFormat.setType را به BulletType.Numbered تنظیم کنید.
- سبک بولت شمارهدار را پیکربندی کنید و پاراگراف را به فریم متنی اضافه کنید.
- ارائه را ذخیره کنید.
این مثال JavaScript یک بولت نماد و یک بولت شمارهدار ایجاد میکند:
var aspose = aspose || {};
aspose.slides = require("aspose.slides.via.java");
const java = require("java");

const presentation = new aspose.slides.Presentation();
try {
    const slide = presentation.getSlides().get_Item(0);
    const shape = slide.getShapes().addAutoShape(aspose.slides.ShapeType.Rectangle, 200, 200, 400, 200);
    const textFrame = shape.getTextFrame();
    textFrame.getParagraphs().clear();

    const symbolParagraph = new aspose.slides.Paragraph();
    symbolParagraph.setText("Welcome to Aspose.Slides");
    symbolParagraph.getParagraphFormat().getBullet().setType(java.newByte(aspose.slides.BulletType.Symbol));
    symbolParagraph.getParagraphFormat().getBullet().setChar(java.newChar(0x2022));
    symbolParagraph.getParagraphFormat().setIndent(25);
    symbolParagraph.getParagraphFormat().getBullet().getColor().setColorType(aspose.slides.ColorType.RGB);
    symbolParagraph.getParagraphFormat().getBullet().getColor().setColor(java.getStaticFieldValue("java.awt.Color", "BLACK"));
    symbolParagraph.getParagraphFormat().getBullet().setBulletHardColor(java.newByte(aspose.slides.NullableBool.True));
    symbolParagraph.getParagraphFormat().getBullet().setHeight(100);
    textFrame.getParagraphs().add(symbolParagraph);

    const numberedParagraph = new aspose.slides.Paragraph();
    numberedParagraph.setText("This is a numbered item");
    numberedParagraph.getParagraphFormat().getBullet().setType(java.newByte(aspose.slides.BulletType.Numbered));
    numberedParagraph.getParagraphFormat().getBullet().setNumberedBulletStyle(java.newByte(aspose.slides.NumberedBulletStyle.BulletCircleNumWDBlackPlain));
    numberedParagraph.getParagraphFormat().setIndent(25);
    numberedParagraph.getParagraphFormat().getBullet().getColor().setColorType(aspose.slides.ColorType.RGB);
    numberedParagraph.getParagraphFormat().getBullet().getColor().setColor(java.getStaticFieldValue("java.awt.Color", "BLACK"));
    numberedParagraph.getParagraphFormat().getBullet().setBulletHardColor(java.newByte(aspose.slides.NullableBool.True));
    numberedParagraph.getParagraphFormat().getBullet().setHeight(100);
    textFrame.getParagraphs().add(numberedParagraph);

    presentation.save("bulleted_and_numbered_list.pptx", aspose.slides.SaveFormat.Pptx);
} finally {
    presentation.dispose();
}
استفاده از بولتهای تصویری
بولتهای تصویری به شما اجازه میدهند به جای نماد یا عدد از تصویر سفارشی استفاده کنید.
- یک نمونه از کلاس Presentation ایجاد کنید.
- اسلاید مربوطه را از طریق شاخص آن دسترسی پیدا کنید.
- یک AutoShape اضافه کنید و به TextFrame آن دسترسی پیدا کنید.
- پاراگراف پیشفرض را از فریم متنی حذف کنید.
- تصویر بولت را بارگذاری کنید و بهعنوان یک PPImage به مجموعه تصاویر ارائه اضافه کنید.
- یک Paragraph ایجاد کنید و متن آن را تنظیم کنید.
- متد BulletFormat.setType را به BulletType.Picture تنظیم کنید.
- تصویر را از طریق BulletFormat.getPicture اختصاص داده و ارتفاع بولت را تنظیم کنید.
- پاراگراف را به فریم متنی اضافه کنید.
- ارائه تغییر یافته را ذخیره کنید.
var aspose = aspose || {};
aspose.slides = require("aspose.slides.via.java");
const java = require("java");

const presentation = new aspose.slides.Presentation();
try {
    const slide = presentation.getSlides().get_Item(0);

    const bulletImage = aspose.slides.Images.fromFile("image.png");
    let presentationImage;
    try {
        presentationImage = presentation.getImages().addImage(bulletImage);
    } finally {
        bulletImage.dispose();
    }

    const shape = slide.getShapes().addAutoShape(aspose.slides.ShapeType.Rectangle, 200, 200, 400, 200);
    const textFrame = shape.getTextFrame();
    textFrame.getParagraphs().clear();

    const paragraph = new aspose.slides.Paragraph();
    paragraph.setText("Welcome to Aspose.Slides");
    paragraph.getParagraphFormat().getBullet().setType(java.newByte(aspose.slides.BulletType.Picture));
    paragraph.getParagraphFormat().getBullet().getPicture().setImage(presentationImage);
    paragraph.getParagraphFormat().getBullet().setHeight(100);
    textFrame.getParagraphs().add(paragraph);

    presentation.save("picture_bullet.pptx", aspose.slides.SaveFormat.Pptx);
    presentation.save("picture_bullet.ppt", aspose.slides.SaveFormat.Ppt);
} finally {
    presentation.dispose();
}
ایجاد فهرست چندسطحی
متد ParagraphFormat.setDepth را تنظیم کنید تا پاراگرافها در سطوح مختلف فهرست قرار گیرند. بالاترین سطح عمق 0 دارد.
- یک Presentation ایجاد کنید و به یک اسلاید دسترسی پیدا کنید.
- یک AutoShape اضافه کنید و پاراگراف پیشفرض را از فریم متنی آن پاک کنید.
- چهار پاراگراف ایجاد کنید و نمادهای بولت آنها را پیکربندی کنید.
- مقادیر ParagraphFormat.setDepth آنها را به
0،1،2و3تنظیم کنید. - پاراگرافها را به فریم متنی اضافه کنید و ارائه را ذخیره کنید.
var aspose = aspose || {};
aspose.slides = require("aspose.slides.via.java");
const java = require("java");

const presentation = new aspose.slides.Presentation();
try {
    const slide = presentation.getSlides().get_Item(0);
    const shape = slide.getShapes().addAutoShape(aspose.slides.ShapeType.Rectangle, 200, 200, 400, 200);
    const textFrame = shape.getTextFrame();
    textFrame.getParagraphs().clear();

    const firstParagraph = new aspose.slides.Paragraph();
    firstParagraph.setText("Content");
    firstParagraph.getParagraphFormat().getBullet().setType(java.newByte(aspose.slides.BulletType.Symbol));
    firstParagraph.getParagraphFormat().getBullet().setChar(java.newChar(0x2022));
    firstParagraph.getParagraphFormat().getDefaultPortionFormat().getFillFormat().setFillType(java.newByte(aspose.slides.FillType.Solid));
    firstParagraph.getParagraphFormat().getDefaultPortionFormat().getFillFormat().getSolidFillColor().setColor(java.getStaticFieldValue("java.awt.Color", "BLACK"));
    firstParagraph.getParagraphFormat().setDepth(java.newShort(0));

    const secondParagraph = new aspose.slides.Paragraph();
    secondParagraph.setText("Second level");
    secondParagraph.getParagraphFormat().getBullet().setType(java.newByte(aspose.slides.BulletType.Symbol));
    secondParagraph.getParagraphFormat().getBullet().setChar(java.newChar(45));
    secondParagraph.getParagraphFormat().getDefaultPortionFormat().getFillFormat().setFillType(java.newByte(aspose.slides.FillType.Solid));
    secondParagraph.getParagraphFormat().getDefaultPortionFormat().getFillFormat().getSolidFillColor().setColor(java.getStaticFieldValue("java.awt.Color", "BLACK"));
    secondParagraph.getParagraphFormat().setDepth(java.newShort(1));

    const thirdParagraph = new aspose.slides.Paragraph();
    thirdParagraph.setText("Third level");
    thirdParagraph.getParagraphFormat().getBullet().setType(java.newByte(aspose.slides.BulletType.Symbol));
    thirdParagraph.getParagraphFormat().getBullet().setChar(java.newChar(0x2022));
    thirdParagraph.getParagraphFormat().getDefaultPortionFormat().getFillFormat().setFillType(java.newByte(aspose.slides.FillType.Solid));
    thirdParagraph.getParagraphFormat().getDefaultPortionFormat().getFillFormat().getSolidFillColor().setColor(java.getStaticFieldValue("java.awt.Color", "BLACK"));
    thirdParagraph.getParagraphFormat().setDepth(java.newShort(2));

    const fourthParagraph = new aspose.slides.Paragraph();
    fourthParagraph.setText("Fourth level");
    fourthParagraph.getParagraphFormat().getBullet().setType(java.newByte(aspose.slides.BulletType.Symbol));
    fourthParagraph.getParagraphFormat().getBullet().setChar(java.newChar(45));
    fourthParagraph.getParagraphFormat().getDefaultPortionFormat().getFillFormat().setFillType(java.newByte(aspose.slides.FillType.Solid));
    fourthParagraph.getParagraphFormat().getDefaultPortionFormat().getFillFormat().getSolidFillColor().setColor(java.getStaticFieldValue("java.awt.Color", "BLACK"));
    fourthParagraph.getParagraphFormat().setDepth(java.newShort(3));

    textFrame.getParagraphs().add(firstParagraph);
    textFrame.getParagraphs().add(secondParagraph);
    textFrame.getParagraphs().add(thirdParagraph);
    textFrame.getParagraphs().add(fourthParagraph);

    presentation.save("multilevel_list.pptx", aspose.slides.SaveFormat.Pptx);
} finally {
    presentation.dispose();
}
شروع موارد فهرست شمارهدار با مقادیر سفارشی
از BulletFormat.setNumberedBulletStartWith برای تنظیم عدد اولیه نمایش داده شده برای پاراگراف شمارهدار استفاده کنید.
- یک Presentation ایجاد کنید و یک AutoShape به اسلاید اضافه کنید.
- پاراگراف پیشفرض را از فریم متنی شکل پاک کنید.
- سه پاراگراف شمارهدار ایجاد کنید.
- برای پاراگرافهای مربوطه، متد BulletFormat.setNumberedBulletStartWith را به
2،3و7تنظیم کنید. - پاراگرافها را به فریم متنی اضافه کنید و ارائه را ذخیره کنید.
var aspose = aspose || {};
aspose.slides = require("aspose.slides.via.java");
const java = require("java");

const presentation = new aspose.slides.Presentation();
try {
    const slide = presentation.getSlides().get_Item(0);
    const shape = slide.getShapes().addAutoShape(aspose.slides.ShapeType.Rectangle, 200, 200, 400, 200);
    const textFrame = shape.getTextFrame();
    textFrame.getParagraphs().clear();

    const firstParagraph = new aspose.slides.Paragraph();
    firstParagraph.setText("Start at 2");
    firstParagraph.getParagraphFormat().getBullet().setType(java.newByte(aspose.slides.BulletType.Numbered));
    firstParagraph.getParagraphFormat().getBullet().setNumberedBulletStartWith(java.newShort(2));
    textFrame.getParagraphs().add(firstParagraph);

    const secondParagraph = new aspose.slides.Paragraph();
    secondParagraph.setText("Start at 3");
    secondParagraph.getParagraphFormat().getBullet().setType(java.newByte(aspose.slides.BulletType.Numbered));
    secondParagraph.getParagraphFormat().getBullet().setNumberedBulletStartWith(java.newShort(3));
    textFrame.getParagraphs().add(secondParagraph);

    const thirdParagraph = new aspose.slides.Paragraph();
    thirdParagraph.setText("Start at 7");
    thirdParagraph.getParagraphFormat().getBullet().setType(java.newByte(aspose.slides.BulletType.Numbered));
    thirdParagraph.getParagraphFormat().getBullet().setNumberedBulletStartWith(java.newShort(7));
    textFrame.getParagraphs().add(thirdParagraph);

    presentation.save("custom_numbered_list.pptx", aspose.slides.SaveFormat.Pptx);
} finally {
    presentation.dispose();
}
کنترل چیدمان پاراگراف و ویژگیهای انتهای آن
تنظیم تورفتگی خط اول
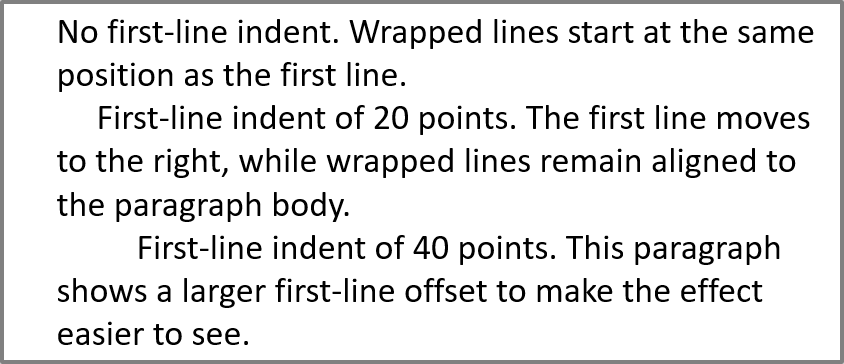
از ParagraphFormat.setIndent برای کنترل تورفتگی خط اول یک پاراگراف استفاده کنید. این متد فقط خط اول را نسبت به حاشیه چپ پاراگراف جابهجا میکند. مقدار مثبت خط اول را به سمت راست حرکت میدهد، در حالی که خطوط باقیمانده با بدنه پاراگراف همتراز میمانند.
هنگامی که نیاز به جابهجایی کل پاراگراف دارید، از ParagraphFormat.setMarginLeft استفاده کنید. وقتی فقط خط اول را میخواهید جابهجا کنید، از ParagraphFormat.setIndent استفاده کنید.
مثال زیر چندین پاراگراف ایجاد میکند و مقادیر مختلف ParagraphFormat.setIndent را برای نشان دادن تأثیر تورفتگی خط اول بر چیدمان پاراگراف اعمال میکند.
- یک نمونه از کلاس Presentation ایجاد کنید.
- به اسلاید هدف دسترسی پیدا کنید.
- یک AutoShape مستطیلی به اسلاید اضافه کنید.
- به TextFrame شکل دسترسی پیدا کنید و پاراگراف پیشفرض را حذف کنید.
- چندین پاراگراف ایجاد کنید و مقادیر مختلف ParagraphFormat.setIndent را برای هر کدام تنظیم کنید.
- پاراگرافها را به فریم متنی اضافه کنید.
- ارائه را ذخیره کنید.
var aspose = aspose || {};
aspose.slides = require("aspose.slides.via.java");
const java = require("java");

const presentation = new aspose.slides.Presentation();
try {
    const slide = presentation.getSlides().get_Item(0);

    const shape = slide.getShapes().addAutoShape(aspose.slides.ShapeType.Rectangle, 50, 50, 420, 220);
    shape.getFillFormat().setFillType(java.newByte(aspose.slides.FillType.NoFill));
    shape.getLineFormat().getFillFormat().setFillType(java.newByte(aspose.slides.FillType.Solid));
    shape.getLineFormat().getFillFormat().getSolidFillColor().setColor(java.getStaticFieldValue("java.awt.Color", "GRAY"));

    const textFrame = shape.getTextFrame();
    textFrame.getTextFrameFormat().setAutofitType(java.newByte(aspose.slides.TextAutofitType.Shape));
    textFrame.getParagraphs().clear();

    const firstParagraph = new aspose.slides.Paragraph();
    firstParagraph.setText("No first-line indent. Wrapped lines start at the same position as the first line.");
    firstParagraph.getParagraphFormat().getDefaultPortionFormat().getFillFormat().setFillType(java.newByte(aspose.slides.FillType.Solid));
    firstParagraph.getParagraphFormat().getDefaultPortionFormat().getFillFormat().getSolidFillColor().setColor(java.getStaticFieldValue("java.awt.Color", "BLACK"));
    firstParagraph.getParagraphFormat().setMarginLeft(20);
    firstParagraph.getParagraphFormat().setIndent(0);

    const secondParagraph = new aspose.slides.Paragraph();
    secondParagraph.setText("First-line indent of 20 points. The first line moves to the right, while wrapped lines remain aligned to the paragraph body.");
    secondParagraph.getParagraphFormat().getDefaultPortionFormat().getFillFormat().setFillType(java.newByte(aspose.slides.FillType.Solid));
    secondParagraph.getParagraphFormat().getDefaultPortionFormat().getFillFormat().getSolidFillColor().setColor(java.getStaticFieldValue("java.awt.Color", "BLACK"));
    secondParagraph.getParagraphFormat().setMarginLeft(20);
    secondParagraph.getParagraphFormat().setIndent(20);

    const thirdParagraph = new aspose.slides.Paragraph();
    thirdParagraph.setText("First-line indent of 40 points. This paragraph shows a larger first-line offset to make the effect easier to see.");
    thirdParagraph.getParagraphFormat().getDefaultPortionFormat().getFillFormat().setFillType(java.newByte(aspose.slides.FillType.Solid));
    thirdParagraph.getParagraphFormat().getDefaultPortionFormat().getFillFormat().getSolidFillColor().setColor(java.getStaticFieldValue("java.awt.Color", "BLACK"));
    thirdParagraph.getParagraphFormat().setMarginLeft(20);
    thirdParagraph.getParagraphFormat().setIndent(40);

    textFrame.getParagraphs().add(firstParagraph);
    textFrame.getParagraphs().add(secondParagraph);
    textFrame.getParagraphs().add(thirdParagraph);

    presentation.save("paragraph_indent.pptx", aspose.slides.SaveFormat.Pptx);
} finally {
    presentation.dispose();
}
نتیجه:
تنظیم تورفتگی آویزان
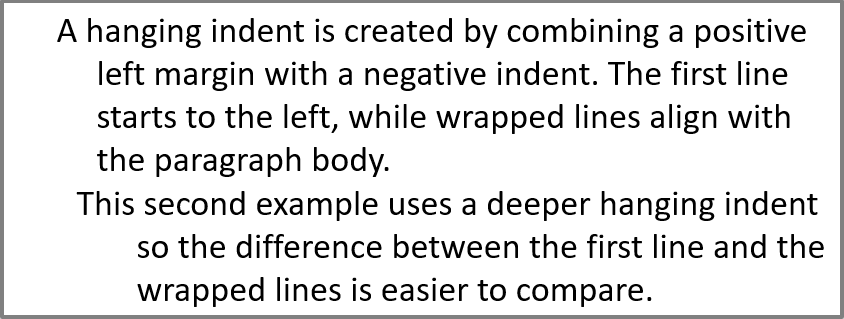
تورفتگی آویزان یک چیدمان پاراگراف است که خط اول نسبت به خطوط باقیمانده به سمت چپ شروع میشود. در Aspose.Slides این اثر را با ParagraphFormat.setIndent ایجاد میکنید. برای جابهجایی خط اول به سمت چپ نسبت به بدنه پاراگراف، مقدار منفی ارسال کنید.
در عمل، ParagraphFormat.setMarginLeft موقعیت چپ بدنه پاراگراف را تعریف میکند و ParagraphFormat.setIndent موقعیت خط اول را نسبت به آن حاشیه تعیین میکند. برای ایجاد تورفتگی آویزان، مقدار مثبت به setMarginLeft و مقدار منفی به setIndent ارسال کنید.
این قالببندی برای کتابشناسیها، مراجع، ورودیهای واژهنامه و سایر پاراگرافها که خطوط بستهشده باید زیر بدنه پاراگراف نه زیر اولین کاراکتر خط اول همتراز شوند، مفید است.
- یک نمونه از کلاس Presentation ایجاد کنید.
- به اسلاید هدف دسترسی پیدا کنید.
- یک AutoShape مستطیلی به اسلاید اضافه کنید.
- به TextFrame شکل دسترسی پیدا کنید و پاراگراف پیشفرض را حذف کنید.
- پاراگرافها را ایجاد کنید و برای هر پاراگراف مقدار مثبت به ParagraphFormat.setMarginLeft ارسال کنید.
- مقدار منفی به ParagraphFormat.setIndent ارسال کنید تا اثر تورفتگی آویزان ایجاد شود.
- پاراگرافها را به فریم متنی اضافه کنید.
- ارائه را ذخیره کنید.
var aspose = aspose || {};
aspose.slides = require("aspose.slides.via.java");
const java = require("java");

const presentation = new aspose.slides.Presentation();
try {
    const slide = presentation.getSlides().get_Item(0);

    const shape = slide.getShapes().addAutoShape(aspose.slides.ShapeType.Rectangle, 50, 50, 420, 220);
    shape.getFillFormat().setFillType(java.newByte(aspose.slides.FillType.NoFill));
    shape.getLineFormat().getFillFormat().setFillType(java.newByte(aspose.slides.FillType.Solid));
    shape.getLineFormat().getFillFormat().getSolidFillColor().setColor(java.getStaticFieldValue("java.awt.Color", "GRAY"));

    const textFrame = shape.getTextFrame();
    textFrame.getTextFrameFormat().setAutofitType(java.newByte(aspose.slides.TextAutofitType.Shape));
    textFrame.getParagraphs().clear();

    const firstParagraph = new aspose.slides.Paragraph();
    firstParagraph.setText("A hanging indent is created by combining a positive left margin with a negative indent. The first line starts to the left, while wrapped lines align with the paragraph body.");
    firstParagraph.getParagraphFormat().getDefaultPortionFormat().getFillFormat().setFillType(java.newByte(aspose.slides.FillType.Solid));
    firstParagraph.getParagraphFormat().getDefaultPortionFormat().getFillFormat().getSolidFillColor().setColor(java.getStaticFieldValue("java.awt.Color", "BLACK"));
    firstParagraph.getParagraphFormat().setMarginLeft(40);
    firstParagraph.getParagraphFormat().setIndent(-20);

    const secondParagraph = new aspose.slides.Paragraph();
    secondParagraph.setText("This second example uses a deeper hanging indent so the difference between the first line and the wrapped lines is easier to compare.");
    secondParagraph.getParagraphFormat().getDefaultPortionFormat().getFillFormat().setFillType(java.newByte(aspose.slides.FillType.Solid));
    secondParagraph.getParagraphFormat().getDefaultPortionFormat().getFillFormat().getSolidFillColor().setColor(java.getStaticFieldValue("java.awt.Color", "BLACK"));
    secondParagraph.getParagraphFormat().setMarginLeft(60);
    secondParagraph.getParagraphFormat().setIndent(-30);

    textFrame.getParagraphs().add(firstParagraph);
    textFrame.getParagraphs().add(secondParagraph);

    presentation.save("hanging_indent.pptx", aspose.slides.SaveFormat.Pptx);
} finally {
    presentation.dispose();
}
نتیجه:
تنظیم ویژگیهای انتهای پاراگراف
متد Paragraph.setEndParagraphPortionFormat قالببندی علامت انتهای پاراگراف را کنترل میکند. مثال زیر اندازه قلم و فونت لاتین را به علامت انتهای پاراگراف دوم اختصاص میدهد:
- یک Presentation ایجاد یا بارگذاری کنید و به اسلایدی دسترسی پیدا کنید.
- یک AutoShape اضافه کنید و پاراگراف پیشفرض آن را پاک کنید.
- دو پاراگراف ایجاد کنید و به آنها بخشهای متنی اضافه کنید.
- برای علامت انتهای پاراگراف دوم یک PortionFormat ایجاد کنید.
- متدهای BasePortionFormat.setFontHeight و BasePortionFormat.setLatinFont را تنظیم کنید.
- قالب را با Paragraph.setEndParagraphPortionFormat اختصاص دهید و ارائه را ذخیره کنید.
var aspose = aspose || {};
aspose.slides = require("aspose.slides.via.java");

const presentation = new aspose.slides.Presentation();
try {
    const slide = presentation.getSlides().get_Item(0);
    const shape = slide.getShapes().addAutoShape(aspose.slides.ShapeType.Rectangle, 10, 10, 200, 250);
    const textFrame = shape.getTextFrame();
    textFrame.getParagraphs().clear();

    const firstParagraph = new aspose.slides.Paragraph();
    firstParagraph.getPortions().add(new aspose.slides.Portion("Sample text"));

    const secondParagraph = new aspose.slides.Paragraph();
    secondParagraph.getPortions().add(new aspose.slides.Portion("Sample text 2"));

    const endParagraphFormat = new aspose.slides.PortionFormat();
    endParagraphFormat.setFontHeight(48);
    endParagraphFormat.setLatinFont(new aspose.slides.FontData("Times New Roman"));
    secondParagraph.setEndParagraphPortionFormat(endParagraphFormat);

    textFrame.getParagraphs().add(firstParagraph);
    textFrame.getParagraphs().add(secondParagraph);

    presentation.save("end_paragraph_format.pptx", aspose.slides.SaveFormat.Pptx);
} finally {
    presentation.dispose();
}
شمارش خطوط رندر شده
برای قواعد پاراگراف که بر بستهبندی خودکار و علامتگذاری در انتهای خطوط تأثیر میگذارند، به Control Line Breaking و Control Hanging Punctuation مراجعه کنید.
از Paragraph.getLinesCount برای شمارش خطوطی که یک پاراگراف پس از چینش متن اشغال میکند، از جمله بستهبندی خودکار، استفاده کنید. این برای بررسی طول متن و چیدمان در قالبهای ارائه مفید است.
یک پاراگراف یک مورد در TextFrame.getParagraphs است و میتواند چندین خط رندر شده را اشغال کند. شکست خط صریح داخل یک پاراگراف یک خط جدید ایجاد میکند بدون اینکه پاراگراف دیگری ساخته شود. بستهبندی خودکار خطوط را بر اساس عرض موجود ایجاد میکند بدون اینکه شکستهای خط صریح در متن وارد شود. بنابراین شمارش پاراگرافها یا کاراکترهای شکست خط نتیجه شمارش خطوط رندر شده را نمیدهد.
مثال زیر یک شکل متنی ایجاد میکند، خطوط آن را میشمارد، شکل را باریک میکند و سپس متن را با رشتهای کوتاهتر جایگزین میکند. بستهبندی فعال است و خودتنظیم غیرفعال است تا عرض شکل بستهبندی را کنترل کند بدون اینکه متن بهصورت خودکار کوچک شود یا شکل تغییر اندازه دهد. ابعاد شکل بر حسب نقطه (points) است. در نهایت، مثال یک پاراگراف دیگر اضافه میکند و تعداد خطوط را در سراسر فریم متنی جمع میکند.
var aspose = aspose || {};
aspose.slides = require("aspose.slides.via.java");
const java = require("java");

const presentation = new aspose.slides.Presentation();
try {
    const slide = presentation.getSlides().get_Item(0);

    const shape = slide.getShapes().addAutoShape(aspose.slides.ShapeType.Rectangle, 50, 50, 400, 200);
    const textFrame = shape.getTextFrame();
    textFrame.getTextFrameFormat().setWrapText(java.newByte(aspose.slides.NullableBool.True));
    textFrame.getTextFrameFormat().setAutofitType(java.newByte(aspose.slides.TextAutofitType.None));

    const paragraph = textFrame.getParagraphs().get_Item(0);
    paragraph.getParagraphFormat().getDefaultPortionFormat().setFontHeight(20);
    paragraph.setText("This text demonstrates how automatic wrapping changes the number of rendered lines.");
    console.log("Original width: " + paragraph.getLinesCount());

    shape.setWidth(150);
    console.log("Narrower shape: " + paragraph.getLinesCount());

    paragraph.setText("Short text.");
    console.log("Shorter text: " + paragraph.getLinesCount());

    const secondParagraph = new aspose.slides.Paragraph();
    secondParagraph.setText("Another paragraph.");
    secondParagraph.getParagraphFormat().getDefaultPortionFormat().setFontHeight(20);
    textFrame.getParagraphs().add(secondParagraph);

    let totalLineCount = 0;
    for (let i = 0; i < textFrame.getParagraphs().getCount(); i++) {
        const currentParagraph = textFrame.getParagraphs().get_Item(i);
        totalLineCount += currentParagraph.getLinesCount();
    }
    console.log("Total lines in the text frame: " + totalLineCount);
} finally {
    presentation.dispose();
}
با این متن و این ابعاد، باریک کردن شکل تعداد خطوط را افزایش میدهد، در حالی که جایگزینی متن با رشته کوتاهتر آن را کاهش میدهد. شمارش دقیق میتواند بسته به در دسترس بودن و جایگزینی فونت، اندازه قلم، حاشیهها، تورفتگی، بستهبندی و تنظیمات خودتنظیم متفاوت باشد. هنگام بررسی یک قالب، از فونتها و تنظیمات چیدمان موردنظر برای محیط هدف استفاده کنید.
تنها شمارش خطوط تعیین نمیکند که آیا متن از محفظهاش سرریز میشود یا خیر. ارتفاع در دسترس، ارتفاع خطوط، فاصله بین پاراگراف و خطوط، و رفتار خودتنظیم نیز اهمیت دارند؛ حتی یک خط واحد میتواند عرض موجود را هنگام غیرفعال بودن بستهبندی تجاوز کند.
واردات و صادرات محتوای پاراگراف
وارد کردن متن HTML به پاراگرافها
از ParagraphCollection.addFromHtml برای تبدیل نشانهگذاری HTML به پاراگرافها و بخشها در یک فریم متنی استفاده کنید.
- یک نمونه از کلاس Presentation ایجاد کنید.
- به یک اسلاید دسترسی پیدا کنید و یک AutoShape اضافه کنید.
- به TextFrame شکل دسترسی پیدا کنید و پاراگراف پیشفرض آن را پاک کنید.
- رشته HTML منبع را تعریف یا بخوانید.
- رشته HTML را به ParagraphCollection.addFromHtml ارسال کنید.
- ارائه را ذخیره کنید.
var aspose = aspose || {};
aspose.slides = require("aspose.slides.via.java");
const java = require("java");

const presentation = new aspose.slides.Presentation();
try {
    const slide = presentation.getSlides().get_Item(0);
    const shapeWidth = presentation.getSlideSize().getSize().getWidth() - 20;
    const shapeHeight = presentation.getSlideSize().getSize().getHeight() - 20;
    const shape = slide.getShapes().addAutoShape(aspose.slides.ShapeType.Rectangle, 10, 10, shapeWidth, shapeHeight);
    shape.getFillFormat().setFillType(java.newByte(aspose.slides.FillType.NoFill));
    shape.getTextFrame().getParagraphs().clear();

    const html = "<p><b>Aspose.Slides</b> imports HTML text into presentation paragraphs.</p>";
    shape.getTextFrame().getParagraphs().addFromHtml(html);
    presentation.save("html_text.pptx", aspose.slides.SaveFormat.Pptx);
} finally {
    presentation.dispose();
}
صادرات متن پاراگراف به HTML
از ParagraphCollection.exportToHtml برای صادرات بازهای انتخابشده از پاراگرافها به صورت HTML استفاده کنید.
- یک نمونه از کلاس Presentation ایجاد یا بارگذاری کنید.
- به اسلاید دسترسی پیدا کنید و AutoShape حاوی متن را پیدا کنید.
- به TextFrame شکل دسترسی پیدا کنید.
- متد ParagraphCollection.exportToHtml را با ایندکس پاراگراف شروع و تعداد پاراگرافهای موردنظر برای صادرات صدا بزنید.
- رشته HTML برگشتی را در یک فایل بنویسید.
var aspose = aspose || {};
aspose.slides = require("aspose.slides.via.java");
const java = require("java");
const fs = require("fs");

const presentation = new aspose.slides.Presentation();
try {
    const slide = presentation.getSlides().get_Item(0);
    const sourceShape = slide.getShapes().addAutoShape(aspose.slides.ShapeType.Rectangle, 20, 20, 400, 100);
    const sourceTextFrame = sourceShape.getTextFrame();
    sourceTextFrame.getParagraphs().clear();
    for (const text of ["First paragraph", "Second paragraph", "Third paragraph"]) {
        const sourceParagraph = new aspose.slides.Paragraph();
        sourceParagraph.setText(text);
        sourceTextFrame.getParagraphs().add(sourceParagraph);
    }
    const shape = slide.getShapes().get_Item(0);

    if (java.instanceOf(shape, "com.aspose.slides.IAutoShape")) {
        const textFrame = shape.getTextFrame();
        if (textFrame !== null) {
            const paragraphs = textFrame.getParagraphs();
            const html = paragraphs.exportToHtml(0, paragraphs.getCount(), null);
            fs.writeFileSync("paragraphs.html", html, "utf8");
        } else {
            console.log("The first shape does not contain a text frame.");
        }
    } else {
        console.log("The first shape is not a text shape.");
    }
} finally {
    presentation.dispose();
}
رندر یک پاراگراف بهعنوان تصویر
Paragraph.getImage یک پاراگراف منفرد را مستقیم رندر میکند و یک IImage برمیگرداند. نتیجه را با استفاده از IImage.save در یک فایل ذخیره کنید. نیازی به رندر شکل حاوی یا برش دستی یک bitmap نیست.
Paragraph.getImage میتواند null برگرداند اگر پاراگراف در مجموعه والد پیدا نشود، مرزهای رندر معتبری نداشته باشد یا قابل رندر نباشد. قبل از ذخیرهکردن نتیجه را بررسی کنید و پس از استفاده تصویر برگردانده شده را آزاد کنید.
رندر یک پاراگراف با مقیاس پیشفرض
جعبه متنی زیر شامل سه پاراگراف است:
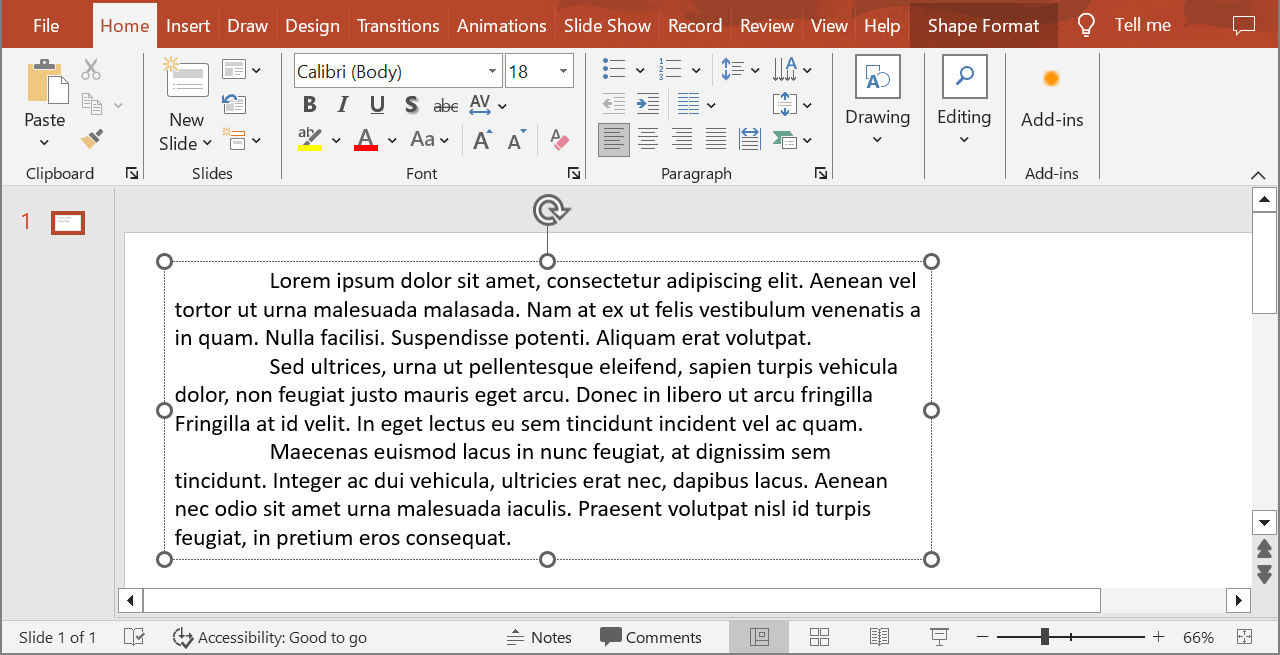
مثال زیر پاراگراف دوم را در یک شکل متنی معمولی با مقیاس پیشفرض رندر میکند و تصویر برگشتی را در قالب PNG ذخیره مینماید. بلوک finally اطمینان میدهد که تصویر بهدرستی آزاد میشود.
var aspose = aspose || {};
aspose.slides = require("aspose.slides.via.java");
const java = require("java");

const presentation = new aspose.slides.Presentation();
try {
    const slide = presentation.getSlides().get_Item(0);
    const sourceShape = slide.getShapes().addAutoShape(aspose.slides.ShapeType.Rectangle, 20, 20, 400, 100);
    const sourceTextFrame = sourceShape.getTextFrame();
    sourceTextFrame.getParagraphs().clear();
    for (const text of ["First paragraph", "Second paragraph", "Third paragraph"]) {
        const sourceParagraph = new aspose.slides.Paragraph();
        sourceParagraph.setText(text);
        sourceTextFrame.getParagraphs().add(sourceParagraph);
    }
    const shape = slide.getShapes().get_Item(0);

    if (java.instanceOf(shape, "com.aspose.slides.IAutoShape")) {
        const textFrame = shape.getTextFrame();
        if (textFrame !== null && textFrame.getParagraphs().getCount() > 1) {
            const paragraph = textFrame.getParagraphs().get_Item(1);
            const paragraphImage = paragraph.getImage();

            if (paragraphImage !== null) {
                try {
                    paragraphImage.save("paragraph.png", aspose.slides.ImageFormat.Png);
                } finally {
                    paragraphImage.dispose();
                }
            } else {
                console.log("The paragraph could not be rendered.");
            }
        } else {
            console.log("The expected paragraph was not found.");
        }
    } else {
        console.log("The first shape is not a text shape.");
    }
} finally {
    presentation.dispose();
}
نتیجه:

رندر یک پاراگراف در سلول جدول با مقیاسگذاری
از نسخهٔ overload متد Paragraph.getImage که پارامترهای scaleX و scaleY را میپذیرد برای تنظیم عوامل مقیاس افقی و عمودی استفاده کنید. مثال زیر یک جدول ایجاد میکند، پاراگراف را در اولین سلول آن با دو برابر عرض و ارتفاع پیشفرض رندر میکند و نتیجه را بهصورت تصویر PNG ذخیره میکند.
var aspose = aspose || {};
aspose.slides = require("aspose.slides.via.java");
const java = require("java");

const scaleX = 2;
const scaleY = 2;

const presentation = new aspose.slides.Presentation();
try {
    const slide = presentation.getSlides().get_Item(0);
    const columnWidths = java.newArray("double", [300]);
    const rowHeights = java.newArray("double", [80]);
    const table = slide.getShapes().addTable(50, 50, columnWidths, rowHeights);
    const paragraph = table.get_Item(0, 0).getTextFrame().getParagraphs().get_Item(0);
    paragraph.setText("Text in a table cell");

    const paragraphImage = paragraph.getImage(scaleX, scaleY);
    if (paragraphImage !== null) {
        try {
            paragraphImage.save("table_paragraph.png", aspose.slides.ImageFormat.Png);
        } finally {
            paragraphImage.dispose();
        }
    } else {
        console.log("The paragraph could not be rendered.");
    }
} finally {
    presentation.dispose();
}
یک عامل مقیاس 1 آن محور را در اندازه پیشفرض پیکسل نگه میدارد. بهعنوان مثال، 2 برای هر دو عامل تصویری میدهد که عرض و ارتفاع آن تقریباً دو برابر ابعاد پیشفرض باشد و به چهار برابر پیکسل منجر شود. عوامل بزرگتر معمولاً متن واضحتری برای بزرگنمایی یا خروجی با وضوح بالا تولید میکنند، اما مصرف حافظه و حجم فایل را نیز افزایش میدهند. عوامل زیر 1 تصاویر کوچکتر با جزئیات کمتر تولید میکنند. برای حفظ نسبت عرض به ارتفاع پاراگراف از عوامل برابر استفاده کنید؛ عوامل متفاوت افقی و عمودی خروجی را بهصورت مستقل کشیده میکنند.
رندر یک shape کامل با Shape.getImage زمانی مفید است که خروجی باید پرکردن، حاشیه یا سایر زمینههای بصری shape را شامل شود. برای تصویر فقط پاراگراف، از Paragraph.getImage استفاده کنید.
سئوالات متداول
آیا میتوانم بستهبندی خطوط را بهطور کامل داخل یک فریم متنی غیرفعال کنم؟
بله. متد TextFrameFormat.setWrapText را تنظیم کنید تا بستهبندی غیرفعال شود، بنابراین خطوط در لبههای فریم متنی شکسته نمیشوند.
چگونه میتوانم مرزهای دقیق یک پاراگراف خاص روی اسلاید را بهدست آورم؟
از Paragraph.getRect برای دریافت مستطیل محاطی پاراگراف استفاده کنید. Portion.getRect مرزهای یک بخش منفرد را فراهم میکند.
کجا تنظیم تراز پاراگراف (چپ، راست، مرکز یا توجیه) کنترل میشود؟
ParagraphFormat.setAlignment یک تنظیم سطح پاراگراف است و بر کل پاراگراف اعمال میشود؛ صرفنظر از قالببندی هر بخش منفرد. برای تراز عمودی بخشهای با اندازه فونت متفاوت در هر خط، به Align Fonts Within a Line مراجعه کنید.
آیا میتوانم زبان تصحیح را برای بخشی از یک پاراگراف تنظیم کنم؟
بله. برای بخشهای منفرد BasePortionFormat.setLanguageId را تنظیم کنید تا یک پاراگراف بتواند متنهایی با زبانهای مختلف داشته باشد.