
在 JavaScript 中管理 PowerPoint 文字段落
概觀
Aspose.Slides for Node.js via Java 以文字框、段落與文字區塊的階層來表示文字:
- TextFrame 表示形狀中的文字容器,並提供對其段落集合的存取。
- Paragraph 表示文字框中的一個段落,並提供對其文字區塊與段落層級格式的存取。
- Portion 表示段落中的一段文字。每個文字區塊可以擁有自己的文字與字元層級格式。
因此,一個段落可以透過多個文字區塊來包含不同字型、顏色、大小與其他格式的文字。
建立與格式化段落
使用多個文字區塊建立段落
以下步驟會建立一個文字框,內含三個段落,每個段落包含三個文字區塊:
- 建立 Presentation 類別的實例。
- 依索引取得目標投影片。
- 在投影片上加入矩形 AutoShape。
- 取得形狀的 TextFrame。
- 使用預設段落,並再向文字框加入兩個 Paragraph 物件。
- 為每個段落加入足夠的 Portion 物件,使其包含三個文字區塊。預設段落已包含一個空的文字區塊。
- 設定每個文字區塊的文字內容。
- 透過 Portion.getPortionFormat 套用字元層級的格式。
- 保存已修改的簡報。
以下 JavaScript 範例實作上述步驟:
var aspose = aspose || {};
aspose.slides = require("aspose.slides.via.java");
const java = require("java");

const presentation = new aspose.slides.Presentation();
try {
    const slide = presentation.getSlides().get_Item(0);
    const shape = slide.getShapes().addAutoShape(aspose.slides.ShapeType.Rectangle, 50, 150, 300, 150);
    const textFrame = shape.getTextFrame();

    const firstParagraph = textFrame.getParagraphs().get_Item(0);
    firstParagraph.getPortions().add(new aspose.slides.Portion());
    firstParagraph.getPortions().add(new aspose.slides.Portion());

    const secondParagraph = new aspose.slides.Paragraph();
    secondParagraph.getPortions().add(new aspose.slides.Portion());
    secondParagraph.getPortions().add(new aspose.slides.Portion());
    secondParagraph.getPortions().add(new aspose.slides.Portion());
    textFrame.getParagraphs().add(secondParagraph);

    const thirdParagraph = new aspose.slides.Paragraph();
    thirdParagraph.getPortions().add(new aspose.slides.Portion());
    thirdParagraph.getPortions().add(new aspose.slides.Portion());
    thirdParagraph.getPortions().add(new aspose.slides.Portion());
    textFrame.getParagraphs().add(thirdParagraph);

    const paragraphCount = textFrame.getParagraphs().getCount();
    for (let paragraphIndex = 0; paragraphIndex < paragraphCount; paragraphIndex++) {
        const paragraph = textFrame.getParagraphs().get_Item(paragraphIndex);
        const portionCount = paragraph.getPortions().getCount();
        for (let portionIndex = 0; portionIndex < portionCount; portionIndex++) {
            const portion = paragraph.getPortions().get_Item(portionIndex);
            portion.setText("Portion " + (paragraphIndex + 1) + "." + (portionIndex + 1));

            if (portionIndex === 0) {
                portion.getPortionFormat().getFillFormat().setFillType(java.newByte(aspose.slides.FillType.Solid));
                portion.getPortionFormat().getFillFormat().getSolidFillColor().setColor(java.getStaticFieldValue("java.awt.Color", "RED"));
                portion.getPortionFormat().setFontBold(java.newByte(aspose.slides.NullableBool.True));
                portion.getPortionFormat().setFontHeight(15);
            } else if (portionIndex === 1) {
                portion.getPortionFormat().getFillFormat().setFillType(java.newByte(aspose.slides.FillType.Solid));
                portion.getPortionFormat().getFillFormat().getSolidFillColor().setColor(java.getStaticFieldValue("java.awt.Color", "BLUE"));
                portion.getPortionFormat().setFontItalic(java.newByte(aspose.slides.NullableBool.True));
                portion.getPortionFormat().setFontHeight(18);
            }
        }
    }

    presentation.save("paragraphs_with_portions.pptx", aspose.slides.SaveFormat.Pptx);
} finally {
    presentation.dispose();
}
建立項目符號與編號清單
建立項目符號或編號清單
項目符號與編號能讓相關項目更易於掃描。在 Aspose.Slides 中,清單設定是透過 BulletFormat 來定義的。
- 建立 Presentation 類別的實例。
- 依索引取得目標投影片。
- 在選取的投影片上加入 AutoShape。
- 取得形狀的 TextFrame。
- 從文字框中移除預設段落。
- 為符號項目符號建立一個 Paragraph。
- 將 BulletFormat.setType 設為 BulletType.Symbol 並指定項目符號字元。
- 設定段落文字、縮排、項目符號顏色與項目符號高度。
- 將段落加入文字框。
- 建立第二個段落,將 BulletFormat.setType 設為 BulletType.Numbered。
- 設定編號項目符號樣式,並將段落加入文字框。
- 保存簡報。
以下 JavaScript 範例會建立符號項目符號與編號項目符號:
var aspose = aspose || {};
aspose.slides = require("aspose.slides.via.java");
const java = require("java");

const presentation = new aspose.slides.Presentation();
try {
    const slide = presentation.getSlides().get_Item(0);
    const shape = slide.getShapes().addAutoShape(aspose.slides.ShapeType.Rectangle, 200, 200, 400, 200);
    const textFrame = shape.getTextFrame();
    textFrame.getParagraphs().clear();

    const symbolParagraph = new aspose.slides.Paragraph();
    symbolParagraph.setText("Welcome to Aspose.Slides");
    symbolParagraph.getParagraphFormat().getBullet().setType(java.newByte(aspose.slides.BulletType.Symbol));
    symbolParagraph.getParagraphFormat().getBullet().setChar(java.newChar(0x2022));
    symbolParagraph.getParagraphFormat().setIndent(25);
    symbolParagraph.getParagraphFormat().getBullet().getColor().setColorType(aspose.slides.ColorType.RGB);
    symbolParagraph.getParagraphFormat().getBullet().getColor().setColor(java.getStaticFieldValue("java.awt.Color", "BLACK"));
    symbolParagraph.getParagraphFormat().getBullet().setBulletHardColor(java.newByte(aspose.slides.NullableBool.True));
    symbolParagraph.getParagraphFormat().getBullet().setHeight(100);
    textFrame.getParagraphs().add(symbolParagraph);

    const numberedParagraph = new aspose.slides.Paragraph();
    numberedParagraph.setText("This is a numbered item");
    numberedParagraph.getParagraphFormat().getBullet().setType(java.newByte(aspose.slides.BulletType.Numbered));
    numberedParagraph.getParagraphFormat().getBullet().setNumberedBulletStyle(java.newByte(aspose.slides.NumberedBulletStyle.BulletCircleNumWDBlackPlain));
    numberedParagraph.getParagraphFormat().setIndent(25);
    numberedParagraph.getParagraphFormat().getBullet().getColor().setColorType(aspose.slides.ColorType.RGB);
    numberedParagraph.getParagraphFormat().getBullet().getColor().setColor(java.getStaticFieldValue("java.awt.Color", "BLACK"));
    numberedParagraph.getParagraphFormat().getBullet().setBulletHardColor(java.newByte(aspose.slides.NullableBool.True));
    numberedParagraph.getParagraphFormat().getBullet().setHeight(100);
    textFrame.getParagraphs().add(numberedParagraph);

    presentation.save("bulleted_and_numbered_list.pptx", aspose.slides.SaveFormat.Pptx);
} finally {
    presentation.dispose();
}
使用圖片項目符號
圖片項目符號允許您使用自訂圖像取代符號或編號。
- 建立 Presentation 類別的實例。
- 依索引取得目標投影片。
- 加入 AutoShape 並取得其 TextFrame。
- 從文字框中移除預設段落。
- 載入項目符號圖像,並以 PPImage 加入簡報的影像集合。
- 建立一個 Paragraph 並設定其文字。
- 將 BulletFormat.setType 設為 BulletType.Picture。
- 透過 BulletFormat.getPicture 指定圖像,並設定項目符號高度。
- 將段落加入文字框。
- 保存已修改的簡報。
以下 JavaScript 範例會建立圖片項目符號:
var aspose = aspose || {};
aspose.slides = require("aspose.slides.via.java");
const java = require("java");

const presentation = new aspose.slides.Presentation();
try {
    const slide = presentation.getSlides().get_Item(0);

    const bulletImage = aspose.slides.Images.fromFile("image.png");
    let presentationImage;
    try {
        presentationImage = presentation.getImages().addImage(bulletImage);
    } finally {
        bulletImage.dispose();
    }

    const shape = slide.getShapes().addAutoShape(aspose.slides.ShapeType.Rectangle, 200, 200, 400, 200);
    const textFrame = shape.getTextFrame();
    textFrame.getParagraphs().clear();

    const paragraph = new aspose.slides.Paragraph();
    paragraph.setText("Welcome to Aspose.Slides");
    paragraph.getParagraphFormat().getBullet().setType(java.newByte(aspose.slides.BulletType.Picture));
    paragraph.getParagraphFormat().getBullet().getPicture().setImage(presentationImage);
    paragraph.getParagraphFormat().getBullet().setHeight(100);
    textFrame.getParagraphs().add(paragraph);

    presentation.save("picture_bullet.pptx", aspose.slides.SaveFormat.Pptx);
    presentation.save("picture_bullet.ppt", aspose.slides.SaveFormat.Ppt);
} finally {
    presentation.dispose();
}
建立多層次清單
將 ParagraphFormat.setDepth 設為不同值,即可將段落放置於清單的不同層級。最高層的深度為 0。
- 建立 Presentation 並取得投影片。
- 加入 AutoShape 並清除其文字框中的預設段落。
- 建立四個段落,並設定其項目符號字元。
- 將它們的 ParagraphFormat.setDepth 分別設為
0、1、2、3。 - 將段落加入文字框,並保存簡報。
以下 JavaScript 範例會建立四層階層的項目符號清單:
var aspose = aspose || {};
aspose.slides = require("aspose.slides.via.java");
const java = require("java");

const presentation = new aspose.slides.Presentation();
try {
    const slide = presentation.getSlides().get_Item(0);
    const shape = slide.getShapes().addAutoShape(aspose.slides.ShapeType.Rectangle, 200, 200, 400, 200);
    const textFrame = shape.getTextFrame();
    textFrame.getParagraphs().clear();

    const firstParagraph = new aspose.slides.Paragraph();
    firstParagraph.setText("Content");
    firstParagraph.getParagraphFormat().getBullet().setType(java.newByte(aspose.slides.BulletType.Symbol));
    firstParagraph.getParagraphFormat().getBullet().setChar(java.newChar(0x2022));
    firstParagraph.getParagraphFormat().getDefaultPortionFormat().getFillFormat().setFillType(java.newByte(aspose.slides.FillType.Solid));
    firstParagraph.getParagraphFormat().getDefaultPortionFormat().getFillFormat().getSolidFillColor().setColor(java.getStaticFieldValue("java.awt.Color", "BLACK"));
    firstParagraph.getParagraphFormat().setDepth(java.newShort(0));

    const secondParagraph = new aspose.slides.Paragraph();
    secondParagraph.setText("Second level");
    secondParagraph.getParagraphFormat().getBullet().setType(java.newByte(aspose.slides.BulletType.Symbol));
    secondParagraph.getParagraphFormat().getBullet().setChar(java.newChar(45));
    secondParagraph.getParagraphFormat().getDefaultPortionFormat().getFillFormat().setFillType(java.newByte(aspose.slides.FillType.Solid));
    secondParagraph.getParagraphFormat().getDefaultPortionFormat().getFillFormat().getSolidFillColor().setColor(java.getStaticFieldValue("java.awt.Color", "BLACK"));
    secondParagraph.getParagraphFormat().setDepth(java.newShort(1));

    const thirdParagraph = new aspose.slides.Paragraph();
    thirdParagraph.setText("Third level");
    thirdParagraph.getParagraphFormat().getBullet().setType(java.newByte(aspose.slides.BulletType.Symbol));
    thirdParagraph.getParagraphFormat().getBullet().setChar(java.newChar(0x2022));
    thirdParagraph.getParagraphFormat().getDefaultPortionFormat().getFillFormat().setFillType(java.newByte(aspose.slides.FillType.Solid));
    thirdParagraph.getParagraphFormat().getDefaultPortionFormat().getFillFormat().getSolidFillColor().setColor(java.getStaticFieldValue("java.awt.Color", "BLACK"));
    thirdParagraph.getParagraphFormat().setDepth(java.newShort(2));

    const fourthParagraph = new aspose.slides.Paragraph();
    fourthParagraph.setText("Fourth level");
    fourthParagraph.getParagraphFormat().getBullet().setType(java.newByte(aspose.slides.BulletType.Symbol));
    fourthParagraph.getParagraphFormat().getBullet().setChar(java.newChar(45));
    fourthParagraph.getParagraphFormat().getDefaultPortionFormat().getFillFormat().setFillType(java.newByte(aspose.slides.FillType.Solid));
    fourthParagraph.getParagraphFormat().getDefaultPortionFormat().getFillFormat().getSolidFillColor().setColor(java.getStaticFieldValue("java.awt.Color", "BLACK"));
    fourthParagraph.getParagraphFormat().setDepth(java.newShort(3));

    textFrame.getParagraphs().add(firstParagraph);
    textFrame.getParagraphs().add(secondParagraph);
    textFrame.getParagraphs().add(thirdParagraph);
    textFrame.getParagraphs().add(fourthParagraph);

    presentation.save("multilevel_list.pptx", aspose.slides.SaveFormat.Pptx);
} finally {
    presentation.dispose();
}
自訂編號清單的起始值
使用 BulletFormat.setNumberedBulletStartWith 可設定編號段落的起始號碼。
- 建立 Presentation 並在投影片上加入 AutoShape。
- 清除形狀文字框中的預設段落。
- 建立三個編號段落。
- 分別將 BulletFormat.setNumberedBulletStartWith 設為
2、3、7。 - 將段落加入文字框,並保存簡報。
以下 JavaScript 範例會為每個段落指派自訂的起始編號:
var aspose = aspose || {};
aspose.slides = require("aspose.slides.via.java");
const java = require("java");

const presentation = new aspose.slides.Presentation();
try {
    const slide = presentation.getSlides().get_Item(0);
    const shape = slide.getShapes().addAutoShape(aspose.slides.ShapeType.Rectangle, 200, 200, 400, 200);
    const textFrame = shape.getTextFrame();
    textFrame.getParagraphs().clear();

    const firstParagraph = new aspose.slides.Paragraph();
    firstParagraph.setText("Start at 2");
    firstParagraph.getParagraphFormat().getBullet().setType(java.newByte(aspose.slides.BulletType.Numbered));
    firstParagraph.getParagraphFormat().getBullet().setNumberedBulletStartWith(java.newShort(2));
    textFrame.getParagraphs().add(firstParagraph);

    const secondParagraph = new aspose.slides.Paragraph();
    secondParagraph.setText("Start at 3");
    secondParagraph.getParagraphFormat().getBullet().setType(java.newByte(aspose.slides.BulletType.Numbered));
    secondParagraph.getParagraphFormat().getBullet().setNumberedBulletStartWith(java.newShort(3));
    textFrame.getParagraphs().add(secondParagraph);

    const thirdParagraph = new aspose.slides.Paragraph();
    thirdParagraph.setText("Start at 7");
    thirdParagraph.getParagraphFormat().getBullet().setType(java.newByte(aspose.slides.BulletType.Numbered));
    thirdParagraph.getParagraphFormat().getBullet().setNumberedBulletStartWith(java.newShort(7));
    textFrame.getParagraphs().add(thirdParagraph);

    presentation.save("custom_numbered_list.pptx", aspose.slides.SaveFormat.Pptx);
} finally {
    presentation.dispose();
}
控制段落版面與結尾屬性
設定首行縮排
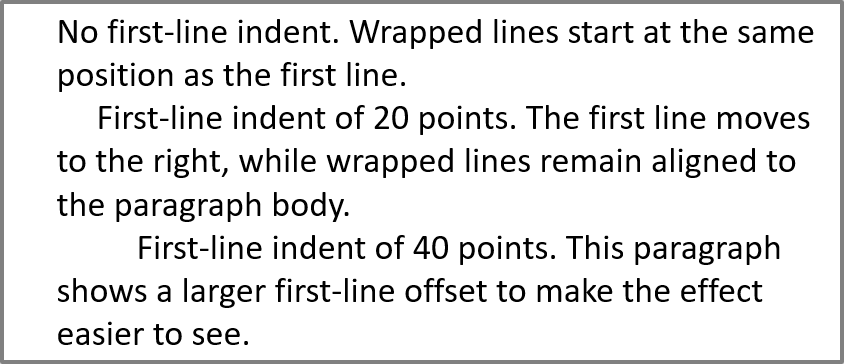
使用 ParagraphFormat.setIndent 來控制段落的首行縮排。此方法僅移動第一行相對於段落左邊界的距離,正值會將首行向右移動,其他行則保持與段落正文對齊。
若需要整段移動,請使用 ParagraphFormat.setMarginLeft。僅需移動首行時,請使用 ParagraphFormat.setIndent。
以下範例建立多個段落,並對它們套用不同的 ParagraphFormat.setIndent 值,以示範首行縮排對段落版面的影響。
- 建立 Presentation 類別的實例。
- 取得目標投影片。
- 在投影片上加入矩形 AutoShape。
- 取得形狀的 TextFrame 並移除預設段落。
- 建立多個段落,為它們設定不同的 ParagraphFormat.setIndent 值。
- 將段落加入文字框。
- 保存已修改的簡報。
以下程式碼示範如何設定段落縮排:
var aspose = aspose || {};
aspose.slides = require("aspose.slides.via.java");
const java = require("java");

const presentation = new aspose.slides.Presentation();
try {
    const slide = presentation.getSlides().get_Item(0);

    const shape = slide.getShapes().addAutoShape(aspose.slides.ShapeType.Rectangle, 50, 50, 420, 220);
    shape.getFillFormat().setFillType(java.newByte(aspose.slides.FillType.NoFill));
    shape.getLineFormat().getFillFormat().setFillType(java.newByte(aspose.slides.FillType.Solid));
    shape.getLineFormat().getFillFormat().getSolidFillColor().setColor(java.getStaticFieldValue("java.awt.Color", "GRAY"));

    const textFrame = shape.getTextFrame();
    textFrame.getTextFrameFormat().setAutofitType(java.newByte(aspose.slides.TextAutofitType.Shape));
    textFrame.getParagraphs().clear();

    const firstParagraph = new aspose.slides.Paragraph();
    firstParagraph.setText("No first-line indent. Wrapped lines start at the same position as the first line.");
    firstParagraph.getParagraphFormat().getDefaultPortionFormat().getFillFormat().setFillType(java.newByte(aspose.slides.FillType.Solid));
    firstParagraph.getParagraphFormat().getDefaultPortionFormat().getFillFormat().getSolidFillColor().setColor(java.getStaticFieldValue("java.awt.Color", "BLACK"));
    firstParagraph.getParagraphFormat().setMarginLeft(20);
    firstParagraph.getParagraphFormat().setIndent(0);

    const secondParagraph = new aspose.slides.Paragraph();
    secondParagraph.setText("First-line indent of 20 points. The first line moves to the right, while wrapped lines remain aligned to the paragraph body.");
    secondParagraph.getParagraphFormat().getDefaultPortionFormat().getFillFormat().setFillType(java.newByte(aspose.slides.FillType.Solid));
    secondParagraph.getParagraphFormat().getDefaultPortionFormat().getFillFormat().getSolidFillColor().setColor(java.getStaticFieldValue("java.awt.Color", "BLACK"));
    secondParagraph.getParagraphFormat().setMarginLeft(20);
    secondParagraph.getParagraphFormat().setIndent(20);

    const thirdParagraph = new aspose.slides.Paragraph();
    thirdParagraph.setText("First-line indent of 40 points. This paragraph shows a larger first-line offset to make the effect easier to see.");
    thirdParagraph.getParagraphFormat().getDefaultPortionFormat().getFillFormat().setFillType(java.newByte(aspose.slides.FillType.Solid));
    thirdParagraph.getParagraphFormat().getDefaultPortionFormat().getFillFormat().getSolidFillColor().setColor(java.getStaticFieldValue("java.awt.Color", "BLACK"));
    thirdParagraph.getParagraphFormat().setMarginLeft(20);
    thirdParagraph.getParagraphFormat().setIndent(40);

    textFrame.getParagraphs().add(firstParagraph);
    textFrame.getParagraphs().add(secondParagraph);
    textFrame.getParagraphs().add(thirdParagraph);

    presentation.save("paragraph_indent.pptx", aspose.slides.SaveFormat.Pptx);
} finally {
    presentation.dispose();
}
結果:
設定懸掛縮排
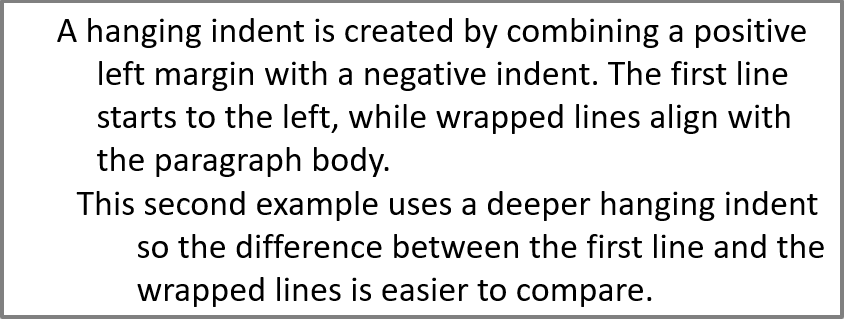
懸掛縮排是指第一行位於其餘行左側的段落版面。於 Aspose.Slides 中,可使用 ParagraphFormat.setIndent,將負值傳入,即可讓第一行相對於段落正文左移。
實務上,ParagraphFormat.setMarginLeft 定義段落正文的左側位置,而 ParagraphFormat.setIndent 定義第一行相對於此左側的位移。要產生懸掛縮排,請將正值傳給 setMarginLeft,並將負值傳給 setIndent。
此設定常用於書目、參考文獻、詞彙表條目等情況,讓換行後的行對齊於段落正文而非第一行的首字元。
- 建立 Presentation 類別的實例。
- 取得目標投影片。
- 在投影片上加入矩形 AutoShape。
- 取得形狀的 TextFrame 並移除預設段落。
- 為每個段落傳入正值給 ParagraphFormat.setMarginLeft。
- 傳入負值給 ParagraphFormat.setIndent 以產生懸掛縮排效果。
- 將段落加入文字框。
- 保存已修改的簡報。
以下程式碼示範如何為段落設定懸掛縮排:
var aspose = aspose || {};
aspose.slides = require("aspose.slides.via.java");
const java = require("java");

const presentation = new aspose.slides.Presentation();
try {
    const slide = presentation.getSlides().get_Item(0);

    const shape = slide.getShapes().addAutoShape(aspose.slides.ShapeType.Rectangle, 50, 50, 420, 220);
    shape.getFillFormat().setFillType(java.newByte(aspose.slides.FillType.NoFill));
    shape.getLineFormat().getFillFormat().setFillType(java.newByte(aspose.slides.FillType.Solid));
    shape.getLineFormat().getFillFormat().getSolidFillColor().setColor(java.getStaticFieldValue("java.awt.Color", "GRAY"));

    const textFrame = shape.getTextFrame();
    textFrame.getTextFrameFormat().setAutofitType(java.newByte(aspose.slides.TextAutofitType.Shape));
    textFrame.getParagraphs().clear();

    const firstParagraph = new aspose.slides.Paragraph();
    firstParagraph.setText("A hanging indent is created by combining a positive left margin with a negative indent. The first line starts to the left, while wrapped lines align with the paragraph body.");
    firstParagraph.getParagraphFormat().getDefaultPortionFormat().getFillFormat().setFillType(java.newByte(aspose.slides.FillType.Solid));
    firstParagraph.getParagraphFormat().getDefaultPortionFormat().getFillFormat().getSolidFillColor().setColor(java.getStaticFieldValue("java.awt.Color", "BLACK"));
    firstParagraph.getParagraphFormat().setMarginLeft(40);
    firstParagraph.getParagraphFormat().setIndent(-20);

    const secondParagraph = new aspose.slides.Paragraph();
    secondParagraph.setText("This second example uses a deeper hanging indent so the difference between the first line and the wrapped lines is easier to compare.");
    secondParagraph.getParagraphFormat().getDefaultPortionFormat().getFillFormat().setFillType(java.newByte(aspose.slides.FillType.Solid));
    secondParagraph.getParagraphFormat().getDefaultPortionFormat().getFillFormat().getSolidFillColor().setColor(java.getStaticFieldValue("java.awt.Color", "BLACK"));
    secondParagraph.getParagraphFormat().setMarginLeft(60);
    secondParagraph.getParagraphFormat().setIndent(-30);

    textFrame.getParagraphs().add(firstParagraph);
    textFrame.getParagraphs().add(secondParagraph);

    presentation.save("hanging_indent.pptx", aspose.slides.SaveFormat.Pptx);
} finally {
    presentation.dispose();
}
結果:
設定段落結尾執行屬性
Paragraph.setEndParagraphPortionFormat 控制段落結尾標記的格式。以下範例為第二個段落的結尾標記指定字型大小與拉丁字型:
- 建立或載入一個 Presentation 並取得投影片。
- 加入 AutoShape 並清除其預設段落。
- 建立兩個段落,並為它們加入文字區塊。
- 為第二個段落的結尾標記建立 PortionFormat。
- 設定 BasePortionFormat.setFontHeight 與 BasePortionFormat.setLatinFont。
- 透過 Paragraph.setEndParagraphPortionFormat 套用格式,並保存簡報。
var aspose = aspose || {};
aspose.slides = require("aspose.slides.via.java");

const presentation = new aspose.slides.Presentation();
try {
    const slide = presentation.getSlides().get_Item(0);
    const shape = slide.getShapes().addAutoShape(aspose.slides.ShapeType.Rectangle, 10, 10, 200, 250);
    const textFrame = shape.getTextFrame();
    textFrame.getParagraphs().clear();

    const firstParagraph = new aspose.slides.Paragraph();
    firstParagraph.getPortions().add(new aspose.slides.Portion("Sample text"));

    const secondParagraph = new aspose.slides.Paragraph();
    secondParagraph.getPortions().add(new aspose.slides.Portion("Sample text 2"));

    const endParagraphFormat = new aspose.slides.PortionFormat();
    endParagraphFormat.setFontHeight(48);
    endParagraphFormat.setLatinFont(new aspose.slides.FontData("Times New Roman"));
    secondParagraph.setEndParagraphPortionFormat(endParagraphFormat);

    textFrame.getParagraphs().add(firstParagraph);
    textFrame.getParagraphs().add(secondParagraph);

    presentation.save("end_paragraph_format.pptx", aspose.slides.SaveFormat.Pptx);
} finally {
    presentation.dispose();
}
計算已呈現的行數
有關影響自動換行與行尾標點的段落規則,請參閱 Control Line Breaking 與 Control Hanging Punctuation。
使用 Paragraph.getLinesCount 可取得段落經文字排版後佔用的行數,包含自動換行。此功能在檢查簡報範本的文字長度與版面時非常有用。
段落是 TextFrame.getParagraphs 中的一個項目,可能會佔用多行已呈現的行數。段落內的顯式換行符會強制換行但不會產生新段落。自動換行則根據可用寬度產生行,且不會在文字中插入顯式換行符。因此,僅計算段落或換行字元無法得到已呈現的行數。
以下範例會建立一個文字形狀、計算其行數、縮窄形狀,接著以較短的字串取代文字。啟用了換行且停用了自動調整大小,以使形狀寬度控制換行而不會自動縮小文字或調整形狀大小。形狀尺寸單位為點。最後,範例會再加入一個段落,並將文字框中所有段落的行數相加。
var aspose = aspose || {};
aspose.slides = require("aspose.slides.via.java");
const java = require("java");

const presentation = new aspose.slides.Presentation();
try {
    const slide = presentation.getSlides().get_Item(0);

    const shape = slide.getShapes().addAutoShape(aspose.slides.ShapeType.Rectangle, 50, 50, 400, 200);
    const textFrame = shape.getTextFrame();
    textFrame.getTextFrameFormat().setWrapText(java.newByte(aspose.slides.NullableBool.True));
    textFrame.getTextFrameFormat().setAutofitType(java.newByte(aspose.slides.TextAutofitType.None));

    const paragraph = textFrame.getParagraphs().get_Item(0);
    paragraph.getParagraphFormat().getDefaultPortionFormat().setFontHeight(20);
    paragraph.setText("This text demonstrates how automatic wrapping changes the number of rendered lines.");
    console.log("Original width: " + paragraph.getLinesCount());

    shape.setWidth(150);
    console.log("Narrower shape: " + paragraph.getLinesCount());

    paragraph.setText("Short text.");
    console.log("Shorter text: " + paragraph.getLinesCount());

    const secondParagraph = new aspose.slides.Paragraph();
    secondParagraph.setText("Another paragraph.");
    secondParagraph.getParagraphFormat().getDefaultPortionFormat().setFontHeight(20);
    textFrame.getParagraphs().add(secondParagraph);

    let totalLineCount = 0;
    for (let i = 0; i < textFrame.getParagraphs().getCount(); i++) {
        const currentParagraph = textFrame.getParagraphs().get_Item(i);
        totalLineCount += currentParagraph.getLinesCount();
    }
    console.log("Total lines in the text frame: " + totalLineCount);
} finally {
    presentation.dispose();
}
使用此文字與尺寸時,縮窄形狀會增加行數,而以短字串取代文字則會減少行數。實際行數可能因字型可用性與替代、字型大小、邊距、縮排、換行與自動調整設定而異;請在檢查範本時使用目標環境的字型與版面設定。
僅憑行數並不能判斷文字是否超出容器。可用高度、行高、段落與行間距以及自動調整行為同樣重要;即使只有單行,若關閉換行功能,也可能超出可用寬度。
匯入與匯出段落內容
將 HTML 文字匯入段落
使用 ParagraphCollection.addFromHtml 可將 HTML 標記轉換為文字框中的段落與文字區塊。
- 建立 Presentation 類別的實例。
- 取得投影片並加入 AutoShape。
- 取得形狀的 TextFrame 並清除其預設段落。
- 定義或讀取來源 HTML 字串。
- 將 HTML 字串傳入 ParagraphCollection.addFromHtml。
- 保存已修改的簡報。
以下 JavaScript 範例會將 HTML 匯入文字框:
var aspose = aspose || {};
aspose.slides = require("aspose.slides.via.java");
const java = require("java");

const presentation = new aspose.slides.Presentation();
try {
    const slide = presentation.getSlides().get_Item(0);
    const shapeWidth = presentation.getSlideSize().getSize().getWidth() - 20;
    const shapeHeight = presentation.getSlideSize().getSize().getHeight() - 20;
    const shape = slide.getShapes().addAutoShape(aspose.slides.ShapeType.Rectangle, 10, 10, shapeWidth, shapeHeight);
    shape.getFillFormat().setFillType(java.newByte(aspose.slides.FillType.NoFill));
    shape.getTextFrame().getParagraphs().clear();

    const html = "<p><b>Aspose.Slides</b> imports HTML text into presentation paragraphs.</p>";
    shape.getTextFrame().getParagraphs().addFromHtml(html);
    presentation.save("html_text.pptx", aspose.slides.SaveFormat.Pptx);
} finally {
    presentation.dispose();
}
將段落文字匯出為 HTML
使用 ParagraphCollection.exportToHtml 可將選取的段落範圍匯出為 HTML。
- 建立或載入一個 Presentation 實例。
- 取得投影片並找到包含文字的 AutoShape。
- 取得形狀的 TextFrame。
- 呼叫 ParagraphCollection.exportToHtml 並傳入起始段落索引與要匯出的段落數量。
- 將回傳的 HTML 字串寫入檔案。
以下自包含的 JavaScript 範例會建立文字形狀並匯出其所有段落:
var aspose = aspose || {};
aspose.slides = require("aspose.slides.via.java");
const java = require("java");
const fs = require("fs");

const presentation = new aspose.slides.Presentation();
try {
    const slide = presentation.getSlides().get_Item(0);
    const sourceShape = slide.getShapes().addAutoShape(aspose.slides.ShapeType.Rectangle, 20, 20, 400, 100);
    const sourceTextFrame = sourceShape.getTextFrame();
    sourceTextFrame.getParagraphs().clear();
    for (const text of ["First paragraph", "Second paragraph", "Third paragraph"]) {
        const sourceParagraph = new aspose.slides.Paragraph();
        sourceParagraph.setText(text);
        sourceTextFrame.getParagraphs().add(sourceParagraph);
    }
    const shape = slide.getShapes().get_Item(0);

    if (java.instanceOf(shape, "com.aspose.slides.IAutoShape")) {
        const textFrame = shape.getTextFrame();
        if (textFrame !== null) {
            const paragraphs = textFrame.getParagraphs();
            const html = paragraphs.exportToHtml(0, paragraphs.getCount(), null);
            fs.writeFileSync("paragraphs.html", html, "utf8");
        } else {
            console.log("The first shape does not contain a text frame.");
        }
    } else {
        console.log("The first shape is not a text shape.");
    }
} finally {
    presentation.dispose();
}
將段落渲染為影像
Paragraph.getImage 直接渲染單一段落,並回傳一個 IImage。使用 IImage.save 將結果存成檔案。您不必先渲染整個形狀或手動裁剪位圖。
若段落在其父集合中找不到、沒有有效的渲染邊界,或無法渲染,Paragraph.getImage 可能會回傳 null。請在保存之前檢查結果,並在使用完畢後釋放返回的影像。
以預設比例渲染段落
以下文字方塊包含三個段落:
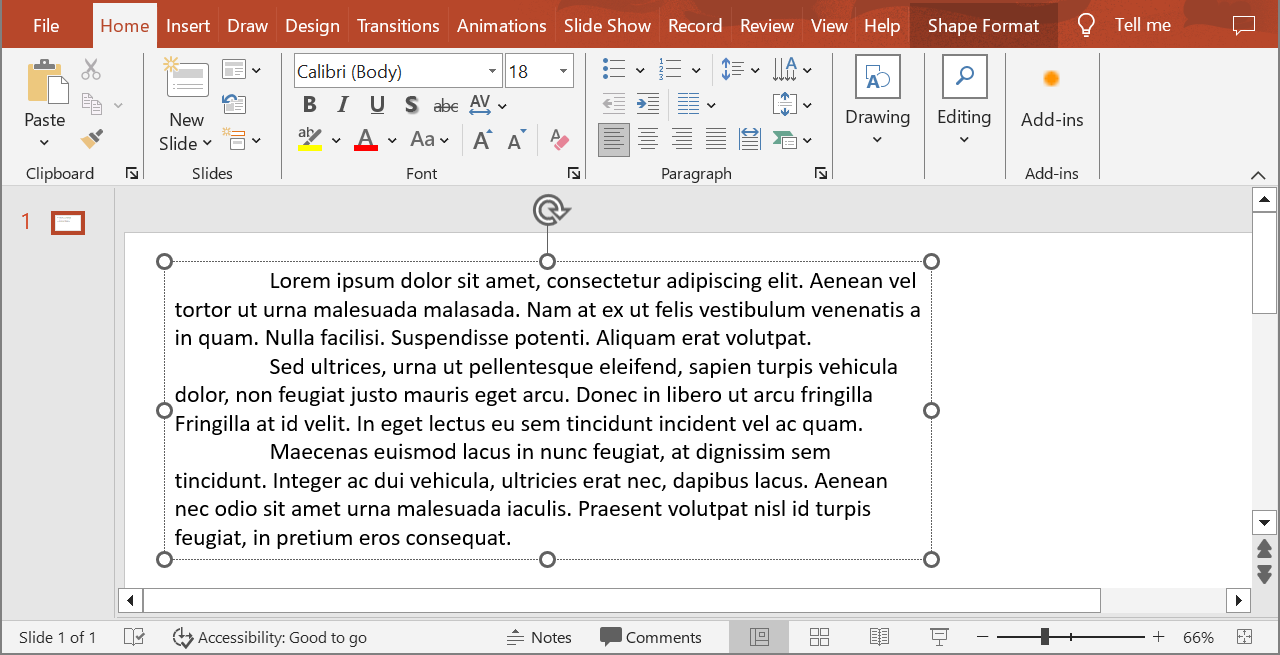
下面的範例會在預設比例下渲染第二個段落,並以 PNG 格式保存返回的影像。finally 區塊確保影像正確釋放。
var aspose = aspose || {};
aspose.slides = require("aspose.slides.via.java");
const java = require("java");

const presentation = new aspose.slides.Presentation();
try {
    const slide = presentation.getSlides().get_Item(0);
    const sourceShape = slide.getShapes().addAutoShape(aspose.slides.ShapeType.Rectangle, 20, 20, 400, 100);
    const sourceTextFrame = sourceShape.getTextFrame();
    sourceTextFrame.getParagraphs().clear();
    for (const text of ["First paragraph", "Second paragraph", "Third paragraph"]) {
        const sourceParagraph = new aspose.slides.Paragraph();
        sourceParagraph.setText(text);
        sourceTextFrame.getParagraphs().add(sourceParagraph);
    }
    const shape = slide.getShapes().get_Item(0);

    if (java.instanceOf(shape, "com.aspose.slides.IAutoShape")) {
        const textFrame = shape.getTextFrame();
        if (textFrame !== null && textFrame.getParagraphs().getCount() > 1) {
            const paragraph = textFrame.getParagraphs().get_Item(1);
            const paragraphImage = paragraph.getImage();

            if (paragraphImage !== null) {
                try {
                    paragraphImage.save("paragraph.png", aspose.slides.ImageFormat.Png);
                } finally {
                    paragraphImage.dispose();
                }
            } else {
                console.log("The paragraph could not be rendered.");
            }
        } else {
            console.log("The expected paragraph was not found.");
        }
    } else {
        console.log("The first shape is not a text shape.");
    }
} finally {
    presentation.dispose();
}
結果:

在表格儲存格中以比例渲染段落
使用接受 scaleX 與 scaleY 參數的 Paragraph.getImage 重載,以設定水平與垂直比例因子。以下範例會建立表格,並在第一個儲存格中以兩倍寬度與高度渲染段落,最後以 PNG 影像保存結果。
var aspose = aspose || {};
aspose.slides = require("aspose.slides.via.java");
const java = require("java");

const scaleX = 2;
const scaleY = 2;

const presentation = new aspose.slides.Presentation();
try {
    const slide = presentation.getSlides().get_Item(0);
    const columnWidths = java.newArray("double", [300]);
    const rowHeights = java.newArray("double", [80]);
    const table = slide.getShapes().addTable(50, 50, columnWidths, rowHeights);
    const paragraph = table.get_Item(0, 0).getTextFrame().getParagraphs().get_Item(0);
    paragraph.setText("Text in a table cell");

    const paragraphImage = paragraph.getImage(scaleX, scaleY);
    if (paragraphImage !== null) {
        try {
            paragraphImage.save("table_paragraph.png", aspose.slides.ImageFormat.Png);
        } finally {
            paragraphImage.dispose();
        }
    } else {
        console.log("The paragraph could not be rendered.");
    }
} finally {
    presentation.dispose();
}
比例因子 1 代表保持該軸的預設像素大小。例如,同時設定 2 會產生寬度與高度約為預設的兩倍的影像,總像素數量約為四倍。較大的比例因子通常能在縮放或高解析度輸出時提供更銳利的文字,但也會增加記憶體使用與檔案大小。低於 1 的比例會產生較小且細節較少的影像。若要保持段落的長寬比,請使用相等的比例因子;不同的水平與垂直比例會獨立拉伸輸出。
若需要包含形狀填色、邊框或其他視覺上下文的完整形狀影像,仍可使用 Shape.getImage。若僅需段落的影像,請使用 Paragraph.getImage。
常見問與答
我可以完全停用文字框內的自動換行嗎?
可以。將 TextFrameFormat.setWrapText 設為停用,即可讓行不會在文字框邊緣換行。
我要如何取得特定段落在投影片上的精確邊界?
使用 Paragraph.getRect 取得段落的外接矩形。Portion.getRect 可取得單一文字區塊的邊界。
段落的對齊方式(左、右、置中或兩端對齊)是哪裡控制的?
ParagraphFormat.setAlignment 為段落層級的設定,會套用於整個段落,與各文字區塊的單獨格式無關。
若要在每行內垂直對齊不同字型大小的文字區塊,請參閱 Align Fonts Within a Line。
我可以為段落的一部分設定校對語言嗎?
可以。為個別文字區塊設定 BasePortionFormat.setLanguageId,即可讓同一段落包含多種語言的文字。