
จัดการย่อหน้าข้อความ PowerPoint ใน JavaScript
ภาพรวม
Aspose.Slides for Node.js via Java แสดงข้อความเป็นลำดับชั้นของ text frames, paragraphs, และ portions:
- TextFrame เป็นตัวบรรจุข้อความใน shape และให้การเข้าถึงชุด collection ของ paragraph
- Paragraph แสดงหนึ่ง paragraph ใน text frame และให้การเข้าถึง portions และการจัดรูปแบบระดับ paragraph
- Portion แสดงส่วนของข้อความภายใน paragraph แต่ละ portion สามารถมีข้อความและการจัดรูปแบบระดับอักขระของเองได้
ดังนั้น paragraph สามารถประกอบด้วยข้อความที่มีฟอนต์ สี ขนาด และการจัดรูปแบบอื่น ๆ ที่ต่างกันโดยใช้หลาย portion
สร้างและจัดรูปแบบย่อหน้า
สร้างย่อหน้าด้วยหลาย Portion
ขั้นตอนต่อไปนี้สร้าง text frame ที่มีสาม paragraph แต่ละ paragraph มีสาม portion:
- สร้างอินสแตนซ์ของคลาส Presentation
- เข้าถึงสไลด์ที่ต้องการโดยใช้ดัชนีของมัน
- เพิ่ม AutoShape สี่เหลี่ยมผืนผ้าไปยังสไลด์
- เข้าถึง TextFrame ของ shape
- ใช้ paragraph เริ่มต้นและเพิ่มอ็อบเจกต์ Paragraph อีกสองอันไปยัง text frame
- เพิ่มอ็อบเจกต์ Portion เพียงพอสำหรับแต่ละ paragraph เพื่อให้มีสาม portion โดย paragraph เริ่มต้นมีหนึ่ง portion ว่างอยู่แล้ว
- ตั้งค่าข้อความของแต่ละ portion
- ใช้การจัดรูปแบบระดับอักขระผ่าน Portion.getPortionFormat
- บันทึก presentation ที่แก้ไขแล้ว
ตัวอย่าง JavaScript นี้แสดงขั้นตอนดังกล่าว:
var aspose = aspose || {};
aspose.slides = require("aspose.slides.via.java");
const java = require("java");

const presentation = new aspose.slides.Presentation();
try {
    const slide = presentation.getSlides().get_Item(0);
    const shape = slide.getShapes().addAutoShape(aspose.slides.ShapeType.Rectangle, 50, 150, 300, 150);
    const textFrame = shape.getTextFrame();

    const firstParagraph = textFrame.getParagraphs().get_Item(0);
    firstParagraph.getPortions().add(new aspose.slides.Portion());
    firstParagraph.getPortions().add(new aspose.slides.Portion());

    const secondParagraph = new aspose.slides.Paragraph();
    secondParagraph.getPortions().add(new aspose.slides.Portion());
    secondParagraph.getPortions().add(new aspose.slides.Portion());
    secondParagraph.getPortions().add(new aspose.slides.Portion());
    textFrame.getParagraphs().add(secondParagraph);

    const thirdParagraph = new aspose.slides.Paragraph();
    thirdParagraph.getPortions().add(new aspose.slides.Portion());
    thirdParagraph.getPortions().add(new aspose.slides.Portion());
    thirdParagraph.getPortions().add(new aspose.slides.Portion());
    textFrame.getParagraphs().add(thirdParagraph);

    const paragraphCount = textFrame.getParagraphs().getCount();
    for (let paragraphIndex = 0; paragraphIndex < paragraphCount; paragraphIndex++) {
        const paragraph = textFrame.getParagraphs().get_Item(paragraphIndex);
        const portionCount = paragraph.getPortions().getCount();
        for (let portionIndex = 0; portionIndex < portionCount; portionIndex++) {
            const portion = paragraph.getPortions().get_Item(portionIndex);
            portion.setText("Portion " + (paragraphIndex + 1) + "." + (portionIndex + 1));

            if (portionIndex === 0) {
                portion.getPortionFormat().getFillFormat().setFillType(java.newByte(aspose.slides.FillType.Solid));
                portion.getPortionFormat().getFillFormat().getSolidFillColor().setColor(java.getStaticFieldValue("java.awt.Color", "RED"));
                portion.getPortionFormat().setFontBold(java.newByte(aspose.slides.NullableBool.True));
                portion.getPortionFormat().setFontHeight(15);
            } else if (portionIndex === 1) {
                portion.getPortionFormat().getFillFormat().setFillType(java.newByte(aspose.slides.FillType.Solid));
                portion.getPortionFormat().getFillFormat().getSolidFillColor().setColor(java.getStaticFieldValue("java.awt.Color", "BLUE"));
                portion.getPortionFormat().setFontItalic(java.newByte(aspose.slides.NullableBool.True));
                portion.getPortionFormat().setFontHeight(18);
            }
        }
    }

    presentation.save("paragraphs_with_portions.pptx", aspose.slides.SaveFormat.Pptx);
} finally {
    presentation.dispose();
}
สร้างรายการแบบมี Bullet และเลขลำดับ
สร้างรายการ Bullet หรือ Numbered
Bullet และการทำเลขลำดับทำให้รายการที่เกี่ยวข้องอ่านง่ายขึ้น ใน Aspose.Slides การตั้งค่าแบบรายการกำหนดผ่าน BulletFormat
- สร้างอินสแตนซ์ของคลาส Presentation
- เข้าถึงสไลด์ที่ต้องการโดยใช้ดัชนีของมัน
- เพิ่ม AutoShape ไปยังสไลด์ที่เลือก
- เข้าถึง TextFrame ของ shape 5.ลบ paragraph เริ่มต้นออกจาก text frame
- สร้าง Paragraph สำหรับ bullet แบบสัญลักษณ์
- ตั้งค่า BulletFormat.setType เป็น BulletType.Symbol และระบุอักขระ bullet
- ตั้งค่าข้อความของ paragraph, ตัวเยื้อง, สี bullet, และความสูงของ bullet
- เพิ่ม paragraph ไปยัง text frame
- สร้าง paragraph ที่สองและตั้งค่า BulletFormat.setType เป็น BulletType.Numbered
- กำหนดค่า style ของ bullet แบบเลขลำดับและเพิ่ม paragraph ไปยัง text frame
- บันทึก presentation
ตัวอย่าง JavaScript นี้สร้าง bullet แบบสัญลักษณ์และ bullet แบบเลขลำดับ:
var aspose = aspose || {};
aspose.slides = require("aspose.slides.via.java");
const java = require("java");

const presentation = new aspose.slides.Presentation();
try {
    const slide = presentation.getSlides().get_Item(0);
    const shape = slide.getShapes().addAutoShape(aspose.slides.ShapeType.Rectangle, 200, 200, 400, 200);
    const textFrame = shape.getTextFrame();
    textFrame.getParagraphs().clear();

    const symbolParagraph = new aspose.slides.Paragraph();
    symbolParagraph.setText("Welcome to Aspose.Slides");
    symbolParagraph.getParagraphFormat().getBullet().setType(java.newByte(aspose.slides.BulletType.Symbol));
    symbolParagraph.getParagraphFormat().getBullet().setChar(java.newChar(0x2022));
    symbolParagraph.getParagraphFormat().setIndent(25);
    symbolParagraph.getParagraphFormat().getBullet().getColor().setColorType(aspose.slides.ColorType.RGB);
    symbolParagraph.getParagraphFormat().getBullet().getColor().setColor(java.getStaticFieldValue("java.awt.Color", "BLACK"));
    symbolParagraph.getParagraphFormat().getBullet().setBulletHardColor(java.newByte(aspose.slides.NullableBool.True));
    symbolParagraph.getParagraphFormat().getBullet().setHeight(100);
    textFrame.getParagraphs().add(symbolParagraph);

    const numberedParagraph = new aspose.slides.Paragraph();
    numberedParagraph.setText("This is a numbered item");
    numberedParagraph.getParagraphFormat().getBullet().setType(java.newByte(aspose.slides.BulletType.Numbered));
    numberedParagraph.getParagraphFormat().getBullet().setNumberedBulletStyle(java.newByte(aspose.slides.NumberedBulletStyle.BulletCircleNumWDBlackPlain));
    numberedParagraph.getParagraphFormat().setIndent(25);
    numberedParagraph.getParagraphFormat().getBullet().getColor().setColorType(aspose.slides.ColorType.RGB);
    numberedParagraph.getParagraphFormat().getBullet().getColor().setColor(java.getStaticFieldValue("java.awt.Color", "BLACK"));
    numberedParagraph.getParagraphFormat().getBullet().setBulletHardColor(java.newByte(aspose.slides.NullableBool.True));
    numberedParagraph.getParagraphFormat().getBullet().setHeight(100);
    textFrame.getParagraphs().add(numberedParagraph);

    presentation.save("bulleted_and_numbered_list.pptx", aspose.slides.SaveFormat.Pptx);
} finally {
    presentation.dispose();
}
ใช้ Picture Bullets
Picture bullets ให้คุณใช้รูปภาพกำหนดเองแทนสัญลักษณ์หรือเลขลำดับ
- สร้างอินสแตนซ์ของคลาสตัว Presentation
- เข้าถึงสไลด์ที่ต้องการโดยใช้ดัชนีของมัน
- เพิ่ม AutoShape และเข้าถึง TextFrame ของมัน
- ลบ paragraph เริ่มต้นออกจาก text frame
- โหลดรูปภาพ bullet และเพิ่มเข้าไปใน collection ของรูปภาพของ presentation เป็น PPImage
- สร้าง Paragraph และตั้งค่าข้อความของมัน
- ตั้งค่า BulletFormat.setType เป็น BulletType.Picture
- กำหนดรูปภาพผ่าน BulletFormat.getPicture และตั้งค่าความสูงของ bullet
- เพิ่ม paragraph ไปยัง text frame
- บันทึก presentation ที่แก้ไขแล้ว
ตัวอย่าง JavaScript นี้สร้าง picture bullet:
var aspose = aspose || {};
aspose.slides = require("aspose.slides.via.java");
const java = require("java");

const presentation = new aspose.slides.Presentation();
try {
    const slide = presentation.getSlides().get_Item(0);

    const bulletImage = aspose.slides.Images.fromFile("image.png");
    let presentationImage;
    try {
        presentationImage = presentation.getImages().addImage(bulletImage);
    } finally {
        bulletImage.dispose();
    }

    const shape = slide.getShapes().addAutoShape(aspose.slides.ShapeType.Rectangle, 200, 200, 400, 200);
    const textFrame = shape.getTextFrame();
    textFrame.getParagraphs().clear();

    const paragraph = new aspose.slides.Paragraph();
    paragraph.setText("Welcome to Aspose.Slides");
    paragraph.getParagraphFormat().getBullet().setType(java.newByte(aspose.slides.BulletType.Picture));
    paragraph.getParagraphFormat().getBullet().getPicture().setImage(presentationImage);
    paragraph.getParagraphFormat().getBullet().setHeight(100);
    textFrame.getParagraphs().add(paragraph);

    presentation.save("picture_bullet.pptx", aspose.slides.SaveFormat.Pptx);
    presentation.save("picture_bullet.ppt", aspose.slides.SaveFormat.Ppt);
} finally {
    presentation.dispose();
}
สร้างรายการหลายระดับ
ตั้งค่า ParagraphFormat.setDepth เพื่อวาง paragraph ในระดับต่าง ๆ ของรายการ ระดับบนสุดมีความลึกเป็น 0
- สร้าง Presentation และเข้าถึงสไลด์
- เพิ่ม AutoShape และลบ paragraph เริ่มต้นออกจาก text frame ของมัน
- สร้างสี่ paragraph และกำหนดสัญลักษณ์ bullet ของพวกมัน
- ตั้งค่าความลึกของพวกมันโดยใช้ ParagraphFormat.setDepth เป็นค่า
0,1,2, และ3 - เพิ่ม paragraph เหล่านั้นไปยัง text frame และบันทึก presentation
ตัวอย่าง JavaScript นี้สร้างรายการ bullet สี่ระดับ:
var aspose = aspose || {};
aspose.slides = require("aspose.slides.via.java");
const java = require("java");

const presentation = new aspose.slides.Presentation();
try {
    const slide = presentation.getSlides().get_Item(0);
    const shape = slide.getShapes().addAutoShape(aspose.slides.ShapeType.Rectangle, 200, 200, 400, 200);
    const textFrame = shape.getTextFrame();
    textFrame.getParagraphs().clear();

    const firstParagraph = new aspose.slides.Paragraph();
    firstParagraph.setText("Content");
    firstParagraph.getParagraphFormat().getBullet().setType(java.newByte(aspose.slides.BulletType.Symbol));
    firstParagraph.getParagraphFormat().getBullet().setChar(java.newChar(0x2022));
    firstParagraph.getParagraphFormat().getDefaultPortionFormat().getFillFormat().setFillType(java.newByte(aspose.slides.FillType.Solid));
    firstParagraph.getParagraphFormat().getDefaultPortionFormat().getFillFormat().getSolidFillColor().setColor(java.getStaticFieldValue("java.awt.Color", "BLACK"));
    firstParagraph.getParagraphFormat().setDepth(java.newShort(0));

    const secondParagraph = new aspose.slides.Paragraph();
    secondParagraph.setText("Second level");
    secondParagraph.getParagraphFormat().getBullet().setType(java.newByte(aspose.slides.BulletType.Symbol));
    secondParagraph.getParagraphFormat().getBullet().setChar(java.newChar(45));
    secondParagraph.getParagraphFormat().getDefaultPortionFormat().getFillFormat().setFillType(java.newByte(aspose.slides.FillType.Solid));
    secondParagraph.getParagraphFormat().getDefaultPortionFormat().getFillFormat().getSolidFillColor().setColor(java.getStaticFieldValue("java.awt.Color", "BLACK"));
    secondParagraph.getParagraphFormat().setDepth(java.newShort(1));

    const thirdParagraph = new aspose.slides.Paragraph();
    thirdParagraph.setText("Third level");
    thirdParagraph.getParagraphFormat().getBullet().setType(java.newByte(aspose.slides.BulletType.Symbol));
    thirdParagraph.getParagraphFormat().getBullet().setChar(java.newChar(0x2022));
    thirdParagraph.getParagraphFormat().getDefaultPortionFormat().getFillFormat().setFillType(java.newByte(aspose.slides.FillType.Solid));
    thirdParagraph.getParagraphFormat().getDefaultPortionFormat().getFillFormat().getSolidFillColor().setColor(java.getStaticFieldValue("java.awt.Color", "BLACK"));
    thirdParagraph.getParagraphFormat().setDepth(java.newShort(2));

    const fourthParagraph = new aspose.slides.Paragraph();
    fourthParagraph.setText("Fourth level");
    fourthParagraph.getParagraphFormat().getBullet().setType(java.newByte(aspose.slides.BulletType.Symbol));
    fourthParagraph.getParagraphFormat().getBullet().setChar(java.newChar(45));
    fourthParagraph.getParagraphFormat().getDefaultPortionFormat().getFillFormat().setFillType(java.newByte(aspose.slides.FillType.Solid));
    fourthParagraph.getParagraphFormat().getDefaultPortionFormat().getFillFormat().getSolidFillColor().setColor(java.getStaticFieldValue("java.awt.Color", "BLACK"));
    fourthParagraph.getParagraphFormat().setDepth(java.newShort(3));

    textFrame.getParagraphs().add(firstParagraph);
    textFrame.getParagraphs().add(secondParagraph);
    textFrame.getParagraphs().add(thirdParagraph);
    textFrame.getParagraphs().add(fourthParagraph);

    presentation.save("multilevel_list.pptx", aspose.slides.SaveFormat.Pptx);
} finally {
    presentation.dispose();
}
เริ่มรายการแบบเลขลำดับด้วยค่าที่กำหนดเอง
ใช้ BulletFormat.setNumberedBulletStartWith เพื่อตั้งค่าตัวเลขเริ่มต้นที่แสดงสำหรับ paragraph ที่เป็นเลขลำดับ
- สร้าง Presentation และเพิ่ม AutoShape ไปยังสไลด์
- ลบ paragraph เริ่มต้นออกจาก text frame ของ shape
- สร้างสาม paragraph ที่เป็นเลขลำดับ
- ตั้งค่า BulletFormat.setNumberedBulletStartWith เป็น
2,3, และ7สำหรับแต่ละ paragraph ตามลำดับ - เพิ่ม paragraph เหล่านั้นไปยัง text frame และบันทึก presentation
ตัวอย่าง JavaScript นี้กำหนดตัวเลขเริ่มต้นแบบกำหนดเองให้กับแต่ละ paragraph:
var aspose = aspose || {};
aspose.slides = require("aspose.slides.via.java");
const java = require("java");

const presentation = new aspose.slides.Presentation();
try {
    const slide = presentation.getSlides().get_Item(0);
    const shape = slide.getShapes().addAutoShape(aspose.slides.ShapeType.Rectangle, 200, 200, 400, 200);
    const textFrame = shape.getTextFrame();
    textFrame.getParagraphs().clear();

    const firstParagraph = new aspose.slides.Paragraph();
    firstParagraph.setText("Start at 2");
    firstParagraph.getParagraphFormat().getBullet().setType(java.newByte(aspose.slides.BulletType.Numbered));
    firstParagraph.getParagraphFormat().getBullet().setNumberedBulletStartWith(java.newShort(2));
    textFrame.getParagraphs().add(firstParagraph);

    const secondParagraph = new aspose.slides.Paragraph();
    secondParagraph.setText("Start at 3");
    secondParagraph.getParagraphFormat().getBullet().setType(java.newByte(aspose.slides.BulletType.Numbered));
    secondParagraph.getParagraphFormat().getBullet().setNumberedBulletStartWith(java.newShort(3));
    textFrame.getParagraphs().add(secondParagraph);

    const thirdParagraph = new aspose.slides.Paragraph();
    thirdParagraph.setText("Start at 7");
    thirdParagraph.getParagraphFormat().getBullet().setType(java.newByte(aspose.slides.BulletType.Numbered));
    thirdParagraph.getParagraphFormat().getBullet().setNumberedBulletStartWith(java.newShort(7));
    textFrame.getParagraphs().add(thirdParagraph);

    presentation.save("custom_numbered_list.pptx", aspose.slides.SaveFormat.Pptx);
} finally {
    presentation.dispose();
}
ควบคุมเค้าโครงย่อหน้าและคุณสมบัติส่วนท้าย
ตั้งค่าการเยื้องบรรทัดแรก
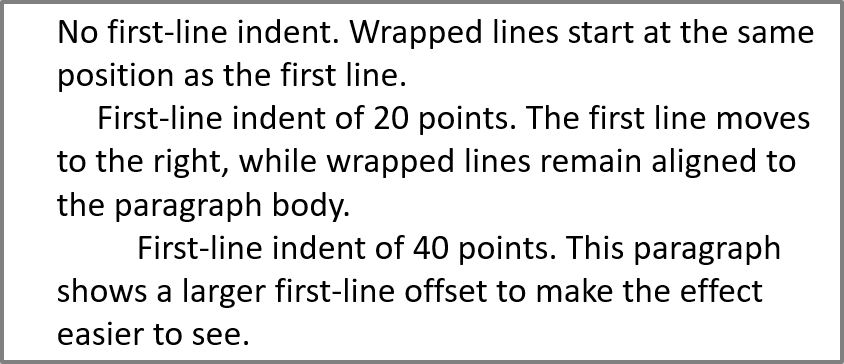
ใช้ ParagraphFormat.setIndent เพื่อควบคุมการเยื้องบรรทัดแรกของ paragraph วิธีนี้จะย้ายบรรทัดแรกเท่านั้นสัมพันธ์กับระยะซ้ายของ paragraph ค่าเป็นบวกจะเลื่อนบรรทัดแรกไปทางขวา ส่วนบรรทัดที่เหลือยังคงจัดชิดกับเนื้อหา paragraph
ใช้ ParagraphFormat.setMarginLeft เมื่อคุณต้องการย้ายทั้ง paragraph ใช้ ParagraphFormat.setIndent เมื่อคุณต้องการย้ายเฉพาะบรรทัดแรกเท่านั้น
ตัวอย่างด้านล่างสร้างหลาย paragraph และกำหนดค่า ParagraphFormat.setIndent ที่แตกต่างกันเพื่อสาธิตว่าการเยื้องบรรทัดแรกส่งผลต่อเค้าโครงอย่างไร
- สร้างอินสแตนซ์ของคลาส Presentation
- เข้าถึงสไลด์เป้าหมาย
- เพิ่ม AutoShape สี่เหลี่ยมผืนผ้าไปยังสไลด์
- เข้าถึง TextFrame ของ shape และลบ paragraph เริ่มต้น
- สร้างหลาย paragraph และกำหนดค่า ParagraphFormat.setIndent ที่แตกต่างกันสำหรับแต่ละอัน
- เพิ่ม paragraph เหล่านั้นไปยัง text frame
- บันทึก presentation ที่แก้ไขแล้ว
โค้ดนี้แสดงวิธีตั้งค่าการเยื้องของ paragraph:
var aspose = aspose || {};
aspose.slides = require("aspose.slides.via.java");
const java = require("java");

const presentation = new aspose.slides.Presentation();
try {
    const slide = presentation.getSlides().get_Item(0);

    const shape = slide.getShapes().addAutoShape(aspose.slides.ShapeType.Rectangle, 50, 50, 420, 220);
    shape.getFillFormat().setFillType(java.newByte(aspose.slides.FillType.NoFill));
    shape.getLineFormat().getFillFormat().setFillType(java.newByte(aspose.slides.FillType.Solid));
    shape.getLineFormat().getFillFormat().getSolidFillColor().setColor(java.getStaticFieldValue("java.awt.Color", "GRAY"));

    const textFrame = shape.getTextFrame();
    textFrame.getTextFrameFormat().setAutofitType(java.newByte(aspose.slides.TextAutofitType.Shape));
    textFrame.getParagraphs().clear();

    const firstParagraph = new aspose.slides.Paragraph();
    firstParagraph.setText("No first-line indent. Wrapped lines start at the same position as the first line.");
    firstParagraph.getParagraphFormat().getDefaultPortionFormat().getFillFormat().setFillType(java.newByte(aspose.slides.FillType.Solid));
    firstParagraph.getParagraphFormat().getDefaultPortionFormat().getFillFormat().getSolidFillColor().setColor(java.getStaticFieldValue("java.awt.Color", "BLACK"));
    firstParagraph.getParagraphFormat().setMarginLeft(20);
    firstParagraph.getParagraphFormat().setIndent(0);

    const secondParagraph = new aspose.slides.Paragraph();
    secondParagraph.setText("First-line indent of 20 points. The first line moves to the right, while wrapped lines remain aligned to the paragraph body.");
    secondParagraph.getParagraphFormat().getDefaultPortionFormat().getFillFormat().setFillType(java.newByte(aspose.slides.FillType.Solid));
    secondParagraph.getParagraphFormat().getDefaultPortionFormat().getFillFormat().getSolidFillColor().setColor(java.getStaticFieldValue("java.awt.Color", "BLACK"));
    secondParagraph.getParagraphFormat().setMarginLeft(20);
    secondParagraph.getParagraphFormat().setIndent(20);

    const thirdParagraph = new aspose.slides.Paragraph();
    thirdParagraph.setText("First-line indent of 40 points. This paragraph shows a larger first-line offset to make the effect easier to see.");
    thirdParagraph.getParagraphFormat().getDefaultPortionFormat().getFillFormat().setFillType(java.newByte(aspose.slides.FillType.Solid));
    thirdParagraph.getParagraphFormat().getDefaultPortionFormat().getFillFormat().getSolidFillColor().setColor(java.getStaticFieldValue("java.awt.Color", "BLACK"));
    thirdParagraph.getParagraphFormat().setMarginLeft(20);
    thirdParagraph.getParagraphFormat().setIndent(40);

    textFrame.getParagraphs().add(firstParagraph);
    textFrame.getParagraphs().add(secondParagraph);
    textFrame.getParagraphs().add(thirdParagraph);

    presentation.save("paragraph_indent.pptx", aspose.slides.SaveFormat.Pptx);
} finally {
    presentation.dispose();
}
ผลลัพธ์:
ตั้งค่า Hanging Indent
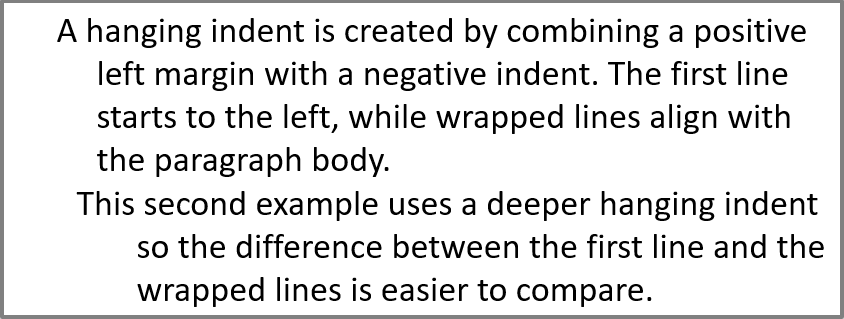
Hanging indent คือเค้าโครงที่บรรทัดแรกเริ่มอยู่ทางซ้ายของบรรทัดที่เหลือ ใน Aspose.Slides คุณสร้างเอฟเฟกต์นี้ด้วย ParagraphFormat.setIndent ให้ค่าติดลบเพื่อย้ายบรรทัดแรกไปทางซ้ายสัมพันธ์กับเนื้อหา paragraph
ในทางปฏิบัติ ParagraphFormat.setMarginLeft กำหนดตำแหน่งซ้ายของเนื้อหา paragraph และ ParagraphFormat.setIndent กำหนดตำแหน่งของบรรทัดแรกสัมพันธ์กับ margin นั้น เพื่อสร้าง hanging indent ให้กำหนดค่าเป็นบวกกับ setMarginLeft และเป็นลบกับ setIndent
การจัดรูปแบบนี้มีประโยชน์สำหรับบรรณานุกรม, อ้างอิง, รายการอภิธานศัพท์ และ paragraph อื่น ๆ ที่ต้องการให้บรรทัดที่ห่อหุ้มเรียงชิดกับเนื้อหาแทนตัวอักษรแรกของบรรทัดแรก
- สร้างอินสแตนซ์ของคลาส Presentation
- เข้าถึงสไลด์เป้าหมาย
- เพิ่ม AutoShape สี่เหลี่ยมผืนผ้าไปยังสไลด์
- เข้าถึง TextFrame ของ shape และลบ paragraph เริ่มต้น
- สร้าง paragraph และกำหนดค่าเป็นบวกให้กับ ParagraphFormat.setMarginLeft สำหรับแต่ละ paragraph
- กำหนดค่าเป็นลบให้กับ ParagraphFormat.setIndent เพื่อสร้างเอฟเฟ็กต์ hanging indent
- เพิ่ม paragraph เหล่านั้นไปยัง text frame
- บันทึก presentation ที่แก้ไขแล้ว
โค้ดนี้แสดงวิธีตั้งค่า hanging indent สำหรับ paragraph:
var aspose = aspose || {};
aspose.slides = require("aspose.slides.via.java");
const java = require("java");

const presentation = new aspose.slides.Presentation();
try {
    const slide = presentation.getSlides().get_Item(0);

    const shape = slide.getShapes().addAutoShape(aspose.slides.ShapeType.Rectangle, 50, 50, 420, 220);
    shape.getFillFormat().setFillType(java.newByte(aspose.slides.FillType.NoFill));
    shape.getLineFormat().getFillFormat().setFillType(java.newByte(aspose.slides.FillType.Solid));
    shape.getLineFormat().getFillFormat().getSolidFillColor().setColor(java.getStaticFieldValue("java.awt.Color", "GRAY"));

    const textFrame = shape.getTextFrame();
    textFrame.getTextFrameFormat().setAutofitType(java.newByte(aspose.slides.TextAutofitType.Shape));
    textFrame.getParagraphs().clear();

    const firstParagraph = new aspose.slides.Paragraph();
    firstParagraph.setText("A hanging indent is created by combining a positive left margin with a negative indent. The first line starts to the left, while wrapped lines align with the paragraph body.");
    firstParagraph.getParagraphFormat().getDefaultPortionFormat().getFillFormat().setFillType(java.newByte(aspose.slides.FillType.Solid));
    firstParagraph.getParagraphFormat().getDefaultPortionFormat().getFillFormat().getSolidFillColor().setColor(java.getStaticFieldValue("java.awt.Color", "BLACK"));
    firstParagraph.getParagraphFormat().setMarginLeft(40);
    firstParagraph.getParagraphFormat().setIndent(-20);

    const secondParagraph = new aspose.slides.Paragraph();
    secondParagraph.setText("This second example uses a deeper hanging indent so the difference between the first line and the wrapped lines is easier to compare.");
    secondParagraph.getParagraphFormat().getDefaultPortionFormat().getFillFormat().setFillType(java.newByte(aspose.slides.FillType.Solid));
    secondParagraph.getParagraphFormat().getDefaultPortionFormat().getFillFormat().getSolidFillColor().setColor(java.getStaticFieldValue("java.awt.Color", "BLACK"));
    secondParagraph.getParagraphFormat().setMarginLeft(60);
    secondParagraph.getParagraphFormat().setIndent(-30);

    textFrame.getParagraphs().add(firstParagraph);
    textFrame.getParagraphs().add(secondParagraph);

    presentation.save("hanging_indent.pptx", aspose.slides.SaveFormat.Pptx);
} finally {
    presentation.dispose();
}
ผลลัพธ์:
ตั้งค่าคุณสมบัติการรันของย่อหน้าสิ้นสุด
Paragraph.setEndParagraphPortionFormat ควบคุมการจัดรูปแบบของสัญลักษณ์สิ้นสุด paragraph ตัวอย่างต่อไปนี้กำหนดขนาดฟอนต์และฟอนต์ Latin ให้กับสัญลักษณ์สิ้นสุดของ paragraph ที่สอง:
- สร้างหรือโหลด Presentation และเข้าถึงสไลด์
- เพิ่ม AutoShape และลบ paragraph เริ่มต้นของมัน
- สร้างสอง paragraph และเพิ่ม portion ของข้อความลงไป
- สร้าง PortionFormat สำหรับสัญลักษณ์สิ้นสุดของ paragraph ที่สอง
- ตั้งค่า BasePortionFormat.setFontHeight และ BasePortionFormat.setLatinFont
- ใช้ Paragraph.setEndParagraphPortionFormat เพื่อนำรูปแบบไปใช้และบันทึก presentation
var aspose = aspose || {};
aspose.slides = require("aspose.slides.via.java");

const presentation = new aspose.slides.Presentation();
try {
    const slide = presentation.getSlides().get_Item(0);
    const shape = slide.getShapes().addAutoShape(aspose.slides.ShapeType.Rectangle, 10, 10, 200, 250);
    const textFrame = shape.getTextFrame();
    textFrame.getParagraphs().clear();

    const firstParagraph = new aspose.slides.Paragraph();
    firstParagraph.getPortions().add(new aspose.slides.Portion("Sample text"));

    const secondParagraph = new aspose.slides.Paragraph();
    secondParagraph.getPortions().add(new aspose.slides.Portion("Sample text 2"));

    const endParagraphFormat = new aspose.slides.PortionFormat();
    endParagraphFormat.setFontHeight(48);
    endParagraphFormat.setLatinFont(new aspose.slides.FontData("Times New Roman"));
    secondParagraph.setEndParagraphPortionFormat(endParagraphFormat);

    textFrame.getParagraphs().add(firstParagraph);
    textFrame.getParagraphs().add(secondParagraph);

    presentation.save("end_paragraph_format.pptx", aspose.slides.SaveFormat.Pptx);
} finally {
    presentation.dispose();
}
นับจำนวนบรรทัดที่แสดงผล
สำหรับกฎของ paragraph ที่มีผลต่อการห่อหุ้มอัตโนมัติและเครื่องหมายวรรคตอนที่สิ้นสุดบรรทัด ดูที่ Control Line Breaking และ Control Hanging Punctuation
ใช้ Paragraph.getLinesCount เพื่อนับจำนวนบรรทัดที่ paragraph ใช้หลังจากการจัดรูปแบบข้อความรวมถึงการห่อหุ้มอัตโนมัติ ซึ่งมีประโยชน์เมื่อพยายามตรวจสอบความยาวของข้อความและการจัดรูปแบบในเทมเพลตของ presentation
paragraph เป็นรายการหนึ่งใน TextFrame.getParagraphs และอาจครอบคลุมหลายบรรทัดที่แสดงผล การใส่ line break ชัดเจนภายใน paragraph จะทำให้เกิดบรรทัดใหม่โดยไม่สร้าง paragraph ใหม่ การห่อหุ้มอัตโนมัติจะสร้างบรรทัดตามความกว้างที่มีอยู่โดยไม่แทรก line break เข้าไปในข้อความ ดังนั้นการนับจำนวน paragraph หรือตัวอักษร line‑break จึงไม่ได้ให้จำนวนบรรทัดที่แสดงผลจริง
ตัวอย่างต่อไปนี้สร้าง shape ข้อความ นับจำนวนบรรทัดของมัน แล้วทำให้ shape แคบลง จากนั้นแทนที่ข้อความด้วยสตริงสั้นกว่า การห่อหุ้มเปิดอยู่และ autofit ปิดไว้เพื่อให้ความกว้างของ shape ควบคุมการห่อหุ้มโดยไม่ให้ข้อความหรือ shape ลดขนาดอัตโนมัติ มิติของ shape วัดเป็น point สุดท้ายตัวอย่างเพิ่ม paragraph อีกหนึ่งอันและสรุปจำนวนบรรทัดจากทั้ง text frame
var aspose = aspose || {};
aspose.slides = require("aspose.slides.via.java");
const java = require("java");

const presentation = new aspose.slides.Presentation();
try {
    const slide = presentation.getSlides().get_Item(0);

    const shape = slide.getShapes().addAutoShape(aspose.slides.ShapeType.Rectangle, 50, 50, 400, 200);
    const textFrame = shape.getTextFrame();
    textFrame.getTextFrameFormat().setWrapText(java.newByte(aspose.slides.NullableBool.True));
    textFrame.getTextFrameFormat().setAutofitType(java.newByte(aspose.slides.TextAutofitType.None));

    const paragraph = textFrame.getParagraphs().get_Item(0);
    paragraph.getParagraphFormat().getDefaultPortionFormat().setFontHeight(20);
    paragraph.setText("This text demonstrates how automatic wrapping changes the number of rendered lines.");
    console.log("Original width: " + paragraph.getLinesCount());

    shape.setWidth(150);
    console.log("Narrower shape: " + paragraph.getLinesCount());

    paragraph.setText("Short text.");
    console.log("Shorter text: " + paragraph.getLinesCount());

    const secondParagraph = new aspose.slides.Paragraph();
    secondParagraph.setText("Another paragraph.");
    secondParagraph.getParagraphFormat().getDefaultPortionFormat().setFontHeight(20);
    textFrame.getParagraphs().add(secondParagraph);

    let totalLineCount = 0;
    for (let i = 0; i < textFrame.getParagraphs().getCount(); i++) {
        const currentParagraph = textFrame.getParagraphs().get_Item(i);
        totalLineCount += currentParagraph.getLinesCount();
    }
    console.log("Total lines in the text frame: " + totalLineCount);
} finally {
    presentation.dispose();
}
ด้วยข้อความและมิติเหล่านี้ การทำให้ shape แคบลงจะเพิ่มจำนวนบรรทัด ส่วนการแทนที่ข้อความด้วยสตริงสั้นจะลดจำนวนบรรทัด จำนวนที่แน่นอนอาจแตกต่างกันตามฟอนต์ที่มีอยู่และการทดแทน ขนาดฟอนต์ ระยะขอบ การเยื้อง การห่อหุ้ม และการตั้งค่า autofit ใช้ฟอนต์และการตั้งค่า layout ที่กำหนดสำหรับสภาพแวดล้อมเป้าหมายเมื่อทำการตรวจสอบเทมเพลต
จำนวนบรรทัดเพียงอย่างเดียวไม่เป็นตัวกำหนดว่าข้อความจะล้นพื้นที่หรือไม่ ความสูงที่มีอยู่ ความสูงของบรรทัด ระยะห่างระหว่าง paragraph และบรรทัด และพฤติกรรม autofit ก็มีผลเช่นกัน; แม้บรรทัดเดียวก็อาจเกินความกว้างที่มีเมื่อปิดการห่อหุ้ม
นำเข้าและส่งออกเนื้อหาย่อหน้า
นำเข้า HTML Text ไปยัง Paragraphs
ใช้ ParagraphCollection.addFromHtml เพื่อแปลง markup HTML เป็น paragraph และ portion ใน text frame
- สร้างอินสแตนซ์ของคลาส Presentation
- เข้าถึงสไลด์และเพิ่ม AutoShape
- เข้าถึง TextFrame ของ shape และลบ paragraph เริ่มต้น
- นิยามหรืออ่านสตริง HTML ต้นทาง
- ส่งสตริง HTML ไปที่ ParagraphCollection.addFromHtml
- บันทึก presentation ที่แก้ไขแล้ว
ตัวอย่าง JavaScript นี้นำเข้า HTML ไปยัง text frame:
var aspose = aspose || {};
aspose.slides = require("aspose.slides.via.java");
const java = require("java");

const presentation = new aspose.slides.Presentation();
try {
    const slide = presentation.getSlides().get_Item(0);
    const shapeWidth = presentation.getSlideSize().getSize().getWidth() - 20;
    const shapeHeight = presentation.getSlideSize().getSize().getHeight() - 20;
    const shape = slide.getShapes().addAutoShape(aspose.slides.ShapeType.Rectangle, 10, 10, shapeWidth, shapeHeight);
    shape.getFillFormat().setFillType(java.newByte(aspose.slides.FillType.NoFill));
    shape.getTextFrame().getParagraphs().clear();

    const html = "<p><b>Aspose.Slides</b> imports HTML text into presentation paragraphs.</p>";
    shape.getTextFrame().getParagraphs().addFromHtml(html);
    presentation.save("html_text.pptx", aspose.slides.SaveFormat.Pptx);
} finally {
    presentation.dispose();
}
ส่งออกข้อความ Paragraph เป็น HTML
ใช้ ParagraphCollection.exportToHtml เพื่อส่งออกช่วงของ paragraph ที่เลือกเป็น HTML
- สร้างหรือโหลดอินสแตนซ์ของคลาส Presentation
- เข้าถึงสไลด์และค้นหา AutoShape ที่มีข้อความ
- เข้าถึง TextFrame ของ shape
- เรียก ParagraphCollection.exportToHtml พร้อมกับดัชนี paragraph เริ่มต้นและจำนวน paragraph ที่ต้องการส่งออก
- เขียนสตริง HTML ที่คืนค่ามาไปยังไฟล์
ตัวอย่าง JavaScript ตัวนี้สร้าง shape ข้อความและส่งออกทุก paragraph ของมัน:
var aspose = aspose || {};
aspose.slides = require("aspose.slides.via.java");
const java = require("java");
const fs = require("fs");

const presentation = new aspose.slides.Presentation();
try {
    const slide = presentation.getSlides().get_Item(0);
    const sourceShape = slide.getShapes().addAutoShape(aspose.slides.ShapeType.Rectangle, 20, 20, 400, 100);
    const sourceTextFrame = sourceShape.getTextFrame();
    sourceTextFrame.getParagraphs().clear();
    for (const text of ["First paragraph", "Second paragraph", "Third paragraph"]) {
        const sourceParagraph = new aspose.slides.Paragraph();
        sourceParagraph.setText(text);
        sourceTextFrame.getParagraphs().add(sourceParagraph);
    }
    const shape = slide.getShapes().get_Item(0);

    if (java.instanceOf(shape, "com.aspose.slides.IAutoShape")) {
        const textFrame = shape.getTextFrame();
        if (textFrame !== null) {
            const paragraphs = textFrame.getParagraphs();
            const html = paragraphs.exportToHtml(0, paragraphs.getCount(), null);
            fs.writeFileSync("paragraphs.html", html, "utf8");
        } else {
            console.log("The first shape does not contain a text frame.");
        }
    } else {
        console.log("The first shape is not a text shape.");
    }
} finally {
    presentation.dispose();
}
แสดง Paragraph เป็น Image
Paragraph.getImage แสดง paragraph เดี่ยวโดยตรงและคืนค่าเป็น IImage. บันทึกผลลัพธ์ไปยังไฟล์ด้วย IImage.save. คุณไม่จำเป็นต้องเรนเดอร์ shape ทั้งหมดหรือครอบตัด bitmap ด้วยตนเอง
Paragraph.getImage อาจคืนค่า null หากไม่พบ paragraph ใน collection พ่อแม่ ไม่มีขอบเขตการเรนเดอร์ที่ถูกต้อง หรือไม่สามารถเรนเดอร์ได้ ตรวจสอบผลลัพธ์ก่อนบันทึกและทำลาย image ที่คืนค่าหลังใช้งาน
แสดง Paragraph ที่สเกลเริ่มต้น
กล่องข้อความต่อไปนี้มีสาม paragraph:
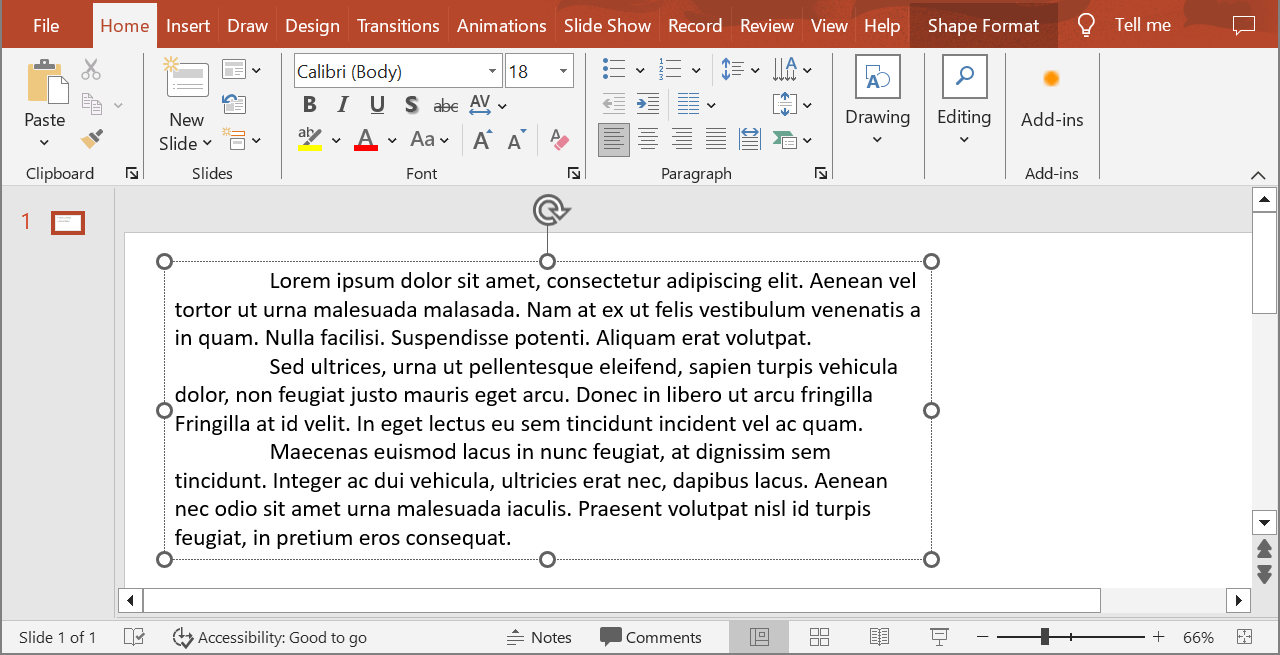
ตัวอย่างต่อไปนี้แสดง paragraph ที่สองใน shape ข้อความปกติที่สเกลเริ่มต้นและบันทึกภาพที่ได้ในรูปแบบ PNG บล็อก finally ทำให้แน่ใจว่า image จะถูกทำลายอย่างถูกต้อง
var aspose = aspose || {};
aspose.slides = require("aspose.slides.via.java");
const java = require("java");

const presentation = new aspose.slides.Presentation();
try {
    const slide = presentation.getSlides().get_Item(0);
    const sourceShape = slide.getShapes().addAutoShape(aspose.slides.ShapeType.Rectangle, 20, 20, 400, 100);
    const sourceTextFrame = sourceShape.getTextFrame();
    sourceTextFrame.getParagraphs().clear();
    for (const text of ["First paragraph", "Second paragraph", "Third paragraph"]) {
        const sourceParagraph = new aspose.slides.Paragraph();
        sourceParagraph.setText(text);
        sourceTextFrame.getParagraphs().add(sourceParagraph);
    }
    const shape = slide.getShapes().get_Item(0);

    if (java.instanceOf(shape, "com.aspose.slides.IAutoShape")) {
        const textFrame = shape.getTextFrame();
        if (textFrame !== null && textFrame.getParagraphs().getCount() > 1) {
            const paragraph = textFrame.getParagraphs().get_Item(1);
            const paragraphImage = paragraph.getImage();

            if (paragraphImage !== null) {
                try {
                    paragraphImage.save("paragraph.png", aspose.slides.ImageFormat.Png);
                } finally {
                    paragraphImage.dispose();
                }
            } else {
                console.log("The paragraph could not be rendered.");
            }
        } else {
            console.log("The expected paragraph was not found.");
        }
    } else {
        console.log("The first shape is not a text shape.");
    }
} finally {
    presentation.dispose();
}
ผลลัพธ์:

แสดง Paragraph ในเซลล์ตารางพร้อมสเกล
ใช้ overload ของ Paragraph.getImage ที่รับพารามิเตอร์ scaleX และ scaleY เพื่อกำหนดปัจจัยสเกลแนวนอนและแนวตั้ง ตัวอย่างต่อไปนี้สร้างตาราง แสดง paragraph ในเซลล์แรกที่กว้างและสูงสองเท่าของสเกลเริ่มต้น และบันทึกผลเป็นภาพ PNG
var aspose = aspose || {};
aspose.slides = require("aspose.slides.via.java");
const java = require("java");

const scaleX = 2;
const scaleY = 2;

const presentation = new aspose.slides.Presentation();
try {
    const slide = presentation.getSlides().get_Item(0);
    const columnWidths = java.newArray("double", [300]);
    const rowHeights = java.newArray("double", [80]);
    const table = slide.getShapes().addTable(50, 50, columnWidths, rowHeights);
    const paragraph = table.get_Item(0, 0).getTextFrame().getParagraphs().get_Item(0);
    paragraph.setText("Text in a table cell");

    const paragraphImage = paragraph.getImage(scaleX, scaleY);
    if (paragraphImage !== null) {
        try {
            paragraphImage.save("table_paragraph.png", aspose.slides.ImageFormat.Png);
        } finally {
            paragraphImage.dispose();
        }
    } else {
        console.log("The paragraph could not be rendered.");
    }
} finally {
    presentation.dispose();
}
ค่าปัจจัยสเกล 1 จะทำให้แกนนั้นคงที่ที่ขนาดพิกเซลเริ่มต้น ตัวอย่างเช่น 2 สำหรับทั้งสองแกนจะทำให้ความกว้างและความสูงของภาพประมาณสองเท่าของขนาดเริ่มต้น ทำให้จำนวนพิกเซลเพิ่มเป็นสี่เท่า ปัจจัยที่ใหญ่กว่าให้ข้อความคมชัดมากขึ้นสำหรับการซูมหรือการส่งออกความละเอียดสูง แต่ก็เพิ่มการใช้หน่วยความจำและขนาดไฟล์ ปัจจัยต่ำกว่า 1 จะให้ภาพเล็กลงและรายละเอียดน้อยลง ใช้ปัจจัยเท่ากันเพื่อคงอัตราส่วนของ paragraph; ปัจจัยแนวนอนและแนวตั้งที่ต่างกันจะยืดรูปภาพออกมาตามแกนนั้น ๆ
การเรนเดอร์ shape ทั้งหมดด้วย Shape.getImage ยังมีประโยชน์เมื่อต้องการรวมการเติมสี, เส้นขอบ หรือบริบทภาพอื่น ๆ ของ shape อย่างไรก็ตาม หากต้องการภาพเฉพาะ paragraph ให้ใช้ Paragraph.getImage
คำถามที่พบบ่อย
ฉันสามารถปิดการเยื้องบรรทัดภายใน text frame อย่างสมบูรณ์ได้หรือไม่?
ใช่. ตั้งค่า TextFrameFormat.setWrapText เพื่อปิดการห่อหุ้มทำให้บรรทัดไม่แตกที่ขอบของ text frame
ฉันจะรับขอบเขตที่แม่นยำบนสไลด์ของ paragraph เฉพาะได้อย่างไร?
ใช้ Paragraph.getRect เพื่อดึงสี่เหลี่ยมขอบเขตของ paragraph. Portion.getRect ให้ขอบเขตของ portion แยกแต่ละอัน
ตำแหน่งการจัดย่อหน้า (ซ้าย, ขวา, ศูนย์, หรือจัดเต็ม) ถูกควบคุมที่ไหน?
ParagraphFormat.setAlignment เป็นการตั้งค่าระดับ paragraph และจะส่งผลต่อทั้ง paragraph ไม่ว่า portion แต่ละอันจะมีการจัดรูปแบบอย่างไร
เพื่อจัดแนวฟอนต์ภายในบรรทัดเดียวกันตามขนาดฟอนต์ที่ต่างกัน ดูที่ Align Fonts Within a Line
ฉันสามารถตั้งค่าภาษาการตรวจสอบสำหรับบางส่วนของย่อหน้าได้หรือไม่?
ใช่. ตั้งค่า BasePortionFormat.setLanguageId สำหรับ portion แต่ละอัน เพื่อให้ paragraph หนึ่งสามารถมีข้อความหลายภาษาได้.