
مدیریت جعبههای متن در ارائهها با JavaScript
مقدمه
در Aspose.Slides برای Node.js از طریق Java، متن اسلاید در فریمهای متنی که به اشکال تعلق دارند ذخیره میشود. کلاس AutoShape نشاندهنده رایجترین شکل حامل متن است و متن آن را از طریق متد AutoShape.getTextFrame نمایش میدهد.
Note
هر شکل خودکار از Shape مشتق میشود، اما هر شکل یک شکل خودکار نیست یا فریم متنی را پشتیبانی نمیکند. هنگام پردازش یک ارائه موجود، قبل از دسترسی به متن، بررسی کنید که یک شکل نمونهای از AutoShape باشد.ایجاد یک جعبه متن در اسلاید
برای ایجاد یک جعبه متن، یک شکل خودکار را به اسلاید اضافه کنید، متن را به فریم متنی آن اضافه کنید و ارائه را ذخیره کنید. مثال زیر یک جعبه متن مستطیلی ایجاد میکند:
const aspose = { slides: require("aspose.slides.via.java") };

const presentation = new aspose.slides.Presentation();
try {
    const slide = presentation.getSlides().get_Item(0);
    const textBox = slide.getShapes().addAutoShape(aspose.slides.ShapeType.Rectangle, 150, 75, 300, 50);
    textBox.addTextFrame("Aspose TextBox");

    presentation.save("TextBox.pptx", aspose.slides.SaveFormat.Pptx);
} finally {
    presentation.dispose();
}
مختصات و ابعادی که به ShapeCollection.addAutoShape ارسال میشوند بر حسب نقطه اندازهگیری میشوند. AutoShape.addTextFrame فریم متنی را با متن ارائهشده مقداردهی اولیه میکند.
بررسی شکل جعبه متن
از متد AutoShape.isTextBox برای تعیین اینکه آیا یک شکل خودکار بهعنوان جعبه متن در نظر گرفته میشود استفاده کنید. این متد زمانی مفید است که یک ارائه شامل هر دو شکل خودکار حامل متن و شکلهای صرفاً گرافیکی باشد.
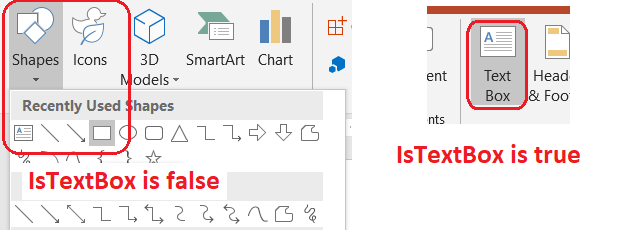
مثال زیر هر شکل خودکار در یک ارائه را بررسی میکند:
const aspose = { slides: require("aspose.slides.via.java") };
const java = require("java");

const presentation = new aspose.slides.Presentation();
try {
    const slide = presentation.getSlides().get_Item(0);
    const textBox = slide.getShapes().addAutoShape(aspose.slides.ShapeType.Rectangle, 10, 10, 120, 40);
    textBox.addTextFrame("Text box");
    slide.getShapes().addAutoShape(aspose.slides.ShapeType.Ellipse, 150, 10, 40, 40);

    for (let slideIndex = 0; slideIndex < presentation.getSlides().size(); slideIndex++) {
        const currentSlide = presentation.getSlides().get_Item(slideIndex);
        for (let shapeIndex = 0; shapeIndex < currentSlide.getShapes().size(); shapeIndex++) {
            const shape = currentSlide.getShapes().get_Item(shapeIndex);
            if (java.instanceOf(shape, "com.aspose.slides.AutoShape")) {
                console.log(shape.isTextBox() ? "The shape is a text box." : "The shape is not a text box.");
            }
        }
    }
} finally {
    presentation.dispose();
}
یک شکل خودکار جدید تا زمانی که متن غیر خالی داشته باشد بهعنوان جعبه متن در نظر گرفته نمیشود. میتوانید آن متن را از طریق AutoShape.addTextFrame یا TextFrame.setText تأمین کنید. افزودن یا اختصاص یک رشته خالی باعث میشود AutoShape.isTextBox مقدار false برگرداند:
const aspose = { slides: require("aspose.slides.via.java") };

const presentation = new aspose.slides.Presentation();
try {
    const slide = presentation.getSlides().get_Item(0);

    const shape1 = slide.getShapes().addAutoShape(aspose.slides.ShapeType.Rectangle, 10, 10, 100, 40);
    shape1.addTextFrame("Shape 1");
    console.log(shape1.isTextBox());

    const shape2 = slide.getShapes().addAutoShape(aspose.slides.ShapeType.Rectangle, 10, 70, 100, 40);
    shape2.getTextFrame().setText("Shape 2");
    console.log(shape2.isTextBox());

    const shape3 = slide.getShapes().addAutoShape(aspose.slides.ShapeType.Rectangle, 10, 130, 100, 40);
    shape3.addTextFrame("");
    console.log(shape3.isTextBox());

    const shape4 = slide.getShapes().addAutoShape(aspose.slides.ShapeType.Rectangle, 10, 190, 100, 40);
    shape4.getTextFrame().setText("");
    console.log(shape4.isTextBox());
} finally {
    presentation.dispose();
}
دو فراخوانی اول true چاپ میکنند؛ دو فراخوانی آخر false چاپ میکنند.
یافتن شکلی که فریم متن را در اختیار دارد
کد عمومی پردازش متن ممکن است یک TextFrame دریافت کند بدون اینکه بداند کدام شیء ارائه آن را در خود دارد. از متد فقط‑خواندنی TextFrame.getParentShape برای بازگشت به Shape مالک آن استفاده کنید.
برای فریم متنی که به یک شکل خودکار یا شکل دیگری حامل متن تعلق دارد، TextFrame.getParentShape مالک را برمیگرداند و TextFrame.getParentCell مقدار null بر میگرداند. قبل از دسترسی به آن مقدار برگشتی را بررسی کنید. برای شناسایی هر دو مالک شکل و خانه جدول، شامل شکلهای مرتبط با گرههای SmartArt، به Search and Replace Text مراجعه کنید.
افزودن ستونها به جعبه متن
متد TextFrameFormat.setColumnCount فریم متن را به ستونها تقسیم میکند، در حالی که TextFrameFormat.setColumnSpacing فاصله بین ستونها را بر حسب نقطه تنظیم میکند. هر دو تنظیم متعلق به TextFrameFormat هستند و میتوانند از طریق فریم متنی یک جعبه متن موجود تغییر کنند. متن بین ستونها داخل همان شکل دوباره جریان مییابد؛ به شکل دیگری ادامه نمییابد.
مثال زیر یک جعبه متن سهستونی با ۱۰ نقطه فاصله بین ستونها ایجاد میکند، ارائه را ذخیره مینماید و تنظیمات ذخیرهشده را از فایل خروجی میخواند:
const aspose = { slides: require("aspose.slides.via.java") };

const presentation = new aspose.slides.Presentation();
try {
    const slide = presentation.getSlides().get_Item(0);
    const textBox = slide.getShapes().addAutoShape(aspose.slides.ShapeType.Rectangle, 100, 100, 300, 200);
    textBox.addTextFrame("This text is distributed automatically across all columns in the text box.");

    const textFrameFormat = textBox.getTextFrame().getTextFrameFormat();
    textFrameFormat.setColumnCount(3);
    textFrameFormat.setColumnSpacing(10);

    presentation.save("TextBoxColumns.pptx", aspose.slides.SaveFormat.Pptx);

    const savedPresentation = new aspose.slides.Presentation("TextBoxColumns.pptx");
    try {
        const savedTextBox = savedPresentation.getSlides().get_Item(0).getShapes().get_Item(0);
        const savedFormat = savedTextBox.getTextFrame().getTextFrameFormat();
        console.log("Columns: " + savedFormat.getColumnCount() + "; spacing: " + savedFormat.getColumnSpacing() + " points");
    } finally {
        savedPresentation.dispose();
    }
} finally {
    presentation.dispose();
}
استخراج متن از ستونهای جداگانه
از TextFrame.splitTextByColumns برای بازیابی متنی که به هر ستون بصری در یک فریم متن موجود اختصاص یافته استفاده کنید. این متد یک رشته برای هر ستون بر اساس ترتیب خواندن ستونی برمیگرداند. یک فریم متن تکستونی آرایهای با یک عنصر تولید میکند و یک ستون خالی توسط یک رشته خالی نشان داده میشود. رشتهها صرفاً متن ساده را شامل میشوند؛ قالببندی در سطح بخش حفظ نمیشود.
این موارد زمانی مفید است که نیاز داشته باشید:
- استخراج متن در حالی که ترتیب خواندن مبتنی بر ستون حفظ میشود.
- فهرستبندی یا مقایسه محتوای اسلایدهای چندستونی.
- خروجی هر ستون به یک فایل جداگانه، فیلد پایگاهداده یا مقصد دیگری.
- بررسی نحوه توزیع مجدد متن پس از تغییر تعداد ستونها با TextFrameFormat.setColumnCount، فاصله با TextFrameFormat.setColumnSpacing، قلم یا اندازه فریم متن.
این متد متن توزیعشده در داخل TextFrame فعلی را گزارش میدهد؛ متن را بهصورت خودکار بین شکلها یا جعبههای متن جداگرانه جریان نمیدهد. توزیع ستونها میتواند به فونتهای موجود و سایر تنظیمات چیدمان متن وابسته باشد، لذا برای نتایج سازگار اطمینان حاصل کنید که فونتهای مورد نیاز در دسترس باشند.
مثال زیر یک ارائه را بارگذاری میکند، اولین شکل خودکار چندستونی دارای فریم متن را پیدا میکند، تعداد ستونهای پیکربندیشده را میخواند و متن هر ستون را به یک فایل جداگانه مینویسد. شکلهایی که فریم متن ندارند نادیده گرفته میشوند.
const aspose = { slides: require("aspose.slides.via.java") };
const java = require("java");
const fs = require("fs");

const presentation = new aspose.slides.Presentation("MultiColumnText.pptx");
try {
    const slide = presentation.getSlides().get_Item(0);
    let textBox = null;
    for (let shapeIndex = 0; shapeIndex < slide.getShapes().size(); shapeIndex++) {
        const shape = slide.getShapes().get_Item(shapeIndex);
        if (java.instanceOf(shape, "com.aspose.slides.AutoShape")) {
            const textFrame = shape.getTextFrame();
            if (textFrame != null) {
                const columnCount = textFrame.getTextFrameFormat().getColumnCount();
                if (columnCount > 1) {
                    textBox = shape;
                    break;
                }
            }
        }
    }

    if (textBox == null) {
        console.log("No multi-column text frame was found.");
    } else {
        const textFrame = textBox.getTextFrame();
        const configuredColumnCount = textFrame.getTextFrameFormat().getColumnCount();
        const columnTexts = textFrame.splitTextByColumns();

        console.log("Configured columns: " + configuredColumnCount);

        for (let columnIndex = 0; columnIndex < columnTexts.length; columnIndex++) {
            const columnNumber = columnIndex + 1;
            const columnText = columnTexts[columnIndex];
            console.log("Column " + columnNumber + ": " + columnText);
            const outputPath = "Column-" + columnNumber + ".txt";
            try {
                fs.writeFileSync(outputPath, columnText, "utf8");
            } catch (error) {
                console.log("Could not write column " + columnNumber + ": " + error.message);
            }
        }
    }
} finally {
    presentation.dispose();
}
بهروزرسانی متن
برای بهروزرسانی متن در سرتاسر یک ارائه، اسلایدها و شکلها را پیمایش کنید، شکلهای خودکار را انتخاب کنید و سپس بخشهای متنی آنها را ویرایش کنید. کار در سطح بخش به شما امکان تغییر هم متن و هم قالببندی کاراکترها را میدهد.
مثال زیر تمام موارد years را در متن شکلهای خودکار با months جایگزین میکند و هر بخش تحت تأثیر را به صورت بولد در میآورد:
const aspose = { slides: require("aspose.slides.via.java") };
const java = require("java");

const fontBold = java.newByte(aspose.slides.NullableBool.True);
const presentation = new aspose.slides.Presentation("Text.pptx");
try {
    for (let slideIndex = 0; slideIndex < presentation.getSlides().size(); slideIndex++) {
        const slide = presentation.getSlides().get_Item(slideIndex);
        for (let shapeIndex = 0; shapeIndex < slide.getShapes().size(); shapeIndex++) {
            const shape = slide.getShapes().get_Item(shapeIndex);
            if (!java.instanceOf(shape, "com.aspose.slides.AutoShape")) {
                continue;
            }

            const textFrame = shape.getTextFrame();
            if (textFrame == null) {
                continue;
            }

            for (let paragraphIndex = 0; paragraphIndex < textFrame.getParagraphs().getCount(); paragraphIndex++) {
                const paragraph = textFrame.getParagraphs().get_Item(paragraphIndex);
                for (let portionIndex = 0; portionIndex < paragraph.getPortions().getCount(); portionIndex++) {
                    const portion = paragraph.getPortions().get_Item(portionIndex);
                    const text = portion.getText();
                    if (text != null && text.includes("years")) {
                        portion.setText(text.replace(/years/g, "months"));
                        portion.getPortionFormat().setFontBold(fontBold);
                    }
                }
            }
        }
    }

    presentation.save("TextChanged.pptx", aspose.slides.SaveFormat.Pptx);
} finally {
    presentation.dispose();
}
این پیمایش فقط متن را در شکلهای خودکار بهروز میکند. متنی که در جدولها، نمودارها، SmartArt یا شکلهای گروهی ذخیره شده است نیاز به پیمایش مجموعههای خود آن اشیاء دارد.
افزودن جعبه متن با پیوند
یک پیوند میتواند به بخش خاصی از متن اختصاص یابد، بهطوری که فقط همان متن بهعنوان لینک کلیکپذیر عمل کند. از HyperlinkManager.setExternalHyperlinkClick برای مرتبطسازی آن بخش با یک URL خارجی استفاده کنید.
مثال زیر متن پیوندی ایجاد میکند و آن را در یک ارائه ذخیره مینماید:
const aspose = { slides: require("aspose.slides.via.java") };

const presentation = new aspose.slides.Presentation();
try {
    const slide = presentation.getSlides().get_Item(0);
    const textBox = slide.getShapes().addAutoShape(aspose.slides.ShapeType.Rectangle, 150, 150, 200, 50);
    textBox.addTextFrame("Aspose.Slides");

    const textPortion = textBox.getTextFrame().getParagraphs().get_Item(0).getPortions().get_Item(0);
    textPortion.getPortionFormat().getHyperlinkManager().setExternalHyperlinkClick("https://www.aspose.com/");

    presentation.save("Hyperlink.pptx", aspose.slides.SaveFormat.Pptx);
} finally {
    presentation.dispose();
}
سؤالات متداول
تفاوت جعبه متن و متغیر متن (placeholder) در اسلاید مستر یا لِیآوت چیست؟
یک placeholder میتواند موقعیت و قالببندی خود را از یک master slide یا layout slide به ارث ببرد. یک جعبه متن عادی یک شکل مستقل بر روی اسلایدی است که در آن ایجاد شده و هنگام تغییر لِیآوت، رفتار placeholder را بهدست نمیآورد.
چگونه میتوانم متن را جایگزین کنم بدون این که متن در نمودارها، جدولها یا SmartArt تغییر یابد؟
پیمایش را به شکلهایی که نمونهای از AutoShape هستند محدود کنید، همانطور که در مثال بهروزرسانی متن نشان داده شده است. نمودارها، جدولها و SmartArt متن را در مدل شیء خود ذخیره میکنند، لذا توسط این حلقه تغییر نمییابند.