
Java में PowerPoint आकार स्वरूपित करें
परिचय
PowerPoint में आप स्लाइड्स में आकार (शेप) जोड़ सकते हैं। चूँकि आकार रेखाओं से बने होते हैं, आप उनके आउटलाइन पर प्रभाव लागू करके या संशोधित करके उन्हें स्वरूपित कर सकते हैं। अतिरिक्त रूप से, आप आकार के भीतर के भाग को कैसे भरा जाए, यह नियंत्रित करने वाली सेटिंग्स निर्धारित करके आकार को स्वरूपित कर सकते हैं।
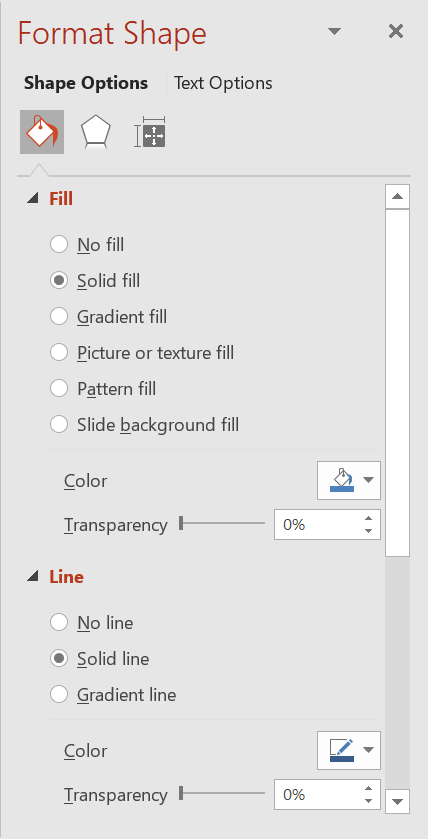
Aspose.Slides for Java इंटरफ़ेस और मेथड प्रदान करता है जो आपको PowerPoint में उपलब्ध वही विकल्पों का उपयोग करके आकारों को स्वरूपित करने की अनुमति देता है।
रेखा स्वरूपित करें
Aspose.Slides का उपयोग करके आप किसी आकार के लिए एक कस्टम लाइन स्टाइल निर्दिष्ट कर सकते हैं। निम्नलिखित चरण प्रक्रिया को स्पष्ट करते हैं:
- Create an instance of the प्रस्तुति class.
- Get a reference to a slide by its index.
- Add an IAutoShape to the slide.
- Set the लाइन स्टाइल of the shape.
- Set the line width.
- Set the डैश स्टाइल of the line.
- Set the line color for the shape.
- Save the modified presentation as a PPTX file.
The following code demonstrates how to format a rectangle AutoShape:
import com.aspose.slides.*;
import java.awt.Color;

// प्रस्तुति फ़ाइल का प्रतिनिधित्व करने वाले Presentation वर्ग को इंस्टैंसिएट करें।
Presentation presentation = new Presentation();
try {
    // पहली स्लाइड प्राप्त करें।
    ISlide slide = presentation.getSlides().get_Item(0);

    // Rectangle प्रकार का ऑटो शेप जोड़ें।
    IAutoShape shape = slide.getShapes().addAutoShape(ShapeType.Rectangle, 50, 150, 150, 75);

    // आयत आकार के लिए फ़िल रंग सेट करें।
    shape.getFillFormat().setFillType(FillType.NoFill);

    // आयत की रेखाओं पर फ़ॉर्मेटिंग लागू करें।
    shape.getLineFormat().setStyle(LineStyle.ThickThin);
    shape.getLineFormat().setWidth(7);
    shape.getLineFormat().setDashStyle(LineDashStyle.Dash);

    // आयत की रेखा के लिए रंग सेट करें।
    shape.getLineFormat().getFillFormat().setFillType(FillType.Solid);
    shape.getLineFormat().getFillFormat().getSolidFillColor().setColor(Color.BLUE);

    // PPTX फ़ाइल को डिस्क पर सहेजें।
    presentation.save("formatted_lines.pptx", SaveFormat.Pptx);
} finally {
    presentation.dispose();
}
The result:

आकार रेखाओं पर स्केच प्रभाव लागू करें
एक स्केच प्रभाव आकार की रेखा को हाथ से खींची हुई जैसा बनाता है। IShape.getLineFormat का उपयोग करके लाइन सेटिंग्स तक पहुँचें, ILineFormat.getSketchFormat का उपयोग करके स्केच सेटिंग्स तक पहुँचें, और ISketchFormat.setSketchType का उपयोग करके LineSketchType enumeration से कोई मान चुनें।
The following Java code shows how to apply a LineSketchType.Curved effect, read the explicitly assigned value, and remove the effect with LineSketchType.None:
Presentation presentation = new Presentation();
try {
    ISlide slide = presentation.getSlides().get_Item(0);
    IAutoShape shape = slide.getShapes().addAutoShape(ShapeType.Rectangle, 50, 50, 200, 100);

    // आकार के लाइन फ़ॉर्मेट और उसके स्केच फ़ॉर्मेट तक पहुंचें।
    ISketchFormat sketchFormat = shape.getLineFormat().getSketchFormat();

    // एक स्केच प्रभाव लागू करें।
    sketchFormat.setSketchType(LineSketchType.Curved);

    // आकार को सीधे असाइन किए गए स्केच प्रभाव को पढ़ें।
    int explicitSketchType = sketchFormat.getSketchType();
    System.out.println("Explicit sketch type: " + explicitSketchType);

    // स्केच प्रभाव हटाएँ।
    sketchFormat.setSketchType(LineSketchType.None);
} finally {
    presentation.dispose();
}
ISketchFormat.getSketchType द्वारा लौटाया गया मान उस सेटिंग को दर्शाता है जो सीधे आकार पर असाइन की गई है। यदि लाइन फ़ॉर्मेटिंग थीम, मास्टर स्लाइड या लेआउट स्लाइड से विरासत में प्राप्त की जा सकती है, तो ILineFormat.getEffective का उपयोग करके, ILineFormatEffectiveData.getSketchFormat तक पहुँचें, और ISketchFormatEffectiveData.getSketchType पढ़ें। प्रभावी मान वह फ़ॉर्मेटिंग दर्शाता है जो विरासत के समाधान के बाद वास्तविक रूप से लागू होती है:
Presentation presentation = new Presentation("presentation.pptx");
try {
    IShape shape = presentation.getSlides().get_Item(0).getShapes().get_Item(0);
    ILineFormat lineFormat = shape.getLineFormat();

    int explicitSketchType = lineFormat.getSketchFormat().getSketchType();
    ILineFormatEffectiveData effectiveLineFormat = lineFormat.getEffective();
    int effectiveSketchType = effectiveLineFormat.getSketchFormat().getSketchType();

    System.out.println("Explicit sketch type: " + explicitSketchType);
    System.out.println("Effective sketch type: " + effectiveSketchType);
} finally {
    presentation.dispose();
}
जॉइन स्टाइल स्वरूपित करें
यहाँ तीन जॉइन टाइप विकल्प हैं:
- गोल
- मिटर
- बिवेल
डिफ़ॉल्ट रूप से, जब PowerPoint दो रेखाओं को कोण पर जोड़ता है (जैसे आकार के कोने पर), तो वह गोल सेटिंग का उपयोग करता है। हालांकि, यदि आप तीखे कोण वाले आकार बना रहे हैं, तो आप मिटर विकल्प को पसंद कर सकते हैं।
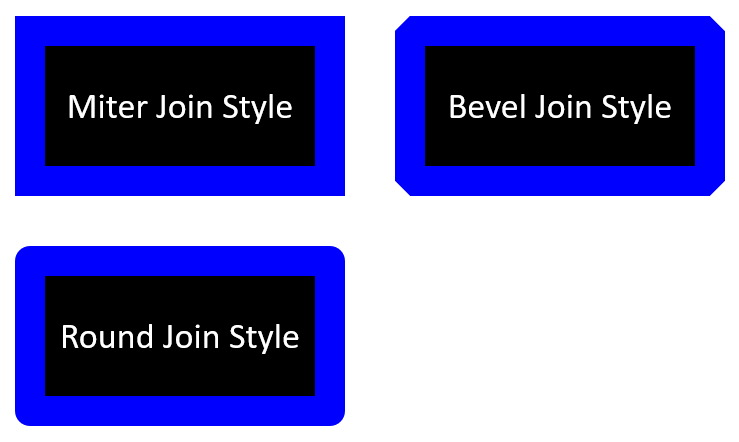
The following Java code demonstrates how three rectangles (as shown in the image above) were created using the Miter, Bevel, and Round join type settings:
import com.aspose.slides.*;
import java.awt.Color;

// प्रस्तुति फ़ाइल का प्रतिनिधित्व करने वाले Presentation क्लास को इंस्टैंसिएट करें।
Presentation presentation = new Presentation();
try {
    // पहली स्लाइड प्राप्त करें।
    ISlide slide = presentation.getSlides().get_Item(0);

    // Rectangle प्रकार के तीन ऑटो शैप जोड़ें।
    IAutoShape shape1 = slide.getShapes().addAutoShape(ShapeType.Rectangle, 20, 20, 150, 75);
    IAutoShape shape2 = slide.getShapes().addAutoShape(ShapeType.Rectangle, 210, 20, 150, 75);
    IAutoShape shape3 = slide.getShapes().addAutoShape(ShapeType.Rectangle, 20, 135, 150, 75);

    // प्रत्येक आयताकार शैप के लिए फ़िल रंग सेट करें।
    shape1.getFillFormat().setFillType(FillType.Solid);
    shape1.getFillFormat().getSolidFillColor().setColor(Color.BLACK);
    shape2.getFillFormat().setFillType(FillType.Solid);
    shape2.getFillFormat().getSolidFillColor().setColor(Color.BLACK);
    shape3.getFillFormat().setFillType(FillType.Solid);
    shape3.getFillFormat().getSolidFillColor().setColor(Color.BLACK);

    // लाइन की चौड़ाई सेट करें।
    shape1.getLineFormat().setWidth(15);
    shape2.getLineFormat().setWidth(15);
    shape3.getLineFormat().setWidth(15);

    // प्रत्येक आयत की रेखा के लिए रंग सेट करें।
    shape1.getLineFormat().getFillFormat().setFillType(FillType.Solid);
    shape1.getLineFormat().getFillFormat().getSolidFillColor().setColor(Color.BLUE);
    shape2.getLineFormat().getFillFormat().setFillType(FillType.Solid);
    shape2.getLineFormat().getFillFormat().getSolidFillColor().setColor(Color.BLUE);
    shape3.getLineFormat().getFillFormat().setFillType(FillType.Solid);
    shape3.getLineFormat().getFillFormat().getSolidFillColor().setColor(Color.BLUE);

    // जॉइन शैली सेट करें।
    shape1.getLineFormat().setJoinStyle(LineJoinStyle.Miter);
    shape2.getLineFormat().setJoinStyle(LineJoinStyle.Bevel);
    shape3.getLineFormat().setJoinStyle(LineJoinStyle.Round);

    // प्रत्येक आयत में टेक्स्ट जोड़ें।
    shape1.getTextFrame().setText("Miter Join Style");
    shape2.getTextFrame().setText("Bevel Join Style");
    shape3.getTextFrame().setText("Round Join Style");

    // PPTX फ़ाइल को डिस्क पर सहेजें।
    presentation.save("join_styles.pptx", SaveFormat.Pptx);
} finally {
    presentation.dispose();
}
ग्रेडिएंट फ़िल
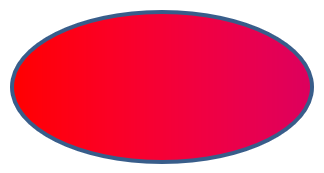
PowerPoint में, ग्रेडिएंट फ़िल एक फ़ॉर्मेटिंग विकल्प है जो आपको आकार में निरंतर रंग मिश्रण लागू करने की अनुमति देता है। उदाहरण के लिए, आप दो या अधिक रंग इस प्रकार लागू कर सकते हैं कि एक धीरे‑धीरे दूसरे में मिल जाता है।
Aspose.Slides का उपयोग करके आकार पर ग्रेडिएंट फ़िल लागू करने के चरण इस प्रकार हैं:
- Create an instance of the प्रस्तुति class.
- Get a reference to a slide by its index.
- Add an IAutoShape to the slide.
- Set the shape’s FillType to
Gradient. - Add your two preferred colors with defined positions using the
addmethods of the gradient stop collection exposed by the IGradientFormat interface. - Save the modified presentation as a PPTX file.
The following Java code demonstrates how to apply a gradient fill effect to an ellipse:
import com.aspose.slides.*;

// प्रस्तुति फ़ाइल का प्रतिनिधित्व करने वाले Presentation क्लास को इंस्टैंसिएट करें।
Presentation presentation = new Presentation();
try {
    // पहली स्लाइड प्राप्त करें।
    ISlide slide = presentation.getSlides().get_Item(0);

    // Ellipse प्रकार का ऑटो शैप जोड़ें।
    IAutoShape shape = slide.getShapes().addAutoShape(ShapeType.Ellipse, 50, 50, 150, 75);

    // एलीप्स पर ग्रेडिएंट फ़ॉर्मेटिंग लागू करें।
    shape.getFillFormat().setFillType(FillType.Gradient);
    shape.getFillFormat().getGradientFormat().setGradientShape(GradientShape.Linear);

    // ग्रेडिएंट की दिशा सेट करें।
    shape.getFillFormat().getGradientFormat().setGradientDirection(GradientDirection.FromCorner2);

    // दो ग्रेडिएंट स्टॉप जोड़ें।
    shape.getFillFormat().getGradientFormat().getGradientStops().addPresetColor((float)1.0, PresetColor.Purple);
    shape.getFillFormat().getGradientFormat().getGradientStops().addPresetColor((float)0, PresetColor.Red);

    // PPTX फ़ाइल को डिस्क पर सहेजें।
    presentation.save("gradient_fill.pptx", SaveFormat.Pptx);
} finally {
    presentation.dispose();
}
The result:
पैटर्न फ़िल
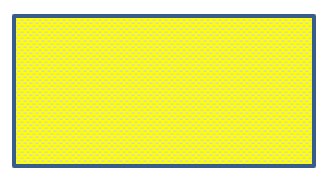
PowerPoint में, पैटर्न फ़िल एक फ़ॉर्मेटिंग विकल्प है जो आपको दो‑रंग की डिज़ाइन — जैसे बिंदु, स्ट्राइप, क्रॉसहैच या चे़क्स — आकार पर लागू करने देता है। आप पैटर्न के अग्रभूमि और पृष्ठभूमि के लिए कस्टम रंग चुन सकते हैं।
Aspose.Slides 45 से अधिक पूर्वनिर्धारित पैटर्न स्टाइल प्रदान करता है जिन्हें आप अपने प्रस्तुतियों की दृश्य आकर्षकता बढ़ाने के लिए आकारों पर लागू कर सकते हैं। पूर्वनिर्धारित पैटर्न चुनने के बाद भी आप निश्चित रंग निर्दिष्ट कर सकते हैं।
पैटर्न फ़िल लागू करने के चरण इस प्रकार हैं:
- Create an instance of the प्रस्तुति class.
- Get a reference to a slide by its index.
- Add an IAutoShape to the slide.
- Set the shape’s FillType to
Pattern. - Choose a pattern style from the predefined options.
- Set the Background Color of the pattern.
- Set the Foreground Color of the pattern.
- Save the modified presentation as a PPTX file.
The following Java code demonstrates how to apply a pattern fill to a rectangle:
import com.aspose.slides.*;
import java.awt.Color;

// प्रस्तुति फ़ाइल का प्रतिनिधित्व करने वाले Presentation वर्ग को इंस्टैंसिएट करें।
Presentation presentation = new Presentation();
try {
    // पहली स्लाइड प्राप्त करें।
    ISlide slide = presentation.getSlides().get_Item(0);

    // Rectangle प्रकार का ऑटो शैप जोड़ें।
    IAutoShape shape = slide.getShapes().addAutoShape(ShapeType.Rectangle, 50, 50, 150, 75);

    // फ़िल टाइप को Pattern पर सेट करें।
    shape.getFillFormat().setFillType(FillType.Pattern);

    // पैटर्न स्टाइल सेट करें।
    shape.getFillFormat().getPatternFormat().setPatternStyle(PatternStyle.Trellis);

    // पैटर्न की पृष्ठभूमि और अग्रभूमि रंग सेट करें।
    shape.getFillFormat().getPatternFormat().getBackColor().setColor(Color.LIGHT_GRAY);
    shape.getFillFormat().getPatternFormat().getForeColor().setColor(Color.YELLOW);

    // PPTX फ़ाइल को डिस्क पर सहेजें।
    presentation.save("pattern_fill.pptx", SaveFormat.Pptx);
} finally {
    presentation.dispose();
}
The result:
पिक्चर फ़िल
PowerPoint में, पिक्चर फ़िल एक फ़ॉर्मेटिंग विकल्प है जो आपको आकार के भीतर चित्र सम्मिलित करने देता है — प्रभावी रूप से चित्र को आकार की पृष्ठभूमि के रूप में उपयोग करता है।
Aspose.Slides का उपयोग करके पिक्चर फ़िल लागू करने के चरण इस प्रकार हैं:
- Create an instance of the प्रस्तुति class.
- Get a reference to a slide by its index.
- Add an IAutoShape to the slide.
- Set the shape’s FillType to
Picture. - Set the picture fill mode to
Tile(or another preferred mode). - Create an IPPImage object from the image you want to use.
- Pass the image to the
ISlidesPicture.setImagemethod. - Save the modified presentation as a PPTX file.
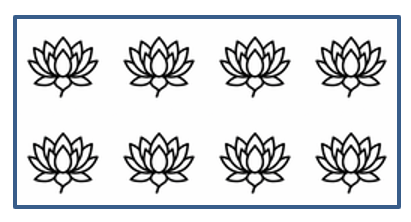
मान लीजिए हमारे पास “lotus.png” फ़ाइल है, जिसमें नीचे दिखाया गया चित्र है:

The following Java code demonstrates how to fill a shape with the picture:
import com.aspose.slides.*;

// प्रस्तुति फ़ाइल का प्रतिनिधित्व करने वाले Presentation क्लास को इंस्टैंसिएट करें।
Presentation presentation = new Presentation();
try {
    // पहली स्लाइड प्राप्त करें।
    ISlide slide = presentation.getSlides().get_Item(0);

    // Rectangle प्रकार का ऑटो शैप जोड़ें।
    IAutoShape shape = slide.getShapes().addAutoShape(ShapeType.Rectangle, 50, 50, 255, 130);

    // फ़िल टाइप को Picture पर सेट करें।
    shape.getFillFormat().setFillType(FillType.Picture);

    // पिक्चर फ़िल मोड सेट करें।
    shape.getFillFormat().getPictureFillFormat().setPictureFillMode(PictureFillMode.Tile);

    // एक इमेज लोड करें और उसे प्रस्तुति संसाधनों में जोड़ें।
    IImage image = Images.fromFile("lotus.png");
    IPPImage picture = presentation.getImages().addImage(image);
    image.dispose();

    // पिक्चर सेट करें।
    shape.getFillFormat().getPictureFillFormat().getPicture().setImage(picture);

    // PPTX फ़ाइल को डिस्क पर सहेजें।
    presentation.save("picture_fill.pptx", SaveFormat.Pptx);
} finally {
    presentation.dispose();
}
The result:
टाइल चित्र को टेक्सचर के रूप में
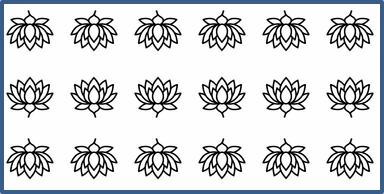
यदि आप टाइल किए हुए चित्र को टेक्सचर के रूप में सेट करना चाहते हैं और टाइलिंग व्यवहार को अनुकूलित करना चाहते हैं, तो आप IPictureFillFormat इंटरफ़ेस और PictureFillFormat क्लास की निम्नलिखित विधियों का उपयोग कर सकते हैं:
- setPictureFillMode: चित्र फ़िल मोड सेट करता है —
TileयाStretch। - setTileAlignment: आकार के भीतर टाइलों की संरेखण निर्दिष्ट करता है।
- setTileFlip: टाइल को क्षैतिज, लंबवत या दोनों दिशा में उलटने को नियंत्रित करता है।
- setTileOffsetX: आकार के मूल बिंदु से टाइल के क्षैतिज ऑफ़सेट (पॉइंट में) को सेट करता है।
- setTileOffsetY: आकार के मूल बिंदु से टाइल के लंबवत ऑफ़सेट (पॉइंट में) को सेट करता है।
- setTileScaleX: टाइल के क्षैतिज स्केल को प्रतिशत में परिभाषित करता है।
- setTileScaleY: टाइल के लंबवत स्केल को प्रतिशत में परिभाषित करता है।
The following code sample shows how to add a rectangle shape with a tiled picture fill and configure tile options:
import com.aspose.slides.*;

// प्रस्तुति फ़ाइल का प्रतिनिधित्व करने वाले Presentation क्लास को इंस्टैंसिएट करें।
Presentation presentation = new Presentation();
try {
    // पहली स्लाइड प्राप्त करें।
    ISlide firstSlide = presentation.getSlides().get_Item(0);

    // आयताकार ऑटो शैप जोड़ें।
    IAutoShape shape = firstSlide.getShapes().addAutoShape(ShapeType.Rectangle, 50, 50, 190, 95);

    // आकार का फ़िल टाइप Picture पर सेट करें।
    shape.getFillFormat().setFillType(FillType.Picture);

    // छवि लोड करें और उसे प्रस्तुति संसाधनों में जोड़ें।
    IImage sourceImage = Images.fromFile("lotus.png");
    IPPImage presentationImage = presentation.getImages().addImage(sourceImage);
    sourceImage.dispose();

    // छवि को आकार में असाइन करें।
    IPictureFillFormat pictureFillFormat = shape.getFillFormat().getPictureFillFormat();
    pictureFillFormat.getPicture().setImage(presentationImage);

    // पिक्चर फ़िल मोड और टाइलिंग गुणों को कॉन्फ़िगर करें।
    pictureFillFormat.setPictureFillMode(PictureFillMode.Tile);
    pictureFillFormat.setTileOffsetX(-32);
    pictureFillFormat.setTileOffsetY(-32);
    pictureFillFormat.setTileScaleX(50);
    pictureFillFormat.setTileScaleY(50);
    pictureFillFormat.setTileAlignment(RectangleAlignment.BottomRight);
    pictureFillFormat.setTileFlip(TileFlip.FlipBoth);

    // PPTX फ़ाइल को डिस्क पर सहेजें।
    presentation.save("tile.pptx", SaveFormat.Pptx);
} finally {
    presentation.dispose();
}
The result:
सॉलिड कलर फ़िल
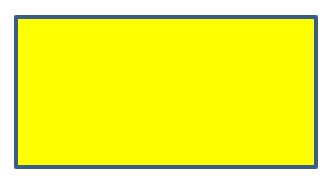
PowerPoint में, सॉलिड कलर फ़िल एक फ़ॉर्मेटिंग विकल्प है जो आकार को एक समान, एकरंगीय भरावट देता है। यह साधारण पृष्ठभूमि रंग ग्रेडिएंट, टेक्सचर या पैटर्न के बिना लागू किया जाता है।
Aspose.Slides का उपयोग करके सॉलिड कलर फ़िल लागू करने के चरण इस प्रकार हैं:
- Create an instance of the प्रस्तुति class.
- Get a reference to a slide by its index.
- Add an IAutoShape to the slide.
- Set the shape’s FillType to
Solid. - Assign your preferred fill color to the shape.
- Save the modified presentation as a PPTX file.
The following Java code demonstrates how to apply a solid color fill to a rectangle in a PowerPoint slide:
import com.aspose.slides.*;
import java.awt.Color;

// प्रस्तुति फ़ाइल का प्रतिनिधित्व करने वाले Presentation क्लास को इंस्टैंसिएट करें।
Presentation presentation = new Presentation();
try {
    // पहली स्लाइड प्राप्त करें।
    ISlide slide = presentation.getSlides().get_Item(0);

    // Rectangle प्रकार का ऑटो शैप जोड़ें।
    IAutoShape shape = slide.getShapes().addAutoShape(ShapeType.Rectangle, 50, 50, 150, 75);

    // फ़िल टाइप को Solid पर सेट करें।
    shape.getFillFormat().setFillType(FillType.Solid);

    // फ़िल रंग सेट करें।
    shape.getFillFormat().getSolidFillColor().setColor(Color.YELLOW);

    // PPTX फ़ाइल को डिस्क पर सहेजें।
    presentation.save("solid_color_fill.pptx", SaveFormat.Pptx);
} finally {
    presentation.dispose();
}
The result:
पारदर्शिता सेट करें
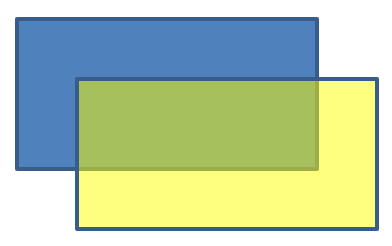
PowerPoint में, जब आप आकार पर सॉलिड कलर, ग्रेडिएंट, पिक्चर या टेक्सचर फ़िल लागू करते हैं, तो आप पारदर्शिता स्तर भी सेट कर सकते हैं जिससे भराव की अपारदर्शिता नियंत्रित होती है। उच्च पारदर्शिता मान आकार को अधिक पारदर्शी बनाता है, जिससे पृष्ठभूमि या नीचे के वस्तुएँ आंशिक रूप से दिखाई देती हैं।
Aspose.Slides आपको Color के अल्फा मान को समायोजित करके पारदर्शिता स्तर सेट करने की अनुमति देता है। नीचे बताया गया है कि इसे कैसे करें:
- Create an instance of the प्रस्तुति class.
- Get a reference to a slide by its index.
- Add an IAutoShape to the slide.
- Set the FillType to
Solid. - Use
Colorto define a color with transparency (thealphacomponent controls transparency). - Save the presentation.
The following Java code demonstrates how to apply a transparent fill color to a rectangle:
import com.aspose.slides.*;
import java.awt.Color;

// प्रस्तुति फ़ाइल का प्रतिनिधित्व करने वाले Presentation क्लास को इंस्टैंसिएट करें।
Presentation presentation = new Presentation();
try {
    // पहली स्लाइड प्राप्त करें।
    ISlide slide = presentation.getSlides().get_Item(0);

    // एक ठोस आयताकार ऑटो शैप जोड़ें।
    IAutoShape solidShape = slide.getShapes().addAutoShape(ShapeType.Rectangle, 50, 50, 150, 75);

    // ठोस आकार के ऊपर एक पारदर्शी आयताकार ऑटो शैप जोड़ें।
    IAutoShape transparentShape = slide.getShapes().addAutoShape(ShapeType.Rectangle, 80, 80, 150, 75);
    transparentShape.getFillFormat().setFillType(FillType.Solid);
    transparentShape.getFillFormat().getSolidFillColor().setColor(new Color(255, 255, 0, 204));

    // PPTX फ़ाइल को डिस्क पर सहेजें।
    presentation.save("shape_transparency.pptx", SaveFormat.Pptx);
} finally {
    presentation.dispose();
}
The result:
आकार घुमाएँ
Aspose.Slides आपको PowerPoint प्रस्तुतियों में आकारों को घुमाने की सुविधा देता है। यह दृश्य तत्वों को विशिष्ट संरेखण या डिज़ाइन आवश्यकताओं के साथ स्थित करने में उपयोगी हो सकता है।
एक स्लाइड पर आकार को घुमाने के चरण इस प्रकार हैं:
- Create an instance of the प्रस्तुति class.
- Get a reference to a slide by its index.
- Add an IAutoShape to the slide.
- Set the shape’s rotation property to the desired angle.
- Save the presentation.
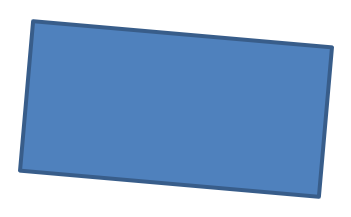
The following Java code demonstrates how to rotate a shape by 5 degrees:
import com.aspose.slides.*;

// प्रस्तुति फ़ाइल का प्रतिनिधित्व करने वाले Presentation क्लास को इंस्टैंसिएट करें।
Presentation presentation = new Presentation();
try {
    // पहली स्लाइड प्राप्त करें।
    ISlide slide = presentation.getSlides().get_Item(0);

    // Rectangle प्रकार का ऑटो शैप जोड़ें।
    IAutoShape shape = slide.getShapes().addAutoShape(ShapeType.Rectangle, 50, 50, 150, 75);

    // आकार को 5 डिग्री घुमाएँ।
    shape.setRotation(5);

    // PPTX फ़ाइल को डिस्क पर सहेजें।
    presentation.save("shape_rotation.pptx", SaveFormat.Pptx);
} finally {
    presentation.dispose();
}
The result:
3 डी बिवेल प्रभाव जोड़ें
Aspose.Slides आपको आकारों पर 3 डी बिवेल प्रभाव लागू करने की अनुमति देता है, जिसके लिए आप उनके ThreeDFormat गुणों को कॉन्फ़िगर करते हैं।
3 डी बिवेल प्रभाव जोड़ने के चरण इस प्रकार हैं:
- Instantiate the प्रस्तुति class.
- Get a reference to a slide by its index.
- Add an IAutoShape to the slide.
- Configure the shape’s ThreeDFormat to define bevel settings.
- Save the presentation.
The following Java code shows how to apply 3 डी बिवेल effects to a shape:
import com.aspose.slides.*;
import java.awt.Color;

// Presentation क्लास का एक इंस्टेंस बनाएं।
Presentation presentation = new Presentation();
try {
    ISlide slide = presentation.getSlides().get_Item(0);

    // स्लाइड में एक आकार जोड़ें।
    IAutoShape shape = slide.getShapes().addAutoShape(ShapeType.Ellipse, 50, 50, 100, 100);
    shape.getFillFormat().setFillType(FillType.Solid);
    shape.getFillFormat().getSolidFillColor().setColor(Color.GREEN);
    shape.getLineFormat().getFillFormat().setFillType(FillType.Solid);
    shape.getLineFormat().getFillFormat().getSolidFillColor().setColor(Color.ORANGE);
    shape.getLineFormat().setWidth(2.0);

    // आकार की ThreeDFormat प्रॉपर्टीज़ सेट करें।
    shape.getThreeDFormat().setDepth(4);
    shape.getThreeDFormat().getBevelTop().setBevelType(BevelPresetType.Circle);
    shape.getThreeDFormat().getBevelTop().setHeight(6);
    shape.getThreeDFormat().getBevelTop().setWidth(6);
    shape.getThreeDFormat().getCamera().setCameraType(CameraPresetType.OrthographicFront);
    shape.getThreeDFormat().getLightRig().setLightType(LightRigPresetType.ThreePt);
    shape.getThreeDFormat().getLightRig().setDirection(LightingDirection.Top);

    // प्रस्तुति को PPTX फ़ाइल के रूप में सहेजें।
    presentation.save("3D_bevel_effect.pptx", SaveFormat.Pptx);
} finally {
    presentation.dispose();
}
The result:

3 डी घुमाव प्रभाव जोड़ें
Aspose.Slides आपको आकारों पर 3 डी घुमाव प्रभाव लागू करने की अनुमति देता है, जिसके लिए आप उनके ThreeDFormat गुणों को कॉन्फ़िगर करते हैं।
3 डी घुमाव लागू करने के चरण इस प्रकार हैं:
- Create an instance of the प्रस्तुति class.
- Get a reference to a slide by its index.
- Add an IAutoShape to the slide.
- Use the setCameraType and setLightType to define the 3 डी rotation.
- Save the presentation.
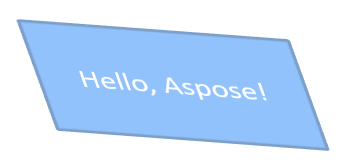
The following Java code demonstrates how to apply 3 डी rotation effects to a shape:
import com.aspose.slides.*;

// Presentation क्लास का एक इंस्टेंस बनाएं।
Presentation presentation = new Presentation();
try {
    ISlide slide = presentation.getSlides().get_Item(0);

    IAutoShape autoShape = slide.getShapes().addAutoShape(ShapeType.Rectangle, 50, 50, 150, 75);
    autoShape.getTextFrame().setText("Hello, Aspose!");

    autoShape.getThreeDFormat().setDepth(6);
    autoShape.getThreeDFormat().getCamera().setRotation(40, 35, 20);
    autoShape.getThreeDFormat().getCamera().setCameraType(CameraPresetType.IsometricLeftUp);
    autoShape.getThreeDFormat().getLightRig().setLightType(LightRigPresetType.Balanced);

    // प्रस्तुति को PPTX फ़ाइल के रूप में सहेजें।
    presentation.save("3D_rotation_effect.pptx", SaveFormat.Pptx);
} finally {
    presentation.dispose();
}
The result:
आकारों के लिए काले‑सफ़ेद रेंडरिंग नियंत्रित करें
IShape.setBlackWhiteMode मेथड यह निर्दिष्ट करता है कि कोई व्यक्तिगत आकार काले‑सफ़ेद मोड में प्रस्तुति देखे या प्रोसेस की जाए तो कैसे रेंडर किया जाएगा। यह स्वयं काले‑सफ़ेद डिस्प्ले को सक्रिय नहीं करता, और सामान्य रंग मोड में आकार की फ़िल, लाइन या अन्य फ़ॉर्मेटिंग को नहीं बदलता।
BlackWhiteMode क्लास के मानों में से एक चुनें। उदाहरण के लिए, Automatic एप्लीकेशन को रूपांतरण चुनने देता है, Gray और LightGray ग्रे रंग का उपयोग करते हैं, BlackWhite केवल काला‑सफ़ेद उपयोग करता है, Black और White एकल रंग को लागू करते हैं, Color सामान्य रंग को बनाए रखता है, और Hidden काले‑सफ़ेद मोड में आकार को छोड़ देता है। NotDefined का अर्थ है कि कोई आकार‑स्तरीय मोड असाइन नहीं किया गया है।
The following Java code creates a colored shape and makes it appear gray in black‑and‑white display mode:
import com.aspose.slides.*;
import java.awt.Color;

Presentation presentation = new Presentation();
try {
    ISlide slide = presentation.getSlides().get_Item(0);

    IAutoShape shape = slide.getShapes().addAutoShape(ShapeType.Rectangle, 50, 50, 200, 100);
    shape.getFillFormat().setFillType(FillType.Solid);
    shape.getFillFormat().getSolidFillColor().setColor(Color.ORANGE);

    // रंग मोड में नारंगी फ़िल बनाए रखें, लेकिन काले-सफ़ेद मोड में आकार को ग्रे रंगरण के साथ रेंडर करें।
    shape.setBlackWhiteMode(BlackWhiteMode.Gray);

    presentation.save("shape_black_white_mode.pptx", SaveFormat.Pptx);
} finally {
    presentation.dispose();
}
सामान्य रंग मोड में, आयत अपना नारंगी फ़िल बनाए रखता है। काले‑सफ़ेद डिस्प्ले वर्कफ़्लो में, इसका रंग ग्रे हो जाता है क्योंकि उसका मोड Gray पर सेट है। इससे आप पूर्ण‑रंग स्लाइड को बनाए रखते हुए मुद्रण, प्री‑व्यू या अन्य वर्कफ़्लो के लिए अलग दृष्टिकोण परिभाषित कर सकते हैं जो काले‑सफ़ेद डिस्प्ले सेटिंग को मानते हैं।
फ़ॉर्मेट रीसेट करें
The following Java code shows how to reset the formatting of a slide and revert the position, size, and formatting of all shapes with placeholders on the LayoutSlide to their default settings:
import com.aspose.slides.*;

Presentation presentation = new Presentation("sample.pptx");
try {
    for (ISlide slide : presentation.getSlides()) {
        // लेआउट में प्लेसहोल्डर वाले स्लाइड पर प्रत्येक आकार को रीसेट करें।
        slide.reset();
    }
    presentation.save("reset_formatting.pptx", SaveFormat.Pptx);
} finally {
    presentation.dispose();
}
FAQ
क्या आकार फ़ॉर्मेटिंग से अंतिम प्रस्तुति फ़ाइल का आकार प्रभावित होता है?
बहुत कम। एम्बेडेड चित्र और मीडिया फ़ाइल आकार का अधिकांश भाग होते हैं, जबकि आकार के पैरामीटर जैसे रंग, प्रभाव और ग्रेडिएंट मेटाडेटा के रूप में ذخیرہ होते हैं और लगभग कोई अतिरिक्त आकार नहीं जोड़ते।
मैं कैसे उन आकारों की पहचान करूँ जो समान फ़ॉर्मेटिंग साझा करते हैं ताकि उन्हें समूहित किया जा सके?
प्रत्येक आकार की प्रमुख फ़ॉर्मेटिंग गुणों — फ़िल, लाइन और प्रभाव सेटिंग्स — की तुलना करें। यदि सभी संबंधित मान मेल खाते हैं, तो उनके शैलियों को समान मानें और उन आकारों को तर्कसंगत रूप से समूहित करें, जिससे बाद में शैली प्रबंधन आसान हो जाता है।
क्या मैं कस्टम आकार शैलियों का एक सेट अलग फ़ाइल में सहेज कर अन्य प्रस्तुतियों में पुनः उपयोग कर सकता हूँ?
हां। वांछित शैलियों वाले नमूना आकार को एक टेम्पलेट स्लाइड डेक या .POTX टेम्पलेट फ़ाइल में सहेजें। नया प्रस्तुति बनाते समय टेम्पलेट खोलें, आवश्यक शैली वाले आकार को क्लोन करें, और जहाँ‑जहाँ जरूरत हो फ़ॉर्मेटिंग पुनः लागू करें।