
จัดรูปแบบรูปร่าง PowerPoint ใน Java
บทนำ
ใน PowerPoint คุณสามารถเพิ่มรูปร่างลงในสไลด์ได้ เนื่องจากรูปร่างประกอบด้วยเส้น คุณสามารถจัดรูปแบบได้โดยการแก้ไขหรือใช้เอฟเฟกต์กับขอบเส้นของมัน นอกจากนี้คุณยังสามารถจัดรูปแบบรูปร่างโดยระบุการตั้งค่าที่ควบคุมการเติมสีภายในของรูปร่างได้
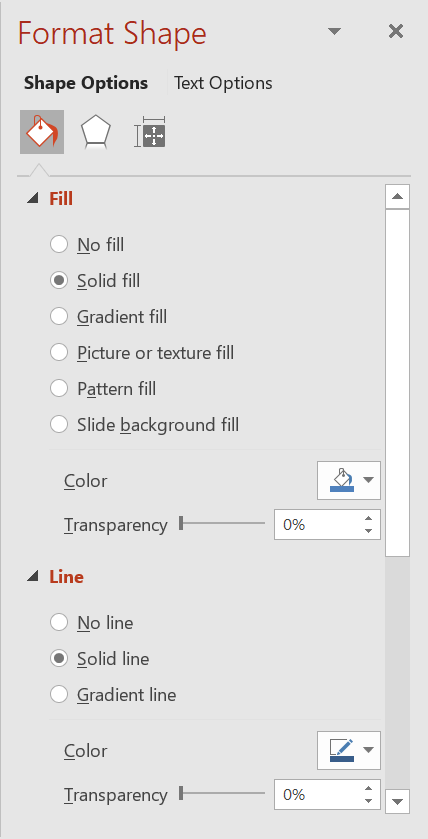
Aspose.Slides for Java มีอินเทอร์เฟซและเมธอดที่ให้คุณจัดรูปแบบรูปร่างได้โดยใช้ตัวเลือกเดียวกับที่มีใน PowerPoint
จัดรูปแบบเส้น
สร้างอินสแตนซ์ของคลาส Presentation รับอ้างอิงถึงสไลด์โดยใช้ดัชนีของมัน เพิ่ม IAutoShape ลงในสไลด์ ตั้งค่า line style ของรูปร่าง ตั้งค่าความกว้างของเส้น ตั้งค่า dash style ของเส้น ตั้งค่าสีเส้นสำหรับรูปร่าง บันทึกพรีเซนเทชันที่แก้ไขแล้วเป็นไฟล์ PPTX
โค้ดต่อไปนี้แสดงวิธีจัดรูปแบบ AutoShape แบบสี่เหลี่ยมผืนผ้า:
import com.aspose.slides.*;
import java.awt.Color;

// สร้างอินสแตนซ์ของคลาส Presentation ที่แทนไฟล์การนำเสนอ.
Presentation presentation = new Presentation();
try {
    // ดึงสไลด์แรก.
    ISlide slide = presentation.getSlides().get_Item(0);

    // เพิ่ม AutoShape ประเภท Rectangle.
    IAutoShape shape = slide.getShapes().addAutoShape(ShapeType.Rectangle, 50, 150, 150, 75);

    // ตั้งค่าสีเติมสำหรับรูปร่างสี่เหลี่ยมผืนผ้า.
    shape.getFillFormat().setFillType(FillType.NoFill);

    // ใช้การจัดรูปแบบกับเส้นของสี่เหลี่ยมผืนผ้า.
    shape.getLineFormat().setStyle(LineStyle.ThickThin);
    shape.getLineFormat().setWidth(7);
    shape.getLineFormat().setDashStyle(LineDashStyle.Dash);

    // ตั้งค่าสีสำหรับเส้นของสี่เหลี่ยมผืนผ้า.
    shape.getLineFormat().getFillFormat().setFillType(FillType.Solid);
    shape.getLineFormat().getFillFormat().getSolidFillColor().setColor(Color.BLUE);

    // บันทึกไฟล์ PPTX ลงดิสก์.
    presentation.save("formatted_lines.pptx", SaveFormat.Pptx);
} finally {
    presentation.dispose();
}

ใช้เอฟเฟกต์ Sketch กับเส้นของรูปร่าง
เอฟเฟกต์ sketch ทำให้เส้นของรูปร่างดูเหมือนถูกวาดด้วยมือ ใช้ IShape.getLineFormat เพื่อเข้าถึงการตั้งค่าเส้น, ILineFormat.getSketchFormat เพื่อเข้าถึงการตั้งค่า sketch, และ ISketchFormat.setSketchType เพื่อเลือกค่าจากการนับจำนวน LineSketchType
โค้ด Java ด้านล่างนี้แสดงวิธีใช้เอฟเฟกต์ LineSketchType.Curved , อ่านค่าที่กำหนดโดยตรง, และลบเอฟเฟกต์ด้วย LineSketchType.None:
Presentation presentation = new Presentation();
try {
    ISlide slide = presentation.getSlides().get_Item(0);
    IAutoShape shape = slide.getShapes().addAutoShape(ShapeType.Rectangle, 50, 50, 200, 100);

    // เข้าถึงฟอร์แมตเส้นของรูปร่างและฟอร์แมตสเก็ตช์ของมัน.
    ISketchFormat sketchFormat = shape.getLineFormat().getSketchFormat();

    // ใช้เอฟเฟกต์สเก็ตช์.
    sketchFormat.setSketchType(LineSketchType.Curved);

    // อ่านเอฟเฟกต์สเก็ตช์ที่กำหนดโดยตรงให้กับรูปร่าง.
    int explicitSketchType = sketchFormat.getSketchType();
    System.out.println("Explicit sketch type: " + explicitSketchType);

    // ลบเอฟเฟกต์สเก็ตช์.
    sketchFormat.setSketchType(LineSketchType.None);
} finally {
    presentation.dispose();
}
ค่าที่คืนจาก ISketchFormat.getSketchType แสดงถึงการตั้งค่าที่กำหนดโดยตรงให้กับรูปร่าง หากการจัดรูปแบบเส้นสามารถสืบทอดจากธีม, มาสเตอร์สไลด์, หรือเลเอาท์สไลด์ ให้ใช้ ILineFormat.getEffective เข้าถึง ILineFormatEffectiveData.getSketchFormat และอ่านค่า ISketchFormatEffectiveData.getSketchType ค่าที่มีผลจริงจะแสดงการจัดรูปแบบที่ถูกนำไปใช้จริงหลังจากการสืบทอดได้รับการแก้ไข:
Presentation presentation = new Presentation("presentation.pptx");
try {
    IShape shape = presentation.getSlides().get_Item(0).getShapes().get_Item(0);
    ILineFormat lineFormat = shape.getLineFormat();

    int explicitSketchType = lineFormat.getSketchFormat().getSketchType();
    ILineFormatEffectiveData effectiveLineFormat = lineFormat.getEffective();
    int effectiveSketchType = effectiveLineFormat.getSketchFormat().getSketchType();

    System.out.println("Explicit sketch type: " + explicitSketchType);
    System.out.println("Effective sketch type: " + effectiveSketchType);
} finally {
    presentation.dispose();
}
จัดรูปแบบสไตล์การเชื่อมต่อ
ต่อไปนี้คือสามตัวเลือกประเภทการเชื่อมต่อ:
- โค้ง
- มิตเตอร์
- บีเวล
โดยค่าเริ่มต้น PowerPoint จะเชื่อมสองเส้นที่มุม (เช่นมุมของรูปร่าง) ด้วยการตั้งค่า Round อย่างไรก็ตาม หากคุณกำลังวาดรูปร่างที่มีมุมคม คุณอาจต้องการใช้ตัวเลือก Miter
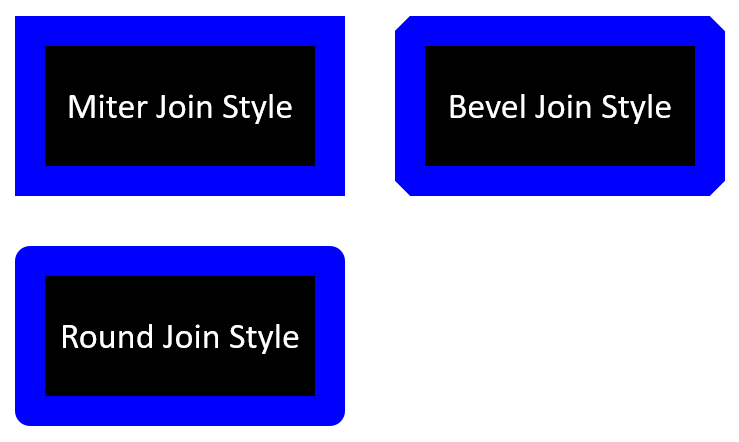
โค้ด Java ด้านล่างนี้แสดงวิธีที่สี่เหลี่ยมผืนผ้าสามรูป (เช่นในรูปด้านบน) ถูกสร้างด้วยการตั้งค่าชนิดการเชื่อมต่อ Miter, Bevel, และ Round:
import com.aspose.slides.*;
import java.awt.Color;

// สร้างอินสแตนซ์ของคลาส Presentation ที่แทนไฟล์การนำเสนอ.
Presentation presentation = new Presentation();
try {
    // ดึงสไลด์แรก.
    ISlide slide = presentation.getSlides().get_Item(0);

    // เพิ่ม AutoShape จำนวนสามรูปแบบ Rectangle.
    IAutoShape shape1 = slide.getShapes().addAutoShape(ShapeType.Rectangle, 20, 20, 150, 75);
    IAutoShape shape2 = slide.getShapes().addAutoShape(ShapeType.Rectangle, 210, 20, 150, 75);
    IAutoShape shape3 = slide.getShapes().addAutoShape(ShapeType.Rectangle, 20, 135, 150, 75);

    // ตั้งค่าสีเติมสำหรับแต่ละรูปร่างสี่เหลี่ยมผืนผ้า.
    shape1.getFillFormat().setFillType(FillType.Solid);
    shape1.getFillFormat().getSolidFillColor().setColor(Color.BLACK);
    shape2.getFillFormat().setFillType(FillType.Solid);
    shape2.getFillFormat().getSolidFillColor().setColor(Color.BLACK);
    shape3.getFillFormat().setFillType(FillType.Solid);
    shape3.getFillFormat().getSolidFillColor().setColor(Color.BLACK);

    // ตั้งความกว้างของเส้น.
    shape1.getLineFormat().setWidth(15);
    shape2.getLineFormat().setWidth(15);
    shape3.getLineFormat().setWidth(15);

    // ตั้งค่าสีสำหรับเส้นของแต่ละสี่เหลี่ยมผืนผ้า.
    shape1.getLineFormat().getFillFormat().setFillType(FillType.Solid);
    shape1.getLineFormat().getFillFormat().getSolidFillColor().setColor(Color.BLUE);
    shape2.getLineFormat().getFillFormat().setFillType(FillType.Solid);
    shape2.getLineFormat().getFillFormat().getSolidFillColor().setColor(Color.BLUE);
    shape3.getLineFormat().getFillFormat().setFillType(FillType.Solid);
    shape3.getLineFormat().getFillFormat().getSolidFillColor().setColor(Color.BLUE);

    // ตั้งค่าสไตล์การเชื่อมต่อ.
    shape1.getLineFormat().setJoinStyle(LineJoinStyle.Miter);
    shape2.getLineFormat().setJoinStyle(LineJoinStyle.Bevel);
    shape3.getLineFormat().setJoinStyle(LineJoinStyle.Round);

    // เพิ่มข้อความให้แต่ละสี่เหลี่ยมผืนผ้า.
    shape1.getTextFrame().setText("Miter Join Style");
    shape2.getTextFrame().setText("Bevel Join Style");
    shape3.getTextFrame().setText("Round Join Style");

    // บันทึกไฟล์ PPTX ลงดิสก์.
    presentation.save("join_styles.pptx", SaveFormat.Pptx);
} finally {
    presentation.dispose();
}
การเติมสีแบบไล่ระดับ
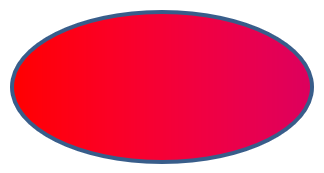
ใน PowerPoint, Gradient Fill เป็นตัวเลือกการจัดรูปแบบที่ให้คุณเติมสีต่อเนื่องหลายสีลงในรูปร่าง ตัวอย่างเช่น คุณสามารถใช้สีสองสีหรือมากกว่าโดยให้สีหนึ่งค่อยๆ จางลงไปเป็นสีอีกสีหนึ่ง
ต่อไปนี้เป็นวิธีการเติมสีไล่ระดับให้กับรูปร่างโดยใช้ Aspose.Slides:
สร้างอินสแตนซ์ของคลาส Presentation
รับอ้างอิงถึงสไลด์โดยใช้ดัชนีของมัน
เพิ่ม IAutoShape ลงในสไลด์
ตั้งค่า FillType ของรูปร่างเป็น Gradient
เพิ่มสองสีที่คุณต้องการพร้อมตำแหน่งที่กำหนดโดยใช้เมธอด add ของคอลเลกชัน gradient stop ที่เปิดโดยอินเทอร์เฟซ IGradientFormat
บันทึกพรีเซนเทชันที่แก้ไขแล้วเป็นไฟล์ PPTX
import com.aspose.slides.*;

// สร้างอินสแตนซ์ของคลาส Presentation ที่แทนไฟล์การนำเสนอ
Presentation presentation = new Presentation();
try {
    // ดึงสไลด์แรก
    ISlide slide = presentation.getSlides().get_Item(0);

    // เพิ่ม AutoShape ประเภท Ellipse
    IAutoShape shape = slide.getShapes().addAutoShape(ShapeType.Ellipse, 50, 50, 150, 75);

    // ใช้การจัดรูปแบบไล่ระดับสีให้กับวงรี
    shape.getFillFormat().setFillType(FillType.Gradient);
    shape.getFillFormat().getGradientFormat().setGradientShape(GradientShape.Linear);

    // ตั้งค่าทิศทางของการไล่ระดับสี
    shape.getFillFormat().getGradientFormat().setGradientDirection(GradientDirection.FromCorner2);

    // เพิ่มสองจุดหยุดไล่ระดับสี
    shape.getFillFormat().getGradientFormat().getGradientStops().addPresetColor((float)1.0, PresetColor.Purple);
    shape.getFillFormat().getGradientFormat().getGradientStops().addPresetColor((float)0, PresetColor.Red);

    // บันทึกไฟล์ PPTX ลงดิสก์
    presentation.save("gradient_fill.pptx", SaveFormat.Pptx);
} finally {
    presentation.dispose();
}
การเติมลาย
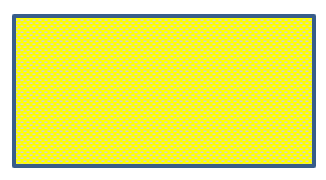
ใน PowerPoint, Pattern Fill เป็นตัวเลือกการจัดรูปแบบที่ให้คุณใส่ลายสองสี—เช่น จุด, ลายขีด, ลายตาราง หรือ เช็ก—ลงในรูปร่าง คุณสามารถเลือกสีกำหนดเองสำหรับสีพื้นหน้าและพื้นหลังของลายได้
Aspose.Slides มีลายแบบกำหนดล่วงหน้ากว่า 45 แบบที่คุณสามารถนำไปใช้กับรูปร่างเพื่อเพิ่มความสวยงามของพรีเซนเทชัน แม้หลังจากเลือกลายที่กำหนดไว้แล้ว คุณยังสามารถระบุสีที่ต้องการใช้ได้อย่างแม่นยำ
ต่อไปนี้เป็นวิธีการเติมลายให้กับรูปร่างโดยใช้ Aspose.Slides:
สร้างอินสแตนซ์ของคลาส Presentation
รับอ้างอิงถึงสไลด์โดยใช้ดัชนีของมัน
เพิ่ม IAutoShape ลงในสไลด์
ตั้งค่า FillType ของรูปร่างเป็น Pattern
เลือกสไตล์ลายจากตัวเลือกที่กำหนดล่วงหน้า
ตั้งค่า Background Color ของลาย
ตั้งค่า Foreground Color ของลาย
บันทึกพรีเซนเทชันที่แก้ไขแล้วเป็นไฟล์ PPTX
import com.aspose.slides.*;
import java.awt.Color;

// สร้างอินสแตนซ์ของคลาส Presentation ที่แทนไฟล์การนำเสนอ
Presentation presentation = new Presentation();
try {
    // ดึงสไลด์แรก
    ISlide slide = presentation.getSlides().get_Item(0);

    // เพิ่ม AutoShape ประเภท Rectangle
    IAutoShape shape = slide.getShapes().addAutoShape(ShapeType.Rectangle, 50, 50, 150, 75);

    // ตั้งค่าชนิดการเติมเป็น Pattern
    shape.getFillFormat().setFillType(FillType.Pattern);

    // ตั้งค่าสไตล์ลาย
    shape.getFillFormat().getPatternFormat().setPatternStyle(PatternStyle.Trellis);

    // ตั้งค่าสีพื้นหลังและสีพื้นหน้าของลาย
    shape.getFillFormat().getPatternFormat().getBackColor().setColor(Color.LIGHT_GRAY);
    shape.getFillFormat().getPatternFormat().getForeColor().setColor(Color.YELLOW);

    // บันทึกไฟล์ PPTX ลงดิสก์
    presentation.save("pattern_fill.pptx", SaveFormat.Pptx);
} finally {
    presentation.dispose();
}
การเติมรูปภาพ
ใน PowerPoint, Picture Fill เป็นตัวเลือกการจัดรูปแบบที่ให้คุณใส่รูปภาพภายในรูปร่าง—ทำให้รูปภาพเป็นพื้นหลังของรูปร่างได้
ต่อไปนี้เป็นวิธีใช้ Aspose.Slides เพื่อเติมรูปภาพลงในรูปร่าง:
สร้างอินสแตนซ์ของคลาส Presentation
รับอ้างอิงถึงสไลด์โดยใช้ดัชนีของมัน
เพิ่ม IAutoShape ลงในสไลด์
ตั้งค่า FillType ของรูปร่างเป็น Picture
ตั้งค่าโหมดการเติมรูปภาพเป็น Tile (หรือโหมดอื่นที่ต้องการ)
สร้างอ็อบเจ็กต์ IPPImage จากรูปภาพที่ต้องการใช้
ส่งรูปภาพให้เมธอด ISlidesPicture.setImage
บันทึกพรีเซนเทชันที่แก้ไขแล้วเป็นไฟล์ PPTX
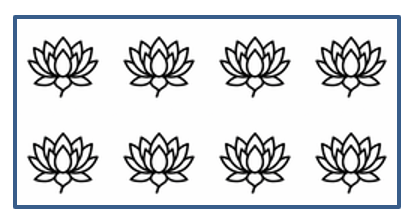
สมมติว่าเรามีไฟล์ “lotus.png” ที่มีรูปภาพต่อไปนี้:

import com.aspose.slides.*;

// สร้างอินสแตนซ์ของคลาส Presentation ที่แทนไฟล์การนำเสนอ
Presentation presentation = new Presentation();
try {
    // ดึงสไลด์แรก
    ISlide slide = presentation.getSlides().get_Item(0);

    // เพิ่ม AutoShape ประเภท Rectangle
    IAutoShape shape = slide.getShapes().addAutoShape(ShapeType.Rectangle, 50, 50, 255, 130);

    // ตั้งค่าชนิดการเติมเป็น Picture
    shape.getFillFormat().setFillType(FillType.Picture);

    // ตั้งค่าโหมดการเติมรูปภาพ
    shape.getFillFormat().getPictureFillFormat().setPictureFillMode(PictureFillMode.Tile);

    // โหลดภาพและเพิ่มลงในทรัพยากรของการนำเสนอ
    IImage image = Images.fromFile("lotus.png");
    IPPImage picture = presentation.getImages().addImage(image);
    image.dispose();

    // ตั้งค่ารูปภาพ
    shape.getFillFormat().getPictureFillFormat().getPicture().setImage(picture);

    // บันทึกไฟล์ PPTX ลงดิสก์
    presentation.save("picture_fill.pptx", SaveFormat.Pptx);
} finally {
    presentation.dispose();
}
ใช้รูปภาพต่อเป็นพื้นผิว
หากคุณต้องการตั้งค่ารูปภาพต่อเป็นพื้นผิวและปรับพฤติกรรมการต่อ คุณสามารถใช้เมธอดต่อนี้ของอินเทอร์เฟซ IPictureFillFormat และคลาส PictureFillFormat:
- setPictureFillMode: ตั้งค่าโหมดการเติมรูปภาพ—either
TileหรือStretch. - setTileAlignment: ระบุตำแหน่งการจัดเรียงของแผ่นต่อภายในรูปร่าง.
- setTileFlip: กำหนดว่าการต่อจะถูกกลับแนวนอน แนวตั้ง หรือทั้งสองอย่างหรือไม่.
- setTileOffsetX: ตั้งค่าการเยื้องแนวนอนของแผ่นต่อ (เป็นจุด) จากตำแหน่งต้นของรูปร่าง.
- setTileOffsetY: ตั้งค่าการเยื้องแนวตั้งของแผ่นต่อ (เป็นจุด) จากตำแหน่งต้นของรูปร่าง.
- setTileScaleX: กำหนดสเกลแนวนอนของแผ่นต่อเป็นเปอร์เซ็นต์.
- setTileScaleY: กำหนดสเกลแนวตั้งของแผ่นต่อเป็นเปอร์เซ็นต์.
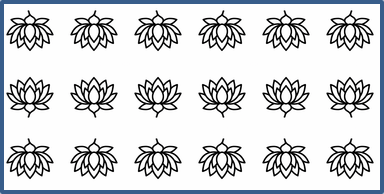
ตัวอย่างโค้ดต่อไปนี้แสดงวิธีเพิ่มรูปร่างสี่เหลี่ยมผืนผ้าพร้อมการเติมรูปภาพต่อและกำหนดตัวเลือกการต่อ:
import com.aspose.slides.*;

// สร้างอินสแตนซ์ของคลาส Presentation ที่แทนไฟล์การนำเสนอ
Presentation presentation = new Presentation();
try {
    // ดึงสไลด์แรก
    ISlide firstSlide = presentation.getSlides().get_Item(0);

    // เพิ่ม AutoShape ประเภท Rectangle
    IAutoShape shape = firstSlide.getShapes().addAutoShape(ShapeType.Rectangle, 50, 50, 190, 95);

    // ตั้งค่าชนิดการเติมของรูปร่างเป็น Picture
    shape.getFillFormat().setFillType(FillType.Picture);

    // โหลดภาพและเพิ่มลงในทรัพยากรของการนำเสนอ
    IImage sourceImage = Images.fromFile("lotus.png");
    IPPImage presentationImage = presentation.getImages().addImage(sourceImage);
    sourceImage.dispose();

    // กำหนดภาพให้กับรูปร่าง
    IPictureFillFormat pictureFillFormat = shape.getFillFormat().getPictureFillFormat();
    pictureFillFormat.getPicture().setImage(presentationImage);

    // กำหนดค่าโหมดการเติมรูปภาพและคุณสมบัติการต่อ
    pictureFillFormat.setPictureFillMode(PictureFillMode.Tile);
    pictureFillFormat.setTileOffsetX(-32);
    pictureFillFormat.setTileOffsetY(-32);
    pictureFillFormat.setTileScaleX(50);
    pictureFillFormat.setTileScaleY(50);
    pictureFillFormat.setTileAlignment(RectangleAlignment.BottomRight);
    pictureFillFormat.setTileFlip(TileFlip.FlipBoth);

    // บันทึกไฟล์ PPTX ลงดิสก์
    presentation.save("tile.pptx", SaveFormat.Pptx);
} finally {
    presentation.dispose();
}
การเติมสีทึบ
ใน PowerPoint, Solid Color Fill เป็นตัวเลือกการจัดรูปแบบที่เติมสีเดียวที่สม่ำเสมอลงในรูปร่าง สีพื้นหลังแบบเรียบนี้จะถูกใช้โดยไม่มีการไล่สี, พื้นผิว หรือ ลายใดๆ
เพื่อเติมสีทึบให้กับรูปร่างโดยใช้ Aspose.Slides ให้ทำตามขั้นตอนต่อไปนี้:
สร้างอินสแตนซ์ของคลาส Presentation
รับอ้างอิงถึงสไลด์โดยใช้ดัชนีของมัน
เพิ่ม IAutoShape ลงในสไลด์
ตั้งค่า FillType ของรูปร่างเป็น Solid
กำหนดสีเติมที่คุณต้องการให้กับรูปร่าง
บันทึกพรีเซนเทชันที่แก้ไขแล้วเป็นไฟล์ PPTX
import com.aspose.slides.*;
import java.awt.Color;

// สร้างอินสแตนซ์ของคลาส Presentation ที่แทนไฟล์การนำเสนอ
Presentation presentation = new Presentation();
try {
    // ดึงสไลด์แรก
    ISlide slide = presentation.getSlides().get_Item(0);

    // เพิ่ม AutoShape ประเภท Rectangle
    IAutoShape shape = slide.getShapes().addAutoShape(ShapeType.Rectangle, 50, 50, 150, 75);

    // ตั้งค่าชนิดการเติมเป็น Solid
    shape.getFillFormat().setFillType(FillType.Solid);

    // ตั้งค่าสีเติม
    shape.getFillFormat().getSolidFillColor().setColor(Color.YELLOW);

    // บันทึกไฟล์ PPTX ลงดิสก์
    presentation.save("solid_color_fill.pptx", SaveFormat.Pptx);
} finally {
    presentation.dispose();
}

ตั้งค่าความโปร่งแสง
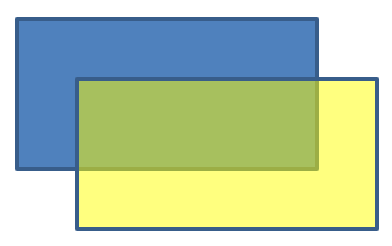
ใน PowerPoint, เมื่อคุณเติมสีทึบ, ไล่ระดับ, รูปภาพ, หรือพื้นผิวลงในรูปร่าง คุณยังสามารถตั้งค่าระดับความโปร่งแสงเพื่อควบคุมความทึบของการเติม ค่าความโปร่งแสงที่สูงทำให้รูปร่างดูโปร่งแสงมากขึ้นและทำให้พื้นหลังหรือวัตถุด้านหลังมองเห็นได้บางส่วน
Aspose.Slides ให้คุณตั้งค่าระดับความโปร่งแสงโดยการปรับค่า alpha ในสีที่ใช้สำหรับการเติม นี่คือวิธีทำ:
สร้างอินสแตนซ์ของคลาส Presentation
รับอ้างอิงถึงสไลด์โดยใช้ดัชนีของมัน
เพิ่ม IAutoShape ลงในสไลด์
ตั้งค่า FillType เป็น Solid
ใช้ Color เพื่อกำหนดสีที่มีค่าความโปร่งแสง (ส่วน alpha ควบคุมความโปร่งแสง)
บันทึกพรีเซนเทชัน
import com.aspose.slides.*;
import java.awt.Color;

// สร้างอินสแตนซ์ของคลาส Presentation ที่แทนไฟล์การนำเสนอ
Presentation presentation = new Presentation();
try {
    // ดึงสไลด์แรก
    ISlide slide = presentation.getSlides().get_Item(0);

    // เพิ่ม AutoShape สี่เหลี่ยมผืนผ้าแบบทึบ
    IAutoShape solidShape = slide.getShapes().addAutoShape(ShapeType.Rectangle, 50, 50, 150, 75);

    // เพิ่ม AutoShape สี่เหลี่ยมผืนผ้าโปร่งแสงเหนือรูปร่างที่ทึบ
    IAutoShape transparentShape = slide.getShapes().addAutoShape(ShapeType.Rectangle, 80, 80, 150, 75);
    transparentShape.getFillFormat().setFillType(FillType.Solid);
    transparentShape.getFillFormat().getSolidFillColor().setColor(new Color(255, 255, 0, 204));

    // บันทึกไฟล์ PPTX ลงดิสก์
    presentation.save("shape_transparency.pptx", SaveFormat.Pptx);
} finally {
    presentation.dispose();
}
การหมุนรูปร่าง
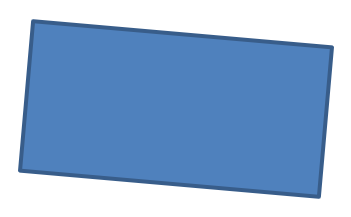
Aspose.Slides ให้คุณหมุนรูปร่างในพรีเซนเทชัน PowerPoint ซึ่งมีประโยชน์เมื่อต้องจัดตำแหน่งองค์ประกอบด้วยการจัดแนวหรือดีไซน์เฉพาะ
เพื่อหมุนรูปร่างบนสไลด์ ให้ทำตามขั้นตอนต่อไปนี้:
สร้างอินสแตนซ์ของคลาส Presentation รับอ้างอิงถึงสไลด์โดยใช้ดัชนีของมัน เพิ่ม IAutoShape ลงในสไลด์ ตั้งค่าคุณสมบัติการหมุนของรูปร่างเป็นมุมที่ต้องการ บันทึกพรีเซนเทชัน
import com.aspose.slides.*;

// สร้างอินสแตนซ์ของคลาส Presentation ที่แทนไฟล์การนำเสนอ
Presentation presentation = new Presentation();
try {
    // ดึงสไลด์แรก
    ISlide slide = presentation.getSlides().get_Item(0);

    // เพิ่ม AutoShape ประเภท Rectangle
    IAutoShape shape = slide.getShapes().addAutoShape(ShapeType.Rectangle, 50, 50, 150, 75);

    // หมุนรูปร่าง 5 องศา
    shape.setRotation(5);

    // บันทึกไฟล์ PPTX ลงดิสก์
    presentation.save("shape_rotation.pptx", SaveFormat.Pptx);
} finally {
    presentation.dispose();
}
เพิ่มเอฟเฟกต์เบเวล 3 มิติ
Aspose.Slides อนุญาตให้คุณเพิ่มเอฟเฟกต์เบเวล 3 มิติให้กับรูปร่างโดยกำหนดคุณสมบัติของ ThreeDFormat
เพื่อเพิ่มเอฟเฟกต์เบเวล 3 มิติให้กับรูปร่าง ให้ทำตามขั้นตอนต่อไปนี้:
สร้างอินสแตนซ์ของคลาส Presentation รับอ้างอิงถึงสไลด์โดยใช้ดัชนีของมัน เพิ่ม IAutoShape ลงในสไลด์ กำหนดค่า ThreeDFormat ของรูปร่างเพื่อกำหนดการตั้งค่าเบเวล บันทึกพรีเซนเทชัน
import com.aspose.slides.*;
import java.awt.Color;

// สร้างอินสแตนซ์ของคลาส Presentation
Presentation presentation = new Presentation();
try {
    ISlide slide = presentation.getSlides().get_Item(0);

    // เพิ่มรูปร่างลงบนสไลด์
    IAutoShape shape = slide.getShapes().addAutoShape(ShapeType.Ellipse, 50, 50, 100, 100);
    shape.getFillFormat().setFillType(FillType.Solid);
    shape.getFillFormat().getSolidFillColor().setColor(Color.GREEN);
    shape.getLineFormat().getFillFormat().setFillType(FillType.Solid);
    shape.getLineFormat().getFillFormat().getSolidFillColor().setColor(Color.ORANGE);
    shape.getLineFormat().setWidth(2.0);

    // ตั้งค่าคุณสมบัติ ThreeDFormat ของรูปร่าง
    shape.getThreeDFormat().setDepth(4);
    shape.getThreeDFormat().getBevelTop().setBevelType(BevelPresetType.Circle);
    shape.getThreeDFormat().getBevelTop().setHeight(6);
    shape.getThreeDFormat().getBevelTop().setWidth(6);
    shape.getThreeDFormat().getCamera().setCameraType(CameraPresetType.OrthographicFront);
    shape.getThreeDFormat().getLightRig().setLightType(LightRigPresetType.ThreePt);
    shape.getThreeDFormat().getLightRig().setDirection(LightingDirection.Top);

    // บันทึกพรีเซนเทชันเป็นไฟล์ PPTX
    presentation.save("3D_bevel_effect.pptx", SaveFormat.Pptx);
} finally {
    presentation.dispose();
}

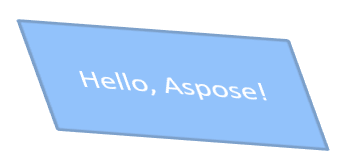
เพิ่มเอฟเฟกต์การหมุน 3 มิติ
Aspose.Slides อนุญาตให้คุณเพิ่มเอฟเฟกต์การหมุน 3 มิติให้กับรูปร่างโดยกำหนดคุณสมบัติของ ThreeDFormat
เพื่อใช้การหมุน 3 มิติบนรูปร่าง:
สร้างอินสแตนซ์ของคลาส Presentation รับอ้างอิงถึงสไลด์โดยใช้ดัชนีของมัน เพิ่ม IAutoShape ลงในสไลด์ ใช้เมธอด setCameraType และ setLightType เพื่อกำหนดการหมุน 3 มิติ บันทึกพรีเซนเทชัน
import com.aspose.slides.*;

// สร้างอินสแตนซ์ของคลาส Presentation
Presentation presentation = new Presentation();
try {
    ISlide slide = presentation.getSlides().get_Item(0);

    IAutoShape autoShape = slide.getShapes().addAutoShape(ShapeType.Rectangle, 50, 50, 150, 75);
    autoShape.getTextFrame().setText("Hello, Aspose!");

    autoShape.getThreeDFormat().setDepth(6);
    autoShape.getThreeDFormat().getCamera().setRotation(40, 35, 20);
    autoShape.getThreeDFormat().getCamera().setCameraType(CameraPresetType.IsometricLeftUp);
    autoShape.getThreeDFormat().getLightRig().setLightType(LightRigPresetType.Balanced);

    // บันทึกพรีเซนเทชันเป็นไฟล์ PPTX
    presentation.save("3D_rotation_effect.pptx", SaveFormat.Pptx);
} finally {
    presentation.dispose();
}
ควบคุมการแสดงผลขาวดำสำหรับรูปร่าง
เมธอด IShape.setBlackWhiteMode ระบุว่ารูปร่างแต่ละอันจะแสดงผลอย่างไรเมื่อพรีเซนเทชันถูกดูหรือประมวลผลในโหมดขาวดำ มันไม่ได้เปิดใช้งานการแสดงผลขาวดำโดยอัตโนมัติและไม่เปลี่ยนการเติม, เส้น หรือการจัดรูปแบบอื่นของรูปร่างในโหมดสีปกติ
ใช้ค่าจากคลาส BlackWhiteMode เพื่อเลือกพฤติกรรมที่ต้องการ เช่น Automatic ให้แอปพลิเคชันแปลงเอง, Gray และ LightGray ใช้สีเทา, BlackWhite ใช้สีดำและสีขาวเท่านั้น, Black และ White บังคับให้เป็นสีเดียว, Color รักษาสีปกติ, Hidden ไม่แสดงรูปร่างในโหมดขาวดำ, NotDefined หมายความว่าไม่มีการกำหนดโหมดระดับรูปร่าง
โค้ด Java ด้านล่างนี้สร้างรูปร่างสีและทำให้แสดงเป็นสีเทาในโหมดแสดงผลขาวดำ:
import com.aspose.slides.*;
import java.awt.Color;

Presentation presentation = new Presentation();
try {
    ISlide slide = presentation.getSlides().get_Item(0);

    IAutoShape shape = slide.getShapes().addAutoShape(ShapeType.Rectangle, 50, 50, 200, 100);
    shape.getFillFormat().setFillType(FillType.Solid);
    shape.getFillFormat().getSolidFillColor().setColor(Color.ORANGE);

    // เก็บการเติมสีส้มในโหมดสี, แต่เรนเดอร์รูปร่างด้วยสีเทาในโหมดขาวดำ.
    shape.setBlackWhiteMode(BlackWhiteMode.Gray);

    presentation.save("shape_black_white_mode.pptx", SaveFormat.Pptx);
} finally {
    presentation.dispose();
}
ในโหมดสีปกติ สี่เหลี่ยมจะคงสีส้มไว้ ในกระบวนการแสดงผลขาวดำ มันจะใช้สีเทาเนื่องจากโหมดถูกตั้งเป็น Gray วิธีนี้ทำให้คุณสามารถเก็บสไลด์สีเต็มได้ในขณะที่กำหนดลักษณะที่แตกต่างสำหรับการพิมพ์, การดูตัวอย่าง หรือกระบวนการอื่นที่เคารพการตั้งค่าแสดงผลขาวดำของพรีเซนเทชัน
รีเซ็ตการจัดรูปแบบ
โค้ด Java ด้านล่างนี้แสดงวิธีรีเซ็ตการจัดรูปแบบของสไลด์และคืนตำแหน่ง, ขนาด, และการจัดรูปแบบของรูปร่างทั้งหมดที่มีตัวแสดงตำแหน่งบน LayoutSlide ให้กลับไปเป็นค่าเริ่มต้น:
import com.aspose.slides.*;

Presentation presentation = new Presentation("sample.pptx");
try {
    for (ISlide slide : presentation.getSlides()) {
        // รีเซ็ตรูปร่างแต่ละอันบนสไลด์ที่มี placeholder บนเลเอาต์
        slide.reset();
    }
    presentation.save("reset_formatting.pptx", SaveFormat.Pptx);
} finally {
    presentation.dispose();
}
คำถามที่พบบ่อย
Does shape formatting affect the final presentation file size?
ผลกระทบต่อขนาดไฟล์พรีเซนเทชันนั้นมีเพียงเล็กน้อย ภาพและสื่อที่ฝังอยู่ใช้พื้นที่ส่วนใหญ่ ส่วนพารามิเตอร์ของรูปร่างเช่นสี, เอฟเฟกต์, และการไล่สีถูกบันทึกเป็นเมตาดาต้าและเพิ่มขนาดไฟล์น้อยมาก
How can I detect shapes on a slide that share identical formatting so I can group them?
เปรียบเทียบคุณสมบัติการจัดรูปแบบหลักของแต่ละรูปร่าง—การเติม, เส้น, และการตั้งค่าเอฟเฟกต์ หากค่าที่สอดคล้องกันทั้งหมดตรงกัน ให้ถือว่ารูปร่างมีสไตล์เดียวกันและสามารถจัดกลุ่มตรรกะได้ ซึ่งทำให้การจัดการสไตล์ในภายหลังง่ายขึ้น
Can I save a set of custom shape styles to a separate file for reuse in other presentations?
ได้ คุณสามารถบันทึกรูปร่างตัวอย่างพร้อมสไตล์ที่ต้องการในสไลด์เทมเพลตหรือไฟล์เทมเพลต .POTX เมื่อต้องสร้างพรีเซนเทชันใหม่ ให้เปิดเทมเพลต ทำการคัดลอกรูปร่างที่สไตล์ต้องการ แล้วนำไปใช้ใหม่ในสไลด์อื่นตามต้องการ.