
Python का उपयोग करके प्रस्तुतियों में 3D इफ़ेक्ट बनाएँ
अवलोकन
Aspose.Slides for Python via .NET shapes और टेक्स्ट के लिए PowerPoint-शैली के 3D फ़ॉर्मेटिंग को बना, संपादित, संरक्षित और रेंडर कर सकता है। यह लेख घूर्णन, एक्सट्रूज़न, बिवल, प्रकाश, सामग्री, ग्रेडिएंट या चित्र भराव, और 3D टेक्स्ट जैसे 3D इफ़ेक्ट्स को कवर करता है।
Note
यह लेख PowerPoint आकृतियों और टेक्स्ट पर 3D फ़ॉर्मेटिंग इफ़ेक्ट्स के बारे में है। यह स्टैंडअलोन 3D मॉडल फ़ाइलों को सम्मिलित या संपादित करने के बारे में नहीं है। जब आप स्लाइड को छवि, PDF, या HTML में निर्यात करते हैं, तो Aspose.Slides उन 3D इफ़ेक्ट्स को निर्यातित 2D आउटपुट में रेंडर करता है।3D फ़ॉर्मेटिंग अवधारणाएँ
एक आकृति पर 3D फ़ॉर्मेटिंग लागू करने के लिए Shape.three_d_format प्रॉपर्टी का उपयोग करें। यह प्रॉपर्टी ThreeDFormat को उजागर करती है, जो उस आकृति के लिए 3D दृश्य को नियंत्रित करती है।
टेक्स्ट के लिए, TextFrameFormat.three_d_format प्रॉपर्टी का उपयोग करें। यह प्रॉपर्टी टेक्स्ट फ्रेम पर 3D फ़ॉर्मेटिंग लागू करती है, न कि आकृति बॉडी पर।
सबसे महत्वपूर्ण प्रॉपर्टी हैं:
| प्रॉपर्टी | नियंत्रित करने वाला | कब उपयोग करें |
|---|---|---|
| camera | दृष्टिकोण, प्रीसेट कैमरा प्रकार, घूर्णन, ज़ूम, और परिप्रेक्ष्य। | ऑब्जेक्ट को 3D स्थान में घुमाएँ या PowerPoint 3D घूर्णन प्रीसेट से मिलाएँ। |
| light_rig | लाइट प्रीसेट, दिशा, और लाइट घूर्णन। | 3D सतह पर हाइलाइट और शैडो कैसे दिखें, इसे बदलें। |
| material | सतह सामग्री, जैसे फ्लैट, मैट, प्लास्टिक, या धातु। | एक ही जियोमेट्री को अधिक सपाट, नरम, चमकदार, या धातु जैसा बनाएँ। |
| extrusion_height | आकृति अपने सामने वाले चेहरे से कितनी दूरी तक पीछे तक विस्तारित होती है। | एक सपाट आकृति को स्पष्ट रूप से मोटी 3D वस्तु में बदलें। |
| extrusion_color | निकाली गई किनारों का रंग। | गहराई दिखाएँ या किनारे के रंग को सामने के भराव के साथ समन्वयित करें। |
| depth | PowerPoint 3D फ़ॉर्मेटिंग द्वारा उपयोग किया गया अतिरिक्त 3D गहराई। | आकृतियों या टेक्स्ट के लिए गहराई को सूक्ष्म रूप से समायोजित करें, विशेषकर बिवल और सामग्री सेटिंग्स के साथ। |
| bevel_top और bevel_bottom | सामने और पीछे के चेहरों पर उठे या गोलाई वाले किनारे। | तेज़ सपाट चेहरे की बजाय एक मुलायम या ढलाई जैसा किनारा जोड़ें। |
| contour_color और contour_width | 3D वस्तु के चारों ओर रूपरेखा। | रेंडर किए गए आउटपुट में वस्तु की सीमा को उजागर करें। |
एक 3D आकृति बनाएं
एक आकृति को विश्वसनीय 3D दिखने से पहले आम तौर पर चार प्रकार की सेटिंग्स की आवश्यकता होती है:
- कैमरा सेटिंग्स, क्योंकि डिफ़ॉल्ट सामने वाला दृश्य एक्सट्रूज़न को छुपा सकता है।
- लाइट सेटिंग्स, क्योंकि प्रकाश चेहरे और किनारों को पठनीय बनाता है।
- मटीरियल सेटिंग्स, क्योंकि सतह यह निर्धारित करती है कि प्रकाश कैसे रेंडर होता है।
- एक्सट्रूज़न या गहराई सेटिंग्स, क्योंकि सपाट आकृति को मोटाई चाहिए।
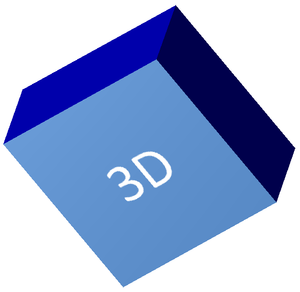
निम्न उदाहरण एक आयत बनाता है, उसके सामने वाले चेहरे पर टेक्स्ट जोड़ता है, और 3D फ़ॉर्मेटिंग लागू करता है। कैमरा घूर्णन मान डिग्री में हैं, और एक्सट्रूज़न ऊँचाई 100 पॉइंट है। उदाहरण स्लाइड को दो गुना डिफ़ॉल्ट आकार में PNG इमेज के रूप में रेंडर करता है और प्रस्तुति को PPTX के रूप में सहेजता है।
import aspose.pydrawing as drawing
import aspose.slides as slides

image_scale = 2

with slides.Presentation() as presentation:
    slide = presentation.slides[0]

    shape = slide.shapes.add_auto_shape(slides.ShapeType.RECTANGLE, 200, 150, 200, 200)

    shape.text_frame.text = "3D"
    shape.text_frame.paragraphs[0].paragraph_format.default_portion_format.font_height = 64

    shape.fill_format.fill_type = slides.FillType.SOLID
    shape.fill_format.solid_fill_color.color = drawing.Color.cornflower_blue

    shape.three_d_format.camera.camera_type = slides.CameraPresetType.ORTHOGRAPHIC_FRONT
    shape.three_d_format.camera.set_rotation(20, 30, 40)
    shape.three_d_format.light_rig.light_type = slides.LightRigPresetType.FLAT
    shape.three_d_format.light_rig.direction = slides.LightingDirection.TOP
    shape.three_d_format.material = slides.MaterialPresetType.FLAT
    shape.three_d_format.extrusion_height = 100
    shape.three_d_format.extrusion_color.color = drawing.Color.blue

    with slide.get_image(image_scale, image_scale) as thumbnail:
        thumbnail.save("shape_3d.png")

    presentation.save("shape_3d.pptx", slides.export.SaveFormat.PPTX)
रेंडर किया गया स्लाइड इमेज आयत को एक मोटी 3D ब्लॉक के रूप में दिखाता है:
कैमरा से आकृति को घुमाएँ
PowerPoint में, 3D घूर्णन को 3-D Rotation पैन से कॉन्फ़िगर किया जाता है। X, Y, और Z घूर्णन मान कैमरा API के माध्यम से सेट किए गए घूर्णन से संबंधित होते हैं।
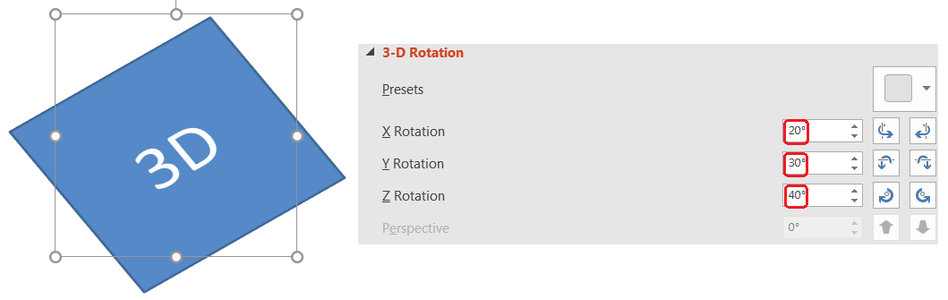
Aspose.Slides में, कैमरा तक पहुँचने के लिए ThreeDFormat.camera का उपयोग करें। यह उदाहरण एक आयत बनाता है, एक ऑर्थोग्राफिक सामने वाला दृश्य चुनता है, और क्रमशः उसके X, Y, और Z घूर्णन को 20, 30, और 40 डिग्री पर सेट करता है। यह आकृति को मेमोरी में कॉन्फ़िगर करता है बिना फ़ाइल सहेजे:
import aspose.slides as slides

with slides.Presentation() as presentation:
    slide = presentation.slides[0]

    shape = slide.shapes.add_auto_shape(slides.ShapeType.RECTANGLE, 200, 150, 200, 200)

    shape.three_d_format.camera.camera_type = slides.CameraPresetType.ORTHOGRAPHIC_FRONT
    shape.three_d_format.camera.set_rotation(20, 30, 40)
जब आपको दर्शक के वस्तु को देखने के तरीके को बदलने की आवश्यकता हो तो कैमरा का उपयोग करें। यह स्लाइड पर 2D आकृति ज्योमेट्री को नहीं बदलता। यह PowerPoint और Aspose.Slides द्वारा रेंडरिंग के समय प्रयुक्त 3D दृष्टिकोण को बदलता है।
एक्सट्रूज़न और गहराई जोड़ें
एक्सट्रूज़न एक आकृति को सामने वाले चेहरे के पीछे विस्तारित करके मोटा दिखाता है। PowerPoint में, गहराई नियंत्रण इस दृश्य मोटाई को निर्धारित करता है, और रंग नियंत्रण पक्षीय चेहरों का रंग सेट करता है।
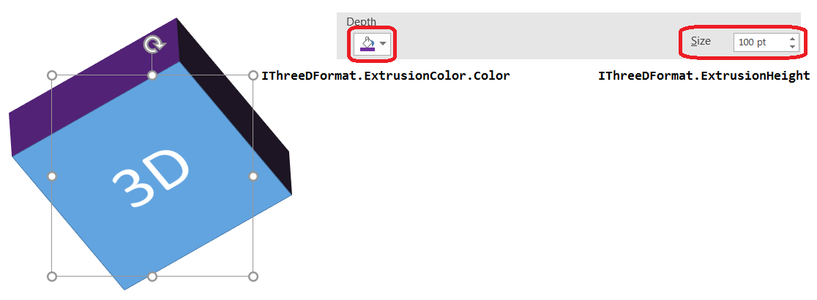
ThreeDFormat.extrusion_height को मोटाई के लिए और ThreeDFormat.extrusion_color को किनारे के रंग के लिए सेट करें। यह उदाहरण आयत को 100 पॉइंट एक्सट्रूज़न के साथ बैंगनी किनारे देता है और उसकी मोटाई दिखाने के लिए कैमरा को घुमाता है। यह आकृति को मेमोरी में कॉन्फ़िगर करता है बिना फ़ाइल सहेजे:
import aspose.pydrawing as drawing
import aspose.slides as slides

with slides.Presentation() as presentation:
    slide = presentation.slides[0]

    shape = slide.shapes.add_auto_shape(slides.ShapeType.RECTANGLE, 200, 150, 200, 200)

    shape.three_d_format.camera.camera_type = slides.CameraPresetType.ORTHOGRAPHIC_FRONT
    shape.three_d_format.camera.set_rotation(20, 30, 40)
    shape.three_d_format.light_rig.light_type = slides.LightRigPresetType.FLAT
    shape.three_d_format.light_rig.direction = slides.LightingDirection.TOP
    shape.three_d_format.material = slides.MaterialPresetType.FLAT
    shape.three_d_format.extrusion_height = 100
    shape.three_d_format.extrusion_color.color = drawing.Color.purple
ThreeDFormat.depth प्रॉपर्टी एक 3D आकृति की गहराई निर्धारित करती है। extrusion_height प्रॉपर्टी एक्सट्रूज़न प्रभाव की ऊँचाई को नियंत्रित करती है, जैसा कि इस उदाहरण में दिखाया गया है।
3D इफ़ेक्ट्स के साथ ग्रेडिएंट या चित्र भराव का उपयोग करें
3D फ़ॉर्मेटिंग आकृति भराव से स्वतंत्र है। आप सामने वाले चेहरे पर ठोस रंग, ग्रेडिएंट, पैटर्न, या चित्र भराव लागू कर सकते हैं और फिर भी वही कैमरा, प्रकाश, सामग्री, और एक्सट्रूज़न सेटिंग्स उपयोग कर सकते हैं।
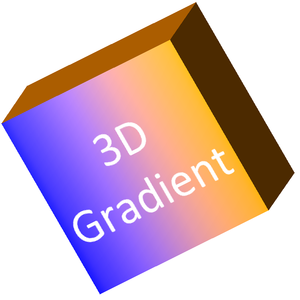
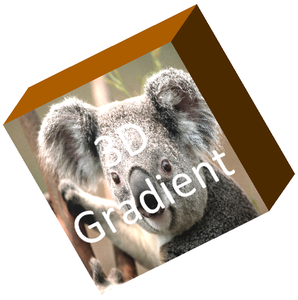
यह उदाहरण फ्रंट फ़ेस पर नीले से संतरे तक के ग्रेडिएंट को लागू करता है और 150 पॉइंट एक्सट्रूज़न पर गहरा नारंगी रंग देता है। ग्रेडिएंट स्टॉप 0 और 100 पर ग्रेडिएंट के शुरू और अंत को चिह्नित करते हैं। कैमरा घूर्णन मान डिग्री में हैं। स्लाइड को दो गुना डिफ़ॉल्ट आकार में PNG इमेज के रूप में रेंडर किया जाता है:
import aspose.pydrawing as drawing
import aspose.slides as slides

image_scale = 2

with slides.Presentation() as presentation:
    slide = presentation.slides[0]

    shape = slide.shapes.add_auto_shape(slides.ShapeType.RECTANGLE, 200, 150, 250, 250)

    shape.text_frame.text = "3D Gradient"
    shape.text_frame.paragraphs[0].paragraph_format.default_portion_format.font_height = 64

    shape.fill_format.fill_type = slides.FillType.GRADIENT
    shape.fill_format.gradient_format.gradient_stops.add(0, drawing.Color.blue)
    shape.fill_format.gradient_format.gradient_stops.add(100, drawing.Color.orange)

    shape.three_d_format.camera.camera_type = slides.CameraPresetType.ORTHOGRAPHIC_FRONT
    shape.three_d_format.camera.set_rotation(10, 20, 30)
    shape.three_d_format.light_rig.light_type = slides.LightRigPresetType.FLAT
    shape.three_d_format.light_rig.direction = slides.LightingDirection.TOP
    shape.three_d_format.material = slides.MaterialPresetType.FLAT
    shape.three_d_format.extrusion_height = 150
    shape.three_d_format.extrusion_color.color = drawing.Color.dark_orange

    with slide.get_image(image_scale, image_scale) as thumbnail:
        thumbnail.save("gradient_3d.png")
चित्र भराव का उपयोग करने के लिए, प्रस्तुति में चित्र जोड़ें और उसे आकृति भराव में असाइन करें। यह उदाहरण कार्य निर्देशिका में “image.jpg” नामक मौजूदा फ़ाइल की आवश्यकता रखता है। यह चित्र को आयत को भरने के लिए फैलाता है, 150 पॉइंट एक्सट्रूज़न लागू करता है, और कैमरा घूर्णन को डिग्री में सेट करता है। यह आकृति को मेमोरी में कॉन्फ़िगर करता है बिना फ़ाइल सहेजे या रेंडर किए:
import aspose.pydrawing as drawing
import aspose.slides as slides

with open("image.jpg", "rb") as image_file:
    image_data = image_file.read()

with slides.Presentation() as presentation:
    slide = presentation.slides[0]

    shape = slide.shapes.add_auto_shape(slides.ShapeType.RECTANGLE, 200, 150, 250, 250)

    image = presentation.images.add_image(image_data)

    shape.fill_format.fill_type = slides.FillType.PICTURE
    shape.fill_format.picture_fill_format.picture.image = image
    shape.fill_format.picture_fill_format.picture_fill_mode = slides.PictureFillMode.STRETCH

    shape.three_d_format.camera.camera_type = slides.CameraPresetType.ORTHOGRAPHIC_FRONT
    shape.three_d_format.camera.set_rotation(10, 20, 30)
    shape.three_d_format.light_rig.light_type = slides.LightRigPresetType.FLAT
    shape.three_d_format.light_rig.direction = slides.LightingDirection.TOP
    shape.three_d_format.material = slides.MaterialPresetType.FLAT
    shape.three_d_format.extrusion_height = 150
    shape.three_d_format.extrusion_color.color = drawing.Color.dark_orange
टेक्स्ट पर 3D फ़ॉर्मेटिंग लागू करें
आकृति 3D फ़ॉर्मेटिंग आकृति के बॉडी को प्रभावित करती है। टेक्स्ट 3D फ़ॉर्मेटिंग टेक्स्ट फ्रेम को प्रभावित करती है। यह WordArt जैसी इफ़ेक्ट्स के लिए उपयोगी है जहाँ अक्षरों को स्वयं एक्सट्रूज़न, सामग्री, प्रकाश, और कैमरा सेटिंग्स की आवश्यकता होती है।
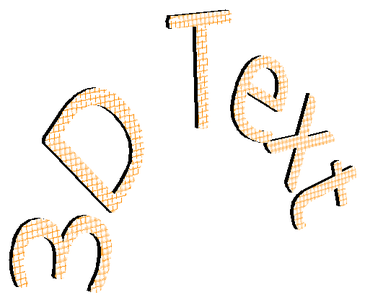
निम्न उदाहरण नारंगी-और-सफेद ग्रिड पैटर्न के साथ टेक्स्ट बनाता है, ऊपर की ओर एक चाप लागू करता है, और TextFrameFormat.three_d_format के माध्यम से 3D सेटिंग्स कॉन्फ़िगर करता है। एक्सट्रूज़न ऊँचाई और गहराई पॉइंट में हैं, और लाइट घूर्णन डिग्री में है। आकृति भराव और रूपरेखा छिपी हुई हैं ताकि केवल टेक्स्ट दिखाई दे। उदाहरण डिफ़ॉल्ट स्लाइड आकार के दो गुना PNG इमेज रेंडर करता है और प्रस्तुति को PPTX के रूप में सहेजता है:
import aspose.pydrawing as drawing
import aspose.slides as slides

image_scale = 2

with slides.Presentation() as presentation:
    slide = presentation.slides[0]

    shape = slide.shapes.add_auto_shape(slides.ShapeType.RECTANGLE, 200, 150, 250, 250)

    shape.fill_format.fill_type = slides.FillType.NO_FILL
    shape.line_format.fill_format.fill_type = slides.FillType.NO_FILL
    shape.text_frame.text = "3D Text"

    portion = shape.text_frame.paragraphs[0].portions[0]
    portion.portion_format.fill_format.fill_type = slides.FillType.PATTERN
    portion.portion_format.fill_format.pattern_format.fore_color.color = drawing.Color.dark_orange
    portion.portion_format.fill_format.pattern_format.back_color.color = drawing.Color.white
    portion.portion_format.fill_format.pattern_format.pattern_style = slides.PatternStyle.LARGE_GRID

    shape.text_frame.paragraphs[0].paragraph_format.default_portion_format.font_height = 128

    text_frame_format = shape.text_frame.text_frame_format
    text_frame_format.transform = slides.TextShapeType.ARCH_UP
    text_frame_format.three_d_format.extrusion_height = 3.5
    text_frame_format.three_d_format.depth = 3
    text_frame_format.three_d_format.material = slides.MaterialPresetType.PLASTIC
    text_frame_format.three_d_format.light_rig.direction = slides.LightingDirection.TOP
    text_frame_format.three_d_format.light_rig.light_type = slides.LightRigPresetType.BALANCED
    text_frame_format.three_d_format.light_rig.set_rotation(0, 0, 40)
    text_frame_format.three_d_format.camera.camera_type = slides.CameraPresetType.PERSPECTIVE_CONTRASTING_RIGHT_FACING

    with slide.get_image(image_scale, image_scale) as thumbnail:
        thumbnail.save("text_3d.png")

    presentation.save("text_3d.pptx", slides.export.SaveFormat.PPTX)
3D आकृति पर टेक्स्ट को सपाट रखें
आकृति की 3D उपस्थिति को बरकरार रखते हुए टेक्स्ट को पठनीय रखने के लिए, TextFrame.text_frame_format के माध्यम से TextFrameFormat.keep_text_flat सेट करें। जब मान True हो, तो टेक्स्ट 3D दृश्य के बाहर रहता है। जब यह False हो, तो टेक्स्ट दृश्य में भाग लेता है और उसकी 3D अभिविन्यास का अनुसरण करता है।
यह सेटिंग आकृति के 3D फ़ॉर्मेटिंग को नहीं हटाती: उसका कैमरा, प्रकाश, सामग्री, और एक्सट्रूज़न Shape.three_d_format के माध्यम से कॉन्फ़िगर रहता है। यह सामान्य घूर्णन से भी अलग है। Shape.rotation स्लाइड प्लेन में आकृति को घुमाता है, जबकि TextFrameFormat.rotation_angle टेक्स्ट के बाउंडिंग बॉक्स के भीतर कस्टम घूर्णन को नियंत्रित करता है। टेक्स्ट को 3D दृश्य से बाहर रखने से इन कोणों में से किसी को भी रीसेट नहीं किया जाता।
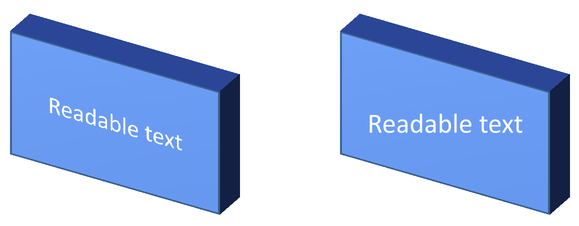
निम्न स्वयं-सबन्धित उदाहरण एक नीली आयत को टेक्स्ट के साथ बनाता है और उसे मूल के बगल में क्लोन करता है। दोनों आकृतियों में समान 3D फ़ॉर्मेटिंग है; केवल टेक्स्ट सेटिंग अलग है: बाएँ पर False और दाएँ पर True। कैमरा एंगल डिग्री में हैं, और एक्सट्रूज़न ऊँचाई 40 पॉइंट है। उदाहरण प्रस्तुति को PPTX के रूप में सहेजता है और तुलना स्लाइड को दो गुना डिफ़ॉल्ट आकार में PNG के रूप में रेंडर करता है।
import aspose.pydrawing as drawing
import aspose.slides as slides

with slides.Presentation() as presentation:
    slide = presentation.slides[0]

    shape = slide.shapes.add_auto_shape(slides.ShapeType.RECTANGLE, 70, 160, 240, 140)

    shape.text_frame.text = "Readable text"
    shape.text_frame.paragraphs[0].paragraph_format.default_portion_format.font_height = 28
    shape.text_frame.paragraphs[0].paragraph_format.alignment = slides.TextAlignment.CENTER
    shape.text_frame.text_frame_format.anchoring_type = slides.TextAnchorType.CENTER
    shape.fill_format.fill_type = slides.FillType.SOLID
    shape.fill_format.solid_fill_color.color = drawing.Color.cornflower_blue

    shape.three_d_format.camera.camera_type = slides.CameraPresetType.ORTHOGRAPHIC_FRONT
    shape.three_d_format.camera.set_rotation(30, 30, 0)
    shape.three_d_format.light_rig.light_type = slides.LightRigPresetType.FLAT
    shape.three_d_format.light_rig.direction = slides.LightingDirection.TOP
    shape.three_d_format.material = slides.MaterialPresetType.FLAT
    shape.three_d_format.extrusion_height = 40
    shape.three_d_format.extrusion_color.color = drawing.Color.royal_blue
    shape.text_frame.text_frame_format.keep_text_flat = False

    flat_text_shape = slide.shapes.add_clone(shape, 400, 160)
    flat_text_shape.text_frame.text_frame_format.keep_text_flat = True

    presentation.save("keep_text_flat.pptx", slides.export.SaveFormat.PPTX)
    with slide.get_image(2, 2) as image:
        image.save("keep_text_flat.png")
बाएँ पर, टेक्स्ट 3D अभिविन्यास का अनुसरण करता है। दाएँ पर, यह सपाट रहता है और पढ़ने में आसान है। दोनों आयतें समान दिखाई देने वाला एक्सट्रूज़न और 3D अभिविन्यास बनाए रखती हैं।
निर्यात और रेंडरिंग व्यवहार
Aspose.Slides PPTX जैसे PowerPoint फ़ॉर्मैट में सहेजते समय 3D फ़ॉर्मेटिंग को संरक्षित रखता है। जब रेंडरिंग या निर्यात फ़िक्स्ड-लेआउट फ़ॉर्मैट्स में किया जाता है, तो 3D दृश्य को रास्टराइज़ किया जाता है या 2D परिणाम के रूप में आउटपुट में ड्रॉ किया जाता है। यह तब लागू होता है जब आप स्लाइड्स को PNG में रेंडर करते हैं, PDF में निर्यात करते हैं, HTML में निर्यात करते हैं, या video conversion के लिए फ़्रेम उत्पन्न करते हैं।
- निर्यात किए गए चित्र और PDF इंटरैक्टिव नहीं होते। निर्यात के बाद दर्शक द्वारा वस्तु को घुमाया नहीं जा सकता।
- अंतिम रूपरंग कैमरा, लाइट रिग, सामग्री, एक्सट्रूज़न, भराव, और स्लाइड स्केलिंग के संयोजन पर निर्भर करता है।
- यदि आपको विरासत में मिले या थीम-आधारित फ़ॉर्मेटिंग मानों को निरीक्षण करने की आवश्यकता है, तो effective shape properties पढ़ें।
- कुछ आउटपुट फ़ॉर्मैट्स संपादन योग्य PowerPoint 3D फ़ॉर्मेटिंग को संग्रहीत नहीं कर सकते। ऐसे फ़ॉर्मैट्स में, दृश्य परिणाम को रेंडर किया जाता है न कि संपादन योग्य 3D सेटिंग्स के रूप में संरक्षित किया जाता है।
FAQ
क्या Aspose.Slides इंटरैक्टिव 3D प्रस्तुतियाँ बना सकता है?
Aspose.Slides आकृतियों और टेक्स्ट के लिए PowerPoint 3D इफ़ेक्ट्स बनाता और रेंडर करता है। यह निर्यात किए गए चित्र, PDF, या HTML पृष्ठों को इंटरैक्टिव 3D दृश्यों में नहीं बदलता जिसे दर्शक घुमा सके। PPTX में, जहाँ फ़ॉर्मेट समर्थन करता है, 3D फ़ॉर्मेटिंग PowerPoint में संपादन योग्य बनी रहती है।
3D मॉडल और 3D इफ़ेक्ट के बीच अंतर क्या है?
3D मॉडल एक अलग 3D वस्तु है जिसे प्रस्तुति में डाला जाता है। 3D इफ़ेक्ट एक फ़ॉर्मेटिंग है जो सामान्य PowerPoint आकृति या टेक्स्ट पर लागू की जाती है, जैसे घूर्णन, एक्सट्रूज़न, बिवल, प्रकाश, और सामग्री। यह लेख 3D इफ़ेक्ट्स को कवर करता है।
एक दिखने योग्य 3D आकृति के लिए कौन सी सेटिंग्स आवश्यक हैं?
न्यूनतम, कैमरा घूर्णन और या तो एक्सट्रूज़न या गहराई सेट करें। व्यावहारिक रूप से, लाइट रिग और सामग्री भी सेट करें ताकि रेंडर की गई सतहों में स्पष्ट हाइलाइट और शैडो हों।
क्या मैं 3D इफ़ेक्ट्स दोनों आकृतियों और टेक्स्ट पर लागू कर सकता हूँ?
हाँ। आकृति बॉडी के लिए Shape.three_d_format और टेक्स्ट के लिए TextFrameFormat.three_d_format उपयोग करें।
क्या 3D इफ़ेक्ट्स चित्रों, PDF, HTML, या वीडियो फ़्रेम्स में निर्यात करने पर दिखाई देंगे?
हाँ। Aspose.Slides स्लाइड इमेज, PDF आउटपुट, HTML आउटपुट, और वीडियो रूपांतरण के लिए उपयोग किए गए फ़्रेम्स बनाते समय 3D इफ़ेक्ट्स को रेंडर करता है। निर्यात किया गया आउटपुट रेंडर किया हुआ रूप दिखाता है, न कि एक संपादन योग्य 3D वस्तु।
क्या मैं विरासत और थीम सेटिंग्स के लागू होने के बाद अंतिम 3D मान पढ़ सकता हूँ?
हाँ। Shape Effective Properties में वर्णित प्रभावी फ़ॉर्मेटिंग APIs का उपयोग करके अंतिम कैमरा, लाइट रिग, बिवल, और संबंधित 3D मानों को पढ़ें।