
สร้างเอฟเฟกต์ 3 มิติในงานนำเสนอด้วย Python
ภาพรวม
Aspose.Slides for Python via .NET สามารถสร้าง, แก้ไข, คงไว้และเรนเดอร์การจัดรูปแบบ 3 มิติสไตล์ PowerPoint สำหรับรูปร่างและข้อความได้ บทความนี้ครอบคลุมเอฟเฟกต์ 3 มิติ เช่น การหมุน, การดันออก, การบีบ, การจัดแสง, วัสดุ, การไล่สีหรือการเติมรูปภาพ, และข้อความ 3 มิติ
หมายเหตุ
บทความนี้เกี่ยวกับเอฟเฟกต์การจัดรูปแบบ 3 มิติบนรูปร่างและข้อความของ PowerPoint ไม่ได้เกี่ยวกับการแทรกหรือแก้ไขไฟล์โมเดล 3 มิติแยกต่างหาก เมื่อคุณส่งออกสไลด์เป็นภาพ, PDF, หรือ HTML, Aspose.Slides จะเรนเดอร์เอฟเฟกต์ 3 มิติเหล่านั้นลงในผลลัพธ์ 2 มิติที่ส่งออกแนวคิดการจัดรูปแบบ 3 มิติ
ใช้คุณสมบัติ Shape.three_d_format เพื่อปรับใช้การจัดรูปแบบ 3 มิติให้กับรูปร่าง คุณสมบัตินี้จะเปิดเผย ThreeDFormat ซึ่งควบคุมฉาก 3 มิติสำหรับรูปร่างนั้น
สำหรับข้อความ ให้ใช้คุณสมบัติ TextFrameFormat.three_d_format ซึ่งจะทำให้การจัดรูปแบบ 3 มิติถูกนำไปใช้กับกรอบข้อความแทนส่วนตัวของรูปร่าง
คุณสมบัติที่สำคัญที่สุดมีดังนี้:
| คุณสมบัติ | สิ่งที่ควบคุม | เมื่อควรใช้ |
|---|---|---|
| camera | มุมมอง, ประเภทกล้องสำเร็จรูป, การหมุน, การซูม, และมุมมองเชิงลึก | หมุนวัตถุในพื้นที่ 3 มิติ หรือใช้ค่าพรีเซ็ตการหมุน 3 มิติของ PowerPoint |
| light_rig | พรีเซ็ตแสง, ทิศทาง, และการหมุนแสง | ปรับการแสดงไฮไลท์และเงาบนพื้นผิว 3 มิติ |
| material | วัสดุผิว, เช่น แบน, แมต, พลาสติก หรือโลหะ | ทำให้เรขาคณิตเดียวกันดูแบนขึ้น, นุ่มขึ้น, มันวาว หรือเป็นโลหะ |
| extrusion_height | ระยะที่รูปร่างยืดออกจากหน้าหน้าตรง | แปลงรูปร่างแบนให้เป็นวัตถุ 3 มิติที่มีความหนาเด่นชัด |
| extrusion_color | สีของด้านที่ดันออก | ทำให้ความลึกมองเห็นได้หรือทำให้สีด้านสอดคล้องกับสีเติมหน้าหน้า |
| depth | ความลึก 3 มิติเพิ่มเติมที่ PowerPoint ใช้ | ปรับความลึกให้ละเอียดสำหรับรูปร่างหรือข้อความ โดยเฉพาะเมื่อใช้ร่วมกับการตั้งค่า bevel และ material |
| bevel_top และ bevel_bottom | ขอบยกหรือโค้งที่หน้าหน้าและด้านหลัง | เพิ่มขอบโค้งหรือแบบพิมพ์แทนหน้าตัดแบนและคม |
| contour_color และ contour_width | เส้นขอบรอบวัตถุ 3 มิติ | เน้นขอบวัตถุในผลลัพธ์ที่เรนเดอร์ |
สร้างรูปร่าง 3 มิติ
โดยทั่วไปรูปร่างต้องการการตั้งค่าสี่ประเภทก่อนที่จะดูเหมือน 3 มิติอย่างน่าเชื่อถือ:
- การตั้งค่ากล้อง, เนื่องจากมุมมองหน้าตั้งต้นอาจซ่อนการดันออก
- การตั้งค่าแสง, เนื่องจากแสงทำให้ด้านและข้างสามารถมองเห็นได้
- การตั้งค่าวัสดุ, เนื่องจากผิวกระทบต่อการเรนเดอร์แสง
- การตั้งค่าการดันออกหรือความลึก, เนื่องจากรูปร่างแบนต้องการความหนา
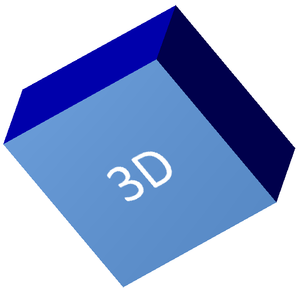
ตัวอย่างต่อไปนี้สร้างสี่เหลี่ยมผืนผ้า, เพิ่มข้อความลงบนหน้าหน้า, และปรับใช้การจัดรูปแบบ 3 มิติ ค่า rotation ของกล้องเป็นองศา และความสูงการดันออกเป็น 100 จุด ตัวอย่างนี้เรนเดอร์สไลด์เป็นภาพ PNG ที่สองเท่าของขนาดเริ่มต้นและบันทึกพรีเซนเตชันเป็น PPTX
import aspose.pydrawing as drawing
import aspose.slides as slides

image_scale = 2

with slides.Presentation() as presentation:
    slide = presentation.slides[0]

    shape = slide.shapes.add_auto_shape(slides.ShapeType.RECTANGLE, 200, 150, 200, 200)

    shape.text_frame.text = "3D"
    shape.text_frame.paragraphs[0].paragraph_format.default_portion_format.font_height = 64

    shape.fill_format.fill_type = slides.FillType.SOLID
    shape.fill_format.solid_fill_color.color = drawing.Color.cornflower_blue

    shape.three_d_format.camera.camera_type = slides.CameraPresetType.ORTHOGRAPHIC_FRONT
    shape.three_d_format.camera.set_rotation(20, 30, 40)
    shape.three_d_format.light_rig.light_type = slides.LightRigPresetType.FLAT
    shape.three_d_format.light_rig.direction = slides.LightingDirection.TOP
    shape.three_d_format.material = slides.MaterialPresetType.FLAT
    shape.three_d_format.extrusion_height = 100
    shape.three_d_format.extrusion_color.color = drawing.Color.blue

    with slide.get_image(image_scale, image_scale) as thumbnail:
        thumbnail.save("shape_3d.png")

    presentation.save("shape_3d.pptx", slides.export.SaveFormat.PPTX)
ภาพสไลด์ที่เรนเดอร์จะแสดงสี่เหลี่ยมผืนผ้าเป็นบล็อก 3 มิติที่หนา:
หมุนรูปร่างด้วยกล้อง
ใน PowerPoint, การหมุน 3 มิติกำหนดจากแผง 3‑D Rotation ค่า rotation ของ X, Y, Z สอดคล้องกับค่าที่คุณตั้งผ่าน API ของกล้อง
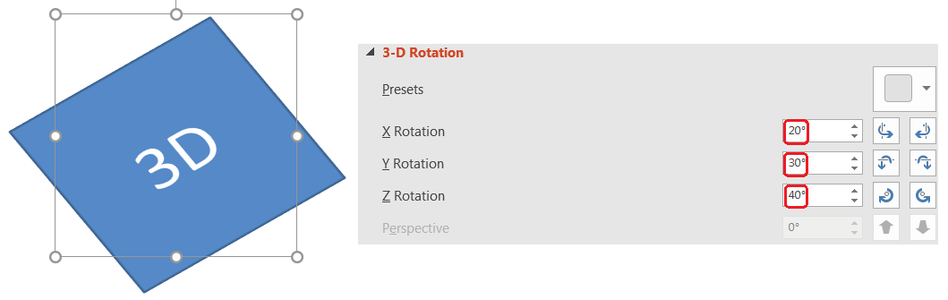
ใน Aspose.Slides, เข้าถึงกล้องผ่าน ThreeDFormat.camera. ตัวอย่างนี้สร้างสี่เหลี่ยม, เลือกมุมมองหน้าแบบออร์โธกราฟิก, และตั้งค่า rotation ของ X, Y, Z เป็น 20°, 30°, และ 40° ตามลำดับ โดยกำหนดรูปร่างในหน่วยความจำโดยไม่บันทึกไฟล์
import aspose.slides as slides

with slides.Presentation() as presentation:
    slide = presentation.slides[0]

    shape = slide.shapes.add_auto_shape(slides.ShapeType.RECTANGLE, 200, 150, 200, 200)

    shape.three_d_format.camera.camera_type = slides.CameraPresetType.ORTHOGRAPHIC_FRONT
    shape.three_d_format.camera.set_rotation(20, 30, 40)
ใช้กล้องเมื่อต้องการเปลี่ยนวิธีที่ผู้ชมมองวัตถุ ไม่ได้เปลี่ยนเรขาคณิต 2 มิติของรูปร่างบนสไลด์ แต่เปลี่ยนมุมมอง 3 มิติที่ PowerPoint และ Aspose.Slides ใช้ในการเรนเดอร์
เพิ่มการดันออกและความลึก
การดันออกทำให้รูปร่างดูหนาโดยขยายไปด้านหลังหน้าหน้า ใน PowerPoint, การควบคุมความลึกกำหนดความหนาที่มองเห็นได้, และการควบคุมสีกำหนดสีของด้านข้าง
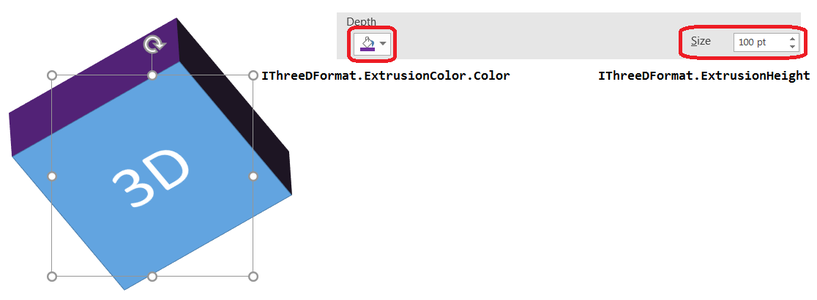
ตั้งค่า ThreeDFormat.extrusion_height เพื่อกำหนดความหนาและ ThreeDFormat.extrusion_color เพื่อกำหนดสีด้าน ตัวอย่างนี้ให้สี่เหลี่ยมมีการดันออก 100 จุดพร้อมสีด้านม่วงและหมุนกล้องเพื่อเปิดเผยความหนา กำหนดรูปร่างในหน่วยความจำโดยไม่บันทึกไฟล์
import aspose.pydrawing as drawing
import aspose.slides as slides

with slides.Presentation() as presentation:
    slide = presentation.slides[0]

    shape = slide.shapes.add_auto_shape(slides.ShapeType.RECTANGLE, 200, 150, 200, 200)

    shape.three_d_format.camera.camera_type = slides.CameraPresetType.ORTHOGRAPHIC_FRONT
    shape.three_d_format.camera.set_rotation(20, 30, 40)
    shape.three_d_format.light_rig.light_type = slides.LightRigPresetType.FLAT
    shape.three_d_format.light_rig.direction = slides.LightingDirection.TOP
    shape.three_d_format.material = slides.MaterialPresetType.FLAT
    shape.three_d_format.extrusion_height = 100
    shape.three_d_format.extrusion_color.color = drawing.Color.purple
คุณสมบัติ ThreeDFormat.depth กำหนดความลึกของรูปร่าง 3 มิติ ส่วน extrusion_height ควบคุมความสูงของเอฟเฟกต์การดันออก ตามที่แสดงในตัวอย่างนี้
ใช้การไล่สีหรือการเติมรูปภาพร่วมกับเอฟเฟกต์ 3 มิติ
การจัดรูปแบบ 3 มิติเป็นอิสระจากการเติมสีของรูปร่าง คุณสามารถใช้สีทึบ, การไล่สี, แพทเทิร์น, หรือการเติมรูปภาพบนหน้าหน้าและยังคงใช้กล้อง, แสง, วัสดุ, และการตั้งค่าการดันออกเดียวกันได้
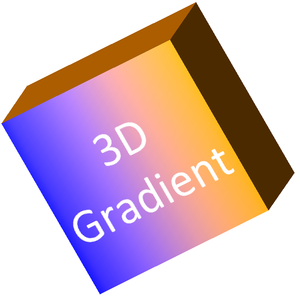
ตัวอย่างนี้ใช้การไล่สีจากสีน้ำเงินไปสีส้มบนหน้าหน้าและสีส้มเข้มบนการดันออก 150 จุด จุดหยุดไล่สีที่ 0 และ 100 แสดงจุดเริ่มและสิ้นสุดของการไล่สี ค่า rotation ของกล้องเป็นองศา สไลด์ถูกเรนเดอร์เป็นภาพ PNG ที่สองเท่าของขนาดเริ่มต้น
import aspose.pydrawing as drawing
import aspose.slides as slides

image_scale = 2

with slides.Presentation() as presentation:
    slide = presentation.slides[0]

    shape = slide.shapes.add_auto_shape(slides.ShapeType.RECTANGLE, 200, 150, 250, 250)

    shape.text_frame.text = "3D Gradient"
    shape.text_frame.paragraphs[0].paragraph_format.default_portion_format.font_height = 64

    shape.fill_format.fill_type = slides.FillType.GRADIENT
    shape.fill_format.gradient_format.gradient_stops.add(0, drawing.Color.blue)
    shape.fill_format.gradient_format.gradient_stops.add(100, drawing.Color.orange)

    shape.three_d_format.camera.camera_type = slides.CameraPresetType.ORTHOGRAPHIC_FRONT
    shape.three_d_format.camera.set_rotation(10, 20, 30)
    shape.three_d_format.light_rig.light_type = slides.LightRigPresetType.FLAT
    shape.three_d_format.light_rig.direction = slides.LightingDirection.TOP
    shape.three_d_format.material = slides.MaterialPresetType.FLAT
    shape.three_d_format.extrusion_height = 150
    shape.three_d_format.extrusion_color.color = drawing.Color.dark_orange

    with slide.get_image(image_scale, image_scale) as thumbnail:
        thumbnail.save("gradient_3d.png")
ผลลัพธ์ที่เรนเดอร์คงการไล่สีบนหน้าหน้าและเรนเดอร์การดันออกแยกต่างหาก:
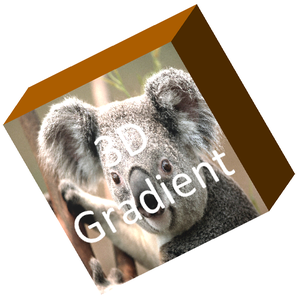
หากต้องการใช้การเติมรูปภาพแทน ให้เพิ่มรูปภาพลงในพรีเซนเตชันและกำหนดให้เป็นการเติมของรูปร่าง ตัวอย่างนี้ต้องมีไฟล์ชื่อ “image.jpg” อยู่ในไดเรกทอรีทำงาน มันยืดรูปภาพให้เต็มสี่เหลี่ยม, ทำการดันออก 150 จุด, และตั้งค่า rotation ของกล้องเป็นองศา กำหนดรูปร่างในหน่วยความจำโดยไม่บันทึกหรือเรนเดอร์ไฟล์
import aspose.pydrawing as drawing
import aspose.slides as slides

with open("image.jpg", "rb") as image_file:
    image_data = image_file.read()

with slides.Presentation() as presentation:
    slide = presentation.slides[0]

    shape = slide.shapes.add_auto_shape(slides.ShapeType.RECTANGLE, 200, 150, 250, 250)

    image = presentation.images.add_image(image_data)

    shape.fill_format.fill_type = slides.FillType.PICTURE
    shape.fill_format.picture_fill_format.picture.image = image
    shape.fill_format.picture_fill_format.picture_fill_mode = slides.PictureFillMode.STRETCH

    shape.three_d_format.camera.camera_type = slides.CameraPresetType.ORTHOGRAPHIC_FRONT
    shape.three_d_format.camera.set_rotation(10, 20, 30)
    shape.three_d_format.light_rig.light_type = slides.LightRigPresetType.FLAT
    shape.three_d_format.light_rig.direction = slides.LightingDirection.TOP
    shape.three_d_format.material = slides.MaterialPresetType.FLAT
    shape.three_d_format.extrusion_height = 150
    shape.three_d_format.extrusion_color.color = drawing.Color.dark_orange
รูปภาพจะถูกเรนเดอร์บนหน้าหน้า ในขณะที่การดันออกจะถูกเรนเดอร์เป็นพื้นผิวด้านข้าง 3 มิติ:
ปรับใช้การจัดรูปแบบ 3 มิติให้กับข้อความ
การจัดรูปแบบ 3 มิติของรูปร่างส่งผลต่อส่วนตัวของรูปร่าง ส่วนการจัดรูปแบบ 3 มิติของข้อความส่งผลต่อกรอบข้อความ ซึ่งเป็นประโยชน์สำหรับเอฟเฟกต์แบบ WordArt ที่ต้องการให้ตัวอักษรเองมีการดันออก, วัสดุ, แสง, และการตั้งค่ากล้อง
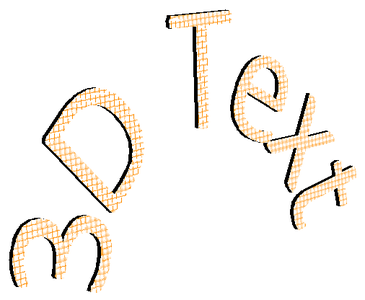
ตัวอย่างต่อไปนี้สร้างข้อความด้วยแพทเทิร์นกริดสีส้มและสีขาว, ใช้การโค้งขึ้น, และกำหนดค่า 3 มิติผ่าน TextFrameFormat.three_d_format. ความสูงการดันออกและความลึกเป็นจุด, การหมุนแสงเป็นองศา การเติมสีและขอบของรูปร่างถูกซ่อนไว้จึงเห็นเฉพาะข้อความ ตัวอย่างนี้เรนเดอร์ภาพ PNG ที่สองเท่าของขนาดสไลด์เริ่มต้นและบันทึกพรีเซนเตชันเป็น PPTX
import aspose.pydrawing as drawing
import aspose.slides as slides

image_scale = 2

with slides.Presentation() as presentation:
    slide = presentation.slides[0]

    shape = slide.shapes.add_auto_shape(slides.ShapeType.RECTANGLE, 200, 150, 250, 250)

    shape.fill_format.fill_type = slides.FillType.NO_FILL
    shape.line_format.fill_format.fill_type = slides.FillType.NO_FILL
    shape.text_frame.text = "3D Text"

    portion = shape.text_frame.paragraphs[0].portions[0]
    portion.portion_format.fill_format.fill_type = slides.FillType.PATTERN
    portion.portion_format.fill_format.pattern_format.fore_color.color = drawing.Color.dark_orange
    portion.portion_format.fill_format.pattern_format.back_color.color = drawing.Color.white
    portion.portion_format.fill_format.pattern_format.pattern_style = slides.PatternStyle.LARGE_GRID

    shape.text_frame.paragraphs[0].paragraph_format.default_portion_format.font_height = 128

    text_frame_format = shape.text_frame.text_frame_format
    text_frame_format.transform = slides.TextShapeType.ARCH_UP
    text_frame_format.three_d_format.extrusion_height = 3.5
    text_frame_format.three_d_format.depth = 3
    text_frame_format.three_d_format.material = slides.MaterialPresetType.PLASTIC
    text_frame_format.three_d_format.light_rig.direction = slides.LightingDirection.TOP
    text_frame_format.three_d_format.light_rig.light_type = slides.LightRigPresetType.BALANCED
    text_frame_format.three_d_format.light_rig.set_rotation(0, 0, 40)
    text_frame_format.three_d_format.camera.camera_type = slides.CameraPresetType.PERSPECTIVE_CONTRASTING_RIGHT_FACING

    with slide.get_image(image_scale, image_scale) as thumbnail:
        thumbnail.save("text_3d.png")

    presentation.save("text_3d.pptx", slides.export.SaveFormat.PPTX)
ข้อความถูกเรนเดอร์เป็นตัวอักษร 3 มิติที่โค้งและดันออก:
ให้ข้อความอยู่แบนบนรูปร่าง 3 มิติ
เพื่อให้ข้อความอ่านง่ายขณะรักษารูปลักษณ์ 3 มิติของรูปร่าง ให้ตั้งค่า TextFrameFormat.keep_text_flat ผ่าน TextFrame.text_frame_format. เมื่อค่าเป็น True ข้อความจะอยู่นอกฉาก 3 มิติ เมื่อเป็น False ข้อความจะเข้าร่วมในฉากและปฏิบัติตามการหมุน 3 มิติ
การตั้งค่านี้ไม่ได้ลบการจัดรูปแบบ 3 มิติของรูปร่าง: กล้อง, แสง, วัสดุ, และการดันออกยังคงตั้งผ่าน Shape.three_d_format นอกจากนี้ยังแตกต่างจากการหมุนทั่วไป Shape.rotation จะหมุนรูปร่างในระนาบสไลด์ ในขณะที่ TextFrameFormat.rotation_angle ควบคุมการหมุนที่กำหนดเองของข้อความภายในกรอบของมัน การทำให้ข้อความอยู่นอกฉาก 3 มิติไม่รีเซ็ตมุมใด ๆ เหล่านั้น
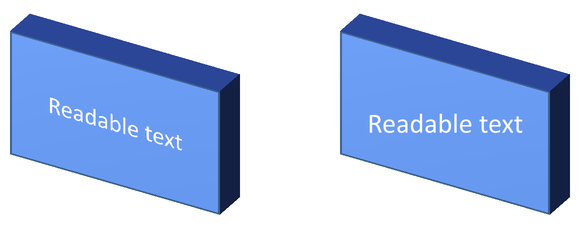
ตัวอย่างต่อไปนี้สร้างสี่เหลี่ยมสีน้ำเงินพร้อมข้อความและคัดลอกมันไปข้าง ๆ ทั้งสองรูปร่างมีการจัดรูปแบบ 3 มิติเดียวกัน; เพียงแค่การตั้งค่าข้อความต่างกัน: False ด้านซ้ายและ True ด้านขวา มุมกล้องเป็นองศา และความสูงการดันออกเป็น 40 จุด ตัวอย่างบันทึกพรีเซนเตชันเป็น PPTX และเรนเดอร์สไลด์เปรียบเทียบเป็น PNG ที่สองเท่าของขนาดเริ่มต้น
import aspose.pydrawing as drawing
import aspose.slides as slides

with slides.Presentation() as presentation:
    slide = presentation.slides[0]

    shape = slide.shapes.add_auto_shape(slides.ShapeType.RECTANGLE, 70, 160, 240, 140)

    shape.text_frame.text = "Readable text"
    shape.text_frame.paragraphs[0].paragraph_format.default_portion_format.font_height = 28
    shape.text_frame.paragraphs[0].paragraph_format.alignment = slides.TextAlignment.CENTER
    shape.text_frame.text_frame_format.anchoring_type = slides.TextAnchorType.CENTER
    shape.fill_format.fill_type = slides.FillType.SOLID
    shape.fill_format.solid_fill_color.color = drawing.Color.cornflower_blue

    shape.three_d_format.camera.camera_type = slides.CameraPresetType.ORTHOGRAPHIC_FRONT
    shape.three_d_format.camera.set_rotation(30, 30, 0)
    shape.three_d_format.light_rig.light_type = slides.LightRigPresetType.FLAT
    shape.three_d_format.light_rig.direction = slides.LightingDirection.TOP
    shape.three_d_format.material = slides.MaterialPresetType.FLAT
    shape.three_d_format.extrusion_height = 40
    shape.three_d_format.extrusion_color.color = drawing.Color.royal_blue
    shape.text_frame.text_frame_format.keep_text_flat = False

    flat_text_shape = slide.shapes.add_clone(shape, 400, 160)
    flat_text_shape.text_frame.text_frame_format.keep_text_flat = True

    presentation.save("keep_text_flat.pptx", slides.export.SaveFormat.PPTX)
    with slide.get_image(2, 2) as image:
        image.save("keep_text_flat.png")
ทางซ้ายข้อความตามการวางแนว 3 มิติ ทางขวาข้อความคงแบนและอ่านง่ายกว่า ทั้งสองสี่เหลี่ยมยังคงมีการดันออกและการวางแนว 3 มิติที่มองเห็นได้เท่าเดิม
พฤติกรรมการส่งออกและการเรนเดอร์
Aspose.Slides คงการจัดรูปแบบ 3 มิติเมื่อตรวจสอบบันทึกเป็นรูปแบบ PowerPoint เช่น PPTX ขณะเรนเดอร์หรือส่งออกเป็นรูปแบบแบบคงที่, ฉาก 3 มิติจะถูกเรนเดอร์เป็นผลลัพธ์ 2 มิติ ซึ่งเกิดขึ้นเมื่อคุณเรนเดอร์สไลด์เป็น PNG, ส่งออกเป็น PDF, ส่งออกเป็น HTML, หรือสร้างเฟรมสำหรับ การแปลงวิดีโอ
ควรจำไว้:
- ภาพและ PDF ที่ส่งออกจะไม่โต้ตอบได้ ผู้ใช้ไม่สามารถหมุนวัตถุหลังจากส่งออกได้
- รูปลักษณ์สุดท้ายขึ้นอยู่กับการผสมผสานของกล้อง, light rig, material, extrusion, fill, และการปรับขนาดสไลด์
- หากต้องการตรวจสอบค่าการจัดรูปแบบที่สืบทอดหรือมาจากธีม ให้อ่าน effective shape properties
- รูปแบบผลลัพธ์บางอย่างไม่สามารถจัดเก็บการจัดรูปแบบ 3 มิติที่แก้ไขได้ ในรูปแบบเหล่านั้น ผลลัพธ์จะเป็นการเรนเดอร์ภาพแทนการเก็บเป็นการตั้งค่า 3 มิติที่แก้ไขได้
คำถามที่พบบ่อย
Aspose.Slides สามารถสร้างพรีเซนเทชัน 3 มิติแบบโต้ตอบได้หรือไม่?
Aspose.Slides สร้างและเรนเดอร์เอฟเฟกต์ 3 มิติของ PowerPoint สำหรับรูปร่างและข้อความ ไม่ได้ทำให้ภาพ, PDF หรือหน้า HTML เป็นฉาก 3 มิติที่ผู้ชมสามารถหมุนได้ ใน PPTX การจัดรูปแบบ 3 มิติเกังอยู่ใน PowerPoint หากฟอร์แมตรองรับ
ความแตกต่างระหว่างโมเดล 3 มิติและเอฟเฟกต์ 3 มิติคืออะไร?
โมเดล 3 มิติคือวัตถุ 3 มิติเสริมที่แทรกเข้ามาในพรีเซนเทชัน ส่วนเอฟเฟกต์ 3 มิติคือการจัดรูปแบบที่ใช้กับรูปร่างหรือข้อความธรรมดาของ PowerPoint เช่น การหมุน, การดันออก, bevel, การจัดแสง, และวัสดุ บทความนี้อธิบายเกี่ยวกับเอฟเฟกต์ 3 มิติ
ต้องตั้งค่าอะไรบ้างเพื่อให้เห็นรูปร่าง 3 มิติ?
อย่างน้อยต้องตั้งค่า rotation ของกล้องและหนึ่งในสองค่า คือ extrusion หรือ depth ในทางปฏิบัติมักกำหนด light rig และ material ด้วย เพื่อให้หน้าตาของการเรนเดอร์มีไฮไลท์และเงาชัดเจน
สามารถใช้เอฟเฟกต์ 3 มิติได้ทั้งกับรูปร่างและข้อความหรือไม่?
ได้ ใช้ Shape.three_d_format สำหรับส่วนของรูปร่างและ TextFrameFormat.three_d_format สำหรับข้อความ
เอฟเฟกต์ 3 มิติจะปรากฏเมื่อส่งออกเป็นภาพ, PDF, HTML หรือเฟรมวิดีโอหรือไม่?
ปรากฏ Aspose.Slides เรนเดอร์เอฟเฟกต์ 3 มิติเมื่อตัวสร้างภาพสไลด์, ผลลัพธ์ PDF, ผลลัพธ์ HTML, และเฟรมที่ใช้สำหรับการแปลงวิดีโอ ผลลัพธ์ที่ส่งออกมีลักษณะการเรนเดอร์แล้ว ไม่ใช่วัตถุ 3 มิติที่แก้ไขได้
สามารถอ่านค่าตัวแปร 3 มิติสุดท้ายหลังจากการสืบทอดและการตั้งค่าธีมหรือไม่?
ได้ ใช้ API การจัดรูปแบบที่มีประสิทธิภาพตามที่อธิบายใน Shape Effective Properties เพื่ออ่านค่า camera, light rig, bevel, และค่าที่เกี่ยวข้องกับ 3 มิติที่ผ่านการสืบทอดและธีมแล้ว