
使用 Python 在簡報中建立 3D 效果
概述
Aspose.Slides for Python via .NET 能夠建立、編輯、保留並呈現 PowerPoint 風格的 3D 格式化,適用於形狀和文字。本文章說明 3D 效果,如旋轉、擠出、斜角、光照、材質、漸層或圖片填滿,以及 3D 文字。
Note
本文章討論的是 PowerPoint 形狀與文字的 3D 格式化效果,並非插入或編輯獨立的 3D 模型檔案。當您將投影片匯出為圖片、PDF 或 HTML 時,Aspose.Slides 會將這些 3D 效果轉換為匯出的 2D 輸出。3D 格式概念
使用 Shape.three_d_format 屬性為形狀套用 3D 格式。此屬性會公開 ThreeDFormat,控制該形狀的 3D 場景。
對於文字,使用 TextFrameFormat.three_d_format 屬性。此屬性會為文字框套用 3D 格式,而不是形狀本體。
最重要的屬性如下:
| 屬性 | 控制項目 | 何時使用 |
|---|---|---|
| camera | 視點、預設相機類型、旋轉、縮放與透視。 | 在 3D 空間中旋轉物件或套用 PowerPoint 的 3D 旋轉預設。 |
| light_rig | 光源預設、方向與光線旋轉。 | 調整 3D 表面上的高光與陰影外觀。 |
| material | 表面材質,例如平面、啞光、塑膠或金屬。 | 讓相同的幾何體看起來更平坦、柔和、有光澤或金屬感。 |
| extrusion_height | 形狀從正面延伸向後的距離。 | 將平面形狀變成可見的厚實 3D 物件。 |
| extrusion_color | 擠出側面的顏色。 | 使深度可見,或讓側面顏色與正面填色協調。 |
| depth | PowerPoint 3D 格式使用的額外深度。 | 微調形狀或文字的深度,特別是與斜角和材質設定一起使用時。 |
| bevel_top 以及 bevel_bottom | 正面與背面的凸起或圓角邊緣。 | 為平面邊緣加入柔和或模具式的效果。 |
| contour_color 以及 contour_width | 繞 3D 物件的輪廓線。 | 在渲染輸出中強調物件邊界。 |
建立 3D 形狀
在形狀看起來具有說服力的 3D 效果前,通常需要四種設定:
- 相機設定,因為預設的正面視圖可能會遮蔽擠出效果。
- 光源設定,因為光照使各面與側面可辨識。
- 材質設定,因為表面會影響光線的呈現方式。
- 擠出或深度設定,因為平面形狀需要厚度。
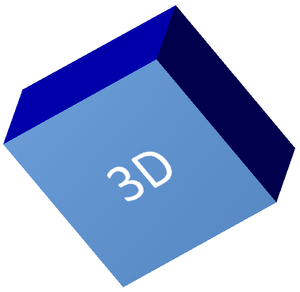
以下範例建立一個矩形,在其正面加入文字,並套用 3D 格式。相機旋轉值以度為單位,擠出高度為 100 點。範例將投影片渲染為 PNG 圖片,尺寸為預設的兩倍,並將簡報儲存為 PPTX。
import aspose.pydrawing as drawing
import aspose.slides as slides

image_scale = 2

with slides.Presentation() as presentation:
    slide = presentation.slides[0]

    shape = slide.shapes.add_auto_shape(slides.ShapeType.RECTANGLE, 200, 150, 200, 200)

    shape.text_frame.text = "3D"
    shape.text_frame.paragraphs[0].paragraph_format.default_portion_format.font_height = 64

    shape.fill_format.fill_type = slides.FillType.SOLID
    shape.fill_format.solid_fill_color.color = drawing.Color.cornflower_blue

    shape.three_d_format.camera.camera_type = slides.CameraPresetType.ORTHOGRAPHIC_FRONT
    shape.three_d_format.camera.set_rotation(20, 30, 40)
    shape.three_d_format.light_rig.light_type = slides.LightRigPresetType.FLAT
    shape.three_d_format.light_rig.direction = slides.LightingDirection.TOP
    shape.three_d_format.material = slides.MaterialPresetType.FLAT
    shape.three_d_format.extrusion_height = 100
    shape.three_d_format.extrusion_color.color = drawing.Color.blue

    with slide.get_image(image_scale, image_scale) as thumbnail:
        thumbnail.save("shape_3d.png")

    presentation.save("shape_3d.pptx", slides.export.SaveFormat.PPTX)
渲染後的投影片圖片顯示矩形為厚實的 3D 方塊:
使用相機旋轉形狀
在 PowerPoint 中,3D 旋轉是從「3‑D 旋轉」面板設定。X、Y、Z 旋轉值對應於您透過相機 API 設定的旋轉值。
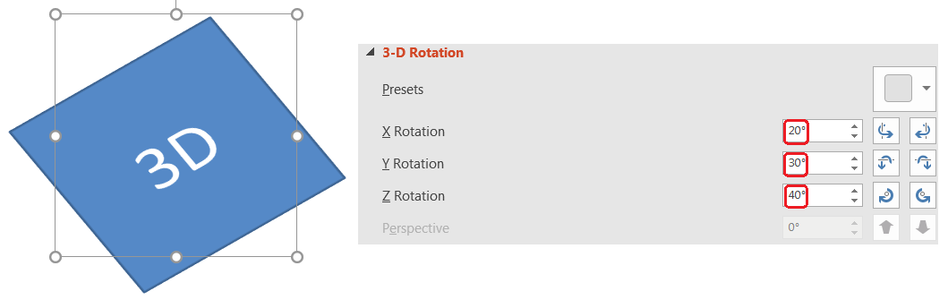
在 Aspose.Slides 中,透過 ThreeDFormat.camera 取得相機。此範例建立矩形,選擇正交前視,並將 X、Y、Z 旋轉分別設定為 20、30、40 度。它在記憶體中配置形狀,未儲存檔案:
import aspose.slides as slides

with slides.Presentation() as presentation:
    slide = presentation.slides[0]

    shape = slide.shapes.add_auto_shape(slides.ShapeType.RECTANGLE, 200, 150, 200, 200)

    shape.three_d_format.camera.camera_type = slides.CameraPresetType.ORTHOGRAPHIC_FRONT
    shape.three_d_format.camera.set_rotation(20, 30, 40)
在需要改變觀察者觀看物件方式時使用相機。它不會改變投影片上 2D 形狀的幾何形狀,只會改變 PowerPoint 與 Aspose.Slides 渲染時使用的 3D 觀點。
加入擠出與深度
擠出透過在正面之後延伸形狀,使其看起來較厚。在 PowerPoint 中,深度控制設定此可見厚度,顏色控制則設定側面的顏色。
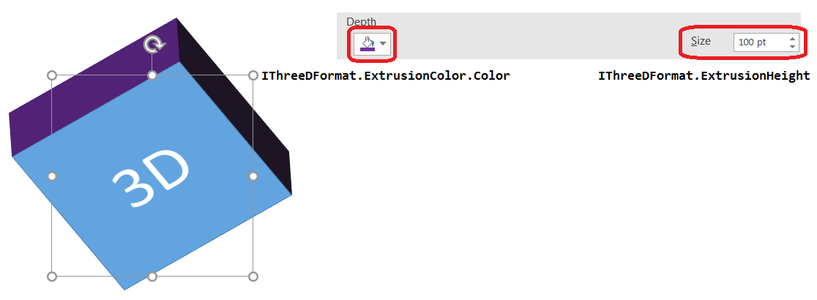
將 ThreeDFormat.extrusion_height 設為厚度,將 ThreeDFormat.extrusion_color 設為側面顏色。此範例為矩形設定 100 點的擠出,側面為紫色,並旋轉相機以顯示其厚度。它在記憶體中配置形狀,未儲存檔案:
import aspose.pydrawing as drawing
import aspose.slides as slides

with slides.Presentation() as presentation:
    slide = presentation.slides[0]

    shape = slide.shapes.add_auto_shape(slides.ShapeType.RECTANGLE, 200, 150, 200, 200)

    shape.three_d_format.camera.camera_type = slides.CameraPresetType.ORTHOGRAPHIC_FRONT
    shape.three_d_format.camera.set_rotation(20, 30, 40)
    shape.three_d_format.light_rig.light_type = slides.LightRigPresetType.FLAT
    shape.three_d_format.light_rig.direction = slides.LightingDirection.TOP
    shape.three_d_format.material = slides.MaterialPresetType.FLAT
    shape.three_d_format.extrusion_height = 100
    shape.three_d_format.extrusion_color.color = drawing.Color.purple
ThreeDFormat.depth 屬性設定 3D 形狀的深度。extrusion_height 控制擠出效果的高度,如本範例所示。
使用漸層或圖片填滿搭配 3D 效果
3D 格式與形狀填滿互不影響。您可以對正面使用實色、漸層、圖案或圖片填滿,同時使用相同的相機、光源、材質與擠出設定。
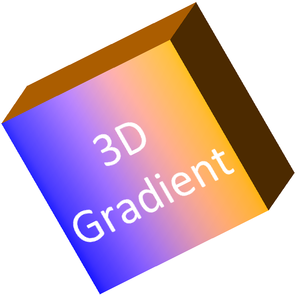
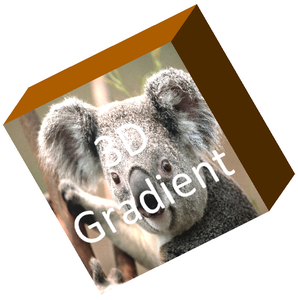
此範例將藍色至橙色的漸層套用於正面,並將深橙色套用於 150 點的擠出。漸層在 0 與 100 處為起點與終點。相機旋轉值以度為單位。投影片渲染為 PNG 圖片,尺寸為預設的兩倍:
import aspose.pydrawing as drawing
import aspose.slides as slides

image_scale = 2

with slides.Presentation() as presentation:
    slide = presentation.slides[0]

    shape = slide.shapes.add_auto_shape(slides.ShapeType.RECTANGLE, 200, 150, 250, 250)

    shape.text_frame.text = "3D Gradient"
    shape.text_frame.paragraphs[0].paragraph_format.default_portion_format.font_height = 64

    shape.fill_format.fill_type = slides.FillType.GRADIENT
    shape.fill_format.gradient_format.gradient_stops.add(0, drawing.Color.blue)
    shape.fill_format.gradient_format.gradient_stops.add(100, drawing.Color.orange)

    shape.three_d_format.camera.camera_type = slides.CameraPresetType.ORTHOGRAPHIC_FRONT
    shape.three_d_format.camera.set_rotation(10, 20, 30)
    shape.three_d_format.light_rig.light_type = slides.LightRigPresetType.FLAT
    shape.three_d_format.light_rig.direction = slides.LightingDirection.TOP
    shape.three_d_format.material = slides.MaterialPresetType.FLAT
    shape.three_d_format.extrusion_height = 150
    shape.three_d_format.extrusion_color.color = drawing.Color.dark_orange

    with slide.get_image(image_scale, image_scale) as thumbnail:
        thumbnail.save("gradient_3d.png")
渲染結果保留正面的漸層,同時分別渲染擠出側面:
若改用圖片填滿,請先將圖片加入簡報,並指派給形狀填滿。此範例假設工作目錄中有名為 image.jpg 的檔案。它將圖片伸展以填滿矩形,設定 150 點的擠出,並以度為單位設定相機旋轉。它在記憶體中配置形狀,未儲存或渲染檔案:
import aspose.pydrawing as drawing
import aspose.slides as slides

with open("image.jpg", "rb") as image_file:
    image_data = image_file.read()

with slides.Presentation() as presentation:
    slide = presentation.slides[0]

    shape = slide.shapes.add_auto_shape(slides.ShapeType.RECTANGLE, 200, 150, 250, 250)

    image = presentation.images.add_image(image_data)

    shape.fill_format.fill_type = slides.FillType.PICTURE
    shape.fill_format.picture_fill_format.picture.image = image
    shape.fill_format.picture_fill_format.picture_fill_mode = slides.PictureFillMode.STRETCH

    shape.three_d_format.camera.camera_type = slides.CameraPresetType.ORTHOGRAPHIC_FRONT
    shape.three_d_format.camera.set_rotation(10, 20, 30)
    shape.three_d_format.light_rig.light_type = slides.LightRigPresetType.FLAT
    shape.three_d_format.light_rig.direction = slides.LightingDirection.TOP
    shape.three_d_format.material = slides.MaterialPresetType.FLAT
    shape.three_d_format.extrusion_height = 150
    shape.three_d_format.extrusion_color.color = drawing.Color.dark_orange
圖片渲染於正面,擠出則以 3D 側面表面呈現:
套用 3D 格式於文字
形狀的 3D 格式影響形狀本體。文字的 3D 格式則影響文字框。這對於類似 WordArt 的效果很有用,因為字母本身需要擠出、材質、光照與相機設定。
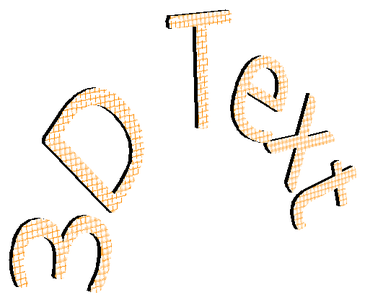
以下範例建立文字,使用橙白格線圖案,套用向上弧形,並透過 TextFrameFormat.three_d_format 設定 3D 參數。擠出高度與深度以點為單位,光線旋轉以度為單位。形狀填滿與輪廓被隱藏,只顯示文字。範例將 PNG 圖片渲染為預設投影片尺寸的兩倍,並將簡報儲存為 PPTX:
import aspose.pydrawing as drawing
import aspose.slides as slides

image_scale = 2

with slides.Presentation() as presentation:
    slide = presentation.slides[0]

    shape = slide.shapes.add_auto_shape(slides.ShapeType.RECTANGLE, 200, 150, 250, 250)

    shape.fill_format.fill_type = slides.FillType.NO_FILL
    shape.line_format.fill_format.fill_type = slides.FillType.NO_FILL
    shape.text_frame.text = "3D Text"

    portion = shape.text_frame.paragraphs[0].portions[0]
    portion.portion_format.fill_format.fill_type = slides.FillType.PATTERN
    portion.portion_format.fill_format.pattern_format.fore_color.color = drawing.Color.dark_orange
    portion.portion_format.fill_format.pattern_format.back_color.color = drawing.Color.white
    portion.portion_format.fill_format.pattern_format.pattern_style = slides.PatternStyle.LARGE_GRID

    shape.text_frame.paragraphs[0].paragraph_format.default_portion_format.font_height = 128

    text_frame_format = shape.text_frame.text_frame_format
    text_frame_format.transform = slides.TextShapeType.ARCH_UP
    text_frame_format.three_d_format.extrusion_height = 3.5
    text_frame_format.three_d_format.depth = 3
    text_frame_format.three_d_format.material = slides.MaterialPresetType.PLASTIC
    text_frame_format.three_d_format.light_rig.direction = slides.LightingDirection.TOP
    text_frame_format.three_d_format.light_rig.light_type = slides.LightRigPresetType.BALANCED
    text_frame_format.three_d_format.light_rig.set_rotation(0, 0, 40)
    text_frame_format.three_d_format.camera.camera_type = slides.CameraPresetType.PERSPECTIVE_CONTRASTING_RIGHT_FACING

    with slide.get_image(image_scale, image_scale) as thumbnail:
        thumbnail.save("text_3d.png")

    presentation.save("text_3d.pptx", slides.export.SaveFormat.PPTX)
文字以弧形、擠出的 3D 造型呈現:
在 3D 形狀上保持文字平面化
若要在保持形狀 3D 外觀的同時讓文字易於閱讀,請透過 TextFrame.text_frame_format 設定 TextFrameFormat.keep_text_flat。當值為 True 時,文字會停留在 3D 場景之外;當值為 False 時,文字會參與 3D 場景並遵循其方向。
此設定不會移除形狀的 3D 格式:其相機、光源、材質與擠出仍透過 Shape.three_d_format 設定。它也不同於一般的旋轉。Shape.rotation 會在投影片平面上旋轉形狀,而 TextFrameFormat.rotation_angle 控制文字在其邊框內的自訂旋轉。將文字保留在 3D 場景之外不會重設上述任一角度。
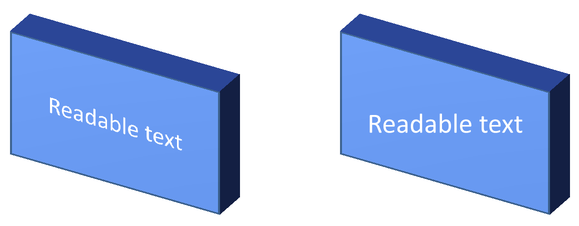
以下完整範例建立一個藍色矩形並加入文字,然後在原始矩形旁邊複製一次。兩個形狀的 3D 格式相同,唯一差異在文字設定:左側為 False,右側為 True。相機角度以度為單位,擠出高度為 40 點。範例將簡報儲存為 PPTX,並將比較投影片渲染為 PNG,尺寸為預設的兩倍。
import aspose.pydrawing as drawing
import aspose.slides as slides

with slides.Presentation() as presentation:
    slide = presentation.slides[0]

    shape = slide.shapes.add_auto_shape(slides.ShapeType.RECTANGLE, 70, 160, 240, 140)

    shape.text_frame.text = "Readable text"
    shape.text_frame.paragraphs[0].paragraph_format.default_portion_format.font_height = 28
    shape.text_frame.paragraphs[0].paragraph_format.alignment = slides.TextAlignment.CENTER
    shape.text_frame.text_frame_format.anchoring_type = slides.TextAnchorType.CENTER
    shape.fill_format.fill_type = slides.FillType.SOLID
    shape.fill_format.solid_fill_color.color = drawing.Color.cornflower_blue

    shape.three_d_format.camera.camera_type = slides.CameraPresetType.ORTHOGRAPHIC_FRONT
    shape.three_d_format.camera.set_rotation(30, 30, 0)
    shape.three_d_format.light_rig.light_type = slides.LightRigPresetType.FLAT
    shape.three_d_format.light_rig.direction = slides.LightingDirection.TOP
    shape.three_d_format.material = slides.MaterialPresetType.FLAT
    shape.three_d_format.extrusion_height = 40
    shape.three_d_format.extrusion_color.color = drawing.Color.royal_blue
    shape.text_frame.text_frame_format.keep_text_flat = False

    flat_text_shape = slide.shapes.add_clone(shape, 400, 160)
    flat_text_shape.text_frame.text_frame_format.keep_text_flat = True

    presentation.save("keep_text_flat.pptx", slides.export.SaveFormat.PPTX)
    with slide.get_image(2, 2) as image:
        image.save("keep_text_flat.png")
左側的文字遵循 3D 方向;右側的文字保持平面且較易閱讀。兩個矩形保留相同的可見擠出與 3D 方向。
匯出與渲染行為
Aspose.Slides 在儲存為 PPTX 等 PowerPoint 格式時會保留 3D 格式。當渲染或匯出為固定版面格式時,3D 場景會被光柵化或繪製為 2D 結果。這適用於將投影片渲染為 PNG、匯出為 PDF、匯出為 HTML,或產生用於 影片轉換 的框格。
請注意以下要點:
- 匯出的圖片與 PDF 並非互動式。匯出後觀者無法旋轉物件。
- 最終外觀取決於相機、光源、材質、擠出、填滿與投影片縮放的組合。
- 若需檢視繼承或主題基礎的格式值,請讀取 effective shape properties。
- 某些輸出格式無法儲存可編輯的 PowerPoint 3D 格式。在這些格式中,視覺結果會以渲染後的圖像呈現,而非保留為可編輯的 3D 設定。
FAQ
Aspose.Slides 能建立互動式 3D 簡報嗎?
Aspose.Slides 會建立並渲染 PowerPoint 形狀與文字的 3D 效果,但不會讓匯出的圖片、PDF 或 HTML 頁面成為可由觀者旋轉的互動式 3D 場景。在 PPTX 中,只要格式支援,3D 格式仍可在 PowerPoint 中編輯。
3D 模型與 3D 效果有何不同?
3D 模型是插入簡報的獨立 3D 物件。3D 效果是對一般 PowerPoint 形狀或文字套用的格式,例如旋轉、擠出、斜角、光照與材質。本文僅討論 3D 效果。
要呈現可見的 3D 形狀,必須設定哪些項目?
至少要設定相機旋轉,並且設定擠出或深度。實務上,還會設定光源與材質,以確保渲染出的面具有清晰的高光與陰影。
我可以同時對形狀與文字套用 3D 效果嗎?
可以。對形狀本體使用 Shape.three_d_format,對文字使用 TextFrameFormat.three_d_format。
匯出為圖片、PDF、HTML 或影片框格時會顯示 3D 效果嗎?
會。Aspose.Slides 在產生投影片影像、PDF、HTML 以及影片轉換用的框格時,會渲染 3D 效果。匯出的結果為已渲染的外觀,而非可編輯的 3D 物件。
我能在套用繼承與主題設定後讀取最終的 3D 值嗎?
可以。使用 Shape Effective Properties 中描述的有效格式 API,即可讀取最終的相機、光源、斜角與相關 3D 值。