
JavaScript에서 프레젠테이션 테마 관리
소개
프레젠테이션 테마는 색상, 글꼴, 배경 스타일, 채우기, 선 및 효과의 조정된 집합을 정의합니다. 테마 인식 객체는 모든 시각적 속성을 고정 값으로 저장하는 대신 이러한 공유 정의를 참조하므로 테마를 변경하면 여러 객체를 한 번에 업데이트할 수 있습니다.
Aspose.Slides에서는 프레젠테이션 수준의 테마를 Presentation.getMasterTheme을 통해 사용할 수 있습니다. 프레젠테이션에는 하위 수준에서 테마 오버라이드가 포함될 수도 있습니다. 마스터는 MasterThemeManager.getOverrideTheme을 통해 프레젠테이션 테마를 오버라이드할 수 있고, 레이아웃이나 개별 슬라이드는 BaseOverrideThemeManager.getOverrideTheme을 통해 상속된 테마를 오버라이드할 수 있습니다. 실제로 슬라이드에 적용되는 유효 테마는 다음과 같은 상속 체인을 통해 결정됩니다: 프레젠테이션 테마 → 마스터 오버라이드 → 레이아웃 오버라이드 → 슬라이드 오버라이드.
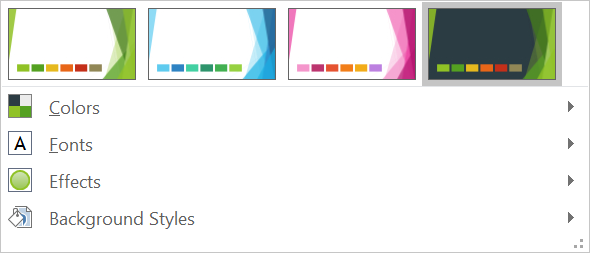
아래 섹션에서는 가장 일반적인 테마 작업 흐름을 보여 줍니다: 테마 검사, 색상 및 글꼴 변경, 테마 복사 또는 적용, 배경 및 효과 스타일 업데이트, 그리고 상속 및 오버라이드가 적용된 후의 유효 값을 읽는 방법.
테마 검사
MasterTheme 객체는 MasterTheme.getColorScheme, MasterTheme.getFontScheme, MasterTheme.getFormatScheme을 통해 테마의 색상 스키마, 글꼴 스키마 및 포맷 스키마를 노출합니다. 변경하기 전에 이러한 컬렉션을 검사하면 외부 소스에서 가져온 프레젠테이션의 경우 스타일 항목 수와 내용이 다양할 수 있기 때문에 특히 유용합니다.
다음 예제는 주요 테마 속성을 읽고 테마에 저장된 배경, 채우기, 선 및 효과 스타일의 개수를 보고합니다:
const aspose = {};
aspose.slides = require("aspose.slides.via.java");

const presentation = new aspose.slides.Presentation("input.pptx");
try {
    const theme = presentation.getMasterTheme();
    console.log("Theme name: " + theme.getName());
    console.log("Accent 1: " + theme.getColorScheme().getAccent1().getColor());
    console.log("Major Latin font: " + theme.getFontScheme().getMajor().getLatinFont().getFontName());
    console.log("Minor Latin font: " + theme.getFontScheme().getMinor().getLatinFont().getFontName());
    console.log("Background fill styles: " + theme.getFormatScheme().getBackgroundFillStyles().size());
    console.log("Fill styles: " + theme.getFormatScheme().getFillStyles().size());
    console.log("Line styles: " + theme.getFormatScheme().getLineStyles().size());
    console.log("Effect styles: " + theme.getFormatScheme().getEffectStyles().size());
} finally {
    presentation.dispose();
}
파일에 마스터가 여러 개 사용되는 경우 모든 슬라이드가 동일한 유효 테마를 갖는다고 가정하지 마세요. 슬라이드와 연결된 마스터를 검사하고, 레이아웃 또는 슬라이드 오버라이드가 존재할 수 있는 경우 아래에 소개된 유효 테마 작업 흐름을 사용하세요.
테마 색상 변경
테마 인식 채우기, 선 및 텍스트는 SchemeColor 열거형의 논리적 색상을 참조할 수 있습니다. ColorScheme에서 해당 항목을 변경하면 여전히 해당 테마 색상을 참조하는 모든 객체가 새로운 값으로 다시 해석됩니다. 직접 RGB 색상을 사용하는 객체는 테마 색상 업데이트의 영향을 받지 않습니다.
다음 엔드‑투‑엔드 예제는 Accent4를 사용하는 도형을 만들고, 테마의 Accent4 색상을 빨간색으로 변경한 뒤 프레젠테이션을 저장하고 다시 열어 유효 채우기 색상을 출력합니다:
const aspose = {};
aspose.slides = require("aspose.slides.via.java");
const java = require("java");

const presentation = new aspose.slides.Presentation();
try {
    const slide = presentation.getSlides().get_Item(0);
    const shape = slide.getShapes().addAutoShape(aspose.slides.ShapeType.Rectangle, 10, 10, 100, 100);
    shape.getFillFormat().setFillType(java.newByte(aspose.slides.FillType.Solid));
    shape.getFillFormat().getSolidFillColor().setSchemeColor(aspose.slides.SchemeColor.Accent4);
    presentation.getMasterTheme().getColorScheme().getAccent4().setColor(java.getStaticFieldValue("java.awt.Color", "RED"));
    presentation.save("theme-color.pptx", aspose.slides.SaveFormat.Pptx);
} finally {
    presentation.dispose();
}

const savedPresentation = new aspose.slides.Presentation("theme-color.pptx");
try {
    const savedSlide = savedPresentation.getSlides().get_Item(0);
    const savedShape = savedSlide.getShapes().get_Item(0);
    const effectiveFill = savedShape.getFillFormat().getEffective();
    console.log("Effective fill color: " + effectiveFill.getSolidFillColor());
} finally {
    savedPresentation.dispose();
}
사각형이 Accent4에 계속 연결되어 있기 때문에 테마가 변경된 후 표시 색상이 빨간색이 됩니다. 도형에 직접 색상을 지정하면 이후 Accent4 변경이 해당 채우기에 영향을 주지 않습니다.
추가 팔레트 색상 사용
PowerPoint는 테마 색상에 색상 변환을 적용하여 밝고 어두운 변형을 파생합니다. Aspose.Slides는 이러한 변환을 ColorTransformOperation 열거형을 통해 제공한다.
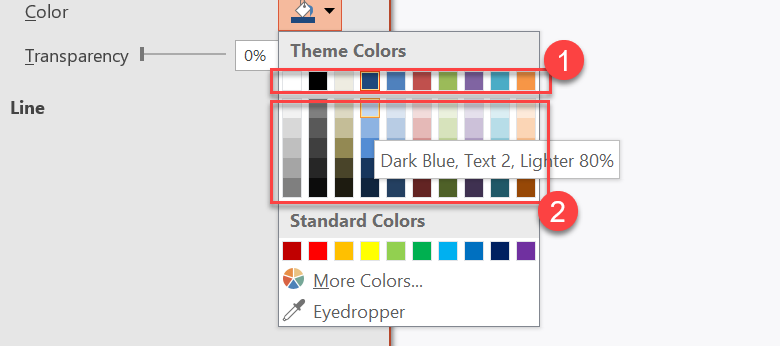
1 – 주요 테마 색상.
2 – 주요 테마 색상으로부터 생성된 밝고 어두운 변형.
다음 예제는 Accent4를 기반으로 여섯 개의 사각형을 만들고, 그 중 다섯 개에 밝기 변환을 적용한 뒤 결과를 저장합니다:
const aspose = {};
aspose.slides = require("aspose.slides.via.java");
const java = require("java");

const presentation = new aspose.slides.Presentation();
try {
    const slide = presentation.getSlides().get_Item(0);

    const shape1 = slide.getShapes().addAutoShape(aspose.slides.ShapeType.Rectangle, 10, 10, 50, 50);
    shape1.getFillFormat().setFillType(java.newByte(aspose.slides.FillType.Solid));
    shape1.getFillFormat().getSolidFillColor().setSchemeColor(aspose.slides.SchemeColor.Accent4);

    const shape2 = slide.getShapes().addAutoShape(aspose.slides.ShapeType.Rectangle, 10, 70, 50, 50);
    shape2.getFillFormat().setFillType(java.newByte(aspose.slides.FillType.Solid));
    shape2.getFillFormat().getSolidFillColor().setSchemeColor(aspose.slides.SchemeColor.Accent4);
    shape2.getFillFormat().getSolidFillColor().getColorTransform().add(aspose.slides.ColorTransformOperation.MultiplyLuminance, java.newFloat(0.2));
    shape2.getFillFormat().getSolidFillColor().getColorTransform().add(aspose.slides.ColorTransformOperation.AddLuminance, java.newFloat(0.8));

    const shape3 = slide.getShapes().addAutoShape(aspose.slides.ShapeType.Rectangle, 10, 130, 50, 50);
    shape3.getFillFormat().setFillType(java.newByte(aspose.slides.FillType.Solid));
    shape3.getFillFormat().getSolidFillColor().setSchemeColor(aspose.slides.SchemeColor.Accent4);
    shape3.getFillFormat().getSolidFillColor().getColorTransform().add(aspose.slides.ColorTransformOperation.MultiplyLuminance, java.newFloat(0.4));
    shape3.getFillFormat().getSolidFillColor().getColorTransform().add(aspose.slides.ColorTransformOperation.AddLuminance, java.newFloat(0.6));

    const shape4 = slide.getShapes().addAutoShape(aspose.slides.ShapeType.Rectangle, 10, 190, 50, 50);
    shape4.getFillFormat().setFillType(java.newByte(aspose.slides.FillType.Solid));
    shape4.getFillFormat().getSolidFillColor().setSchemeColor(aspose.slides.SchemeColor.Accent4);
    shape4.getFillFormat().getSolidFillColor().getColorTransform().add(aspose.slides.ColorTransformOperation.MultiplyLuminance, java.newFloat(0.6));
    shape4.getFillFormat().getSolidFillColor().getColorTransform().add(aspose.slides.ColorTransformOperation.AddLuminance, java.newFloat(0.4));

    const shape5 = slide.getShapes().addAutoShape(aspose.slides.ShapeType.Rectangle, 10, 250, 50, 50);
    shape5.getFillFormat().setFillType(java.newByte(aspose.slides.FillType.Solid));
    shape5.getFillFormat().getSolidFillColor().setSchemeColor(aspose.slides.SchemeColor.Accent4);
    shape5.getFillFormat().getSolidFillColor().getColorTransform().add(aspose.slides.ColorTransformOperation.MultiplyLuminance, java.newFloat(0.75));

    const shape6 = slide.getShapes().addAutoShape(aspose.slides.ShapeType.Rectangle, 10, 310, 50, 50);
    shape6.getFillFormat().setFillType(java.newByte(aspose.slides.FillType.Solid));
    shape6.getFillFormat().getSolidFillColor().setSchemeColor(aspose.slides.SchemeColor.Accent4);
    shape6.getFillFormat().getSolidFillColor().getColorTransform().add(aspose.slides.ColorTransformOperation.MultiplyLuminance, java.newFloat(0.5));

    presentation.save("theme-color-palette.pptx", aspose.slides.SaveFormat.Pptx);
} finally {
    presentation.dispose();
}
이 변형은 여전히 테마 색상을 기반으로 합니다. 이후 Accent4가 변경되면 변환된 색상이 새로운 Accent4 값으로 다시 계산됩니다.
SchemeColor 값을 ColorScheme 슬롯에 매핑
SchemeColor 열거형은 Text1, Background1, Text2, Background2를 사용하고, ColorScheme은 동일한 테마 슬롯을 Dark1, Light1, Dark2, Light2로 노출합니다. 매핑은 고정됩니다:
Text1=Dark1Background1=Light1Text2=Dark2Background2=Light2
이는 동일한 테마 슬롯에 대한 다른 이름일 뿐이며, 한 형태에서 다른 형태로 동적으로 변환되는 값은 아닙니다.
테마 글꼴 변경
테마 글꼴 스키마는 제목용 주요 글꼴 세트와 본문용 보조 글꼴 세트를 포함합니다. FontScheme.getMajor와 FontScheme.getMinor 메서드를 통해 각각의 세트를 확인할 수 있습니다.
PowerPoint 호환 테마 글꼴 식별자는 텍스트 서식에 사용할 수 있습니다:
+mn‑lt– 본문 글꼴 라틴어 (Minor Latin Font)+mj‑lt– 제목 글꼴 라틴어 (Major Latin Font)+mn‑ea– 본문 글꼴 동아시아 (Minor East Asian Font)+mj‑ea– 제목 글꼴 동아시아 (Major East Asian Font)
다음 예제는 주요 라틴 테마 글꼴을 사용하는 제목 하나와 보조 라틴 테마 글꼴을 사용하는 본문 라인 하나를 만든 뒤, 테마 글꼴을 변경하고 결과를 저장합니다:
const aspose = {};
aspose.slides = require("aspose.slides.via.java");

const presentation = new aspose.slides.Presentation();
try {
    const slide = presentation.getSlides().get_Item(0);

    const heading = slide.getShapes().addAutoShape(aspose.slides.ShapeType.Rectangle, 40, 40, 500, 60);
    heading.getTextFrame().setText("Theme heading");
    heading.getTextFrame().getParagraphs().get_Item(0).getPortions().get_Item(0).getPortionFormat().setLatinFont(new aspose.slides.FontData("+mj-lt"));

    const body = slide.getShapes().addAutoShape(aspose.slides.ShapeType.Rectangle, 40, 120, 500, 60);
    body.getTextFrame().setText("Theme body text");
    body.getTextFrame().getParagraphs().get_Item(0).getPortions().get_Item(0).getPortionFormat().setLatinFont(new aspose.slides.FontData("+mn-lt"));

    presentation.getMasterTheme().getFontScheme().getMajor().setLatinFont(new aspose.slides.FontData("Aptos Display"));
    presentation.getMasterTheme().getFontScheme().getMinor().setLatinFont(new aspose.slides.FontData("Arial"));
    presentation.save("theme-fonts.pptx", aspose.slides.SaveFormat.Pptx);
} finally {
    presentation.dispose();
}
제목은 주요 글꼴을 따르고 본문 텍스트는 보조 글꼴을 따릅니다. 테마 식별자가 아닌 명시적 글꼴 이름이 지정된 텍스트는 테마 글꼴 스키마가 변경되어도 자동으로 전환되지 않습니다.
주요 및 보조 글꼴 컬렉션에는 키릴 문자, 아라비아 문자, 일본어, 조지아 문자, 타나 문자 등 개별 쓰기 시스템에 대한 매핑도 포함될 수 있습니다. 이러한 매핑을 검사·추가·교체·제거하려면 Script‑Specific Theme Fonts를 참조하세요.
Tip
프레젠테이션 글꼴에 대한 자세한 내용은 PowerPoint Fonts를 확인하세요.테마 복사 또는 적용
아래 작업 흐름은 서로 다른 테마 관련 문제를 해결합니다.
외부 테마를 마스터에 종속된 슬라이드에 적용
PowerPoint 테마 파일(.thmx)이 있고 해당 마스터에 의존하는 모든 슬라이드를 다시 스타일링하려면 MasterSlide.applyExternalThemeToDependingSlides를 사용합니다. Presentation.getMasters 컬렉션(=> MasterSlideCollection)에서 마스터를 선택하고 메서드에 테마 파일 경로를 전달합니다.
메서드는 다음 작업을 수행합니다:
- 선택한 마스터를 기반으로 새 마스터 슬라이드를 생성합니다.
- 외부 테마를 새 마스터에 적용합니다.
- 이전에 선택한 마스터에 의존하던 모든 슬라이드에 새 마스터를 할당합니다.
- 새로 생성된 MasterSlide를 반환합니다.
다음 예제는 첫 번째 마스터에 종속된 슬라이드에 외부 테마를 적용하고 프레젠테이션을 저장합니다:
const aspose = {};
aspose.slides = require("aspose.slides.via.java");

const presentation = new aspose.slides.Presentation("presentation.pptx");
try {
    const selectedMaster = presentation.getMasters().get_Item(0);
    const themedMaster = selectedMaster.applyExternalThemeToDependingSlides("corporate-theme.thmx");

    console.log("Created master: " + themedMaster.getName());
    presentation.save("presentation-with-external-theme.pptx", aspose.slides.SaveFormat.Pptx);
} finally {
    presentation.dispose();
}
잘못되었거나 손상되었거나 지원되지 않는 테마는 PptxReadException을 발생시킬 수 있습니다. 사용자가 제공한 경로를 검증하고 파일 시스템 접근 오류를 처리하며 테마가 성공적으로 적용된 뒤에만 프레젠테이션을 저장하세요.
선택한 마스터에만 의존했던 슬라이드가 재할당됩니다. 다른 마스터에 연결된 슬라이드는 기존 마스터와 테마를 유지합니다. 테마 인식 색상, 글꼴, 채우기, 선, 배경 및 효과는 외부 테마를 기준으로 재해석됩니다. 직접 지정된 색상·글꼴·채우기·기타 서식은 변경되지 않을 수 있습니다. 레이아웃‑레벨 및 슬라이드‑레벨 오버라이드가 새 마스터에서 상속된 값보다 우선할 수도 있습니다.
테마가 런타임 환경에 없는 글꼴을 참조할 수 있습니다. 일관된 렌더링 및 내보내기를 위해 필요한 글꼴을 설치하거나 custom font sources를 통해 제공하거나 font substitution을 구성하세요.
이 작업 흐름은 마스터‑레벨 전용이며, 메서드는 .thmx 파일 경로만 받아 슬라이드‑레벨이나 레이아웃‑레벨 테마 오버라이드를 수동으로 만들 필요가 없습니다.
다중 마스터 프레젠테이션에서 서로 다른 외부 테마 적용
대상 마스터를 미리 알 수 없을 때는 Slide.getLayoutSlide와 LayoutSlide.getMasterSlide를 통해 대표 슬라이드에서 마스터를 얻습니다. 테마를 적용하기 전에 원본 마스터 참조를 저장하세요. 각 호출마다 프레젠테이션에 새 마스터가 생성됩니다.
다음 예제는 두 섹션의 슬라이드를 사용해 각 마스터를 찾고, 각각 다른 외부 테마를 적용합니다:
const aspose = {};
aspose.slides = require("aspose.slides.via.java");

const presentation = new aspose.slides.Presentation("multi-master-presentation.pptx");
try {
    if (presentation.getSlides().size() < 5) {
        console.log("The presentation does not contain the expected representative slides.");
    } else {
        const firstGroupMaster = presentation.getSlides().get_Item(0).getLayoutSlide().getMasterSlide();
        const secondGroupMaster = presentation.getSlides().get_Item(4).getLayoutSlide().getMasterSlide();

        if (firstGroupMaster.getSlideId() === secondGroupMaster.getSlideId()) {
            console.log("The representative slides use the same master.");
        } else {
            const firstThemedMaster = firstGroupMaster.applyExternalThemeToDependingSlides("blue-theme.thmx");
            const secondThemedMaster = secondGroupMaster.applyExternalThemeToDependingSlides("green-theme.thmx");

            console.log("First themed master: " + firstThemedMaster.getName());
            console.log("Second themed master: " + secondThemedMaster.getName());
            presentation.save("multi-master-with-external-themes.pptx", aspose.slides.SaveFormat.Pptx);
        }
    }
} finally {
    presentation.dispose();
}
첫 번째 호출은 firstGroupMaster에 의존하는 슬라이드만, 두 번째 호출은 secondGroupMaster에 의존하는 슬라이드만 영향을 줍니다. 다른 마스터에 속한 슬라이드는 재스타일링되지 않습니다.
슬라이드 이동 시 원본 테마 보존
슬라이드를 다른 프레젠테이션으로 이동하면서 원본 디자인을 유지하려면 MasterSlideCollection.addClone로 원본 마스터를 대상 프레젠테이션에 복제한 뒤, SlideCollection.addClone와 복제된 마스터를 사용해 슬라이드를 복제합니다. 이렇게 하면 마스터, 레이아웃 및 연관된 테마가 함께 복사됩니다.
const aspose = {};
aspose.slides = require("aspose.slides.via.java");

const source = new aspose.slides.Presentation("source-theme.pptx");
try {
    const target = new aspose.slides.Presentation("target.pptx");
    try {
        const sourceSlide = source.getSlides().get_Item(0);
        const clonedMaster = target.getMasters().addClone(sourceSlide.getLayoutSlide().getMasterSlide());
        target.getSlides().addClone(sourceSlide, clonedMaster, true);
        target.save("theme-preserved.pptx", aspose.slides.SaveFormat.Pptx);
    } finally {
        target.dispose();
    }
} finally {
    source.dispose();
}
대상 프레젠테이션에 슬라이드가 동일한 디자인으로 보이게 해야 할 때 권장되는 작업 흐름입니다. 무관한 대상 마스터에 콘텐츠만 복제하면 테마 기반 색상·글꼴·배경·효과가 변경될 수 있습니다.
기존 슬라이드에 테마 값 적용
대상 슬라이드가 현재 마스터와 레이아웃을 유지해야 할 경우, 소스 테마를 기반으로 슬라이드‑레벨 오버라이드를 초기화합니다. OverrideTheme.initColorSchemeFrom, OverrideTheme.initFontSchemeFrom, OverrideTheme.initFormatSchemeFrom 메서드는 세 가지 주요 테마 구성 요소를 오버라이드에 복사합니다.
const aspose = {};
aspose.slides = require("aspose.slides.via.java");

const source = new aspose.slides.Presentation("source-theme.pptx");
try {
    const target = new aspose.slides.Presentation("target.pptx");
    try {
        const sourceTheme = source.getMasterTheme();
        const targetSlide = target.getSlides().get_Item(0);
        const overrideTheme = targetSlide.getThemeManager().getOverrideTheme();
        overrideTheme.initColorSchemeFrom(sourceTheme.getColorScheme());
        overrideTheme.initFontSchemeFrom(sourceTheme.getFontScheme());
        overrideTheme.initFormatSchemeFrom(sourceTheme.getFormatScheme());
        target.save("theme-applied-to-slide.pptx", aspose.slides.SaveFormat.Pptx);
    } finally {
        target.dispose();
    }
} finally {
    source.dispose();
}
이렇게 하면 다른 슬라이드가 상속하는 테마는 바꾸지 않고 해당 슬라이드만 사용되는 테마가 바뀝니다. 로컬 오버라이드를 제거하고 상속값으로 되돌리려면 OverrideTheme.clear를 호출하세요.
레이아웃에 테마 오버라이드 적용
레이아웃‑레벨 오버라이드는 해당 레이아웃을 사용하는 슬라이드에 적용되며, 개별 슬라이드에 자체 오버라이드가 있지 않은 경우에만 적용됩니다. 동일한 초기화 메서드를 LayoutSlideThemeManager를 통해 사용할 수 있습니다:
const aspose = {};
aspose.slides = require("aspose.slides.via.java");

const source = new aspose.slides.Presentation("source-theme.pptx");
try {
    const target = new aspose.slides.Presentation("target.pptx");
    try {
        const sourceTheme = source.getMasterTheme();
        const targetSlide = target.getSlides().get_Item(0);
        const overrideTheme = targetSlide.getLayoutSlide().getThemeManager().getOverrideTheme();
        overrideTheme.initColorSchemeFrom(sourceTheme.getColorScheme());
        overrideTheme.initFontSchemeFrom(sourceTheme.getFontScheme());
        overrideTheme.initFormatSchemeFrom(sourceTheme.getFormatScheme());
        target.save("theme-applied-to-layout.pptx", aspose.slides.SaveFormat.Pptx);
    } finally {
        target.dispose();
    }
} finally {
    source.dispose();
}
많은 레이아웃과 슬라이드가 동일한 기본 디자인을 공유해야 하면 마스터 또는 프레젠테이션 수준 테마를, 하나의 레이아웃 패밀리가 다른 스타일링이 필요하면 레이아웃 오버라이드, 진짜 예외 상황만 슬라이드 오버라이드를 사용하세요. 과도한 슬라이드‑레벨 오버라이드는 이후 전역 테마 변경을 예측하기 어렵게 만듭니다.
테마 배경 스타일 업데이트
테마의 배경 채우기는 FormatScheme.getBackgroundFillStyles에 저장됩니다. PowerPoint UI에서는 실제 컬렉션에 저장된 채우기 정의 수보다 더 많은 배경 옵션을 보여줄 수 있는데, 이는 UI가 테마 채우기와 테마 색상 및 기타 스타일 참조를 조합할 수 있기 때문입니다.
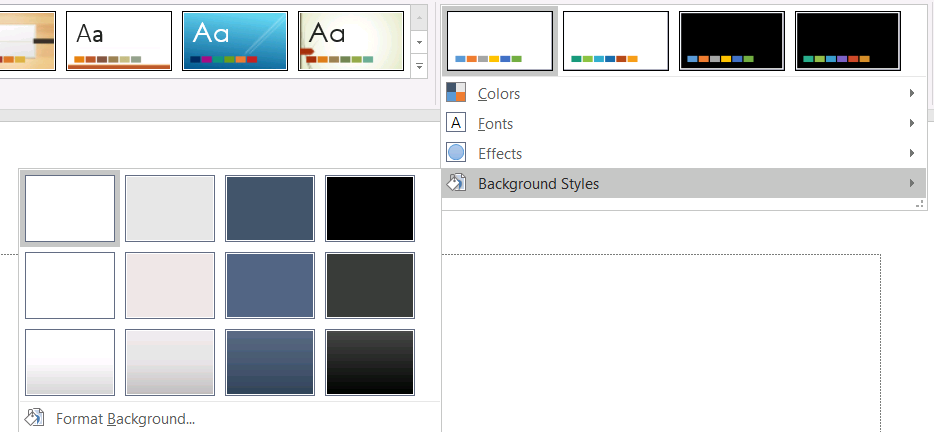
배경 스타일을 사용하기 전에 저장된 컬렉션과 현재 Background.getStyleIndex를 확인하세요. 인덱스 0은 테마 채우기가 없음을 의미하고, 양수 값은 테마 배경‑스타일 참조를 나타냅니다. 이는 JavaScript 컬렉션을 직접 인덱싱할 때 0이 첫 번째 항목을 의미하는 경우와 다릅니다. 모든 프레젠테이션에 동일한 배경 채우기 스타일 수가 있다고 가정하지 마세요.
다음 예제는 사용 가능한 배경 채우기 개수를 보고하고, 첫 번째 마스터에 테마 배경 참조를 할당한 뒤 프레젠테이션을 저장합니다:
const aspose = {};
aspose.slides = require("aspose.slides.via.java");
const java = require("java");

const presentation = new aspose.slides.Presentation("input.pptx");
try {
    const backgroundStyles = presentation.getMasterTheme().getFormatScheme().getBackgroundFillStyles();
    console.log("Background fill styles: " + backgroundStyles.size());
    if (backgroundStyles.size() === 0) {
        throw new Error("The presentation theme does not contain background fill styles.");
    }

    const masterSlide = presentation.getMasters().get_Item(0);
    masterSlide.getBackground().setType(java.newByte(aspose.slides.BackgroundType.Themed));
    masterSlide.getBackground().setStyleIndex(1);
    presentation.save("theme-background.pptx", aspose.slides.SaveFormat.Pptx);
} finally {
    presentation.dispose();
}
보이는 결과는 마스터가 참조하는 테마 항목과 레이아웃·슬라이드 레벨에서의 배경 오버라이드 여부에 따라 달라집니다. 슬라이드가 자체 배경을 사용하고 있다면 마스터 배경만 바꾸어도 해당 슬라이드에는 영향을 주지 않을 수 있습니다. 최종 상속된 배경을 확인하려면 Background.getEffective을 사용하세요.
Warning
스타일 인덱스를 0부터 시작하는 컬렉션 인덱스로 취급하지 마세요. 또한 한 파일에서 사용한 스타일 번호를 다른 파일에 그대로 적용한다고 가정하지 마십시오; 테마 스타일 정의는 프레젠테이션마다 다릅니다.Tip
직접적인 배경 서식 및 배경 상속에 대해서는 Presentation Background를 참고하세요.테마 효과 업데이트
테마 포맷 스키마는 FormatScheme.getFillStyles, FormatScheme.getLineStyles, FormatScheme.getEffectStyles를 통해 각각 채우기, 선, 효과 스타일 컬렉션을 노출합니다. 일반적인 Office 테마는 미묘, 보통, 강렬이라는 시각적 구분을 위해 세 개의 주요 스타일 항목을 포함하지만, 코드는 고정된 개수를 가정하지 말고 각 컬렉션을 검사해야 합니다.
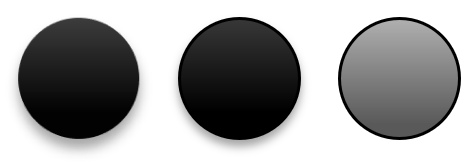
JavaScript에서 이러한 컬렉션에 접근할 때는 인덱스가 0부터 시작합니다: 인덱스 0은 첫 번째 저장된 스타일, 인덱스 2는 세 번째 스타일을 의미합니다. 도형의 스타일‑참조 인덱스는 별개의 개념이며, ShapeStyle을 통해 노출됩니다. 테마 스타일을 수정하면 해당 테마 스타일을 참조하는 도형에 영향을 주며, 직접 서식이 적용된 도형은 변하지 않을 수 있습니다.
다음 예제는 필요한 스타일 항목이 존재하는지 확인하고, 첫 번째 선 스타일을, 세 번째 채우기 스타일을, 세 번째 효과 스타일에 외부 그림자를 추가한 뒤 결과를 저장합니다:
const aspose = {};
aspose.slides = require("aspose.slides.via.java");
const java = require("java");

const presentation = new aspose.slides.Presentation("Subtle_Moderate_Intense.pptx");
try {
    const formatScheme = presentation.getMasterTheme().getFormatScheme();
    if (formatScheme.getLineStyles().size() < 1 || formatScheme.getFillStyles().size() < 3 || formatScheme.getEffectStyles().size() < 3) {
        throw new Error("The theme does not contain the style entries required by this example.");
    }

    formatScheme.getLineStyles().get_Item(0).getFillFormat().setFillType(java.newByte(aspose.slides.FillType.Solid));
    formatScheme.getLineStyles().get_Item(0).getFillFormat().getSolidFillColor().setColor(java.getStaticFieldValue("java.awt.Color", "RED"));
    formatScheme.getFillStyles().get_Item(2).setFillType(java.newByte(aspose.slides.FillType.Solid));
    formatScheme.getFillStyles().get_Item(2).getSolidFillColor().setColor(java.newInstanceSync("java.awt.Color", 34, 139, 34));
    const effectFormat = formatScheme.getEffectStyles().get_Item(2).getEffectFormat();
    effectFormat.enableOuterShadowEffect();
    effectFormat.getOuterShadowEffect().setDistance(10);
    presentation.save("theme-effects.pptx", aspose.slides.SaveFormat.Pptx);
} finally {
    presentation.dispose();
}
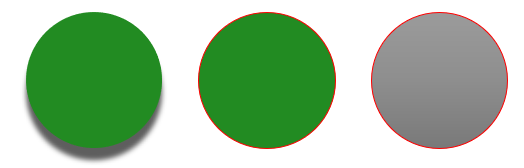
이 슬롯을 참조하는 도형의 경우 첫 번째 테마 선 스타일이 빨간색이 되고, 세 번째 테마 채우기 스타일이 짙은 숲색(단색)으로 바뀌며, 세 번째 효과 스타일은 거리 10포인트의 외부 그림자를 갖게 됩니다. 정확한 시각적 결과는 각 도형이 어떤 슬롯을 참조하고 있는지, 그리고 직접 서식이 테마를 오버라이드하는지에 따라 달라집니다.
유효 단색 채우기가 테마 색상을 사용하는지 판단
채우기는 객체에 직접 저장될 수도 있고, 단락, 레이아웃, 마스터, 테마 스타일 또는 다른 서식 레벨에서 상속될 수도 있습니다. FillFormat.getEffective을 호출해 계층 구조를 불변의 유효‑채우기 스냅샷으로 해석합니다. 먼저 getFillType 값을 확인하세요. FillType.Solid인 경우에만 단색 채우기 속성을 읽어야 합니다.
단색 채우기의 경우 getSolidFillColor는 상속·테마 조회·색상 변환이 적용된 후 최종 렌더링된 RGB 값을 반환합니다. getSolidFillSchemeColor 메서드는 해당 논리적 SchemeColor 슬롯(예: Text1, Accent6)을 반환합니다. SchemeColor.NotDefined는 유효 단색 채우기가 스킴 색상을 기반으로 하지 않음을 의미합니다. 테마 색상 또는 직접 RGB 색상만 사용하는 워크플로에서는 이 값을 통해 직접 RGB 채우기를 식별할 수 있습니다.
로컬 ColorFormat.getSchemeColor 값만으로 채우기를 분류하지 마세요. 예를 들어 텍스트 일부는 로컬에 스킴 색상이 정의되지 않아 NotDefined가 되지만, 유효 채우기는 테마 색상을 상속받아 Text1이나 Accent6이 될 수 있습니다. 반대로 getSolidFillSchemeColor는 어떤 논리적 테마 슬롯이 최종 색상을 만든 것인지 알려 주지만, 그 슬롯이 객체, 단락, 레이아웃, 마스터 등 어느 레벨에서 왔는지는 알려 주지 않습니다.
다음 예제는 프레젠테이션을 로드하고, 도형 채우기와 텍스트 부분 채우기를 모두 감사하며, 각 최종 RGB값과 연관된 스킴 색상을 출력하고, 테마 색상 변화를 추적하지 않는 단색 채우기를 표시합니다:
const aspose = {};
aspose.slides = require("aspose.slides.via.java");
const java = require("java");

function toHexColor(color) {
    const red = color.getRed().toString(16).padStart(2, "0");
    const green = color.getGreen().toString(16).padStart(2, "0");
    const blue = color.getBlue().toString(16).padStart(2, "0");
    return `#${red}${green}${blue}`.toUpperCase();
}

function auditFill(objectName, localFill) {
    const effectiveFill = localFill.getEffective();

    if (effectiveFill.getFillType() !== aspose.slides.FillType.Solid) {
        console.log(objectName + ": fill type = " + effectiveFill.getFillType() + "; not a solid fill.");
        return;
    }

    const rgb = effectiveFill.getSolidFillColor();
    const effectiveSchemeColor = effectiveFill.getSolidFillSchemeColor();
    const localSchemeColor = localFill.getSolidFillColor().getSchemeColor();

    console.log(objectName + ": RGB = " + toHexColor(rgb));
    console.log(objectName + ": local scheme = " + localSchemeColor + ", effective scheme = " + effectiveSchemeColor);

    if (effectiveSchemeColor === aspose.slides.SchemeColor.NotDefined) {
        console.log(objectName + ": direct RGB or another non-scheme fill; audit as theme-independent.");
    } else {
        console.log(objectName + ": theme-dependent through " + effectiveSchemeColor + ".");
    }
}

const presentation = new aspose.slides.Presentation("input.pptx");
try {
    const slideCount = presentation.getSlides().size();
    for (let slideIndex = 0; slideIndex < slideCount; slideIndex++) {
        const slide = presentation.getSlides().get_Item(slideIndex);

        const shapeCount = slide.getShapes().size();
        for (let shapeIndex = 0; shapeIndex < shapeCount; shapeIndex++) {
            const shape = slide.getShapes().get_Item(shapeIndex);
            const shapeName = "Slide " + (slideIndex + 1) + ", shape " + (shapeIndex + 1);
            auditFill(shapeName, shape.getFillFormat());

            if (java.instanceOf(shape, "com.aspose.slides.IAutoShape")) {
                const paragraphCount = shape.getTextFrame().getParagraphs().getCount();
                for (let paragraphIndex = 0; paragraphIndex < paragraphCount; paragraphIndex++) {
                    const paragraph = shape.getTextFrame().getParagraphs().get_Item(paragraphIndex);

                    const portionCount = paragraph.getPortions().getCount();
                    for (let portionIndex = 0; portionIndex < portionCount; portionIndex++) {
                        const portion = paragraph.getPortions().get_Item(portionIndex);
                        const portionName = shapeName + ", paragraph " + (paragraphIndex + 1) + ", portion " + (portionIndex + 1);
                        auditFill(portionName, portion.getPortionFormat().getFillFormat());
                    }
                }
            }
        }
    }
} finally {
    presentation.dispose();
}
NotDefined 분기는 테마 색상 슬롯 변화에 반응하지 않는 단색 채우기 목록을 제공합니다. 새 브랜드 팔레트를 적용해야 할 때 해당 객체들을 검토하세요. 보고된 RGB 값은 현재 모습을 보여 주고, 스킴 값은 그 모습이 테마와 연결되어 있는지 여부를 설명합니다.
유효‑포맷 객체는 스냅샷입니다. 프레젠테이션 테마, 테마 오버라이드 또는 상속된 서식을 변경한 뒤에는 getEffective을 다시 호출하고 새로운 유효‑채우기 객체를 읽은 뒤 색상을 비교하거나 보고하세요.
유효 테마 값 읽기
원시 테마 객체는 특정 레벨에 정의된 내용을 알려 주지만, 유효 값은 상속 및 로컬 오버라이드가 적용된 뒤 슬라이드나 도형이 실제로 사용하는 값을 알려 줍니다. 슬라이드의 경우 BaseOverrideThemeManager.createThemeEffective를 호출합니다. 배경은 Background.getEffective를, 채우기는 FillFormat.getEffective를 사용합니다.
다음 예제는 슬라이드에서 유효 테마, 배경 및 첫 번째 도형 채우기를 읽습니다:
const aspose = {};
aspose.slides = require("aspose.slides.via.java");

const presentation = new aspose.slides.Presentation("input.pptx");
try {
    const slide = presentation.getSlides().get_Item(0);
    const effectiveTheme = slide.getThemeManager().createThemeEffective();
    const effectiveBackground = slide.getBackground().getEffective();
    console.log("Effective major Latin font: " + effectiveTheme.getFontScheme().getMajor().getLatinFont().getFontName());
    console.log("Effective minor Latin font: " + effectiveTheme.getFontScheme().getMinor().getLatinFont().getFontName());
    console.log("Effective background fill type: " + effectiveBackground.getFillFormat().getFillType());
    if (slide.getShapes().size() > 0) {
        const effectiveFill = slide.getShapes().get_Item(0).getFillFormat().getEffective();
        console.log("First shape effective fill type: " + effectiveFill.getFillType());
        if (effectiveFill.getFillType() === aspose.slides.FillType.Solid) {
            console.log("First shape effective fill color: " + effectiveFill.getSolidFillColor());
        }
    }
} finally {
    presentation.dispose();
}
렌더링 진단, 검증 및 비교를 위해 유효 데이터를 사용하세요. Presentation.getMasterTheme만 검사하면 마스터·레이아웃·슬라이드·도형 오버라이드가 최종 모습을 바꾸는 경우를 놓칠 수 있습니다.
FAQ
외부 테마를 적용하면 프레젠테이션의 모든 슬라이드가 영향을 받나요?
아니요. MasterSlide.applyExternalThemeToDependingSlides는 선택한 마스터에 의존하는 슬라이드만 재할당합니다. 다른 마스터를 사용하는 슬라이드는 기존 테마를 유지합니다.
마스터를 바꾸지 않고 단일 슬라이드에만 테마를 적용할 수 있나요?
예. 슬라이드의 SlideThemeManager를 사용해 오버라이드 테마를 초기화하면 됩니다. 변경 사항은 해당 슬라이드에만 적용되고, 다른 슬라이드는 기존 테마를 계속 상속합니다.
한 프레젠테이션에서 다른 프레젠테이션으로 테마를 옮기는 가장 안전한 방법은?
슬라이드를 이동하면서 원본 모습을 보존하려면 MasterSlideCollection.addClone으로 원본 마스터를 대상에 복제하고, 이어서 SlideCollection.addClone와 해당 마스터를 사용해 슬라이드를 복제하세요. 이렇게 하면 마스터, 레이아웃 및 테마가 함께 유지됩니다.
상속 및 오버라이드 후의 유효 값을 어떻게 확인하나요?
슬라이드 또는 레이아웃 테마의 경우 BaseOverrideThemeManager.createThemeEffective를, 포맷 객체(예: Background.getEffective, FillFormat.getEffective)의 경우 해당 유효‑데이터 메서드를 사용하세요. 이 API들은 상속 및 오버라이드가 적용된 최종 값을 반환합니다.