Add Watermarks to Presentations in .NET
Introduction
A watermark in a presentation is a text or image stamp used on a slide or throughout all presentation slides. Usually, a watermark is used to indicate that the presentation is a draft (e.g., a “Draft” watermark), that it contains confidential information (e.g., a “Confidential” watermark), to specify which company it belongs to (e.g., a “Company Name” watermark), to identify the presentation author, etc. A watermark helps to prevent copyright violations by indicating that the presentation should not be copied. Watermarks are used in both PowerPoint and OpenDocument presentation formats. In Aspose.Slides, you can add a watermark to PowerPoint PPT, PPTX, and OpenDocument ODP file formats.
In Aspose.Slides, there are various ways you can create watermarks in PowerPoint or OpenDocument documents and modify their design and behavior. The common aspect is that to add text watermarks, you should use the ITextFrame interface, and to add image watermarks, use the PictureFrame class or fill a watermark shape with an image. PictureFrame implements the IShape interface, allowing you to use all the flexible settings of the shape object. Since ITextFrame is not a shape and its settings are limited, it is wrapped into an IShape object.
There are two ways a watermark can be applied: to a single slide or to all presentation slides. The Slide Master is used to apply a watermark to all presentation slides — the watermark is added to the Slide Master, fully designed there, and applied to all slides without affecting the permission to modify the watermark on individual slides.
A watermark is usually considered to be unavailable for editing by other users. To prevent the watermark (or rather the watermark’s parent shape) from being edited, Aspose.Slides provides shape locking functionality. A specific shape can be locked on a normal slide or on a Slide Master. When the watermark shape is locked on the Slide Master, it will be locked on all presentation slides.
You can set a name for the watermark so that in the future, if you want to delete it, you can find it in the slide’s shapes by name.
You can design the watermark in any way; however, there are usually common features in watermarks, such as center alignment, rotation, front position, etc. We will consider how to use these in the examples below.
Text Watermark
Add a Text Watermark to a Slide
To add a text watermark in PPT, PPTX, or ODP, you can first add a shape to the slide, then add a text frame to this shape. The text frame is represented by the ITextFrame interface. This type is not inherited from IShape, which has a wide set of properties for positioning the watermark in a flexible way. Therefore, the ITextFrame object is wrapped in an IAutoShape object. To add watermark text to the shape, use the AddTextFrame method as shown below.
string watermarkText = "CONFIDENTIAL";

using Presentation presentation = new Presentation();
ISlide slide = presentation.Slides[0];

// Add the watermark to the slide.
IAutoShape watermarkShape = slide.Shapes.AddAutoShape(ShapeType.Rectangle, 100, 100, 400, 40);
ITextFrame watermarkFrame = watermarkShape.AddTextFrame(watermarkText);
See also
Add a Text Watermark to a Presentation
If you want to add a text watermark to the entire presentation (i.e., all slides at once), add it to the MasterSlide. The rest of the logic is the same as when adding a watermark to a single slide — create an IAutoShape object and then add the watermark to it using the AddTextFrame method.
string watermarkText = "CONFIDENTIAL";

using Presentation presentation = new Presentation();
IMasterSlide masterSlide = presentation.Masters[0];

// Add the watermark to the master slide.
IAutoShape watermarkShape = masterSlide.Shapes.AddAutoShape(ShapeType.Rectangle, 100, 100, 400, 40);
ITextFrame watermarkFrame = watermarkShape.AddTextFrame(watermarkText);
See also
Set Watermark Shape Transparency
By default, the rectangle shape is styled with fill and line colors. This means that when the watermark is added, it may appear with a solid background or border that can potentially distract from the slide’s content. To ensure that the watermark remains subtle and does not interfere with the presentation’s visual design, you can make the shape completely transparent.
The following lines of code make the shape transparent by removing both its fill and border colors:
watermarkShape.FillFormat.FillType = FillType.NoFill;
watermarkShape.LineFormat.FillFormat.FillType = FillType.NoFill;
Set the Font for a Text Watermark
Before applying the text watermark to your slide, it’s important to customize its appearance so that it harmonizes with the overall design. You can change the font type and size to ensure that the watermark is both legible and aesthetically pleasing. Customizing the font can also help in reinforcing brand identity or simply matching the presentation style.
The code snippet below demonstrates how to adjust the watermark’s font settings by selecting a specific Latin font and setting an appropriate font height:
IPortionFormat textFormat = watermarkFrame.Paragraphs[0].ParagraphFormat.DefaultPortionFormat;
textFormat.LatinFont = new FontData("Arial");
textFormat.FontHeight = 50;
Set the Watermark Text Color
Before applying your watermark, it’s essential to ensure that the text color is set appropriately so that it blends well with your slide content without overwhelming it. Adjusting the color transparency (alpha) along with the red, green, and blue components allows you to create a subtle, semi-transparent watermark that is visible yet unobtrusive. This approach helps maintain focus on your main presentation while still protecting your content.
To set the color of the watermark text, use the following code:
int alpha = 150, red = 200, green = 200, blue = 200;

IFillFormat fillFormat = watermarkFrame.Paragraphs[0].ParagraphFormat.DefaultPortionFormat.FillFormat;
fillFormat.FillType = FillType.Solid;
fillFormat.SolidFillColor.Color = Color.FromArgb(alpha, red, green, blue);
Center a Text Watermark
Properly centering your text watermark can significantly enhance the overall aesthetics of your presentation by ensuring that the watermark is symmetrically positioned, regardless of the slide dimensions. This approach not only gives your slides a professional look but also ensures that the watermark does not interfere with the main content of the slide.
The code snippet below demonstrates how to calculate the center position of a slide and place the text watermark accordingly:
SizeF slideSize = presentation.SlideSize.Size;

float watermarkWidth = 400;
float watermarkHeight = 40;
float watermarkX = (slideSize.Width - watermarkWidth) / 2;
float watermarkY = (slideSize.Height - watermarkHeight) / 2;

IAutoShape watermarkShape = slide.Shapes.AddAutoShape(
    ShapeType.Rectangle, watermarkX, watermarkY, watermarkWidth, watermarkHeight);

ITextFrame watermarkFrame = watermarkShape.AddTextFrame(watermarkText);
The image below shows the final result.
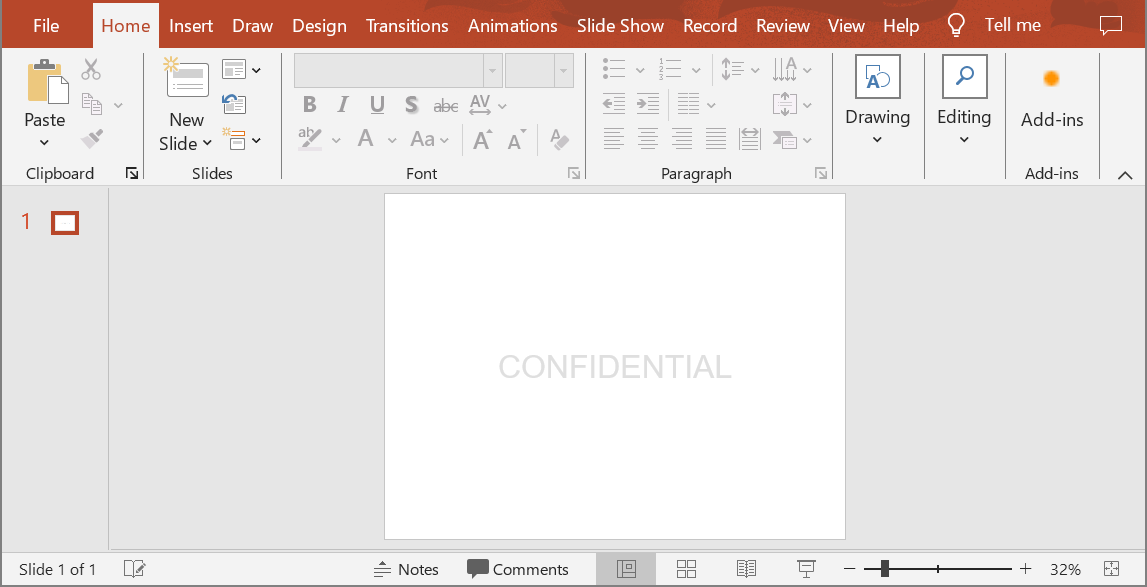
Image Watermark
Add an Image Watermark to a Presentation
In many cases, an image watermark can provide a unique branding element or a more visually appealing alternative to a text watermark. Before adding the watermark, make sure that the image file is readily available (e.g., PNG for transparency). The following example demonstrates how to load an image from your file system, add it to the presentation, and then apply it as a watermark using the shape’s fill properties.
using FileStream imageStream = File.OpenRead("watermark.png");
IPPImage image = presentation.Images.AddImage(imageStream);

watermarkShape.FillFormat.FillType = FillType.Picture;
watermarkShape.FillFormat.PictureFillFormat.Picture.Image = image;
watermarkShape.FillFormat.PictureFillFormat.PictureFillMode = PictureFillMode.Stretch;
Lock a Watermark from Editing
If it is necessary to prevent a watermark from being edited, use the IAutoShape.ShapeLock property on the shape. With this property, you can protect the shape from being selected, resized, repositioned, grouped with other elements, lock its text from editing, and much more:
// Lock the watermark shape from modifying.
watermarkShape.ShapeLock.SelectLocked = true;
watermarkShape.ShapeLock.SizeLocked = true;
watermarkShape.ShapeLock.TextLocked = true;
watermarkShape.ShapeLock.PositionLocked = true;
watermarkShape.ShapeLock.GroupingLocked = true;
Bring a Watermark to Front
In Aspose.Slides, the Z-order of shapes can be set via the IShapeCollection.Reorder method. To do this, you need to call this method from the presentation slides list and pass the shape reference and its order number into the method. This way, it is possible to bring a shape to the front or send it to the back of the slide. This feature is especially useful if you need to place a watermark in front of the presentation:
int shapeCount = slide.Shapes.Count;
slide.Shapes.Reorder(shapeCount - 1, watermarkShape);
Set Watermark Rotation
Adjusting the rotation of your watermark can significantly enhance the visual impact and subtlety of your presentation. A diagonal watermark, for example, can be less intrusive while still providing robust protection against unauthorized use. The following example calculates the appropriate angle based on the slide’s dimensions so that the watermark is positioned diagonally across the slide. This dynamic calculation ensures the watermark remains effective regardless of varying slide sizes.
double diagonalAngle = Math.Atan((slideSize.Height / slideSize.Width)) * 180 / Math.PI;

watermarkShape.Rotation = (float)diagonalAngle;
Set a Name for a Watermark
Aspose.Slides allows you to set the name of a shape. By using the shape name, you can access it in the future to modify or delete it. To set the name of the watermark shape, assign it to the IAutoShape.Name property:
watermarkShape.Name = "watermark";
Remove a Watermark
To remove the watermark shape, use the IAutoShape.Name property to find it in the slide shapes. Then, pass the watermark shape into the IShapeCollection.Remove method:
List<IShape> slideShapes = slide.Shapes.ToList();
foreach (IShape shape in slideShapes)
{
    if (string.Compare(shape.Name, "watermark", StringComparison.Ordinal) == 0)
    {
        slide.Shapes.Remove(watermarkShape);
    }
}
A Live Example
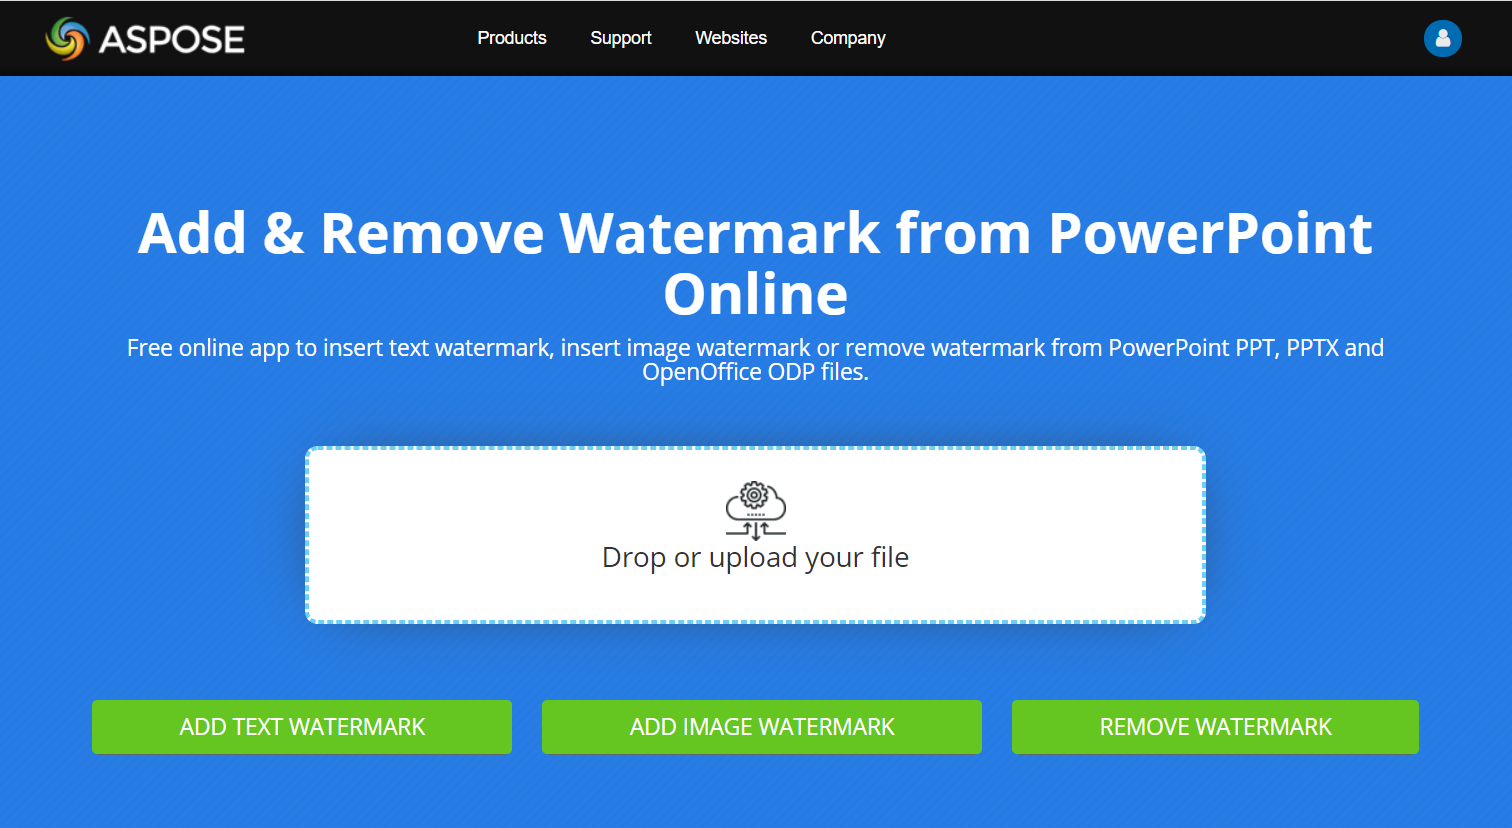
You may want to check out the Aspose.Slides free Add Watermark and Remove Watermark online tools.
FAQ
What is a watermark and why should I use it?
A watermark is a text or image overlay applied to slides that helps protect intellectual property, enhance brand recognition, or prevent unauthorized use of presentations.
Can I add a watermark to all slides in a presentation?
Yes, Aspose.Slides allows you to programmatically add a watermark to every slide in a presentation. You can iterate through all the slides and apply the watermark settings individually.
How can I adjust the transparency of the watermark?
You can adjust the transparency of the watermark by modifying the fill settings (FillFormat) of the shape. This ensures that the watermark is subtle and does not distract from the slide content.
What image formats are supported for watermarks?
Aspose.Slides supports various image formats such as PNG, JPEG, GIF, BMP, SVG, and more.
Can I customize the font and style of a text watermark?
Yes, you can choose any font, size, and style to match the design of your presentation and maintain brand consistency.
How do I change the position or orientation of a watermark?
You can adjust the position and orientation of the watermark programmatically by modifying the shape’s coordinates, size, and rotation properties.