
Manage PowerPoint Text Paragraphs in Python
Overview
Aspose.Slides for Python via .NET represents text as a hierarchy of text frames, paragraphs, and portions:
- TextFrame represents the text container in a shape and provides access to its paragraph collection.
- Paragraph represents one paragraph in a text frame and provides access to its portions and paragraph-level formatting.
- Portion represents a text run within a paragraph. Each portion can have its own text and character-level formatting.
A paragraph can therefore contain text with different fonts, colors, sizes, and other formatting by using multiple portions.
Create and Format Paragraphs
Create Paragraphs with Multiple Portions
The following steps create a text frame with three paragraphs, each containing three portions:
- Create an instance of the Presentation class.
- Access the relevant slide through its index.
- Add a rectangular AutoShape to the slide.
- Access the shape’s TextFrame.
- Use the default paragraph and add two more Paragraph objects to the text frame.
- Add enough Portion objects for each paragraph to contain three portions. The default paragraph already contains one empty portion.
- Set the text of each portion.
- Apply character-level formatting through Portion.portion_format.
- Save the modified presentation.
This Python example implements the steps:
import aspose.pydrawing as draw
import aspose.slides as slides

with slides.Presentation() as presentation:
    slide = presentation.slides[0]
    shape = slide.shapes.add_auto_shape(slides.ShapeType.RECTANGLE, 50, 150, 300, 150)
    text_frame = shape.text_frame

    first_paragraph = text_frame.paragraphs[0]
    first_paragraph.portions.add(slides.Portion())
    first_paragraph.portions.add(slides.Portion())

    second_paragraph = slides.Paragraph()
    second_paragraph.portions.add(slides.Portion())
    second_paragraph.portions.add(slides.Portion())
    second_paragraph.portions.add(slides.Portion())
    text_frame.paragraphs.add(second_paragraph)

    third_paragraph = slides.Paragraph()
    third_paragraph.portions.add(slides.Portion())
    third_paragraph.portions.add(slides.Portion())
    third_paragraph.portions.add(slides.Portion())
    text_frame.paragraphs.add(third_paragraph)

    for paragraph_index in range(text_frame.paragraphs.count):
        paragraph = text_frame.paragraphs[paragraph_index]
        for portion_index in range(paragraph.portions.count):
            portion = paragraph.portions[portion_index]
            portion.text = f"Portion {paragraph_index + 1}.{portion_index + 1}"

            if portion_index == 0:
                portion.portion_format.fill_format.fill_type = slides.FillType.SOLID
                portion.portion_format.fill_format.solid_fill_color.color = draw.Color.red
                portion.portion_format.font_bold = slides.NullableBool.TRUE
                portion.portion_format.font_height = 15
            elif portion_index == 1:
                portion.portion_format.fill_format.fill_type = slides.FillType.SOLID
                portion.portion_format.fill_format.solid_fill_color.color = draw.Color.blue
                portion.portion_format.font_italic = slides.NullableBool.TRUE
                portion.portion_format.font_height = 18

    presentation.save("paragraphs_with_portions.pptx", slides.export.SaveFormat.PPTX)
Create Bulleted and Numbered Lists
Create a Bulleted or Numbered List
Bullets and numbering make related items easier to scan. In Aspose.Slides, list settings are defined through BulletFormat.
- Create an instance of the Presentation class.
- Access the relevant slide through its index.
- Add an AutoShape to the selected slide.
- Access the shape’s TextFrame.
- Remove the default paragraph from the text frame.
- Create a Paragraph for a symbol bullet.
- Set BulletFormat.type to BulletType.SYMBOL and specify the bullet character.
- Set the paragraph text, indent, bullet color, and bullet height.
- Add the paragraph to the text frame.
- Create a second paragraph and set BulletFormat.type to BulletType.NUMBERED.
- Configure the numbered bullet style and add the paragraph to the text frame.
- Save the presentation.
This Python example creates a symbol bullet and a numbered bullet:
import aspose.pydrawing as draw
import aspose.slides as slides

with slides.Presentation() as presentation:
    slide = presentation.slides[0]
    shape = slide.shapes.add_auto_shape(slides.ShapeType.RECTANGLE, 200, 200, 400, 200)
    text_frame = shape.text_frame
    text_frame.paragraphs.clear()

    symbol_paragraph = slides.Paragraph()
    symbol_paragraph.text = "Welcome to Aspose.Slides"
    symbol_paragraph.paragraph_format.bullet.type = slides.BulletType.SYMBOL
    symbol_paragraph.paragraph_format.bullet.char = chr(0x2022)
    symbol_paragraph.paragraph_format.indent = 25
    symbol_paragraph.paragraph_format.bullet.color.color_type = slides.ColorType.RGB
    symbol_paragraph.paragraph_format.bullet.color.color = draw.Color.black
    symbol_paragraph.paragraph_format.bullet.is_bullet_hard_color = slides.NullableBool.TRUE
    symbol_paragraph.paragraph_format.bullet.height = 100
    text_frame.paragraphs.add(symbol_paragraph)

    numbered_paragraph = slides.Paragraph()
    numbered_paragraph.text = "This is a numbered item"
    numbered_paragraph.paragraph_format.bullet.type = slides.BulletType.NUMBERED
    numbered_paragraph.paragraph_format.bullet.numbered_bullet_style = slides.NumberedBulletStyle.BULLET_CIRCLE_NUM_WD_BLACK_PLAIN
    numbered_paragraph.paragraph_format.indent = 25
    numbered_paragraph.paragraph_format.bullet.color.color_type = slides.ColorType.RGB
    numbered_paragraph.paragraph_format.bullet.color.color = draw.Color.black
    numbered_paragraph.paragraph_format.bullet.is_bullet_hard_color = slides.NullableBool.TRUE
    numbered_paragraph.paragraph_format.bullet.height = 100
    text_frame.paragraphs.add(numbered_paragraph)

    presentation.save("bulleted_and_numbered_list.pptx", slides.export.SaveFormat.PPTX)
Use Picture Bullets
Picture bullets let you use a custom image instead of a symbol or number.
- Create an instance of the Presentation class.
- Access the relevant slide through its index.
- Add an AutoShape and access its TextFrame.
- Remove the default paragraph from the text frame.
- Load the bullet image and add it to the presentation’s image collection as a PPImage.
- Create a Paragraph and set its text.
- Set BulletFormat.type to BulletType.PICTURE.
- Assign the image through BulletFormat.picture and set the bullet height.
- Add the paragraph to the text frame.
- Save the modified presentation.
This Python example creates a picture bullet:
import aspose.slides as slides

with slides.Presentation() as presentation:
    slide = presentation.slides[0]

    with slides.Images.from_file("bullets.png") as bullet_image:
        presentation_image = presentation.images.add_image(bullet_image)

    shape = slide.shapes.add_auto_shape(slides.ShapeType.RECTANGLE, 200, 200, 400, 200)
    text_frame = shape.text_frame
    text_frame.paragraphs.clear()

    paragraph = slides.Paragraph()
    paragraph.text = "Welcome to Aspose.Slides"
    paragraph.paragraph_format.bullet.type = slides.BulletType.PICTURE
    paragraph.paragraph_format.bullet.picture.image = presentation_image
    paragraph.paragraph_format.bullet.height = 100
    text_frame.paragraphs.add(paragraph)

    presentation.save("picture_bullet.pptx", slides.export.SaveFormat.PPTX)
    presentation.save("picture_bullet.ppt", slides.export.SaveFormat.PPT)
Create a Multilevel List
Set ParagraphFormat.depth to place paragraphs at different levels of a list. The top level has a depth of 0.
- Create a Presentation and access a slide.
- Add an AutoShape and clear the default paragraph from its text frame.
- Create four paragraphs and configure their bullet symbols.
- Set their ParagraphFormat.depth values to
0,1,2, and3. - Add the paragraphs to the text frame and save the presentation.
This Python example creates a four-level bulleted list:
import aspose.pydrawing as draw
import aspose.slides as slides

with slides.Presentation() as presentation:
    slide = presentation.slides[0]
    shape = slide.shapes.add_auto_shape(slides.ShapeType.RECTANGLE, 200, 200, 400, 200)
    text_frame = shape.text_frame
    text_frame.paragraphs.clear()

    first_paragraph = slides.Paragraph()
    first_paragraph.text = "Content"
    first_paragraph.paragraph_format.bullet.type = slides.BulletType.SYMBOL
    first_paragraph.paragraph_format.bullet.char = chr(0x2022)
    first_paragraph.paragraph_format.default_portion_format.fill_format.fill_type = slides.FillType.SOLID
    first_paragraph.paragraph_format.default_portion_format.fill_format.solid_fill_color.color = draw.Color.black
    first_paragraph.paragraph_format.depth = 0

    second_paragraph = slides.Paragraph()
    second_paragraph.text = "Second level"
    second_paragraph.paragraph_format.bullet.type = slides.BulletType.SYMBOL
    second_paragraph.paragraph_format.bullet.char = "-"
    second_paragraph.paragraph_format.default_portion_format.fill_format.fill_type = slides.FillType.SOLID
    second_paragraph.paragraph_format.default_portion_format.fill_format.solid_fill_color.color = draw.Color.black
    second_paragraph.paragraph_format.depth = 1

    third_paragraph = slides.Paragraph()
    third_paragraph.text = "Third level"
    third_paragraph.paragraph_format.bullet.type = slides.BulletType.SYMBOL
    third_paragraph.paragraph_format.bullet.char = chr(0x2022)
    third_paragraph.paragraph_format.default_portion_format.fill_format.fill_type = slides.FillType.SOLID
    third_paragraph.paragraph_format.default_portion_format.fill_format.solid_fill_color.color = draw.Color.black
    third_paragraph.paragraph_format.depth = 2

    fourth_paragraph = slides.Paragraph()
    fourth_paragraph.text = "Fourth level"
    fourth_paragraph.paragraph_format.bullet.type = slides.BulletType.SYMBOL
    fourth_paragraph.paragraph_format.bullet.char = "-"
    fourth_paragraph.paragraph_format.default_portion_format.fill_format.fill_type = slides.FillType.SOLID
    fourth_paragraph.paragraph_format.default_portion_format.fill_format.solid_fill_color.color = draw.Color.black
    fourth_paragraph.paragraph_format.depth = 3

    text_frame.paragraphs.add(first_paragraph)
    text_frame.paragraphs.add(second_paragraph)
    text_frame.paragraphs.add(third_paragraph)
    text_frame.paragraphs.add(fourth_paragraph)

    presentation.save("multilevel_list.pptx", slides.export.SaveFormat.PPTX)
Start Numbered List Items at Custom Values
Use BulletFormat.numbered_bullet_start_with to set the initial number displayed for a numbered paragraph.
- Create a Presentation and add an AutoShape to a slide.
- Clear the default paragraph from the shape’s text frame.
- Create three numbered paragraphs.
- Set BulletFormat.numbered_bullet_start_with to
2,3, and7for the respective paragraphs. - Add the paragraphs to the text frame and save the presentation.
This Python example assigns a custom starting number to each paragraph:
import aspose.slides as slides

with slides.Presentation() as presentation:
    slide = presentation.slides[0]
    shape = slide.shapes.add_auto_shape(slides.ShapeType.RECTANGLE, 200, 200, 400, 200)
    text_frame = shape.text_frame
    text_frame.paragraphs.clear()

    first_paragraph = slides.Paragraph()
    first_paragraph.text = "Start at 2"
    first_paragraph.paragraph_format.bullet.type = slides.BulletType.NUMBERED
    first_paragraph.paragraph_format.bullet.numbered_bullet_start_with = 2
    text_frame.paragraphs.add(first_paragraph)

    second_paragraph = slides.Paragraph()
    second_paragraph.text = "Start at 3"
    second_paragraph.paragraph_format.bullet.type = slides.BulletType.NUMBERED
    second_paragraph.paragraph_format.bullet.numbered_bullet_start_with = 3
    text_frame.paragraphs.add(second_paragraph)

    third_paragraph = slides.Paragraph()
    third_paragraph.text = "Start at 7"
    third_paragraph.paragraph_format.bullet.type = slides.BulletType.NUMBERED
    third_paragraph.paragraph_format.bullet.numbered_bullet_start_with = 7
    text_frame.paragraphs.add(third_paragraph)

    presentation.save("custom_numbered_list.pptx", slides.export.SaveFormat.PPTX)
Control Paragraph Layout and End Properties
Set a First-Line Indent
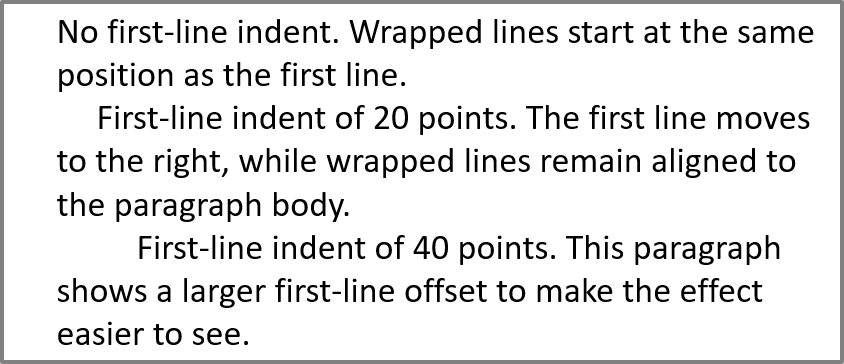
Use the ParagraphFormat.indent property to control the first-line indent of a paragraph. This property moves only the first line relative to the paragraph’s left margin. A positive value shifts the first line to the right, while the remaining lines stay aligned to the paragraph body.
Use ParagraphFormat.margin_left when you need to move the whole paragraph. Use ParagraphFormat.indent when you need to move only the first line.
The example below creates several paragraphs and applies different ParagraphFormat.indent values to demonstrate how the first-line indent affects paragraph layout.
- Create an instance of the Presentation class.
- Access the target slide.
- Add a rectangular AutoShape to the slide.
- Access the shape’s TextFrame and remove the default paragraph.
- Create several paragraphs and set different ParagraphFormat.indent values for them.
- Add the paragraphs to the text frame.
- Save the modified presentation.
This code shows you how to set a paragraph indent:
import aspose.pydrawing as draw
import aspose.slides as slides

with slides.Presentation() as presentation:
    slide = presentation.slides[0]
    shape = slide.shapes.add_auto_shape(slides.ShapeType.RECTANGLE, 50, 50, 420, 220)
    shape.fill_format.fill_type = slides.FillType.NO_FILL
    shape.line_format.fill_format.fill_type = slides.FillType.SOLID
    shape.line_format.fill_format.solid_fill_color.color = draw.Color.gray

    text_frame = shape.text_frame
    text_frame.text_frame_format.autofit_type = slides.TextAutofitType.SHAPE
    text_frame.paragraphs.clear()

    first_paragraph = slides.Paragraph()
    first_paragraph.text = "No first-line indent. Wrapped lines start at the same position as the first line."
    first_paragraph.paragraph_format.default_portion_format.fill_format.fill_type = slides.FillType.SOLID
    first_paragraph.paragraph_format.default_portion_format.fill_format.solid_fill_color.color = draw.Color.black
    first_paragraph.paragraph_format.margin_left = 20
    first_paragraph.paragraph_format.indent = 0

    second_paragraph = slides.Paragraph()
    second_paragraph.text = "First-line indent of 20 points. The first line moves to the right, while wrapped lines remain aligned to the paragraph body."
    second_paragraph.paragraph_format.default_portion_format.fill_format.fill_type = slides.FillType.SOLID
    second_paragraph.paragraph_format.default_portion_format.fill_format.solid_fill_color.color = draw.Color.black
    second_paragraph.paragraph_format.margin_left = 20
    second_paragraph.paragraph_format.indent = 20

    third_paragraph = slides.Paragraph()
    third_paragraph.text = "First-line indent of 40 points. This paragraph shows a larger first-line offset to make the effect easier to see."
    third_paragraph.paragraph_format.default_portion_format.fill_format.fill_type = slides.FillType.SOLID
    third_paragraph.paragraph_format.default_portion_format.fill_format.solid_fill_color.color = draw.Color.black
    third_paragraph.paragraph_format.margin_left = 20
    third_paragraph.paragraph_format.indent = 40

    text_frame.paragraphs.add(first_paragraph)
    text_frame.paragraphs.add(second_paragraph)
    text_frame.paragraphs.add(third_paragraph)

    presentation.save("paragraph_indent.pptx", slides.export.SaveFormat.PPTX)
The result:
Set a Hanging Indent
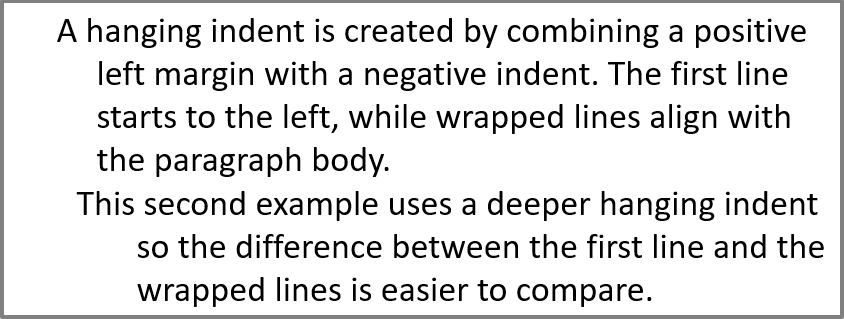
A hanging indent is a paragraph layout in which the first line starts to the left of the remaining lines. In Aspose.Slides, you create this effect with the ParagraphFormat.indent property. Set indent to a negative value to move the first line to the left relative to the paragraph body.
In practice, ParagraphFormat.margin_left defines the left position of the paragraph body, and ParagraphFormat.indent defines the position of the first line relative to that margin. To create a hanging indent, set a positive margin_left value and a negative indent value.
This formatting is useful for bibliographies, references, glossary entries, and other paragraphs where wrapped lines must align under the paragraph body rather than under the first character of the first line.
- Create an instance of the Presentation class.
- Access the target slide.
- Add a rectangular AutoShape to the slide.
- Access the shape’s TextFrame and remove the default paragraph.
- Create paragraphs and set a positive ParagraphFormat.margin_left value for each paragraph.
- Set a negative ParagraphFormat.indent value to create the hanging indent effect.
- Add the paragraphs to the text frame.
- Save the modified presentation.
This code shows you how to set a hanging indent for a paragraph:
import aspose.pydrawing as draw
import aspose.slides as slides

with slides.Presentation() as presentation:
    slide = presentation.slides[0]
    shape = slide.shapes.add_auto_shape(slides.ShapeType.RECTANGLE, 50, 50, 420, 220)
    shape.fill_format.fill_type = slides.FillType.NO_FILL
    shape.line_format.fill_format.fill_type = slides.FillType.SOLID
    shape.line_format.fill_format.solid_fill_color.color = draw.Color.gray

    text_frame = shape.text_frame
    text_frame.text_frame_format.autofit_type = slides.TextAutofitType.SHAPE
    text_frame.paragraphs.clear()

    first_paragraph = slides.Paragraph()
    first_paragraph.text = "A hanging indent is created by combining a positive left margin with a negative indent. The first line starts to the left, while wrapped lines align with the paragraph body."
    first_paragraph.paragraph_format.default_portion_format.fill_format.fill_type = slides.FillType.SOLID
    first_paragraph.paragraph_format.default_portion_format.fill_format.solid_fill_color.color = draw.Color.black
    first_paragraph.paragraph_format.margin_left = 40
    first_paragraph.paragraph_format.indent = -20

    second_paragraph = slides.Paragraph()
    second_paragraph.text = "This second example uses a deeper hanging indent so the difference between the first line and the wrapped lines is easier to compare."
    second_paragraph.paragraph_format.default_portion_format.fill_format.fill_type = slides.FillType.SOLID
    second_paragraph.paragraph_format.default_portion_format.fill_format.solid_fill_color.color = draw.Color.black
    second_paragraph.paragraph_format.margin_left = 60
    second_paragraph.paragraph_format.indent = -30

    text_frame.paragraphs.add(first_paragraph)
    text_frame.paragraphs.add(second_paragraph)

    presentation.save("hanging_indent.pptx", slides.export.SaveFormat.PPTX)
The result:
Set End Paragraph Run Properties
The Paragraph.end_paragraph_portion_format property controls the formatting of the paragraph end mark. The following example assigns a font size and Latin font to the end mark of the second paragraph:
- Load a Presentation and access a slide.
- Add an AutoShape and clear its default paragraph.
- Create two paragraphs and add text portions to them.
- Create a PortionFormat for the second paragraph’s end mark.
- Set PortionFormat.font_height and PortionFormat.latin_font.
- Assign the format to Paragraph.end_paragraph_portion_format and save the presentation.
import aspose.slides as slides

with slides.Presentation("Test.pptx") as presentation:
    slide = presentation.slides[0]
    shape = slide.shapes.add_auto_shape(slides.ShapeType.RECTANGLE, 10, 10, 200, 250)
    text_frame = shape.text_frame
    text_frame.paragraphs.clear()

    first_paragraph = slides.Paragraph()
    first_paragraph.portions.add(slides.Portion("Sample text"))

    second_paragraph = slides.Paragraph()
    second_paragraph.portions.add(slides.Portion("Sample text 2"))

    end_paragraph_format = slides.PortionFormat()
    end_paragraph_format.font_height = 48
    end_paragraph_format.latin_font = slides.FontData("Times New Roman")
    second_paragraph.end_paragraph_portion_format = end_paragraph_format

    text_frame.paragraphs.add(first_paragraph)
    text_frame.paragraphs.add(second_paragraph)

    presentation.save("end_paragraph_format.pptx", slides.export.SaveFormat.PPTX)
Count Rendered Lines
For paragraph rules that affect automatic wrapping and punctuation at line endings, see Control Line Breaking and Control Hanging Punctuation.
Use Paragraph.get_lines_count to count the lines occupied by a paragraph after text layout, including automatic wrapping. This is useful when checking text length and layout in presentation templates.
A paragraph is one item in TextFrame.paragraphs, and it can occupy several rendered lines. An explicit line break within a paragraph forces a new line without creating another paragraph. Automatic wrapping creates lines based on the available width without inserting explicit line breaks into the text. Counting paragraphs or line-break characters therefore does not give the rendered line count.
The following example creates a text shape, counts its lines, narrows the shape, and then replaces the text with a shorter string. Wrapping is enabled and autofit is disabled so that the shape width controls wrapping without automatically shrinking the text or resizing the shape. Shape dimensions are in points. Finally, the example adds another paragraph and sums the line counts across the text frame.
import aspose.slides as slides

with slides.Presentation() as presentation:
    slide = presentation.slides[0]

    shape = slide.shapes.add_auto_shape(slides.ShapeType.RECTANGLE, 50, 50, 400, 200)
    text_frame = shape.text_frame
    text_frame.text_frame_format.wrap_text = slides.NullableBool.TRUE
    text_frame.text_frame_format.autofit_type = slides.TextAutofitType.NONE

    paragraph = text_frame.paragraphs[0]
    paragraph.paragraph_format.default_portion_format.font_height = 20
    paragraph.text = "This text demonstrates how automatic wrapping changes the number of rendered lines."
    print(f"Original width: {paragraph.get_lines_count()}")

    shape.width = 150
    print(f"Narrower shape: {paragraph.get_lines_count()}")

    paragraph.text = "Short text."
    print(f"Shorter text: {paragraph.get_lines_count()}")

    second_paragraph = slides.Paragraph()
    second_paragraph.text = "Another paragraph."
    second_paragraph.paragraph_format.default_portion_format.font_height = 20
    text_frame.paragraphs.add(second_paragraph)

    total_line_count = 0
    for current_paragraph in text_frame.paragraphs:
        total_line_count += current_paragraph.get_lines_count()
    print(f"Total lines in the text frame: {total_line_count}")
With this text and these dimensions, narrowing the shape increases the line count, while replacing the text with the short string reduces it. Exact counts can vary with font availability and substitution, font size, margins, indentation, wrapping, and autofit settings. Use the fonts and layout settings intended for the target environment when checking a template.
The line count alone does not determine whether text overflows its container. The available height, line heights, paragraph and line spacing, and autofit behavior also matter; even a single line can exceed the available width when wrapping is disabled.
Import and Export Paragraph Content
Import HTML Text into Paragraphs
Use ParagraphCollection.add_from_html to convert HTML markup into paragraphs and portions in a text frame.
- Create an instance of the Presentation class.
- Access a slide and add an AutoShape.
- Access the shape’s TextFrame and clear its default paragraph.
- Read the source HTML file.
- Pass the HTML string to ParagraphCollection.add_from_html.
- Save the modified presentation.
This Python example imports HTML into a text frame:
import aspose.slides as slides

with slides.Presentation() as presentation:
    slide = presentation.slides[0]
    shape_width = presentation.slide_size.size.width - 20
    shape_height = presentation.slide_size.size.height - 20
    shape = slide.shapes.add_auto_shape(slides.ShapeType.RECTANGLE, 10, 10, shape_width, shape_height)
    shape.fill_format.fill_type = slides.FillType.NO_FILL
    shape.text_frame.paragraphs.clear()

    with open("file.html", "r", encoding="utf-8") as html_stream:
        html = html_stream.read()

    shape.text_frame.paragraphs.add_from_html(html)
    presentation.save("html_text.pptx", slides.export.SaveFormat.PPTX)
Export Paragraph Text to HTML
Use ParagraphCollection.export_to_html to export a selected range of paragraphs as HTML.
- Create an instance of the Presentation class and load the desired presentation.
- Access the slide and find the AutoShape that contains the text.
- Access the shape’s TextFrame.
- Call ParagraphCollection.export_to_html with the starting paragraph index and the number of paragraphs to export.
- Write the returned HTML string to a file.
This Python example exports all paragraphs from the first text shape:
import aspose.slides as slides

with slides.Presentation("ExportingHTMLText.pptx") as presentation:
    shape = presentation.slides[0].shapes[0]

    if isinstance(shape, slides.AutoShape) and shape.text_frame is not None:
        paragraphs = shape.text_frame.paragraphs
        html = paragraphs.export_to_html(0, paragraphs.count, None)
        with open("paragraphs.html", "w", encoding="utf-8") as html_stream:
            html_stream.write(html)
    else:
        print("The first shape is not a text shape.")
Render a Paragraph as an Image
Paragraph provides the get_image method for rendering an individual paragraph directly. The method returns an IImage that you can save to a file or stream with IImage.save. You do not need to render the containing shape or crop a bitmap manually.
The get_image method can return None if the paragraph cannot be found in its parent collection, has no valid rendering bounds, or cannot be rendered. Check the result before saving it and use the returned image as a context manager to release its resources.
Render a Paragraph at the Default Scale
Let’s assume we have a presentation file called sample.pptx with one slide, where the first shape is a text box containing three paragraphs.
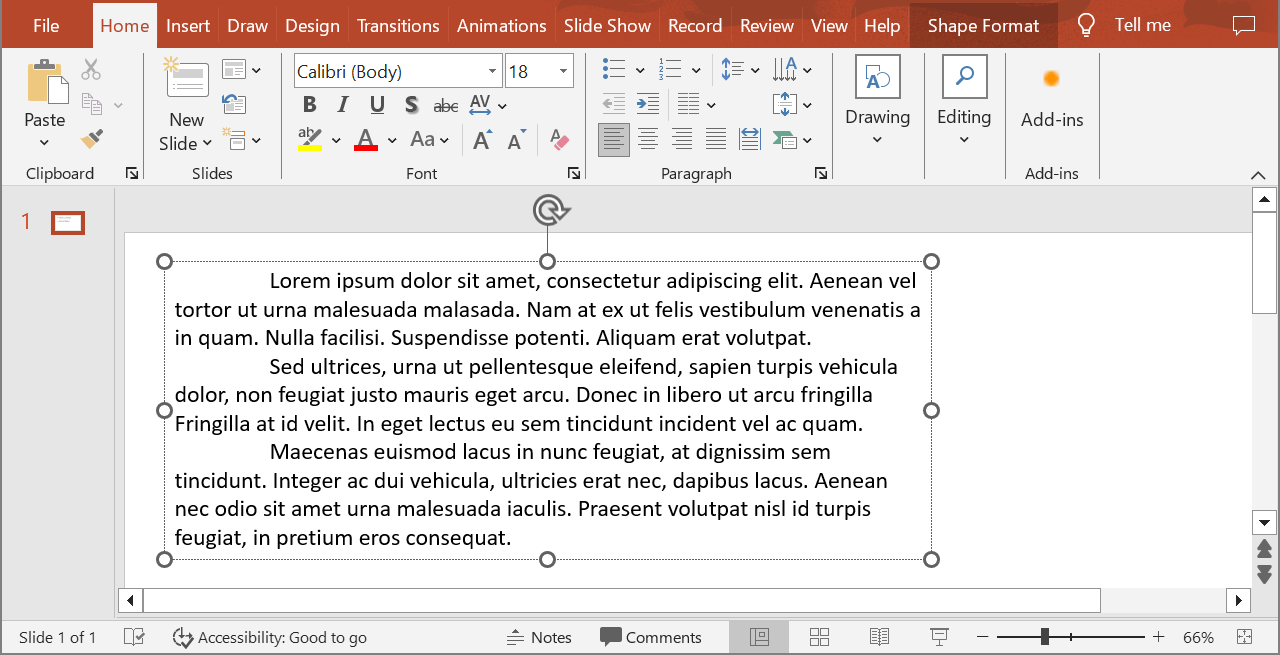
The following example renders the second paragraph in a regular text shape at the default scale and saves the returned image in PNG format:
import aspose.slides as slides

with slides.Presentation("sample.pptx") as presentation:
    shape = presentation.slides[0].shapes[0]

    if isinstance(shape, slides.AutoShape) and shape.text_frame is not None and shape.text_frame.paragraphs.count > 1:
        paragraph = shape.text_frame.paragraphs[1]
        paragraph_image = paragraph.get_image()

        if paragraph_image is not None:
            with paragraph_image:
                paragraph_image.save("paragraph.png", slides.ImageFormat.PNG)
        else:
            print("The paragraph could not be rendered.")
    else:
        print("The expected text shape or paragraph was not found.")
The result:

Render a Paragraph in a Table Cell with Scaling
Pass horizontal and vertical scale factors to get_image to control the size of the rendered paragraph. The following example creates a table, renders the paragraph in its first cell at twice its default width and height, and saves the result as a PNG image:
import aspose.slides as slides

scale_x = 2
scale_y = 2

with slides.Presentation() as presentation:
    slide = presentation.slides[0]
    table = slide.shapes.add_table(50, 50, [300], [80])
    paragraph = table.rows[0][0].text_frame.paragraphs[0]
    paragraph.text = "Text in a table cell"

    paragraph_image = paragraph.get_image(scale_x, scale_y)
    if paragraph_image is not None:
        with paragraph_image:
            paragraph_image.save("table_paragraph.png", slides.ImageFormat.PNG)
    else:
        print("The paragraph could not be rendered.")
A scale factor of 1 keeps that axis at its default pixel size. For example, 2 for both factors produces an image whose width and height are approximately twice the default dimensions, resulting in four times as many pixels. Larger factors generally produce sharper text for zooming or high-resolution output, but they also increase memory use and file size. Factors below 1 produce smaller images with less detail. Use equal factors to preserve the paragraph’s aspect ratio; different horizontal and vertical factors stretch the output independently.
Rendering a whole shape with Shape.get_image remains useful when the output must include the shape’s fill, border, or other visual context. For a paragraph-only image, use Paragraph.get_image.
FAQ
Can I completely disable line wrapping inside a text frame?
Yes. Set TextFrameFormat.wrap_text to disable wrapping so lines do not break at the text frame’s edges.
How can I get the exact on-slide bounds of a specific paragraph?
Use Paragraph.get_rect to retrieve the paragraph’s bounding rectangle. Portion.get_rect provides the bounds of an individual portion.
Where is paragraph alignment (left, right, center, or justify) controlled?
ParagraphFormat.alignment is a paragraph-level setting and applies to the whole paragraph regardless of individual portion formatting.
To vertically align portions of different font sizes within each line, see Align Fonts Within a Line.
Can I set the proofing language for part of a paragraph?
Yes. Set PortionFormat.language_id for individual portions, so one paragraph can contain text in multiple languages.