
จัดการการซูมการนำเสนอใน JavaScript
บทนำ
Zoom ใน PowerPoint ช่วยให้คุณสามารถกระโดดไปและกลับจากสไลด์, ส่วน, และช่วงต่าง ๆ ของการนำเสนอได้ เมื่อคุณกำลังพรีเซนต์ ความสามารถในการนำทางอย่างรวดเร็วผ่านเนื้อหาเหล่านี้อาจเป็นประโยชน์อย่างมาก.
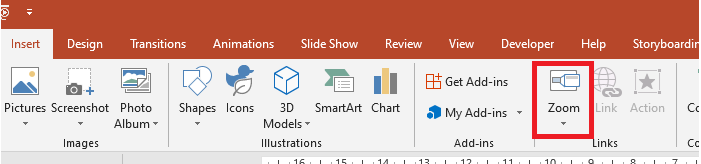
- เพื่อสรุปการนำเสนอทั้งหมดในสไลด์เดียว ให้ใช้ Summary Zoom.
- เพื่อแสดงเฉพาะสไลด์ที่เลือก ให้ใช้ Slide Zoom.
- เพื่อแสดงส่วนเดียวเท่านั้น ให้ใช้ Section Zoom.
Zoom สไลด์
Zoom สไลด์สามารถทำให้การนำเสนอของคุณมีความไดนามิกมากขึ้น โดยให้คุณนำทางระหว่างสไลด์ได้อย่างอิสระตามลำดับที่ต้องการโดยไม่ขัดจังหวะการพรีเซนต์ Zoom สไลด์เหมาะสำหรับการนำเสนอสั้น ๆ ที่ไม่มีหลายส่วนมาก แต่คุณก็สามารถใช้มันในสถาณการณ์การนำเสนอประเภทต่าง ๆ ได้เช่นกัน
Zoom สไลด์ช่วยให้คุณเจาะลึกข้อมูลหลายส่วนขณะยังคงรู้สึกว่าอยู่บนผ้าใบเดียวกัน
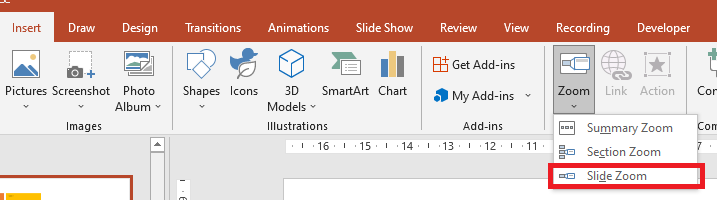
สำหรับอ็อบเจกต์ Zoom สไลด์ Aspose.Slides มีการแสดงผลแบบ enumeration ZoomImageType , คลาส ZoomFrame และเมธอดบางส่วนในคลาส ShapeCollection
การสร้าง Zoom Frame
คุณสามารถเพิ่ม Zoom Frame ลงในสไลด์ได้ดังนี้:
- Create an instance of the Presentation class.
- Create new slides to which you intend to link the zoom frames.
- Add an identification text and background to the created slides.
- Add zoom frames (containing the references to created slides) to the first slide.
- Write the modified presentation as a PPTX file.
This JavaScript code shows you how to create a zoom frame on a slide:
var pres = new aspose.slides.Presentation();
try {
    // เพิ่มสไลด์ใหม่ไปยังงานนำเสนอ
    var slide2 = pres.getSlides().addEmptySlide(pres.getSlides().get_Item(0).getLayoutSlide());
    var slide3 = pres.getSlides().addEmptySlide(pres.getSlides().get_Item(0).getLayoutSlide());
    // สร้างพื้นหลังสำหรับสไลด์ที่สอง
    slide2.getBackground().setType(aspose.slides.BackgroundType.OwnBackground);
    slide2.getBackground().getFillFormat().setFillType(java.newByte(aspose.slides.FillType.Solid));
    slide2.getBackground().getFillFormat().getSolidFillColor().setColor(java.getStaticFieldValue("java.awt.Color", "cyan"));
    // สร้างกล่องข้อความสำหรับสไลด์ที่สอง
    var autoshape = slide2.getShapes().addAutoShape(aspose.slides.ShapeType.Rectangle, 100, 200, 500, 200);
    autoshape.getTextFrame().setText("Second Slide");
    // สร้างพื้นหลังสำหรับสไลด์ที่สาม
    slide3.getBackground().setType(aspose.slides.BackgroundType.OwnBackground);
    slide3.getBackground().getFillFormat().setFillType(java.newByte(aspose.slides.FillType.Solid));
    slide3.getBackground().getFillFormat().getSolidFillColor().setColor(java.getStaticFieldValue("java.awt.Color", "darkGray"));
    // สร้างกล่องข้อความสำหรับสไลด์ที่สาม
    autoshape = slide3.getShapes().addAutoShape(aspose.slides.ShapeType.Rectangle, 100, 200, 500, 200);
    autoshape.getTextFrame().setText("Trird Slide");
    // เพิ่มอ็อบเจกต์ ZoomFrame
    pres.getSlides().get_Item(0).getShapes().addZoomFrame(20, 20, 250, 200, slide2);
    pres.getSlides().get_Item(0).getShapes().addZoomFrame(200, 250, 250, 200, slide3);
    // บันทึกงานนำเสนอ
    pres.save("presentation.pptx", aspose.slides.SaveFormat.Pptx);
} finally {
    if (pres != null) {
        pres.dispose();
    }
}
การสร้าง Zoom Frame ด้วยภาพกำหนดเอง
ด้วย Aspose.Slides for Node.js via Java คุณสามารถสร้าง Zoom Frame พร้อมภาพพรีวิวสไลด์ที่ต่างออกไปได้ดังนี้:
- Create an instance of the Presentation class.
- Create a new slide to which you intend to link the zoom frame.
- Add an identification text and background to the slide.
- Create an PPImage object by adding an image to the Images collection associated with the Presentation object that will be used to fill the frame.
- Add zoom frames (containing the reference to created slide) to the first slide.
- Write the modified presentation as a PPTX file.
This JavaScript code shows you how to create a zoom frame with a different image:
var pres = new aspose.slides.Presentation();
try {
    // เพิ่มสไลด์ใหม่ไปยังงานนำเสนอ
    var slide = pres.getSlides().addEmptySlide(pres.getSlides().get_Item(0).getLayoutSlide());
    // สร้างพื้นหลังสำหรับสไลด์ที่สอง
    slide.getBackground().setType(aspose.slides.BackgroundType.OwnBackground);
    slide.getBackground().getFillFormat().setFillType(java.newByte(aspose.slides.FillType.Solid));
    slide.getBackground().getFillFormat().getSolidFillColor().setColor(java.getStaticFieldValue("java.awt.Color", "cyan"));
    // สร้างกล่องข้อความสำหรับสไลด์ที่สาม
    var autoshape = slide.getShapes().addAutoShape(aspose.slides.ShapeType.Rectangle, 100, 200, 500, 200);
    autoshape.getTextFrame().setText("Second Slide");
    // สร้างภาพใหม่สำหรับอ็อบเจกต์ซูม
    var picture;
    var image = aspose.slides.Images.fromFile("image.png");
    try {
        picture = pres.getImages().addImage(image);
    } finally {
        if (image != null) {
            image.dispose();
        }
    }
    // เพิ่มอ็อบเจกต์ ZoomFrame
    pres.getSlides().get_Item(0).getShapes().addZoomFrame(20, 20, 300, 200, slide, picture);
    // บันทึกงานนำเสนอ
    pres.save("presentation.pptx", aspose.slides.SaveFormat.Pptx);
} catch (e) {console.log(e);
} finally {
    if (pres != null) {
        pres.dispose();
    }
}
การจัดรูปแบบ Zoom Frame
ในส่วนก่อนหน้า เราได้แสดงวิธีสร้าง Zoom Frame อย่างง่าย เพื่อสร้าง Zoom Frame ที่ซับซ้อนมากขึ้น คุณต้องปรับเปลี่ยนการจัดรูปแบบของ Frame อย่างง่าย มีตัวเลือกการจัดรูปแบบหลายอย่างที่คุณสามารถนำไปใช้กับ Zoom Frame ได้
คุณสามารถควบคุมการจัดรูปแบบของ Zoom Frame บนสไลด์ได้ดังนี้:
- Create an instance of the Presentation class.
- Create new slides to link to which you intend to link the zoom frame.
- Add some identification text and background to the created slides.
- Add zoom frames (containing the references to the created slides) to the first slide.
- Create an PPImage object by adding an image to the Images collection associated with the Presentation object that will be used to fill the frame. 6 Set a custom image for the first zoom frame object. 7 Change the line format for the second zoom frame object. 8 Remove the background from an image of the second zoom frame object. 9 Write the modified presentation as a PPTX file.
This JavaScript code shows you how to change a zoom frame’s formatting on a slide:
var pres = new aspose.slides.Presentation();
try {
    // เพิ่มสไลด์ใหม่ไปยังงานนำเสนอ
    var slide2 = pres.getSlides().addEmptySlide(pres.getSlides().get_Item(0).getLayoutSlide());
    var slide3 = pres.getSlides().addEmptySlide(pres.getSlides().get_Item(0).getLayoutSlide());
    // สร้างพื้นหลังสำหรับสไลด์ที่สอง
    slide2.getBackground().setType(aspose.slides.BackgroundType.OwnBackground);
    slide2.getBackground().getFillFormat().setFillType(java.newByte(aspose.slides.FillType.Solid));
    slide2.getBackground().getFillFormat().getSolidFillColor().setColor(java.getStaticFieldValue("java.awt.Color", "cyan"));
    // สร้างกล่องข้อความสำหรับสไลด์ที่สอง
    var autoshape = slide2.getShapes().addAutoShape(aspose.slides.ShapeType.Rectangle, 100, 200, 500, 200);
    autoshape.getTextFrame().setText("Second Slide");
    // สร้างพื้นหลังสำหรับสไลด์ที่สาม
    slide3.getBackground().setType(aspose.slides.BackgroundType.OwnBackground);
    slide3.getBackground().getFillFormat().setFillType(java.newByte(aspose.slides.FillType.Solid));
    slide3.getBackground().getFillFormat().getSolidFillColor().setColor(java.getStaticFieldValue("java.awt.Color", "darkGray"));
    // สร้างกล่องข้อความสำหรับสไลด์ที่สาม
    autoshape = slide3.getShapes().addAutoShape(aspose.slides.ShapeType.Rectangle, 100, 200, 500, 200);
    autoshape.getTextFrame().setText("Trird Slide");
    // เพิ่มอ็อบเจกต์ ZoomFrame
    var zoomFrame1 = pres.getSlides().get_Item(0).getShapes().addZoomFrame(20, 20, 250, 200, slide2);
    var zoomFrame2 = pres.getSlides().get_Item(0).getShapes().addZoomFrame(200, 250, 250, 200, slide3);
    // สร้างภาพใหม่สำหรับอ็อบเจกต์ซูม
    var picture;
    var image = aspose.slides.Images.fromFile("image.png");
    try {
        picture = pres.getImages().addImage(image);
    } finally {
        if (image != null) {
            image.dispose();
        }
    }
    // ตั้งค่าภาพกำหนดเองสำหรับอ็อบเจกต์ zoomFrame1
    zoomFrame1.setImage(picture);
    // ตั้งค่ารูปแบบ Zoom Frame สำหรับอ็อบเจกต์ zoomFrame2
    zoomFrame2.getLineFormat().setWidth(5);
    zoomFrame2.getLineFormat().getFillFormat().setFillType(java.newByte(aspose.slides.FillType.Solid));
    zoomFrame2.getLineFormat().getFillFormat().getSolidFillColor().setColor(java.getStaticFieldValue("java.awt.Color", "pink"));
    zoomFrame2.getLineFormat().setDashStyle(aspose.slides.LineDashStyle.DashDot);
    // การตั้งค่าสำหรับไม่แสดงพื้นหลังสำหรับอ็อบเจกต์ zoomFrame2
    zoomFrame2.setShowBackground(false);
    // บันทึกงานนำเสนอ
    pres.save("presentation.pptx", aspose.slides.SaveFormat.Pptx);
} catch (e) {console.log(e);
} finally {
    if (pres != null) {
        pres.dispose();
    }
}
Section Zoom
Section Zoom เป็นลิงก์ไปยังส่วนหนึ่งในงานนำเสนอของคุณ คุณสามารถใช้ Section Zoom เพื่อกลับไปยังส่วนที่ต้องการเน้นย้ำ หรือใช้เพื่อชี้ให้เห็นว่าชิ้นส่วนต่าง ๆ ของการนำเสนอของคุณเชื่อมโยงกันอย่างไร
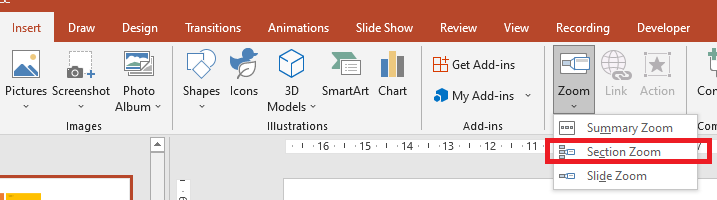
สำหรับอ็อบเจกต์ Section Zoom Aspose.Slides มีคลาส SectionZoomFrame และเมธอดบางส่วนในคลาส ShapeCollection
การสร้าง Section Zoom Frame
คุณสามารถเพิ่ม Section Zoom Frame ลงในสไลด์ได้ดังนี้:
- Create an instance of the Presentation class.
- Create a new slide.
- Add an identification background to the created slide.
- Create a new section to which you intend to link the zoom frame.
- Add a section zoom frame (containing references to the created section) to the first slide. 6.Write the modified presentation as a PPTX file.
This JavaScript code shows you how to create a zoom frame on a slide:
var pres = new aspose.slides.Presentation();
try {
    // เพิ่มสไลด์ใหม่ไปยังงานนำเสนอ
    var slide = pres.getSlides().addEmptySlide(pres.getSlides().get_Item(0).getLayoutSlide());
    slide.getBackground().getFillFormat().setFillType(java.newByte(aspose.slides.FillType.Solid));
    slide.getBackground().getFillFormat().getSolidFillColor().setColor(java.getStaticFieldValue("java.awt.Color", "yellow"));
    slide.getBackground().setType(aspose.slides.BackgroundType.OwnBackground);
    // เพิ่ม Section ใหม่ไปยังงานนำเสนอ
    pres.getSections().addSection("Section 1", slide);
    // เพิ่มอ็อบเจกต์ SectionZoomFrame
    var sectionZoomFrame = pres.getSlides().get_Item(0).getShapes().addSectionZoomFrame(20, 20, 300, 200, pres.getSections().get_Item(1));
    // บันทึกงานนำเสนอ
    pres.save("presentation.pptx", aspose.slides.SaveFormat.Pptx);
} finally {
    if (pres != null) {
        pres.dispose();
    }
}
การสร้าง Section Zoom Frame ด้วยภาพกำหนดเอง
โดยใช้ Aspose.Slides for Node.js via Java คุณสามารถสร้าง Section Zoom Frame พร้อมภาพพรีวิวสไลด์ที่ต่างออกไปได้ดังนี้:
- Create an instance of the Presentation class.
- Create a new slide.
- Add an identification background to created slide.
- Create a new section to which you intend to link the zoom frame.
- Create an PPImage object by adding an image to the Images collection associated with the Presentation object that will be used to fill the frame. 6 Add a section zoom frame (containing a reference to the created section) to the first slide. 7 Write the modified presentation as a PPTX file.
This JavaScript code shows you how to create a zoom frame with a different image:
var pres = new aspose.slides.Presentation();
try {
    // เพิ่มสไลด์ใหม่ไปยังงานนำเสนอ
    var slide = pres.getSlides().addEmptySlide(pres.getSlides().get_Item(0).getLayoutSlide());
    slide.getBackground().getFillFormat().setFillType(java.newByte(aspose.slides.FillType.Solid));
    slide.getBackground().getFillFormat().getSolidFillColor().setColor(java.getStaticFieldValue("java.awt.Color", "yellow"));
    slide.getBackground().setType(aspose.slides.BackgroundType.OwnBackground);
    // เพิ่ม Section ใหม่ไปยังงานนำเสนอ
    pres.getSections().addSection("Section 1", slide);
    // สร้างภาพใหม่สำหรับอ็อบเจกต์ซูม
    var picture;
    var image = aspose.slides.Images.fromFile("image.png");
    try {
        picture = pres.getImages().addImage(image);
    } finally {
        if (image != null) {
            image.dispose();
        }
    }
    // เพิ่มอ็อบเจกต์ SectionZoomFrame
    var sectionZoomFrame = pres.getSlides().get_Item(0).getShapes().addSectionZoomFrame(20, 20, 300, 200, pres.getSections().get_Item(1), picture);
    // บันทึกงานนำเสนอ
    pres.save("presentation.pptx", aspose.slides.SaveFormat.Pptx);
} catch (e) {console.log(e);
} finally {
    if (pres != null) {
        pres.dispose();
    }
}
การจัดรูปแบบ Section Zoom Frame
เพื่อสร้าง Section Zoom Frame ที่ซับซ้อนมากขึ้น คุณต้องปรับเปลี่ยนการจัดรูปแบบของ Frame อย่างง่าย มีตัวเลือกการจัดรูปแบบหลายอย่างที่คุณสามารถนำไปใช้กับ Section Zoom Frame ได้
คุณสามารถควบคุมการจัดรูปแบบของ Section Zoom Frame บนสไลด์ได้ดังนี้:
- Create an instance of the Presentation class.
- Create a new slide.
- Add identification background to created slide.
- Create a new section to which you intend to link the zoom frame. 5.Add a section zoom frame (containing references to created section) to the first slide. 6.Change the size and position for the created section zoom object. 7.Create an PPImage object by adding an image to the Images collection associated with the Presentation object that will be used to fill the frame. 8.Set a custom image for the created section zoom frame object. 9.Set the return to the original slide from the linked section ability. 10.Remove the background from an image of the section zoom frame object. 11.Change the line format for the second zoom frame object. 12.Change the transition duration. 13.Write the modified presentation as a PPTX file.
This JavaScript code shows you how to change a section zoom frame’s formatting:
var pres = new aspose.slides.Presentation();
try {
    // เพิ่มสไลด์ใหม่ไปยังงานนำเสนอ
    var slide = pres.getSlides().addEmptySlide(pres.getSlides().get_Item(0).getLayoutSlide());
    slide.getBackground().getFillFormat().setFillType(java.newByte(aspose.slides.FillType.Solid));
    slide.getBackground().getFillFormat().getSolidFillColor().setColor(java.getStaticFieldValue("java.awt.Color", "yellow"));
    slide.getBackground().setType(aspose.slides.BackgroundType.OwnBackground);
    // เพิ่ม Section ใหม่ไปยังงานนำเสนอ
    pres.getSections().addSection("Section 1", slide);
    // เพิ่มอ็อบเจกต์ SectionZoomFrame
    var sectionZoomFrame = pres.getSlides().get_Item(0).getShapes().addSectionZoomFrame(20, 20, 300, 200, pres.getSections().get_Item(1));
    // การจัดรูปแบบสำหรับ SectionZoomFrame
    sectionZoomFrame.setX(100);
    sectionZoomFrame.setY(300);
    sectionZoomFrame.setWidth(100);
    sectionZoomFrame.setHeight(75);
    var picture;
    var image = aspose.slides.Images.fromFile("image.png");
    try {
        picture = pres.getImages().addImage(image);
    } finally {
        if (image != null) {
            image.dispose();
        }
    }
    sectionZoomFrame.setImage(picture);
    sectionZoomFrame.setReturnToParent(true);
    sectionZoomFrame.setShowBackground(false);
    sectionZoomFrame.getLineFormat().getFillFormat().setFillType(java.newByte(aspose.slides.FillType.Solid));
    sectionZoomFrame.getLineFormat().getFillFormat().getSolidFillColor().setColor(java.getStaticFieldValue("java.awt.Color", "gray"));
    sectionZoomFrame.getLineFormat().setDashStyle(aspose.slides.LineDashStyle.DashDot);
    sectionZoomFrame.getLineFormat().setWidth(2.5);
    sectionZoomFrame.setTransitionDuration(1.5);
    // บันทึกงานนำเสนอ
    pres.save("presentation.pptx", aspose.slides.SaveFormat.Pptx);
} catch (e) {console.log(e);
} finally {
    if (pres != null) {
        pres.dispose();
    }
}
Summary Zoom
Summary Zoom คล้ายกับหน้าลงจอดที่แสดงชิ้นส่วนทั้งหมดของการนำเสนอพร้อมกัน เมื่อคุณพรีเซนต์ คุณสามารถใช้ Zoom เพื่อไปจากตำแหน่งหนึ่งไปอีกตำแหน่งหนึ่งในลำดับที่คุณต้องการได้ คุณสามารถทำแบบสร้างสรรค์ ข้ามไปข้างหน้า หรือกลับไปดูส่วนต่าง ๆ ของสไลด์โชว์โดยไม่ทำให้การไหลของการนำเสนอขัดจังหวะ
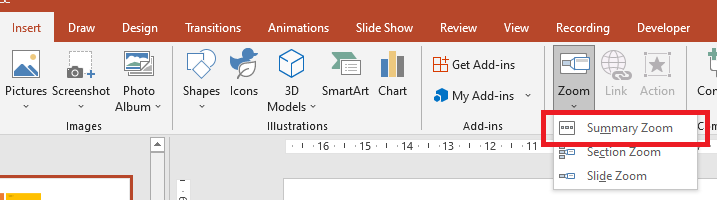
สำหรับอ็อบเจกต์ Summary Zoom Aspose.Slides มีคลาส SummaryZoomFrame, SummaryZoomSection และ SummaryZoomSectionCollection รวมถึงเมธอดบางส่วนในคลาส ShapeCollection
การสร้าง Summary Zoom
คุณสามารถเพิ่ม Summary Zoom Frame ลงในสไลด์ได้ดังนี้:
- Create an instance of the Presentation class.
- Create new slides with identification background and new sections for created slides.
- Add the summary zoom frame to the first slide. 4.Write the modified presentation as a PPTX file.
This JavaScript code shows you how to create a summary zoom frame on a slide:
var pres = new aspose.slides.Presentation();
try {
    // เพิ่มสไลด์ใหม่ไปยังงานนำเสนอ
    var slide = pres.getSlides().addEmptySlide(pres.getSlides().get_Item(0).getLayoutSlide());
    slide.getBackground().getFillFormat().setFillType(java.newByte(aspose.slides.FillType.Solid));
    slide.getBackground().getFillFormat().getSolidFillColor().setColor(java.getStaticFieldValue("java.awt.Color", "gray"));
    slide.getBackground().setType(aspose.slides.BackgroundType.OwnBackground);
    // เพิ่ม Section ใหม่ไปยังงานนำเสนอ
    pres.getSections().addSection("Section 1", slide);
    // เพิ่มสไลด์ใหม่ไปยังงานนำเสนอ
    slide = pres.getSlides().addEmptySlide(pres.getSlides().get_Item(0).getLayoutSlide());
    slide.getBackground().getFillFormat().setFillType(java.newByte(aspose.slides.FillType.Solid));
    slide.getBackground().getFillFormat().getSolidFillColor().setColor(java.getStaticFieldValue("java.awt.Color", "cyan"));
    slide.getBackground().setType(aspose.slides.BackgroundType.OwnBackground);
    // เพิ่ม Section ใหม่ไปยังงานนำเสนอ
    pres.getSections().addSection("Section 2", slide);
    // เพิ่มสไลด์ใหม่ไปยังงานนำเสนอ
    slide = pres.getSlides().addEmptySlide(pres.getSlides().get_Item(0).getLayoutSlide());
    slide.getBackground().getFillFormat().setFillType(java.newByte(aspose.slides.FillType.Solid));
    slide.getBackground().getFillFormat().getSolidFillColor().setColor(java.getStaticFieldValue("java.awt.Color", "magenta"));
    slide.getBackground().setType(aspose.slides.BackgroundType.OwnBackground);
    // เพิ่ม Section ใหม่ไปยังงานนำเสนอ
    pres.getSections().addSection("Section 3", slide);
    // เพิ่มสไลด์ใหม่ไปยังงานนำเสนอ
    slide = pres.getSlides().addEmptySlide(pres.getSlides().get_Item(0).getLayoutSlide());
    slide.getBackground().getFillFormat().setFillType(java.newByte(aspose.slides.FillType.Solid));
    slide.getBackground().getFillFormat().getSolidFillColor().setColor(java.getStaticFieldValue("java.awt.Color", "green"));
    slide.getBackground().setType(aspose.slides.BackgroundType.OwnBackground);
    // เพิ่ม Section ใหม่ไปยังงานนำเสนอ
    pres.getSections().addSection("Section 4", slide);
    // เพิ่มอ็อบเจกต์ SummaryZoomFrame
    var summaryZoomFrame = pres.getSlides().get_Item(0).getShapes().addSummaryZoomFrame(150, 50, 300, 200);
    // บันทึกงานนำเสนอ
    pres.save("presentation.pptx", aspose.slides.SaveFormat.Pptx);
} finally {
    if (pres != null) {
        pres.dispose();
    }
}
การเพิ่มและลบ Summary Zoom Section
ทุก Section ใน Summary Zoom Frame แสดงด้วยอ็อบเจกต์ SummaryZoomSection ซึ่งจัดเก็บในอ็อบเจกต์ SummaryZoomSectionCollection คุณสามารถเพิ่มหรือเอาอ็อบเจกต์ Summary Zoom Section ออกได้ผ่านคลาส SummaryZoomSectionCollection ดังนี้:
- Create an instance of the Presentation class.
- Create new slides with identification background and new sections for created slides.
- Add a summary zoom frame into the first slide. 4.Add a new slide and section to the presentation. 5.Add the created section to the summary zoom frame. 6.Remove the first section from the summary zoom frame. 7.Write the modified presentation as a PPTX file.
This JavaScript code shows you how to add and remove sections in a summary zoom frame:
var pres = new aspose.slides.Presentation();
try {
    // เพิ่มสไลด์ใหม่ไปยังงานนำเสนอ
    var slide = pres.getSlides().addEmptySlide(pres.getSlides().get_Item(0).getLayoutSlide());
    slide.getBackground().getFillFormat().setFillType(java.newByte(aspose.slides.FillType.Solid));
    slide.getBackground().getFillFormat().getSolidFillColor().setColor(java.getStaticFieldValue("java.awt.Color", "gray"));
    slide.getBackground().setType(aspose.slides.BackgroundType.OwnBackground);
    // เพิ่ม Section ใหม่ไปยังงานนำเสนอ
    pres.getSections().addSection("Section 1", slide);
    // เพิ่มสไลด์ใหม่ไปยังงานนำเสนอ
    slide = pres.getSlides().addEmptySlide(pres.getSlides().get_Item(0).getLayoutSlide());
    slide.getBackground().getFillFormat().setFillType(java.newByte(aspose.slides.FillType.Solid));
    slide.getBackground().getFillFormat().getSolidFillColor().setColor(java.getStaticFieldValue("java.awt.Color", "cyan"));
    slide.getBackground().setType(aspose.slides.BackgroundType.OwnBackground);
    // เพิ่ม Section ใหม่ไปยังงานนำเสนอ
    pres.getSections().addSection("Section 2", slide);
    // เพิ่มอ็อบเจกต์ SummaryZoomFrame
    var summaryZoomFrame = pres.getSlides().get_Item(0).getShapes().addSummaryZoomFrame(150, 50, 300, 200);
    // เพิ่มสไลด์ใหม่ไปยังงานนำเสนอ
    slide = pres.getSlides().addEmptySlide(pres.getSlides().get_Item(0).getLayoutSlide());
    slide.getBackground().getFillFormat().setFillType(java.newByte(aspose.slides.FillType.Solid));
    slide.getBackground().getFillFormat().getSolidFillColor().setColor(java.getStaticFieldValue("java.awt.Color", "magenta"));
    slide.getBackground().setType(aspose.slides.BackgroundType.OwnBackground);
    // เพิ่ม Section ใหม่ไปยังงานนำเสนอ
    var section3 = pres.getSections().addSection("Section 3", slide);
    // เพิ่ม Section ไปยัง Summary Zoom
    summaryZoomFrame.getSummaryZoomCollection().addSummaryZoomSection(section3);
    // ลบ Section จาก Summary Zoom
    summaryZoomFrame.getSummaryZoomCollection().removeSummaryZoomSection(pres.getSections().get_Item(1));
    // บันทึกงานนำเสนอ
    pres.save("presentation.pptx", aspose.slides.SaveFormat.Pptx);
} finally {
    if (pres != null) {
        pres.dispose();
    }
}
การจัดรูปแบบ Summary Zoom Section
เพื่อสร้างอ็อบเจกต์ Summary Zoom Section ที่ซับซ้อนมากขึ้น คุณต้องปรับเปลี่ยนการจัดรูปแบบของ Frame อย่างง่าย มีตัวเลือกการจัดรูปแบบหลายอย่างที่คุณสามารถนำไปใช้กับอ็อบเจกต์ Summary Zoom Section ได้
คุณสามารถควบคุมการจัดรูปแบบของอ็อบเจกต์ Summary Zoom Section ใน Summary Zoom Frame ได้ดังนี้:
- Create an instance of the Presentation class.
- Create new slides with identification background and new sections for created slides.
- Add a summary zoom frame to the first slide.
4.Get a summary zoom section object for the first object from the
ISummaryZoomSectionCollection. 5.Create an PPImage object by adding an image to the images collection associated with the Presentation object that will be used to fill the frame. 6.Set a custom image for the created section zoom frame object. 7.Set the return to the original slide from the linked section ability. 8.Change the line format for the second zoom frame object. 9.Change the transition duration. 10.Write the modified presentation as a PPTX file.
This JavaScript code shows you how to change the formatting for a summary zoom section object:
var pres = new aspose.slides.Presentation();
try {
    // เพิ่มสไลด์ใหม่ไปยังงานนำเสนอ
    var slide = pres.getSlides().addEmptySlide(pres.getSlides().get_Item(0).getLayoutSlide());
    slide.getBackground().getFillFormat().setFillType(java.newByte(aspose.slides.FillType.Solid));
    slide.getBackground().getFillFormat().getSolidFillColor().setColor(java.getStaticFieldValue("java.awt.Color", "gray"));
    slide.getBackground().setType(aspose.slides.BackgroundType.OwnBackground);
    // เพิ่ม Section ใหม่ไปยังงานนำเสนอ
    pres.getSections().addSection("Section 1", slide);
    // เพิ่มสไลด์ใหม่ไปยังงานนำเสนอ
    slide = pres.getSlides().addEmptySlide(pres.getSlides().get_Item(0).getLayoutSlide());
    slide.getBackground().getFillFormat().setFillType(java.newByte(aspose.slides.FillType.Solid));
    slide.getBackground().getFillFormat().getSolidFillColor().setColor(java.getStaticFieldValue("java.awt.Color", "cyan"));
    slide.getBackground().setType(aspose.slides.BackgroundType.OwnBackground);
    // เพิ่ม Section ใหม่ไปยังงานนำเสนอ
    pres.getSections().addSection("Section 2", slide);
    // เพิ่มอ็อบเจกต์ SummaryZoomFrame
    var summaryZoomFrame = pres.getSlides().get_Item(0).getShapes().addSummaryZoomFrame(150, 50, 300, 200);
    // ดึงอ็อบเจกต์ SummaryZoomSection ตัวแรก
    var summarySection = summaryZoomFrame.getSummaryZoomCollection().get_Item(0);
    // การจัดรูปแบบสำหรับอ็อบเจกต์ SummaryZoomSection
    var picture;
    var image = aspose.slides.Images.fromFile("image.png");
    try {
        picture = pres.getImages().addImage(picture);
    } finally {
        if (image != null) {
            image.dispose();
        }
    }
    summarySection.setImage(picture);
    summarySection.setReturnToParent(false);
    summarySection.getLineFormat().getFillFormat().setFillType(java.newByte(aspose.slides.FillType.Solid));
    summarySection.getLineFormat().getFillFormat().getSolidFillColor().setColor(java.getStaticFieldValue("java.awt.Color", "black"));
    summarySection.getLineFormat().setDashStyle(aspose.slides.LineDashStyle.DashDot);
    summarySection.getLineFormat().setWidth(1.5);
    summarySection.setTransitionDuration(1.5);
    // บันทึกงานนำเสนอ
    pres.save("presentation.pptx", aspose.slides.SaveFormat.Pptx);
} catch (e) {console.log(e);
} finally {
    if (pres != null) {
        pres.dispose();
    }
}
FAQ
Can I control returning to the ‘parent’ slide after showing the target?
Yes. The Zoom frame or section has a setReturnToParent method that, when enabled, sends viewers back to the originating slide after they visit the target content.
Can I adjust the ‘speed’ or duration of the Zoom transition?
Yes. Zoom exposes a setTransitionDuration method so you can control how long the jump animation takes.
Are there limits on how many Zoom objects a presentation can contain?
There is no hard API limit documented. Practical limits depend on overall presentation complexity and the viewer’s performance. You can add many Zoom frames, but consider file size and rendering time.