
Quản lý Zoom trong Bài trình bày bằng Python
Introduction
Zoom trong PowerPoint cho phép bạn nhảy tới và đi từ các slide, phần và đoạn cụ thể của một bài thuyết trình. Khi bạn đang trình bày, khả năng điều hướng nhanh chóng qua nội dung này có thể rất hữu ích.
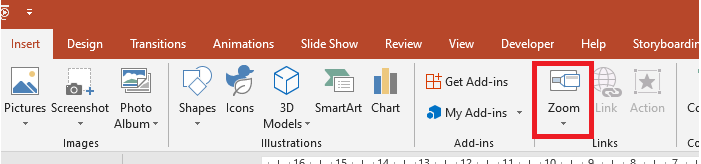
- Để tóm tắt toàn bộ bài thuyết trình trên một slide, sử dụng Summary Zoom.
- Để chỉ hiển thị các slide đã chọn, sử dụng Slide Zoom.
- Để chỉ hiển thị một phần duy nhất, sử dụng Section Zoom.
Slide Zoom
Zoom slide có thể làm cho bài thuyết trình của bạn năng động hơn, cho phép bạn tự do di chuyển giữa các slide theo bất kỳ thứ tự nào mà không làm gián đoạn luồng trình bày. Zoom slide rất phù hợp cho các bài thuyết trình ngắn không có nhiều phần, nhưng bạn vẫn có thể dùng chúng trong các kịch bản trình bày khác nhau.
Zoom slide giúp bạn khai thác nhiều thông tin đồng thời mà vẫn cảm thấy như đang làm việc trên một canvas duy nhất.
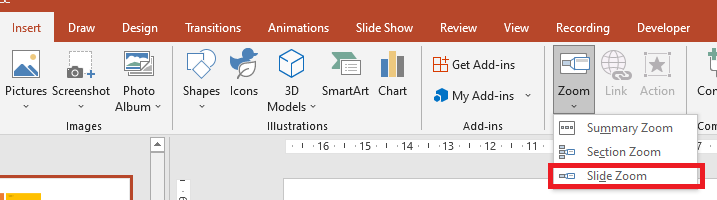
Đối với các đối tượng Zoom slide, Aspose.Slides cung cấp enum ZoomImageType, lớp ZoomFrame và một số phương thức trong lớp ShapeCollection.
Creating Zoom Frames
Bạn có thể thêm một khung zoom vào slide theo cách sau:
- Tạo một thể hiện của lớp Presentation.
- Tạo các slide mới mà bạn dự định liên kết.
- Thêm văn bản nhận dạng và nền cho các slide đã tạo.
- Thêm các khung zoom (chứa tham chiếu tới các slide đã tạo) vào slide đầu tiên.
- Ghi bài thuyết trình đã sửa thành file PPTX.
Mã mẫu này cho bạn thấy cách tạo một khung zoom trong slide:
import aspose.slides as slides
import aspose.pydrawing as draw

with slides.Presentation() as pres:
    #Thêm các slide mới vào bài thuyết trình
    slide2 = pres.slides.add_empty_slide(pres.slides[0].layout_slide)
    slide3 = pres.slides.add_empty_slide(pres.slides[0].layout_slide)

    # Tạo nền cho slide thứ hai
    slide2.background.type = slides.BackgroundType.OWN_BACKGROUND
    slide2.background.fill_format.fill_type = slides.FillType.SOLID
    slide2.background.fill_format.solid_fill_color.color = draw.Color.cyan

    # Tạo một hộp văn bản cho slide thứ hai
    autoshape = slide2.shapes.add_auto_shape(slides.ShapeType.RECTANGLE, 100, 200, 500, 200)
    autoshape.text_frame.text = "Second Slide"

    # Tạo nền cho slide thứ ba
    slide3.background.type = slides.BackgroundType.OWN_BACKGROUND
    slide3.background.fill_format.fill_type = slides.FillType.SOLID
    slide3.background.fill_format.solid_fill_color.color = draw.Color.dark_khaki

    # Tạo một hộp văn bản cho slide thứ ba
    autoshape = slide3.shapes.add_auto_shape(slides.ShapeType.RECTANGLE, 100, 200, 500, 200)
    autoshape.text_frame.text = "Trird Slide"

    #Add Thêm các đối tượng ZoomFrame
    pres.slides[0].shapes.add_zoom_frame(20, 20, 250, 200, slide2)
    pres.slides[0].shapes.add_zoom_frame(200, 250, 250, 200, slide3)

    # Lưu bài thuyết trình
    pres.save("presentation-zoom.pptx", slides.export.SaveFormat.PPTX)
Creating Zoom Frames with Custom Images
Với Aspose.Slides for Python via .NET, bạn có thể tạo một khung zoom với hình ảnh khác với hình ảnh xem trước của slide theo cách sau:
- Tạo một thể hiện của lớp
Presentation. - Tạo một slide mới mà bạn dự định liên kết.
- Thêm văn bản nhận dạng và nền cho slide đã tạo.
- Tạo một đối tượng PPImage bằng cách thêm hình ảnh vào bộ sưu tập Images của đối tượng Presentation sẽ được dùng để điền vào khung.
- Thêm các khung zoom (chứa tham chiếu tới slide đã tạo) vào slide đầu tiên.
- Ghi bài thuyết trình đã sửa thành file PPTX.
Mã Python này cho bạn thấy cách tạo một khung zoom với hình ảnh khác:
import aspose.slides as slides
import aspose.pydrawing as draw

with slides.Presentation() as pres:
    #Thêm một slide mới vào bài thuyết trình
    slide = pres.slides.add_empty_slide(pres.slides[0].layout_slide)

    # Tạo nền cho slide thứ hai
    slide.background.type = slides.BackgroundType.OWN_BACKGROUND
    slide.background.fill_format.fill_type = slides.FillType.SOLID
    slide.background.fill_format.solid_fill_color.color = draw.Color.cyan

    # Tạo một hộp văn bản cho slide thứ ba
    autoshape = slide.shapes.add_auto_shape(slides.ShapeType.RECTANGLE, 100, 200, 500, 200)
    autoshape.text_frame.text = "Second Slide"

    # Tạo một hình ảnh mới cho đối tượng zoom
    image = pres.images.add_image(slides.Images.from_file("img.jpeg"))

    #Thêm đối tượng ZoomFrame
    pres.slides[0].shapes.add_zoom_frame(20, 20, 300, 200, slide, image)

    # Lưu bài thuyết trình
    pres.save("presentation.pptx", slides.export.SaveFormat.PPTX)
Formatting Zoom Frames
Trong các phần trước (bên trên), chúng tôi đã chỉ cho bạn cách tạo các khung zoom đơn giản. Để tạo các khung zoom phức tạp hơn, bạn phải thay đổi định dạng của các khung. Có một số cài đặt định dạng mà bạn có thể áp dụng cho một khung zoom.
Bạn có thể kiểm soát định dạng của khung zoom trong slide theo cách sau:
- Tạo một thể hiện của lớp
Presentation. - Tạo các slide mới để liên kết.
- Thêm văn bản nhận dạng và nền cho các slide đã tạo.
- Thêm các khung zoom (chứa tham chiếu tới các slide đã tạo) vào slide đầu tiên.
- Tạo một đối tượng PPImage bằng cách thêm hình ảnh vào bộ sưu tập Images của đối tượng Presentation sẽ được dùng để điền vào khung.
- Đặt một hình ảnh tùy chỉnh cho đối tượng khung zoom đầu tiên.
- Thay đổi định dạng đường viền cho đối tượng khung zoom thứ hai.
- Xóa nền khỏi hình ảnh của đối tượng khung zoom thứ hai.
- Ghi bài thuyết trình đã sửa thành file PPTX.
Mã mẫu Python này cho bạn thấy cách thay đổi định dạng của khung zoom:
import aspose.slides as slides
import aspose.pydrawing as draw

with slides.Presentation() as pres:
    #Thêm các slide mới vào bài thuyết trình
    slide2 = pres.slides.add_empty_slide(pres.slides[0].layout_slide)
    slide3 = pres.slides.add_empty_slide(pres.slides[0].layout_slide)

    # Tạo nền cho slide thứ hai
    slide2.background.type = slides.BackgroundType.OWN_BACKGROUND
    slide2.background.fill_format.fill_type = slides.FillType.SOLID
    slide2.background.fill_format.solid_fill_color.color = draw.Color.cyan

    # Tạo một hộp văn bản cho slide thứ hai
    autoshape = slide2.shapes.add_auto_shape(slides.ShapeType.RECTANGLE, 100, 200, 500, 200)
    autoshape.text_frame.text = "Second Slide"

    # Tạo nền cho slide thứ ba
    slide3.background.type = slides.BackgroundType.OWN_BACKGROUND
    slide3.background.fill_format.fill_type = slides.FillType.SOLID
    slide3.background.fill_format.solid_fill_color.color = draw.Color.dark_khaki

    # Tạo một hộp văn bản cho slide thứ ba
    autoshape = slide3.shapes.add_auto_shape(slides.ShapeType.RECTANGLE, 100, 200, 500, 200)
    autoshape.text_frame.text = "Trird Slide"

    #Thêm các đối tượng ZoomFrame
    zoomFrame1 = pres.slides[0].shapes.add_zoom_frame(20, 20, 250, 200, slide2)
    zoomFrame2 = pres.slides[0].shapes.add_zoom_frame(200, 250, 250, 200, slide3)

    # Tạo một hình ảnh mới cho đối tượng zoom
    image = pres.images.add_image(slides.Images.from_file("img.jpeg"))
    # Đặt hình ảnh tùy chỉnh cho đối tượng zoomFrame1
    zoomFrame1.image = image

    # Đặt định dạng khung zoom cho đối tượng zoomFrame2
    zoomFrame2.line_format.width = 5
    zoomFrame2.line_format.fill_format.fill_type = slides.FillType.SOLID
    zoomFrame2.line_format.fill_format.solid_fill_color.color = draw.Color.hot_pink
    zoomFrame2.line_format.dash_style = slides.LineDashStyle.DASH_DOT

    # Không hiển thị nền cho đối tượng zoomFrame2
    zoomFrame2.show_background = False

    # Lưu bài thuyết trình
    pres.save("presentation-zoom2.pptx", slides.export.SaveFormat.PPTX)
Section Zoom
Zoom phần là một liên kết đến một phần trong bài thuyết trình của bạn. Bạn có thể dùng zoom phần để quay lại các phần mà bạn muốn nhấn mạnh. Hoặc bạn có thể dùng chúng để làm nổi bật cách các phần của bài thuyết trình kết nối với nhau.
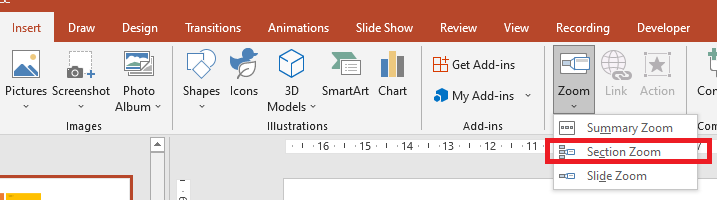
Đối với các đối tượng zoom phần, Aspose.Slides cung cấp lớp SectionZoomFrame và một số phương thức trong lớp ShapeCollection.
Creating Section Zoom Frames
Bạn có thể thêm một khung zoom phần vào slide theo cách sau:
- Tạo một thể hiện của lớp Presentation.
- Tạo một slide mới.
- Thêm nền nhận dạng cho slide đã tạo.
- Tạo một phần mới mà bạn dự định liên kết khung zoom.
- Thêm một khung zoom phần (chứa tham chiếu tới phần đã tạo) vào slide đầu tiên.
- Ghi bài thuyết trình đã sửa thành file PPTX.
Mã Python này cho bạn thấy cách tạo một khung zoom trên slide:
import aspose.slides as slides
import aspose.pydrawing as draw

with slides.Presentation() as pres:
    #Thêm một slide mới vào bài thuyết trình
    slide = pres.slides.add_empty_slide(pres.slides[0].layout_slide)

    slide.background.type = slides.BackgroundType.OWN_BACKGROUND
    slide.background.fill_format.fill_type = slides.FillType.SOLID
    slide.background.fill_format.solid_fill_color.color = draw.Color.yellow_green


    # Thêm một Section mới vào bài thuyết trình
    pres.sections.add_section("Section 1", slide)

    # Thêm một đối tượng SectionZoomFrame
    sectionZoomFrame = pres.slides[0].shapes.add_section_zoom_frame(20, 20, 300, 200, pres.sections[1])

    # Lưu bài thuyết trình
    pres.save("presentation.pptx", slides.export.SaveFormat.PPTX)
Creating Section Zoom Frames with Custom Images
Sử dụng Aspose.Slides for Python, bạn có thể tạo một khung zoom phần với một hình ảnh xem trước slide khác theo cách sau:
- Tạo một thể hiện của lớp Presentation.
- Tạo một slide mới.
- Thêm nền nhận dạng cho slide đã tạo.
- Tạo một phần mới mà bạn dự định liên kết khung zoom.
- Tạo một đối tượng PPImage bằng cách thêm hình ảnh vào bộ sưu tập Images của đối tượng Presentation sẽ được dùng để điền vào khung.
- Thêm một khung zoom phần (chứa tham chiếu tới phần đã tạo) vào slide đầu tiên.
- Ghi bài thuyết trình đã sửa thành file PPTX.
Mã Python này cho bạn thấy cách tạo một khung zoom với hình ảnh khác:
import aspose.slides as slides
import aspose.pydrawing as draw

with slides.Presentation() as pres:
    #Thêm một slide mới vào bài thuyết trình
    slide = pres.slides.add_empty_slide(pres.slides[0].layout_slide)

    slide.background.type = slides.BackgroundType.OWN_BACKGROUND
    slide.background.fill_format.fill_type = slides.FillType.SOLID
    slide.background.fill_format.solid_fill_color.color = draw.Color.yellow_green


    # Thêm một Section mới vào bài thuyết trình
    pres.sections.add_section("Section 1", slide)

    # Tạo một hình ảnh mới cho đối tượng zoom
    image = pres.images.add_image(slides.Images.from_file("img.jpeg"))

    # Thêm một đối tượng SectionZoomFrame
    sectionZoomFrame = pres.slides[0].shapes.add_section_zoom_frame(20, 20, 300, 200, pres.sections[1], image)

    # Lưu bài thuyết trình
    pres.save("presentation.pptx", slides.export.SaveFormat.PPTX)
Formatting Section Zoom Frames
Để tạo các khung zoom phần phức tạp hơn, bạn phải thay đổi định dạng của một khung đơn giản. Có một số tùy chọn định dạng mà bạn có thể áp dụng cho khung zoom phần.
Bạn có thể kiểm soát định dạng của khung zoom phần trên slide theo cách sau:
- Tạo một thể hiện của lớp Presentation.
- Tạo một slide mới.
- Thêm nền nhận dạng cho slide đã tạo.
- Tạo một phần mới mà bạn dự định liên kết khung zoom.
- Thêm một khung zoom phần (chứa tham chiếu tới phần đã tạo) vào slide đầu tiên.
- Thay đổi kích thước và vị trí cho đối tượng zoom phần đã tạo.
- Tạo một đối tượng PPImage bằng cách thêm hình ảnh vào bộ sưu tập Images của đối tượng Presentation sẽ được dùng để điền vào khung.
- Đặt một hình ảnh tùy chỉnh cho đối tượng khung zoom phần đã tạo.
- Đặt khả năng trở lại slide gốc từ phần đã liên kết.
- Xóa nền khỏi hình ảnh của đối tượng khung zoom phần.
- Thay đổi định dạng đường viền cho đối tượng khung zoom thứ hai.
- Thay đổi thời lượng chuyển đổi.
- Ghi bài thuyết trình đã sửa thành file PPTX.
Mã Python này cho bạn thấy cách thay đổi định dạng của khung zoom phần:
import aspose.slides as slides
import aspose.pydrawing as draw


with slides.Presentation() as pres:
    #Thêm một slide mới vào bài thuyết trình
    slide = pres.slides.add_empty_slide(pres.slides[0].layout_slide)
    slide.background.fill_format.fill_type = slides.FillType.SOLID
    slide.background.fill_format.solid_fill_color.color = draw.Color.yellow_green
    slide.background.type = slides.BackgroundType.OWN_BACKGROUND

    # Thêm một Section mới vào bài thuyết trình
    pres.sections.add_section("Section 1", slide)

    # Thêm một đối tượng SectionZoomFrame
    sectionZoomFrame = pres.slides[0].shapes.add_section_zoom_frame(20, 20, 300, 200, pres.sections[1])

    # Định dạng cho SectionZoomFrame
    sectionZoomFrame.x = 100
    sectionZoomFrame.y = 300
    sectionZoomFrame.width = 100
    sectionZoomFrame.height = 75

    image = pres.images.add_image(slides.Images.from_file("img.jpeg"))
    sectionZoomFrame.image = image

    sectionZoomFrame.return_to_parent = True
    sectionZoomFrame.show_background = False

    sectionZoomFrame.line_format.fill_format.fill_type = slides.FillType.SOLID
    sectionZoomFrame.line_format.fill_format.solid_fill_color.color = draw.Color.brown
    sectionZoomFrame.line_format.dash_style = slides.LineDashStyle.DASH_DOT
    sectionZoomFrame.line_format.width = 2.5

    sectionZoomFrame.transition_duration = 1.5

    # Lưu bài thuyết trình
    pres.save("presentation.pptx", slides.export.SaveFormat.PPTX)
Summary Zoom
Zoom tóm tắt giống như một trang đích nơi tất cả các phần của bài thuyết trình được hiển thị đồng thời. Khi bạn đang trình bày, bạn có thể dùng zoom để di chuyển từ một vị trí trong bài thuyết trình sang vị trí khác theo bất kỳ thứ tự nào bạn muốn. Bạn có thể sáng tạo, bỏ qua hoặc quay lại các phần của slide mà không làm gián đoạn luồng trình bày.
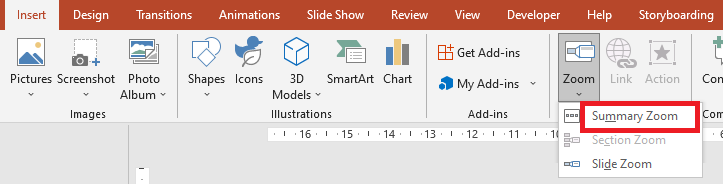
Đối với các đối tượng zoom tóm tắt, Aspose.Slides cung cấp lớp SummaryZoomFrame, SummaryZoomSection và SummaryZoomSectionCollection và một số phương thức trong lớp ShapeCollection.
Creating Summary Zoom
Bạn có thể thêm một khung zoom tóm tắt vào slide theo cách sau:
- Tạo một thể hiện của lớp Presentation.
- Tạo các slide mới với nền nhận dạng và các phần mới cho các slide đã tạo.
- Thêm khung zoom tóm tắt vào slide đầu tiên.
- Ghi bài thuyết trình đã sửa thành file PPTX.
Mã Python này cho bạn thấy cách tạo một khung zoom tóm tắt trên slide:
import aspose.slides as slides
import aspose.pydrawing as draw

with slides.Presentation() as pres:
    # Tạo mảng slide
    for slideNumber in range(5):
        # Thêm slide mới vào bài thuyết trình
        slide = pres.slides.add_empty_slide(pres.slides[0].layout_slide)

        # Tạo nền cho slide
        slide.background.type = slides.BackgroundType.OWN_BACKGROUND
        slide.background.fill_format.fill_type = slides.FillType.SOLID
        slide.background.fill_format.solid_fill_color.color = draw.Color.dark_khaki

        # Tạo một hộp văn bản cho slide
        autoshape = slide.shapes.add_auto_shape(slides.ShapeType.RECTANGLE, 100, 200, 500, 200)
        autoshape.text_frame.text = "Slide - {num}".format(num = (slideNumber + 2))

    # Tạo các đối tượng zoom cho tất cả slide trong slide đầu tiên
    for slideNumber in range(1, len(pres.slides)):
        x = (slideNumber - 1) * 100
        y = (slideNumber - 1) * 100
        zoomFrame = pres.slides[0].shapes.add_zoom_frame(x, y, 150, 120, pres.slides[slideNumber])

        # Đặt thuộc tính ReturnToParent để quay trở lại slide đầu tiên
        zoomFrame.return_to_parent = True

    # Lưu bài thuyết trình
    pres.save("presentation-zoom3.pptx", slides.export.SaveFormat.PPTX)
Adding and Removing Summary Zoom Section
Tất cả các phần trong một khung zoom tóm tắt được biểu diễn bằng các đối tượng SummaryZoomSection, được lưu trong đối tượng SummaryZoomSectionCollection. Bạn có thể thêm hoặc xóa một đối tượng phần zoom tóm tắt thông qua lớp SummaryZoomSectionCollection theo cách sau:
- Tạo một thể hiện của lớp Presentation.
- Tạo các slide mới với nền nhận dạng và các phần mới cho các slide đã tạo.
- Thêm một khung zoom tóm tắt vào slide đầu tiên.
- Thêm một slide và phần mới vào bài thuyết trình.
- Thêm phần đã tạo vào khung zoom tóm tắt.
- Xóa phần đầu tiên khỏi khung zoom tóm tắt.
- Ghi bài thuyết trình đã sửa thành file PPTX.
Mã Python này cho bạn thấy cách thêm và xóa các phần trong khung zoom tóm tắt:
import aspose.slides as slides
import aspose.pydrawing as draw


with slides.Presentation() as pres:
    #Thêm một slide mới vào bài thuyết trình
    slide = pres.slides.add_empty_slide(pres.slides[0].layout_slide)
    slide.background.fill_format.fill_type = slides.FillType.SOLID
    slide.background.fill_format.solid_fill_color.color = draw.Color.yellow_green
    slide.background.type = slides.BackgroundType.OWN_BACKGROUND

    # Thêm một section mới vào bài thuyết trình
    pres.sections.add_section("Section 1", slide)

    #Thêm một slide mới vào bài thuyết trình
    slide = pres.slides.add_empty_slide(pres.slides[0].layout_slide)
    slide.background.fill_format.fill_type = slides.FillType.SOLID
    slide.background.fill_format.solid_fill_color.color = draw.Color.aqua
    slide.background.type = slides.BackgroundType.OWN_BACKGROUND

    # Thêm một section mới vào bài thuyết trình
    pres.sections.add_section("Section 2", slide)

    # Thêm đối tượng SummaryZoomFrame
    summaryZoomFrame = pres.slides[0].shapes.add_summary_zoom_frame(150, 50, 300, 200)

    #Thêm một slide mới vào bài thuyết trình
    slide = pres.slides.add_empty_slide(pres.slides[0].layout_slide)
    slide.background.fill_format.fill_type = slides.FillType.SOLID
    slide.background.fill_format.solid_fill_color.color = draw.Color.chartreuse
    slide.background.type = slides.BackgroundType.OWN_BACKGROUND

    # Thêm một section mới vào bài thuyết trình
    section3 = pres.sections.add_section("Section 3", slide)

    # Thêm một section vào Summary Zoom
    summaryZoomFrame.summary_zoom_collection.add_summary_zoom_section(section3)

    # Xóa section khỏi Summary Zoom
    summaryZoomFrame.summary_zoom_collection.remove_summary_zoom_section(pres.sections[1])

    # Lưu bài thuyết trình
    pres.save("presentation.pptx", slides.export.SaveFormat.PPTX)
Formatting Summary Zoom Sections
Để tạo các đối tượng phần zoom tóm tắt phức tạp hơn, bạn phải thay đổi định dạng của một khung đơn giản. Có một số tùy chọn định dạng mà bạn có thể áp dụng cho một đối tượng phần zoom tóm tắt.
Bạn có thể kiểm soát định dạng cho một đối tượng phần zoom tóm tắt trong khung zoom tóm tắt theo cách sau:
- Tạo một thể hiện của lớp Presentation.
- Tạo các slide mới với nền nhận dạng và các phần mới cho các slide đã tạo.
- Thêm một khung zoom tóm tắt vào slide đầu tiên.
- Lấy một đối tượng phần zoom tóm tắt cho đối tượng đầu tiên từ
SummaryZoomSectionCollection. - Tạo một đối tượng
PPImagebằng cách thêm hình ảnh vào bộ sưu tập images của đối tượng Presentation sẽ được dùng để điền vào khung. - Đặt một hình ảnh tùy chỉnh cho đối tượng khung zoom phần đã tạo.
- Đặt khả năng trở lại slide gốc từ phần đã liên kết.
- Thay đổi định dạng đường viền cho đối tượng khung zoom thứ hai.
- Thay đổi thời lượng chuyển đổi.
- Ghi bài thuyết trình đã sửa thành file PPTX.
Mã Python này cho bạn thấy cách thay đổi định dạng cho một đối tượng phần zoom tóm tắt:
import aspose.slides as slides
import aspose.pydrawing as draw

with slides.Presentation() as pres:
    #Thêm một slide mới vào bài thuyết trình
    slide = pres.slides.add_empty_slide(pres.slides[0].layout_slide)
    slide.background.fill_format.fill_type = slides.FillType.SOLID
    slide.background.fill_format.solid_fill_color.color = draw.Color.brown
    slide.background.type = slides.BackgroundType.OWN_BACKGROUND

    # Thêm một section mới vào bài thuyết trình
    pres.sections.add_section("Section 1", slide)

    #Thêm một slide mới vào bài thuyết trình
    slide = pres.slides.add_empty_slide(pres.slides[0].layout_slide)
    slide.background.fill_format.fill_type = slides.FillType.SOLID
    slide.background.fill_format.solid_fill_color.color = draw.Color.aqua
    slide.background.type = slides.BackgroundType.OWN_BACKGROUND

    # Thêm một section mới vào bài thuyết trình
    pres.sections.add_section("Section 2", slide)

    # Thêm đối tượng SummaryZoomFrame
    summaryZoomFrame = pres.slides[0].shapes.add_summary_zoom_frame(150, 50, 300, 200)

    # Lấy đối tượng SummaryZoomSection đầu tiên
    summarySection = summaryZoomFrame.summary_zoom_collection[0]

    # Định dạng cho đối tượng SummaryZoomSection
    image = pres.images.add_image(slides.Images.from_file("img.jpeg"))
    summarySection.image = image

    summarySection.return_to_parent = False

    summarySection.line_format.fill_format.fill_type = slides.FillType.SOLID
    summarySection.line_format.fill_format.solid_fill_color.color = draw.Color.black
    summarySection.line_format.dash_style = slides.LineDashStyle.DASH_DOT
    summarySection.line_format.width = 1.5

    summarySection.transition_duration = 1.5

    # Lưu bài thuyết trình
    pres.save("presentation.pptx", slides.export.SaveFormat.PPTX)
FAQ
Can I control returning to the ‘parent’ slide after showing the target?
Yes. The Zoom frame or section has a return_to_parent behavior that, when enabled, sends viewers back to the originating slide after they visit the target content.
Can I adjust the ‘speed’ or duration of the Zoom transition?
Yes. Zoom supports setting a transition_duration so you can control how long the jump animation takes.
Are there limits on how many Zoom objects a presentation can contain?
There is no hard API limit documented. Practical limits depend on overall presentation complexity and the viewer’s performance. You can add many Zoom frames, but consider file size and rendering time.