
จัดการซูมในการนำเสนอด้วย Python
บทนำ
Zoom ใน PowerPoint ช่วยให้คุณกระโดดไปและกลับจากสไลด์ส่วนต่าง ๆ ของการนำเสนอได้อย่างรวดเร็ว เมื่อคุณกำลังพรีเซนต์ ความสามารถในการนำทางอย่างรวดเร็วผ่านเนื้อหาอาจเป็นประโยชน์อย่างมาก
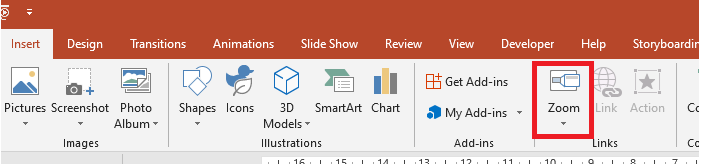
- เพื่อสรุปการนำเสนอทั้งหมดในสไลด์เดียว ใช้ Summary Zoom.
- เพื่อแสดงสไลด์ที่เลือกเท่านั้น ใช้ Slide Zoom.
- เพื่อแสดงส่วนเดียวเท่านั้น ใช้ Section Zoom.
สไลด์ซูม
สไลด์ซูมสามารถทำให้การนำเสนอของคุณมีความไดนามิกมากขึ้น โดยให้คุณนำทางระหว่างสไลด์ได้อย่างอิสระตามลำดับที่ต้องการโดยไม่ทำให้การนำเสนอหยุดชะงัก สไลด์ซูมเหมาะสำหรับการนำเสนอสั้น ๆ ที่ไม่มีหลายส่วน แต่คุณก็ยังสามารถใช้ในสถานการณ์การนำเสนอที่หลากหลายได้
สไลด์ซูมช่วยให้คุณเจาะลึกข้อมูลหลายชิ้นโดยรู้สึกเหมือนอยู่บนผืนผ้าใบเดียว
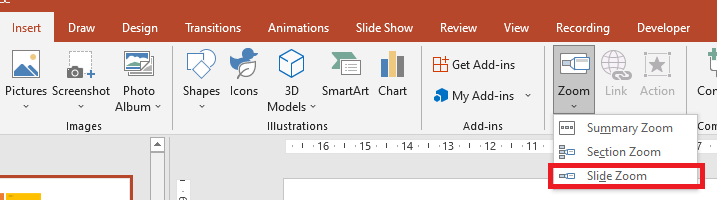
สำหรับวัตถุ slide zoom, Aspose.Slides ให้การสนับสนุน enumeration ZoomImageType, คลาส ZoomFrame และบางเมธอดในคลาส ShapeCollection
การสร้าง Zoom Frame
คุณสามารถเพิ่ม Zoom Frame ลงบนสไลด์ได้ตามขั้นตอนนี้:
- สร้างอินสแตนซ์ของคลาส Presentation
- สร้างสไลด์ใหม่ที่คุณต้องการลิงก์ไป
- เพิ่มข้อความระบุตัวตนและพื้นหลังให้กับสไลด์ที่สร้าง
- เพิ่ม Zoom Frame (ซึ่งอ้างอิงถึงสไลด์ที่สร้าง) ไปยังสไลด์แรก
- บันทึกการนำเสนอที่แก้ไขเป็นไฟล์ PPTX
โค้ดตัวอย่างนี้แสดงวิธีการสร้าง Zoom Frame บนสไลด์:
import aspose.slides as slides
import aspose.pydrawing as draw

with slides.Presentation() as pres:
    #เพิ่มสไลด์ใหม่ไปยังการนำเสนอ
    slide2 = pres.slides.add_empty_slide(pres.slides[0].layout_slide)
    slide3 = pres.slides.add_empty_slide(pres.slides[0].layout_slide)

    # สร้างพื้นหลังสำหรับสไลด์ที่สอง
    slide2.background.type = slides.BackgroundType.OWN_BACKGROUND
    slide2.background.fill_format.fill_type = slides.FillType.SOLID
    slide2.background.fill_format.solid_fill_color.color = draw.Color.cyan

    # สร้างกล่องข้อความสำหรับสไลด์ที่สอง
    autoshape = slide2.shapes.add_auto_shape(slides.ShapeType.RECTANGLE, 100, 200, 500, 200)
    autoshape.text_frame.text = "Second Slide"

    # สร้างพื้นหลังสำหรับสไลด์ที่สาม
    slide3.background.type = slides.BackgroundType.OWN_BACKGROUND
    slide3.background.fill_format.fill_type = slides.FillType.SOLID
    slide3.background.fill_format.solid_fill_color.color = draw.Color.dark_khaki

    # สร้างกล่องข้อความสำหรับสไลด์ที่สาม
    autoshape = slide3.shapes.add_auto_shape(slides.ShapeType.RECTANGLE, 100, 200, 500, 200)
    autoshape.text_frame.text = "Trird Slide"

    #เพิ่มอ็อบเจ็กต์ ZoomFrame
    pres.slides[0].shapes.add_zoom_frame(20, 20, 250, 200, slide2)
    pres.slides[0].shapes.add_zoom_frame(200, 250, 250, 200, slide3)

    # บันทึกการนำเสนอ
    pres.save("presentation-zoom.pptx", slides.export.SaveFormat.PPTX)
การสร้าง Zoom Frame ด้วยภาพแบบกำหนดเอง
ด้วย Aspose.Slides for Python ผ่าน .NET คุณสามารถสร้าง Zoom Frame ด้วยภาพที่ไม่ใช่ภาพตัวอย่างสไลด์ได้ตามขั้นตอนนี้:
- สร้างอินสแตนซ์ของคลาส
Presentation - สร้างสไลด์ใหม่ที่คุณต้องการลิงก์ไป
- เพิ่มข้อความระบุตัวตนและพื้นหลังให้กับสไลด์ที่สร้าง
- สร้างอ็อบเจ็กต์ PPImage โดยเพิ่มภาพลงในคอลเลกชัน Images ของอ็อบเจ็กต์ Presentation เพื่อใช้เติมเฟรม
- เพิ่ม Zoom Frame (ซึ่งอ้างอิงถึงสไลด์ที่สร้าง) ไปยังสไลด์แรก
- บันทึกการนำเสนอที่แก้ไขเป็นไฟล์ PPTX
โค้ด Python นี้แสดงวิธีการสร้าง Zoom Frame ด้วยภาพที่แตกต่าง:
import aspose.slides as slides
import aspose.pydrawing as draw

with slides.Presentation() as pres:
    #เพิ่มสไลด์ใหม่ไปยังการนำเสนอ
    slide = pres.slides.add_empty_slide(pres.slides[0].layout_slide)

    # สร้างพื้นหลังสำหรับสไลด์ที่สอง
    slide.background.type = slides.BackgroundType.OWN_BACKGROUND
    slide.background.fill_format.fill_type = slides.FillType.SOLID
    slide.background.fill_format.solid_fill_color.color = draw.Color.cyan

    # สร้างกล่องข้อความสำหรับสไลด์ที่สาม
    autoshape = slide.shapes.add_auto_shape(slides.ShapeType.RECTANGLE, 100, 200, 500, 200)
    autoshape.text_frame.text = "Second Slide"

    # สร้างภาพใหม่สำหรับอ็อบเจ็กต์ซูม
    image = pres.images.add_image(slides.Images.from_file("img.jpeg"))

    #เพิ่มอ็อบเจ็กต์ ZoomFrame
    pres.slides[0].shapes.add_zoom_frame(20, 20, 300, 200, slide, image)

    # บันทึกการนำเสนอ
    pres.save("presentation.pptx", slides.export.SaveFormat.PPTX)
การจัดรูปแบบ Zoom Frame
ในส่วนก่อนหน้านี้ (ข้างบน) เราได้แสดงวิธีการสร้าง Zoom Frame อย่างง่าย เพื่อสร้าง Zoom Frame ที่ซับซ้อนมากขึ้น คุณต้องปรับรูปแบบของเฟรม มีการตั้งค่าการจัดรูปแบบหลายอย่างที่คุณสามารถนำไปใช้กับ Zoom Frame
คุณสามารถควบคุมการจัดรูปแบบของ Zoom Frame บนสไลด์ได้ตามขั้นตอนนี้:
- สร้างอินสแตนซ์ของคลาส
Presentation - สร้างสไลด์ใหม่ที่ต้องการลิงก์ไป
- เพิ่มข้อความระบุตัวตนและพื้นหลังให้กับสไลด์ที่สร้าง
- เพิ่ม Zoom Frame (ซึ่งอ้างอิงถึงสไลด์ที่สร้าง) ไปยังสไลด์แรก
- สร้างอ็อบเจ็กต์ PPImage โดยเพิ่มภาพลงในคอลเลกชัน Images ของอ็อบเจ็กต์ Presentation เพื่อใช้เติมเฟรม
- ตั้งค่าภาพแบบกำหนดเองสำหรับอ็อบเจ็กต์ Zoom Frame ตัวแรก
- เปลี่ยนรูปแบบเส้นของอ็อบเจ็กต์ Zoom Frame ตัวที่สอง
- ลบพื้นหลังจากภาพของอ็อบเจ็กต์ Zoom Frame ตัวที่สอง
- บันทึกการนำเสนอที่แก้ไขเป็นไฟล์ PPTX
โค้ดตัวอย่าง Python นี้แสดงวิธีการเปลี่ยนรูปแบบของ Zoom Frame:
import aspose.slides as slides
import aspose.pydrawing as draw

with slides.Presentation() as pres:
    #เพิ่มสไลด์ใหม่ไปยังการนำเสนอ
    slide2 = pres.slides.add_empty_slide(pres.slides[0].layout_slide)
    slide3 = pres.slides.add_empty_slide(pres.slides[0].layout_slide)

    # สร้างพื้นหลังสำหรับสไลด์ที่สอง
    slide2.background.type = slides.BackgroundType.OWN_BACKGROUND
    slide2.background.fill_format.fill_type = slides.FillType.SOLID
    slide2.background.fill_format.solid_fill_color.color = draw.Color.cyan

    # สร้างกล่องข้อความสำหรับสไลด์ที่สอง
    autoshape = slide2.shapes.add_auto_shape(slides.ShapeType.RECTANGLE, 100, 200, 500, 200)
    autoshape.text_frame.text = "Second Slide"

    # สร้างพื้นหลังสำหรับสไลด์ที่สาม
    slide3.background.type = slides.BackgroundType.OWN_BACKGROUND
    slide3.background.fill_format.fill_type = slides.FillType.SOLID
    slide3.background.fill_format.solid_fill_color.color = draw.Color.dark_khaki

    # สร้างกล่องข้อความสำหรับสไลด์ที่สาม
    autoshape = slide3.shapes.add_auto_shape(slides.ShapeType.RECTANGLE, 100, 200, 500, 200)
    autoshape.text_frame.text = "Trird Slide"

    #เพิ่มอ็อบเจ็กต์ ZoomFrame
    zoomFrame1 = pres.slides[0].shapes.add_zoom_frame(20, 20, 250, 200, slide2)
    zoomFrame2 = pres.slides[0].shapes.add_zoom_frame(200, 250, 250, 200, slide3)

    # สร้างภาพใหม่สำหรับอ็อบเจ็กต์ซูม
    image = pres.images.add_image(slides.Images.from_file("img.jpeg"))
    # ตั้งค่าภาพแบบกำหนดสำหรับอ็อบเจ็กต์ zoomFrame1
    zoomFrame1.image = image

    # ตั้งค่ารูปแบบเฟรมซูมสำหรับอ็อบเจ็กต์ zoomFrame2
    zoomFrame2.line_format.width = 5
    zoomFrame2.line_format.fill_format.fill_type = slides.FillType.SOLID
    zoomFrame2.line_format.fill_format.solid_fill_color.color = draw.Color.hot_pink
    zoomFrame2.line_format.dash_style = slides.LineDashStyle.DASH_DOT

    # ไม่แสดงพื้นหลังสำหรับอ็อบเจ็กต์ zoomFrame2
    zoomFrame2.show_background = False

    # บันทึกการนำเสนอ
    pres.save("presentation-zoom2.pptx", slides.export.SaveFormat.PPTX)
Section Zoom
Section Zoom คือการลิงก์ไปยังส่วนหนึ่งของการนำเสนอ คุณสามารถใช้ Section Zoom เพื่อกลับไปยังส่วนที่ต้องการเน้นย้ำ หรือใช้เพื่อแสดงว่าชิ้นส่วนต่าง ๆ ของการนำเสนอเชื่อมต่อกันอย่างไร
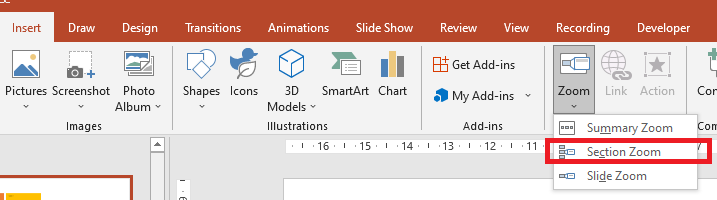
สำหรับวัตถุ section zoom, Aspose.Slides ให้คลาส SectionZoomFrame และบางเมธอดภายใต้คลาส ShapeCollection
การสร้าง Section Zoom Frame
คุณสามารถเพิ่ม Section Zoom Frame ลงบนสไลด์ได้ตามขั้นตอนนี้:
- สร้างอินสแตนซ์ของคลาส Presentation
- สร้างสไลด์ใหม่
- เพิ่มพื้นหลังระบุตัวตนให้กับสไลด์ที่สร้าง
- สร้างส่วนใหม่ที่คุณต้องการลิงก์กับ Zoom Frame
- เพิ่ม Section Zoom Frame (ซึ่งอ้างอิงถึงส่วนที่สร้าง) ไปยังสไลด์แรก
- บันทึกการนำเสนอที่แก้ไขเป็นไฟล์ PPTX
โค้ด Python นี้แสดงวิธีการสร้าง Zoom Frame บนสไลด์:
import aspose.slides as slides
import aspose.pydrawing as draw

with slides.Presentation() as pres:
    #เพิ่มสไลด์ใหม่ไปยังการนำเสนอ
    slide = pres.slides.add_empty_slide(pres.slides[0].layout_slide)

    slide.background.type = slides.BackgroundType.OWN_BACKGROUND
    slide.background.fill_format.fill_type = slides.FillType.SOLID
    slide.background.fill_format.solid_fill_color.color = draw.Color.yellow_green


    # เพิ่มส่วนใหม่ไปยังการนำเสนอ
    pres.sections.add_section("Section 1", slide)

    # เพิ่มอ็อบเจ็กต์ SectionZoomFrame
    sectionZoomFrame = pres.slides[0].shapes.add_section_zoom_frame(20, 20, 300, 200, pres.sections[1])

    # บันทึกการนำเสนอ
    pres.save("presentation.pptx", slides.export.SaveFormat.PPTX)
การสร้าง Section Zoom Frame ด้วยภาพแบบกำหนดเอง
โดยใช้ Aspose.Slides for Python คุณสามารถสร้าง Section Zoom Frame ด้วยภาพตัวอย่างสไลด์ที่แตกต่างได้ตามขั้นตอนนี้:
- สร้างอินสแตนซ์ของคลาส Presentation
- สร้างสไลด์ใหม่
- เพิ่มพื้นหลังระบุตัวตนให้กับสไลด์ที่สร้าง
- สร้างส่วนใหม่ที่คุณต้องการลิงก์กับ Zoom Frame
- สร้างอ็อบเจ็กต์ PPImage โดยเพิ่มภาพลงในคอลเลกชัน Images ของอ็อบเจ็กต์ Presentation เพื่อใช้เติมเฟรม
- เพิ่ม Section Zoom Frame (ซึ่งอ้างอิงถึงส่วนที่สร้าง) ไปยังสไลด์แรก
- บันทึกการนำเสนอที่แก้ไขเป็นไฟล์ PPTX
โค้ด Python นี้แสดงวิธีการสร้าง Zoom Frame ด้วยภาพที่แตกต่าง:
import aspose.slides as slides
import aspose.pydrawing as draw

with slides.Presentation() as pres:
    #เพิ่มสไลด์ใหม่ไปยังการนำเสนอ
    slide = pres.slides.add_empty_slide(pres.slides[0].layout_slide)

    slide.background.type = slides.BackgroundType.OWN_BACKGROUND
    slide.background.fill_format.fill_type = slides.FillType.SOLID
    slide.background.fill_format.solid_fill_color.color = draw.Color.yellow_green


    # เพิ่มส่วนใหม่ไปยังการนำเสนอ
    pres.sections.add_section("Section 1", slide)

    # สร้างภาพใหม่สำหรับอ็อบเจ็กต์ซูม
    image = pres.images.add_image(slides.Images.from_file("img.jpeg"))

    # เพิ่มอ็อบเจ็กต์ SectionZoomFrame
    sectionZoomFrame = pres.slides[0].shapes.add_section_zoom_frame(20, 20, 300, 200, pres.sections[1], image)

    # บันทึกการนำเสนอ
    pres.save("presentation.pptx", slides.export.SaveFormat.PPTX)
การจัดรูปแบบ Section Zoom Frame
เพื่อสร้าง Section Zoom Frame ที่ซับซ้อนขึ้น คุณต้องปรับรูปแบบของเฟรมง่าย ๆ มีตัวเลือกการจัดรูปแบบหลายอย่างที่คุณสามารถนำไปใช้กับ Section Zoom Frame
คุณสามารถควบคุมการจัดรูปแบบของ Section Zoom Frame บนสไลด์ได้ตามขั้นตอนนี้:
- สร้างอินสแตนซ์ของคลาส Presentation
- สร้างสไลด์ใหม่
- เพิ่มพื้นหลังระบุตัวตนให้กับสไลด์ที่สร้าง
- สร้างส่วนใหม่ที่คุณต้องการลิงก์กับ Zoom Frame
- เพิ่ม Section Zoom Frame (ซึ่งอ้างอิงถึงส่วนที่สร้าง) ไปยังสไลด์แรก
- ปรับขนาดและตำแหน่งของอ็อบเจ็กต์ Section Zoom ที่สร้าง
- สร้างอ็อบเจ็กต์ PPImage โดยเพิ่มภาพลงในคอลเลกชัน Images ของอ็อบเจ็กต์ Presentation เพื่อใช้เติมเฟรม
- ตั้งค่าภาพแบบกำหนดเองสำหรับอ็อบเจ็กต์ Section Zoom Frame ที่สร้าง
- ตั้งค่าความสามารถ คืนสไลด์เดิมจากส่วนที่ลิงก์
- ลบพื้นหลังจากภาพของอ็อบเจ็กต์ Section Zoom Frame
- เปลี่ยนรูปแบบเส้นของอ็อบเจ็กต์ Zoom Frame ตัวที่สอง
- เปลี่ยนระยะเวลาในการเปลี่ยนซีน
- บันทึกการนำเสนอที่แก้ไขเป็นไฟล์ PPTX
โค้ด Python นี้แสดงวิธีการเปลี่ยนรูปแบบของ Section Zoom Frame:
import aspose.slides as slides
import aspose.pydrawing as draw


with slides.Presentation() as pres:
    #เพิ่มสไลด์ใหม่ไปยังการนำเสนอ
    slide = pres.slides.add_empty_slide(pres.slides[0].layout_slide)
    slide.background.fill_format.fill_type = slides.FillType.SOLID
    slide.background.fill_format.solid_fill_color.color = draw.Color.yellow_green
    slide.background.type = slides.BackgroundType.OWN_BACKGROUND

    # เพิ่มส่วนใหม่ไปยังการนำเสนอ
    pres.sections.add_section("Section 1", slide)

    # เพิ่มอ็อบเจ็กต์ SectionZoomFrame
    sectionZoomFrame = pres.slides[0].shapes.add_section_zoom_frame(20, 20, 300, 200, pres.sections[1])

    # การจัดรูปแบบสำหรับ SectionZoomFrame
    sectionZoomFrame.x = 100
    sectionZoomFrame.y = 300
    sectionZoomFrame.width = 100
    sectionZoomFrame.height = 75

    image = pres.images.add_image(slides.Images.from_file("img.jpeg"))
    sectionZoomFrame.image = image

    sectionZoomFrame.return_to_parent = True
    sectionZoomFrame.show_background = False

    sectionZoomFrame.line_format.fill_format.fill_type = slides.FillType.SOLID
    sectionZoomFrame.line_format.fill_format.solid_fill_color.color = draw.Color.brown
    sectionZoomFrame.line_format.dash_style = slides.LineDashStyle.DASH_DOT
    sectionZoomFrame.line_format.width = 2.5

    sectionZoomFrame.transition_duration = 1.5

    # บันทึกการนำเสนอ
    pres.save("presentation.pptx", slides.export.SaveFormat.PPTX)
Summary Zoom
Summary Zoom เปรียบเสมือนหน้าลงจอดที่แสดงส่วนต่าง ๆ ของการนำเสนอทั้งหมดพร้อมกัน เมื่อคุณพรีเซนต์ คุณสามารถใช้ Zoom เพื่อเดินทางจากตำแหน่งหนึ่งไปยังอีกตำแหน่งหนึ่งในลำดับใดก็ได้ คุณสามารถสร้างสรรค์ คัดลัด หรือกลับมาดูส่วนต่าง ๆ ของสไลด์โชว์โดยไม่ทำให้การนำเสนอหยุดชะงัก
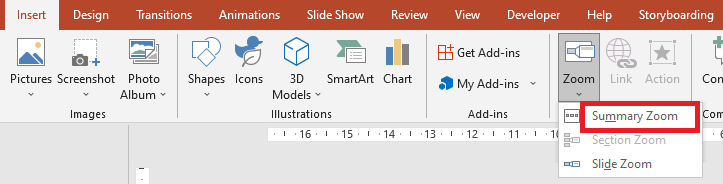
สำหรับวัตถุ summary zoom, Aspose.Slides ให้คลาส SummaryZoomFrame, SummaryZoomSection และ SummaryZoomSectionCollection พร้อมเมธอดบางอย่างภายใต้คลาส ShapeCollection
การสร้าง Summary Zoom
คุณสามารถเพิ่ม Summary Zoom Frame ลงบนสไลด์ได้ตามขั้นตอนนี้:
- สร้างอินสแตนซ์ของคลาส Presentation
- สร้างสไลด์ใหม่พร้อมพื้นหลังระบุตัวตนและส่วนใหม่สำหรับสไลด์ที่สร้าง
- เพิ่ม Summary Zoom Frame ไปยังสไลด์แรก
- บันทึกการนำเสนอที่แก้ไขเป็นไฟล์ PPTX
โค้ด Python นี้แสดงวิธีการสร้าง Summary Zoom Frame บนสไลด์:
import aspose.slides as slides
import aspose.pydrawing as draw

with slides.Presentation() as pres:
    # สร้างอาร์เรย์สไลด์
    for slideNumber in range(5):
        #เพิ่มสไลด์ใหม่ไปยังการนำเสนอ
        slide = pres.slides.add_empty_slide(pres.slides[0].layout_slide)

        # สร้างพื้นหลังสำหรับสไลด์
        slide.background.type = slides.BackgroundType.OWN_BACKGROUND
        slide.background.fill_format.fill_type = slides.FillType.SOLID
        slide.background.fill_format.solid_fill_color.color = draw.Color.dark_khaki

        # สร้างกล่องข้อความสำหรับสไลด์
        autoshape = slide.shapes.add_auto_shape(slides.ShapeType.RECTANGLE, 100, 200, 500, 200)
        autoshape.text_frame.text = "Slide - {num}".format(num = (slideNumber + 2))

    # สร้างอ็อบเจ็กต์ซูมสำหรับสไลด์ทั้งหมดในสไลด์แรก
    for slideNumber in range(1, len(pres.slides)):
        x = (slideNumber - 1) * 100
        y = (slideNumber - 1) * 100
        zoomFrame = pres.slides[0].shapes.add_zoom_frame(x, y, 150, 120, pres.slides[slideNumber])

        # ตั้งค่าคุณสมบัติ ReturnToParent เพื่อกลับไปยังสไลด์แรก
        zoomFrame.return_to_parent = True

    # บันทึกการนำเสนอ
    pres.save("presentation-zoom3.pptx", slides.export.SaveFormat.PPTX)
เพิ่มและลบ Summary Zoom Section
ส่วนทั้งหมดใน Summary Zoom Frame แทนด้วยอ็อบเจ็กต์ SummaryZoomSection ที่เก็บอยู่ในอ็อบเจ็กต์ SummaryZoomSectionCollection คุณสามารถเพิ่มหรือเอาออกอ็อบเจ็กต์ Summary Zoom Section ผ่านคลาส SummaryZoomSectionCollection ได้ตามขั้นตอนนี้:
- สร้างอินสแตนซ์ของคลาส Presentation
- สร้างสไลด์ใหม่พร้อมพื้นหลังระบุตัวตนและส่วนใหม่สำหรับสไลด์ที่สร้าง
- เพิ่ม Summary Zoom Frame เข้าไปในสไลด์แรก
- เพิ่มสไลด์และส่วนใหม่ลงในการนำเสนอ
- เพิ่มส่วนที่สร้างเข้าไปใน Summary Zoom Frame
- ลบส่วนแรกออกจาก Summary Zoom Frame
- บันทึกการนำเสนอที่แก้ไขเป็นไฟล์ PPTX
โค้ด Python นี้แสดงวิธีการเพิ่มและลบส่วนใน Summary Zoom Frame:
import aspose.slides as slides
import aspose.pydrawing as draw


with slides.Presentation() as pres:
    #เพิ่มสไลด์ใหม่ไปยังการนำเสนอ
    slide = pres.slides.add_empty_slide(pres.slides[0].layout_slide)
    slide.background.fill_format.fill_type = slides.FillType.SOLID
    slide.background.fill_format.solid_fill_color.color = draw.Color.yellow_green
    slide.background.type = slides.BackgroundType.OWN_BACKGROUND

    # เพิ่มส่วนใหม่ไปยังการนำเสนอ
    pres.sections.add_section("Section 1", slide)

    #เพิ่มสไลด์ใหม่ไปยังการนำเสนอ
    slide = pres.slides.add_empty_slide(pres.slides[0].layout_slide)
    slide.background.fill_format.fill_type = slides.FillType.SOLID
    slide.background.fill_format.solid_fill_color.color = draw.Color.aqua
    slide.background.type = slides.BackgroundType.OWN_BACKGROUND

    # เพิ่มส่วนใหม่ไปภายในการนำเสนอ
    pres.sections.add_section("Section 2", slide)

    # เพิ่มอ็อบเจ็กต์ SummaryZoomFrame
    summaryZoomFrame = pres.slides[0].shapes.add_summary_zoom_frame(150, 50, 300, 200)

    #เพิ่มสไลด์ใหม่ไปยังการนำเสนอ
    slide = pres.slides.add_empty_slide(pres.slides[0].layout_slide)
    slide.background.fill_format.fill_type = slides.FillType.SOLID
    slide.background.fill_format.solid_fill_color.color = draw.Color.chartreuse
    slide.background.type = slides.BackgroundType.OWN_BACKGROUND

    # เพิ่มส่วนใหม่ไปยังการนำเสนอ
    section3 = pres.sections.add_section("Section 3", slide)

    # เพิ่มส่วนเข้าไปใน Summary Zoom
    summaryZoomFrame.summary_zoom_collection.add_summary_zoom_section(section3)

    # ลบส่วนออกจาก Summary Zoom
    summaryZoomFrame.summary_zoom_collection.remove_summary_zoom_section(pres.sections[1])

    # บันทึกการนำเสนอ
    pres.save("presentation.pptx", slides.export.SaveFormat.PPTX)
การจัดรูปแบบ Summary Zoom Section
เพื่อสร้างอ็อบเจ็กต์ Summary Zoom Section ที่ซับซ้อนขึ้น คุณต้องปรับรูปแบบของเฟรมง่าย ๆ มีตัวเลือกการจัดรูปแบบหลายอย่างที่คุณสามารถนำไปใช้กับอ็อบเจ็กต์ Summary Zoom Section
คุณสามารถควบคุมการจัดรูปแบบของอ็อบเจ็กต์ Summary Zoom Section ภายใน Summary Zoom Frame ได้ตามขั้นตอนนี้:
- สร้างอินสแตนซ์ของคลาส Presentation
- สร้างสไลด์ใหม่พร้อมพื้นหลังระบุตัวตนและส่วนใหม่สำหรับสไลด์ที่สร้าง
- เพิ่ม Summary Zoom Frame ไปยังสไลด์แรก
- ดึงอ็อบเจ็กต์ Summary Zoom Section สำหรับอ็อบเจ็กต์แรกจาก
SummaryZoomSectionCollection - สร้างอ็อบเจ็กต์
PPImageโดยเพิ่มภาพลงในคอลเลกชัน Images ของอ็อบเจ็กต์ Presentation เพื่อใช้เติมเฟรม - ตั้งค่าภาพแบบกำหนดเองสำหรับอ็อบเจ็กต์ Section Zoom Frame ที่สร้าง
- ตั้งค่าความสามารถ คืนสไลด์เดิมจากส่วนที่ลิงก์
- เปลี่ยนรูปแบบเส้นของอ็อบเจ็กต์ Zoom Frame ตัวที่สอง
- เปลี่ยนระยะเวลาในการเปลี่ยนซีน
- บันทึกการนำเสนอที่แก้ไขเป็นไฟล์ PPTX
โค้ด Python นี้แสดงวิธีการเปลี่ยนรูปแบบของอ็อบเจ็กต์ Summary Zoom Section:
import aspose.slides as slides
import aspose.pydrawing as draw

with slides.Presentation() as pres:
    #เพิ่มสไลด์ใหม่ไปยังการนำเสนอ
    slide = pres.slides.add_empty_slide(pres.slides[0].layout_slide)
    slide.background.fill_format.fill_type = slides.FillType.SOLID
    slide.background.fill_format.solid_fill_color.color = draw.Color.brown
    slide.background.type = slides.BackgroundType.OWN_BACKGROUND

    # เพิ่มส่วนใหม่ไปยังการนำเสนอ
    pres.sections.add_section("Section 1", slide)

    #เพิ่มสไลด์ใหม่ไปยังการนำเสนอ
    slide = pres.slides.add_empty_slide(pres.slides[0].layout_slide)
    slide.background.fill_format.fill_type = slides.FillType.SOLID
    slide.background.fill_format.solid_fill_color.color = draw.Color.aqua
    slide.background.type = slides.BackgroundType.OWN_BACKGROUND

    # เพิ่มส่วนใหม่ไปยังการนำเสนอ
    pres.sections.add_section("Section 2", slide)

    # เพิ่มอ็อบเจ็กต์ SummaryZoomFrame
    summaryZoomFrame = pres.slides[0].shapes.add_summary_zoom_frame(150, 50, 300, 200)

    # ดึงอ็อบเจ็กต์ SummaryZoomSection ตัวแรก
    summarySection = summaryZoomFrame.summary_zoom_collection[0]

    # การจัดรูปแบบสำหรับอ็อบเจ็กต์ SummaryZoomSection
    image = pres.images.add_image(slides.Images.from_file("img.jpeg"))
    summarySection.image = image

    summarySection.return_to_parent = False

    summarySection.line_format.fill_format.fill_type = slides.FillType.SOLID
    summarySection.line_format.fill_format.solid_fill_color.color = draw.Color.black
    summarySection.line_format.dash_style = slides.LineDashStyle.DASH_DOT
    summarySection.line_format.width = 1.5

    summarySection.transition_duration = 1.5

    # บันทึกการนำเสนอ
    pres.save("presentation.pptx", slides.export.SaveFormat.PPTX)
FAQ
ฉันสามารถควบคุมการคืนสู่สไลด์ “แม่” หลังจากแสดงเป้าหมายได้หรือไม่?
ใช่. Zoom frame หรือ section มีพฤติกรรม return_to_parent ซึ่งเมื่อเปิดใช้งานจะส่งผู้ชมกลับไปยังสไลด์ต้นทางหลังจากเยี่ยมชมเนื้อหาเป้าหมาย
ฉันสามารถปรับความ “เร็ว” หรือระยะเวลาในการเปลี่ยนซีนของ Zoom ได้หรือไม่?
ใช่. Zoom รองรับการตั้งค่า transition_duration เพื่อให้คุณควบคุมระยะเวลาของการกระโดดแอนิเมชัน
มีขีดจำกัดจำนวนวัตถุ Zoom ที่การนำเสนอสามารถมีได้หรือไม่?
ไม่มีขีดจำกัด API ที่ระบุอย่างชัดเจน ขีดจำกัดเชิงปฏิบัติจะแตกต่างตามความซับซ้อนของการนำเสนอโดยรวมและประสิทธิภาพของผู้ชม คุณสามารถเพิ่ม Zoom frame ได้หลายตัว แต่ควรคำนึงถึงขนาดไฟล์และเวลาเรนเดอร์