Analyzing your prompt, please hold on...
An error occurred while retrieving the results. Please refresh the page and try again.
viewBoxThe viewBox attribute is a powerful feature in SVG that controls the scaling and positioning of graphics within the viewport. It acts as a flexible window inside the SVG canvas, letting you decide which part of the drawing is visible and how it should fit into a given space. Because viewBox works on a coordinate‑based system, SVG graphics can be resized without quality loss or distortion.
This article covers:
viewBoxviewBoxviewBoxTo discuss viewBox effectively, we first define the three core concepts.
SVG canvas – The infinite virtual space where all SVG graphics are drawn. Think of it as an endless sheet of paper without borders. You only see the portion defined by the viewport.
SVG viewport – The visible area where the SVG content is rendered. It is defined by the width and height attributes of the <svg> element and works like a window onto the canvas.
1<svg width="500" height="500">...</svg>Initial coordinate system – The default x‑y plane applied to the canvas. The origin (0,0) is at the top‑left corner, the positive x‑axis points right, and the positive y‑axis points down. Units are pixels unless otherwise specified. See the article on SVG coordinate systems and units.
User coordinate system – The system that maps user‑defined units to screen pixels. Applying a viewBox creates a new user coordinate system relative to the initial one, allowing you to scale, rotate, skew, or flip the content.
viewBox worksThe viewBox attribute defines a rectangular region of the canvas and consists of four whitespace‑separated numbers:
| Values | Description | Default |
|---|---|---|
| min-x | X-coordinate of the viewBox’s top-left corner | 0 |
| min-y | Y-coordinate of the viewBox’s top-left corner | 0 |
| width | Width of the viewBox rectangle | — |
| height | Height of the viewBox rectangle | — |
1viewBox="min-x min-y width height"When present, the viewBox maps the specified canvas area to the viewport, enabling both scaling and cropping.
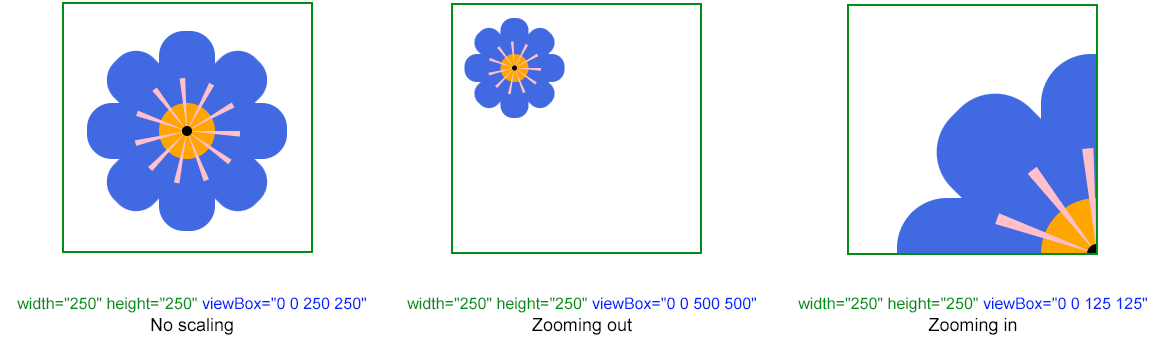
ViewBox syntax1<svg width="250" height="250" viewBox="0 0 250 250" xmlns="http://www.w3.org/2000/svg">
2 …
3</svg>min‑x / min‑y shifts the origin, effectively cropping the image.width / height scales the image up or down.The figure below illustrates three scenarios: no scaling, zoom‑out, and zoom‑in.
Note: In all illustrations, the viewport is shown in green and the viewBox region in blue.
 1<svg width="250" height="250" viewBox="0 0 250 250" xmlns="http://www.w3.org/2000/svg">
 2  <g fill="RoyalBlue">
 3    <rect x="25" y="100" rx="25" ry="25" width="200" height="56" />
 4    <rect x="25" y="100" rx="25" ry="25" width="200" height="56" transform="rotate(90 125 128)" />
 5    <rect x="25" y="100" rx="25" ry="25" width="200" height="56" transform="rotate(-45 125 128)" />
 6    <rect x="25" y="100" rx="25" ry="25" width="200" height="56" transform="rotate(45 125 128)" />
 7  </g>
 8  <circle cx="125" cy="128" r="28" stroke="pink" stroke-width="50" stroke-dasharray="3 13" fill="Orange" />
 9  <circle cx="125" cy="128" r="5" />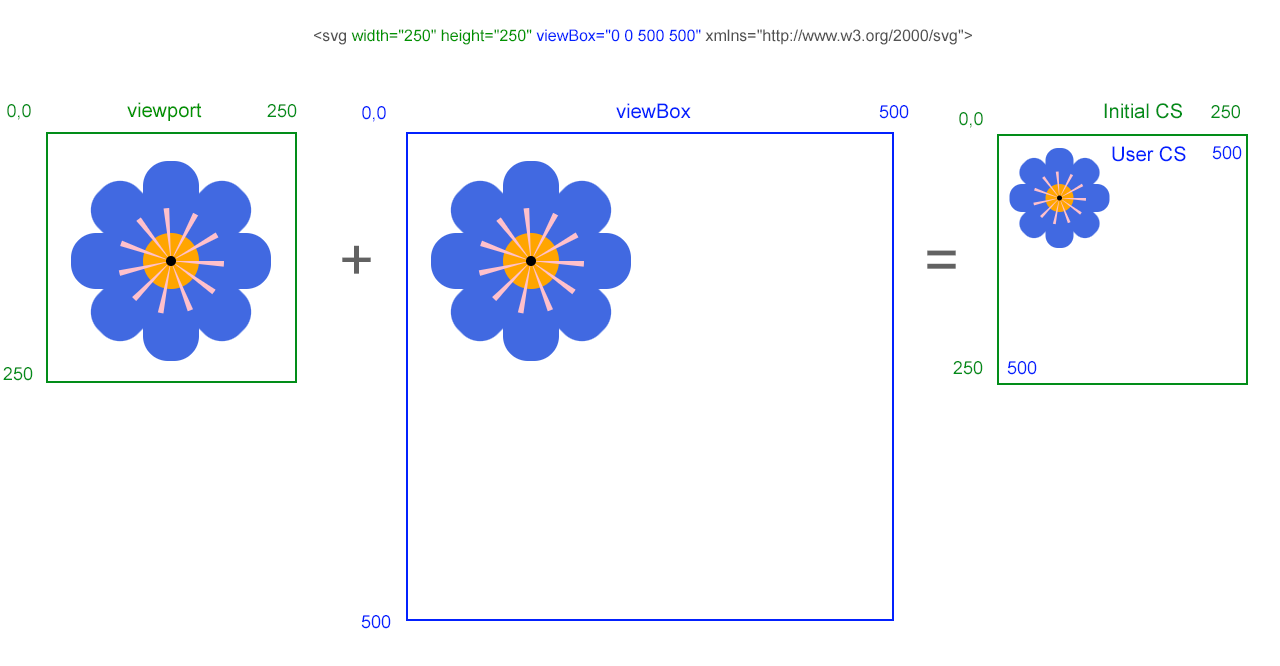
10</svg>viewBoxLet’s start by looking at scaling, which we can do with the last two viewBox parameters: width and height. We will leave the first two parameters at 0 0 for now. If the SVG viewBox width and height parameters are the same dimensions as the viewport, then there is no zoom in or zoom out. This means that nothing changes.
viewBox larger than viewport)When the viewBox’s width and height are larger than the viewport dimensions, the browser fits the larger canvas area into the smaller viewport, resulting in a smaller visual size.
The preserveAspectRatio attribute can fine‑tune how this scaling behaves.
viewBox smaller than viewport)If the viewBox is smaller than the viewport, the content is enlarged to fill the available space. Parts that exceed the viewport may be cropped.

viewBoxThe viewBox is a very useful tool for cropping images. The easiest way to crop the image is by using the min-x and min-y coordinates. Let’s look at how to crop the image to the left or right.
Setting a negative min‑x moves the viewBox left, cutting off the right side of the image.
1<svg width="250" height="250" viewBox="-100 0 250 250" …>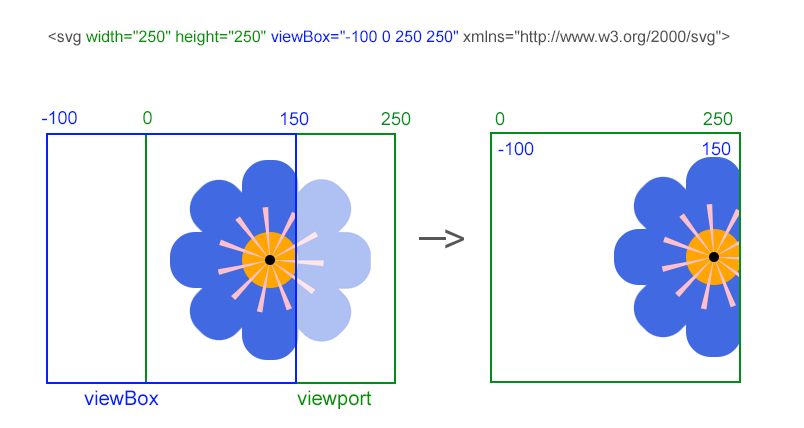
A positive min‑x shifts the viewBox right, removing the left portion.
1<svg width="250" height="250" viewBox="100 0 250 250" …>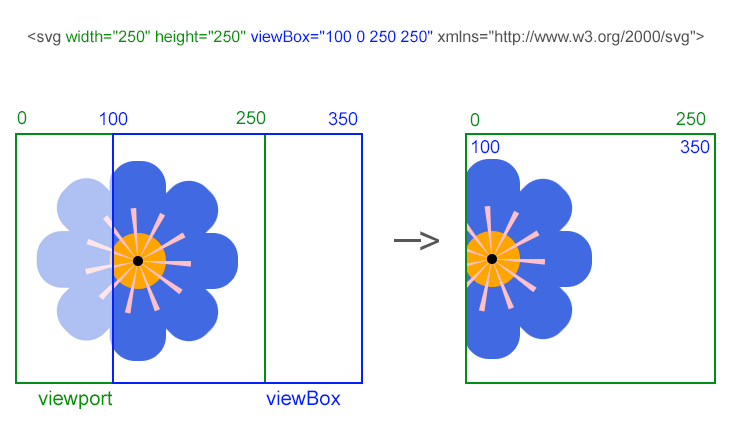
viewBoxIt defines a rectangular region of the SVG canvas and maps that region to the element’s viewport, enabling scalable and crop‑able graphics.
width and height set the size of the viewport in CSS pixels, while viewBox determines which portion of the canvas is displayed and how it is scaled to fit the viewport.
Yes. Combine viewBox with width="100%" and height="auto" (or omit them) to let the SVG scale fluidly while preserving its aspect ratio.
It controls how the viewBox content aligns within the viewport when the aspect ratios differ, allowing you to stretch, meet, or slice the image as needed.
No, but it is highly recommended because it provides a consistent coordinate system across different display sizes, which simplifies animation calculations.
The viewBox attribute was introduced in the SVG 1.0 specification (2001) as a means to make vector graphics scalable across devices and resolutions. Its primary purpose was to separate the definition of graphics from the display size, ensuring that SVG images could be reused without loss of quality.
To learn more and get SVG code examples for scaling, moving, rotating, and skewing SVG graphics using the SVG transform attribute, please go to the
SVG Transformation article.
Read the
SVG Transformations – C# Examples article to get C# code examples for rotating, scaling, translating, and skewing SVG graphics using Aspose.SVG for .NET library.
| Problem | Cause | Solution |
|---|---|---|
| SVG appears stretched or squashed | viewBox aspect ratio does not match viewport and preserveAspectRatio is omitted | Add preserveAspectRatio="xMidYMid meet" (or another appropriate value) to keep proportions |
| Part of the image is cut off unexpectedly | min‑x/min‑y values are set incorrectly, shifting the viewBox outside the desired area | Verify the coordinate origin and adjust min‑x/min‑y so the viewBox covers the intended region |
| Scaling looks blurry on high‑DPI screens | Using pixel‑based width/height without viewBox | Keep viewBox and set width="100%" (or use CSS) so the browser handles resolution scaling |
| ViewBox does not respond to CSS changes | Inline width/height attributes override CSS | Remove explicit width/height from the SVG tag and control size via CSS or container dimensions |
viewBox attribute is ignored | Syntax error – missing quotes or wrong number of values | Ensure the attribute follows the exact viewBox="min-x min-y width height" format |
| Task | Example |
|---|---|
| Zoom in 2× without altering the original SVG | <svg width="250" height="250" viewBox="0 0 125 125"> |
| Crop 50 units from the right side | svg width="250" height="250" viewBox="-50 0 250 250" |
| Preserve aspect ratio while filling the viewport | <svg width="250" height="250" viewBox="0 0 250 250" preserveAspectRatio="xMidYMid slice"> |
| Combine scaling and translation | <svg width="250" height="250" viewBox="-100 -100 500 500"> |
The viewBox attribute is a versatile tool that defines how SVG graphics are scaled, positioned, and cropped within the viewport. By specifying four key parameters – min‑x, min‑y, width, and height – you control the visible area of the SVG canvas and map it to the viewport. This mapping enables seamless scaling, allowing SVG graphics to be resized without quality loss or distortion.
Adjusting viewBox modifies the user coordinate system relative to the initial system. Changing min‑x/min‑y shifts the visible region (cropping), while altering width/height scales the image up or down. A larger viewBox creates a zoom‑out effect; a smaller viewBox creates a zoom‑in effect. Introduced in SVG 1.0, viewBox remains essential for building responsive, resolution‑independent graphics.
Analyzing your prompt, please hold on...
An error occurred while retrieving the results. Please refresh the page and try again.