Crea una tabella

Aspose.Words consente agli utenti di creare tabelle in un documento da zero e fornisce diversi metodi per farlo. Questo articolo presenta i dettagli su come aggiungere tabelle formattate al documento utilizzando ciascun metodo, nonché un confronto tra ciascun metodo alla fine dell’articolo.

Stili di tabella predefiniti

Alla tabella appena creata vengono assegnati valori predefiniti simili a quelli utilizzati in Microsoft Word:

Proprietà tabella Predefinito in Aspose.Words
Border Style Single
Border Width 1/2 pt
Border Color Black
Left and Right Padding 5.4 pts
AutoFit Mode AutoFit to Window
Allow AutoFit True

Crea una tabella con DocumentBuilder

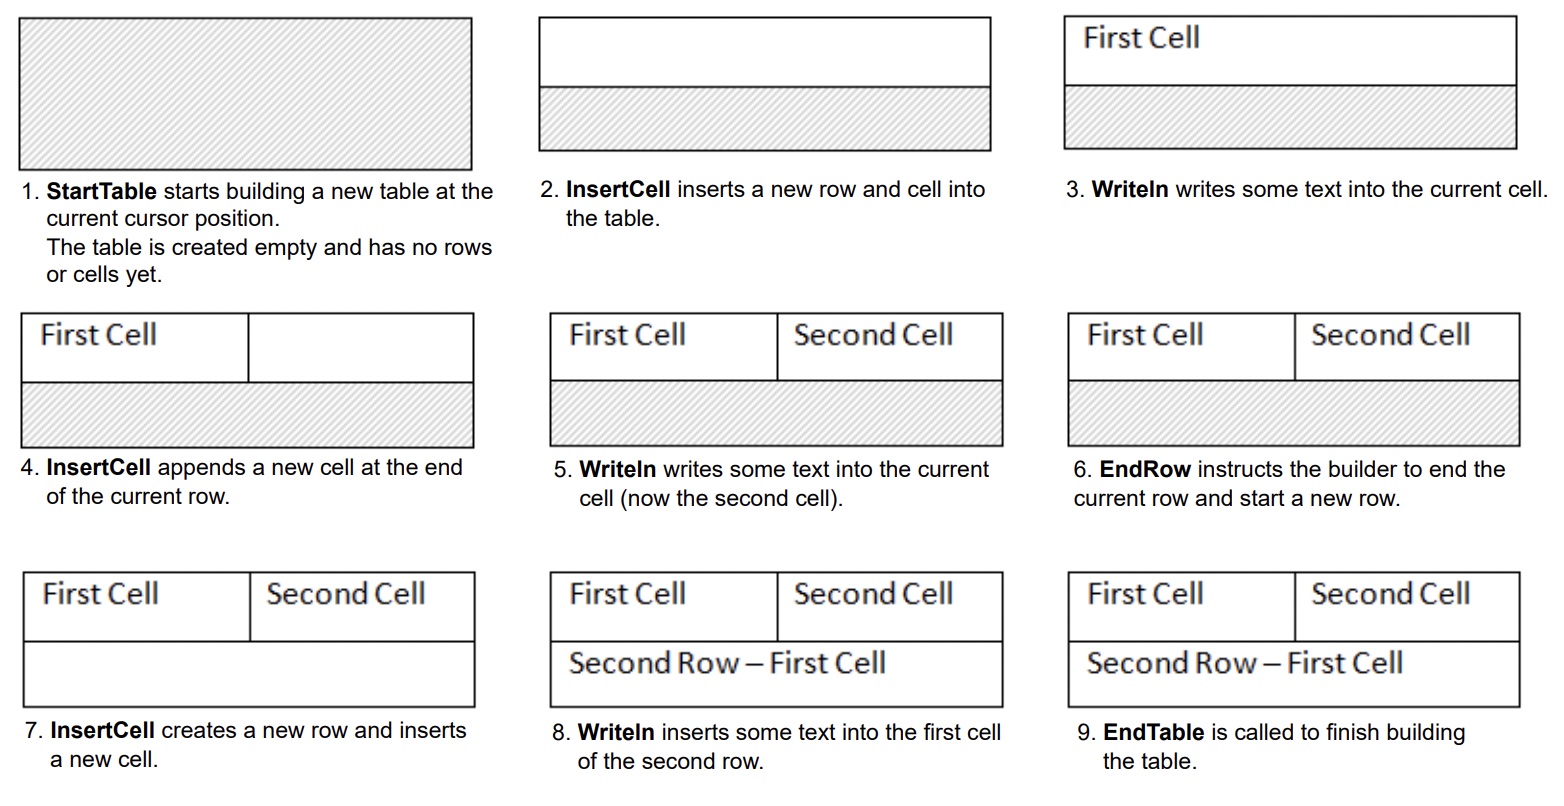
In Aspose.Words, gli utenti possono creare una tabella in un documento utilizzando DocumentBuilder. L’algoritmo di base per creare una tabella è il seguente:

  1. Inizia la tabella con StartTable
  2. Aggiungi una cella alla tabella utilizzando InsertCell: questo avvia automaticamente una nuova riga
  3. Facoltativamente, utilizzare la proprietà CellFormat per specificare la formattazione della cella
  4. Inserisci il contenuto della cella utilizzando i metodi DocumentBuilder appropriati come Writeln, InsertImage e altri
  5. Ripetere i passaggi 2-4 fino al completamento della riga
  6. Chiama EndRow per terminare la riga corrente
  7. Facoltativamente, utilizzare la proprietà RowFormat per specificare la formattazione della riga
  8. Ripetere i passaggi da 2 a 7 fino al completamento della tabella
  9. Chiama EndTable per completare la creazione della tabella

Il processo di creazione di una tabella può essere visto chiaramente nella seguente immagine:

creating-table-process

L’esempio di codice seguente mostra come creare una tabella semplice utilizzando DocumentBuilder con formattazione predefinita:

// For complete examples and data files, please go to https://github.com/aspose-words/Aspose.Words-for-.NET.git.
Document doc = new Document();
DocumentBuilder builder = new DocumentBuilder(doc);
// Start building the table.
builder.StartTable();
builder.InsertCell();
builder.Write("Row 1, Cell 1 Content.");
// Build the second cell.
builder.InsertCell();
builder.Write("Row 1, Cell 2 Content.");
// Call the following method to end the row and start a new row.
builder.EndRow();
// Build the first cell of the second row.
builder.InsertCell();
builder.Write("Row 2, Cell 1 Content");
// Build the second cell.
builder.InsertCell();
builder.Write("Row 2, Cell 2 Content.");
builder.EndRow();
// Signal that we have finished building the table.
builder.EndTable();
doc.Save(ArtifactsDir + "WorkingWithTables.CreateSimpleTable.docx");

Il seguente esempio di codice mostra come creare una tabella formattata utilizzando DocumentBuilder:

// For complete examples and data files, please go to https://github.com/aspose-words/Aspose.Words-for-.NET.git.
Document doc = new Document();
DocumentBuilder builder = new DocumentBuilder(doc);
Table table = builder.StartTable();
builder.InsertCell();
// Table wide formatting must be applied after at least one row is present in the table.
table.LeftIndent = 20.0;
// Set height and define the height rule for the header row.
builder.RowFormat.Height = 40.0;
builder.RowFormat.HeightRule = HeightRule.AtLeast;
builder.CellFormat.Shading.BackgroundPatternColor = Color.FromArgb(198, 217, 241);
builder.ParagraphFormat.Alignment = ParagraphAlignment.Center;
builder.Font.Size = 16;
builder.Font.Name = "Arial";
builder.Font.Bold = true;
builder.CellFormat.Width = 100.0;
builder.Write("Header Row,\n Cell 1");
// We don't need to specify this cell's width because it's inherited from the previous cell.
builder.InsertCell();
builder.Write("Header Row,\n Cell 2");
builder.InsertCell();
builder.CellFormat.Width = 200.0;
builder.Write("Header Row,\n Cell 3");
builder.EndRow();
builder.CellFormat.Shading.BackgroundPatternColor = Color.White;
builder.CellFormat.Width = 100.0;
builder.CellFormat.VerticalAlignment = CellVerticalAlignment.Center;
// Reset height and define a different height rule for table body.
builder.RowFormat.Height = 30.0;
builder.RowFormat.HeightRule = HeightRule.Auto;
builder.InsertCell();
// Reset font formatting.
builder.Font.Size = 12;
builder.Font.Bold = false;
builder.Write("Row 1, Cell 1 Content");
builder.InsertCell();
builder.Write("Row 1, Cell 2 Content");
builder.InsertCell();
builder.CellFormat.Width = 200.0;
builder.Write("Row 1, Cell 3 Content");
builder.EndRow();
builder.InsertCell();
builder.CellFormat.Width = 100.0;
builder.Write("Row 2, Cell 1 Content");
builder.InsertCell();
builder.Write("Row 2, Cell 2 Content");
builder.InsertCell();
builder.CellFormat.Width = 200.0;
builder.Write("Row 2, Cell 3 Content.");
builder.EndRow();
builder.EndTable();
doc.Save(ArtifactsDir + "WorkingWithTables.FormattedTable.docx");

Il seguente esempio di codice mostra come inserire una tabella nidificata utilizzando DocumentBuilder:

// For complete examples and data files, please go to https://github.com/aspose-words/Aspose.Words-for-.NET.git.
Document doc = new Document();
DocumentBuilder builder = new DocumentBuilder(doc);
Cell cell = builder.InsertCell();
builder.Writeln("Outer Table Cell 1");
builder.InsertCell();
builder.Writeln("Outer Table Cell 2");
// This call is important to create a nested table within the first table.
// Without this call, the cells inserted below will be appended to the outer table.
builder.EndTable();
// Move to the first cell of the outer table.
builder.MoveTo(cell.FirstParagraph);
// Build the inner table.
builder.InsertCell();
builder.Writeln("Inner Table Cell 1");
builder.InsertCell();
builder.Writeln("Inner Table Cell 2");
builder.EndTable();
doc.Save(ArtifactsDir + "WorkingWithTables.NestedTable.docx");
view raw nested-table.cs hosted with ❤ by GitHub

Crea una tabella tramite DOM (Document Object Model)

Puoi inserire tabelle direttamente nel DOM aggiungendo un nuovo nodo Table in una posizione specifica.

Tieni presente che subito dopo la creazione del nodo della tabella, la tabella stessa sarà completamente vuota, ovvero non conterrà ancora righe e celle. Per inserire righe e celle in una tabella, aggiungere i nodi secondari Row e Cell appropriati all’DOM.

Il seguente esempio di codice mostra come creare una nuova tabella da zero aggiungendo i nodi figlio appropriati all’albero del documento:

// For complete examples and data files, please go to https://github.com/aspose-words/Aspose.Words-for-.NET.git.
Document doc = new Document();
// We start by creating the table object. Note that we must pass the document object
// to the constructor of each node. This is because every node we create must belong
// to some document.
Table table = new Table(doc);
doc.FirstSection.Body.AppendChild(table);
// Here we could call EnsureMinimum to create the rows and cells for us. This method is used
// to ensure that the specified node is valid. In this case, a valid table should have at least one Row and one cell.
// Instead, we will handle creating the row and table ourselves.
// This would be the best way to do this if we were creating a table inside an algorithm.
Row row = new Row(doc);
row.RowFormat.AllowBreakAcrossPages = true;
table.AppendChild(row);
Cell cell = new Cell(doc);
cell.CellFormat.Shading.BackgroundPatternColor = Color.LightBlue;
cell.CellFormat.Width = 80;
cell.AppendChild(new Paragraph(doc));
cell.FirstParagraph.AppendChild(new Run(doc, "Row 1, Cell 1 Text"));
row.AppendChild(cell);
// We would then repeat the process for the other cells and rows in the table.
// We can also speed things up by cloning existing cells and rows.
row.AppendChild(cell.Clone(false));
row.LastCell.AppendChild(new Paragraph(doc));
row.LastCell.FirstParagraph.AppendChild(new Run(doc, "Row 1, Cell 2 Text"));
// We can now apply any auto fit settings.
table.AutoFit(AutoFitBehavior.FixedColumnWidths);
doc.Save(ArtifactsDir + "WorkingWithTables.InsertTableDirectly.docx");

Crea una tabella da HTML

Aspose.Words supporta l’inserimento di contenuto in un documento da un’origine HTML utilizzando il metodo InsertHtml. L’input può essere una pagina HTML completa o solo uno snippet parziale.

Utilizzando il metodo InsertHtml, gli utenti possono inserire tabelle nel documento tramite tag di tabella come <table>, <tr>, <td>.

Il seguente esempio di codice mostra come inserire una tabella in un documento da una stringa contenente tag HTML:

// For complete examples and data files, please go to https://github.com/aspose-words/Aspose.Words-for-.NET.git.
Document doc = new Document();
DocumentBuilder builder = new DocumentBuilder(doc);
// Note that AutoFitSettings does not apply to tables inserted from HTML.
builder.InsertHtml("<table>" +
"<tr>" +
"<td>Row 1, Cell 1</td>" +
"<td>Row 1, Cell 2</td>" +
"</tr>" +
"<tr>" +
"<td>Row 2, Cell 2</td>" +
"</tr>" +
"</table>");
doc.Save(ArtifactsDir + "WorkingWithTables.InsertTableFromHtml.docx");

Inserisci una copia di una tabella esistente

Ci sono spesso momenti in cui è necessario creare una tabella basata su una tabella già esistente in un documento. Il modo più semplice per duplicare una tabella mantenendo tutta la formattazione è clonare il nodo Tabella utilizzando il metodo Clone.

La stessa tecnica può essere utilizzata per aggiungere copie di una riga o cella esistente a una tabella.

L’esempio di codice seguente mostra come duplicare una tabella utilizzando i costruttori di nodi:

// For complete examples and data files, please go to https://github.com/aspose-words/Aspose.Words-for-.NET.git.
Document doc = new Document(MyDir + "Tables.docx");
Table table = (Table) doc.GetChild(NodeType.Table, 0, true);
// Clone the table and insert it into the document after the original.
Table tableClone = (Table) table.Clone(true);
table.ParentNode.InsertAfter(tableClone, table);
// Insert an empty paragraph between the two tables,
// or else they will be combined into one upon saving this has to do with document validation.
table.ParentNode.InsertAfter(new Paragraph(doc), table);
doc.Save(ArtifactsDir + "WorkingWithTables.CloneCompleteTable.docx");

L’esempio di codice seguente mostra come clonare l’ultima riga di una tabella e aggiungerla alla tabella:

// For complete examples and data files, please go to https://github.com/aspose-words/Aspose.Words-for-.NET.git.
Document doc = new Document(MyDir + "Tables.docx");
Table table = (Table) doc.GetChild(NodeType.Table, 0, true);
Row clonedRow = (Row) table.LastRow.Clone(true);
// Remove all content from the cloned row's cells. This makes the row ready for new content to be inserted into.
foreach (Cell cell in clonedRow.Cells)
cell.RemoveAllChildren();
table.AppendChild(clonedRow);
doc.Save(ArtifactsDir + "WorkingWithTables.CloneLastRow.docx");

Se stai cercando di creare tabelle in un documento che crescono dinamicamente con ogni record della tua origine dati, il metodo sopra descritto non è consigliato. Invece, il risultato desiderato si ottiene più facilmente utilizzando Mail merge con le regioni. Puoi saperne di più su questa tecnica nella sezione Mail Merge con le Regioni.

Confronta i modi per creare una tabella

Aspose.Words fornisce diversi metodi per creare nuove tabelle in un documento. Ogni metodo presenta vantaggi e svantaggi, quindi la scelta di quale utilizzare dipende spesso dalla situazione specifica.

Diamo uno sguardo più da vicino a questi modi di creare tabelle e confrontiamo i loro pro e contro:

Metodo Vantaggi Svantaggi
Tramite DocumentBuilder Il metodo standard per inserire tabelle e altro contenuto di documenti A volte è difficile creare molte varietà di tabelle contemporaneamente con la stessa istanza del builder
Tramite DOM Si adatta meglio al codice circostante che crea e inserisce i nodi direttamente nel DOM senza utilizzare un DocumentBuilder La tabella viene creata “vuota”: prima di eseguire la maggior parte delle operazioni, è necessario richiamare EnsureMinimum per creare eventuali nodi figli mancanti
Dall’HTML Può creare una nuova tabella da sorgente HTML utilizzando tag come <table>, <tr>, <td> Non tutti i possibili formati di tabella Microsoft Word possono essere applicati all’HTML
Clonazione di una tabella esistente Puoi creare una copia di una tabella esistente mantenendo tutta la formattazione di righe e celle I nodi figlio appropriati devono essere rimossi prima che la tabella sia pronta per l’uso