
Crear efectos 3D en presentaciones usando Java
Resumen
Aspose.Slides for Java puede crear, editar, conservar y renderizar el formato 3D estilo PowerPoint para formas y texto. Este artículo cubre efectos 3D como rotación, extrusión, biseles, iluminación, material, degradado o relleno de imagen, y texto 3D.
Nota
Este artículo trata sobre efectos de formato 3D en formas y texto de PowerPoint. No se trata de insertar o editar archivos de modelo 3D independientes. Cuando exportas una diapositiva a una imagen, PDF o HTML, Aspose.Slides renderiza esos efectos 3D en la salida 2D exportada.Conceptos de formato 3D
Utiliza el método IShape.getThreeDFormat para aplicar formato 3D a una forma. El método devuelve IThreeDFormat, que controla la escena 3D para esa forma.
Para el texto, utiliza el método ITextFrameFormat.getThreeDFormat. Esto aplica formato 3D al marco de texto en lugar del cuerpo de la forma.
Los miembros de API más importantes son:
| Miembro de API | Qué controla | Cuándo usarlo |
|---|---|---|
| getCamera | Punto de vista, tipo de cámara predefinido, rotación, zoom y perspectiva. | Rotar el objeto en el espacio 3D o coincidir con un preajuste de rotación 3D de PowerPoint. |
| getLightRig | Preajuste de luz, dirección y rotación de la luz. | Cambiar cómo aparecen los reflejos y sombras en la superficie 3D. |
| getMaterial y setMaterial | Material de la superficie, como plano, mate, plástico o metal. | Hacer que la misma geometría parezca más plana, más suave, brillante o metálica. |
| getExtrusionHeight y setExtrusionHeight | Cuán lejos se extiende la forma desde su cara frontal hacia atrás. | Convertir una forma plana en un objeto 3D visiblemente grueso. |
| getExtrusionColor | Color de los lados extruidos. | Hacer visible la profundidad o coordinar el color de los lados con el relleno frontal. |
| getDepth y setDepth | Profundidad 3D adicional utilizada por el formato 3D de PowerPoint. | Ajustar finamente la profundidad de formas o texto, especialmente junto con los ajustes de bisel y material. |
| getBevelTop y getBevelBottom | Bordes elevados o redondeados en las caras frontal y trasera. | Agregar un borde suavizado o moldeado en lugar de una cara plana y afilada. |
| getContourColor y getContourWidth y setContourWidth | Contorno alrededor del objeto 3D. | Resaltar el límite del objeto en la salida renderizada. |
Crear una forma 3D
Una forma normalmente necesita cuatro tipos de configuraciones antes de que parezca convincentemente 3D:
- Configuraciones de cámara, porque la vista frontal predeterminada puede ocultar la extrusión.
- Configuraciones de luz, porque la iluminación hace que las caras y los lados sean legibles.
- Configuraciones de material, porque la superficie afecta cómo se renderiza la luz.
- Configuraciones de extrusión o profundidad, porque una forma plana necesita grosor.
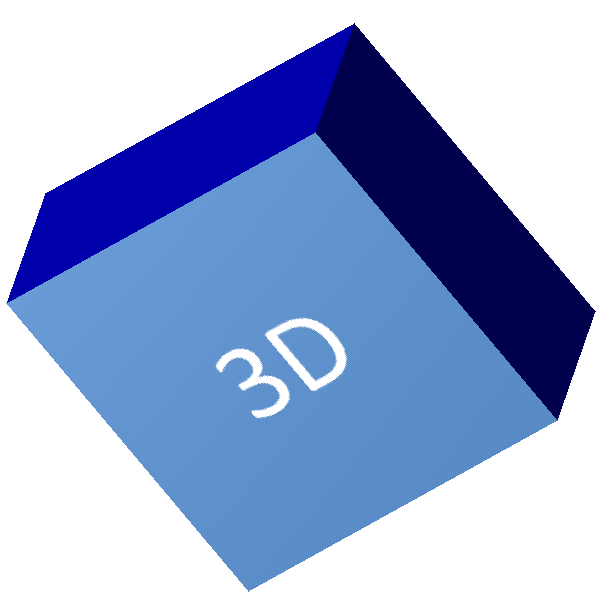
El siguiente ejemplo crea un rectángulo, agrega texto a su cara frontal y aplica formato 3D. Los valores de rotación de la cámara están en grados, y la altura de extrusión es de 100 puntos. El ejemplo renderiza la diapositiva a una imagen PNG con el doble de sus dimensiones predeterminadas y guarda la presentación como PPTX.
import com.aspose.slides.*;
import java.awt.Color;

final float imageScale = 2;

Presentation presentation = new Presentation();
try {
    ISlide slide = presentation.getSlides().get_Item(0);

    IAutoShape shape = slide.getShapes().addAutoShape(ShapeType.Rectangle, 200, 150, 200, 200);

    shape.getTextFrame().setText("3D");
    shape.getTextFrame().getParagraphs().get_Item(0).getParagraphFormat().getDefaultPortionFormat().setFontHeight(64);

    shape.getFillFormat().setFillType(FillType.Solid);
    shape.getFillFormat().getSolidFillColor().setColor(new Color(100, 149, 237));

    shape.getThreeDFormat().getCamera().setCameraType(CameraPresetType.OrthographicFront);
    shape.getThreeDFormat().getCamera().setRotation(20, 30, 40);
    shape.getThreeDFormat().getLightRig().setLightType(LightRigPresetType.Flat);
    shape.getThreeDFormat().getLightRig().setDirection(LightingDirection.Top);
    shape.getThreeDFormat().setMaterial(MaterialPresetType.Flat);
    shape.getThreeDFormat().setExtrusionHeight(100);
    shape.getThreeDFormat().getExtrusionColor().setColor(Color.BLUE);

    IImage thumbnail = slide.getImage(imageScale, imageScale);
    try {
        thumbnail.save("shape_3d.png", ImageFormat.Png);
    } finally {
        thumbnail.dispose();
    }

    presentation.save("shape_3d.pptx", SaveFormat.Pptx);
} finally {
    presentation.dispose();
}
La imagen de la diapositiva renderizada muestra el rectángulo como un bloque 3D grueso:
Rotar una forma con la cámara
En PowerPoint, la rotación 3D se configura desde el panel Rotación 3-D. Los valores de rotación X, Y y Z corresponden a la rotación que estableces a través de la API de cámara.
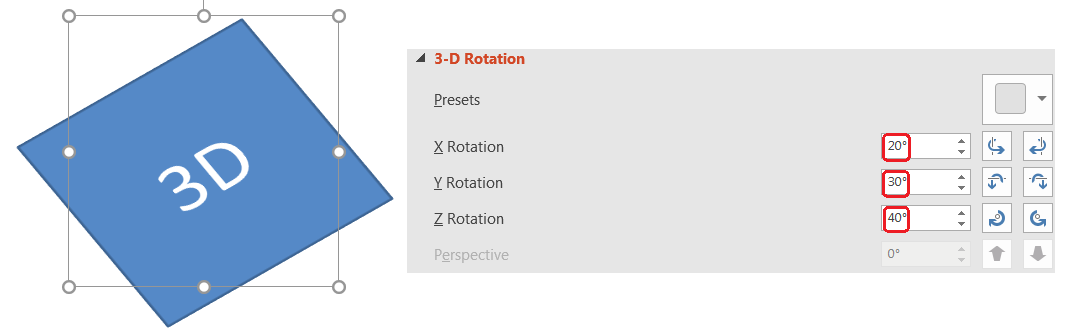
En Aspose.Slides, accede a la cámara mediante IThreeDFormat.getCamera. Este ejemplo crea un rectángulo, selecciona una vista frontal ortográfica y establece sus rotaciones X, Y y Z a 20, 30 y 40 grados, respectivamente. Configura la forma en memoria sin guardar un archivo:
import com.aspose.slides.*;

Presentation presentation = new Presentation();
try {
    ISlide slide = presentation.getSlides().get_Item(0);

    IAutoShape shape = slide.getShapes().addAutoShape(ShapeType.Rectangle, 200, 150, 200, 200);

    shape.getThreeDFormat().getCamera().setCameraType(CameraPresetType.OrthographicFront);
    shape.getThreeDFormat().getCamera().setRotation(20, 30, 40);
} finally {
    presentation.dispose();
}
Utiliza la cámara cuando necesites cambiar cómo el espectador ve el objeto. No modifica la geometría 2D de la forma en la diapositiva. Cambia el punto de vista 3D usado por PowerPoint y por Aspose.Slides al renderizar.
Agregar extrusión y profundidad
La extrusión hace que una forma parezca gruesa al extenderla detrás de la cara frontal. En PowerPoint, el control de profundidad establece este grosor visible, y el control de color define el color de las caras laterales.
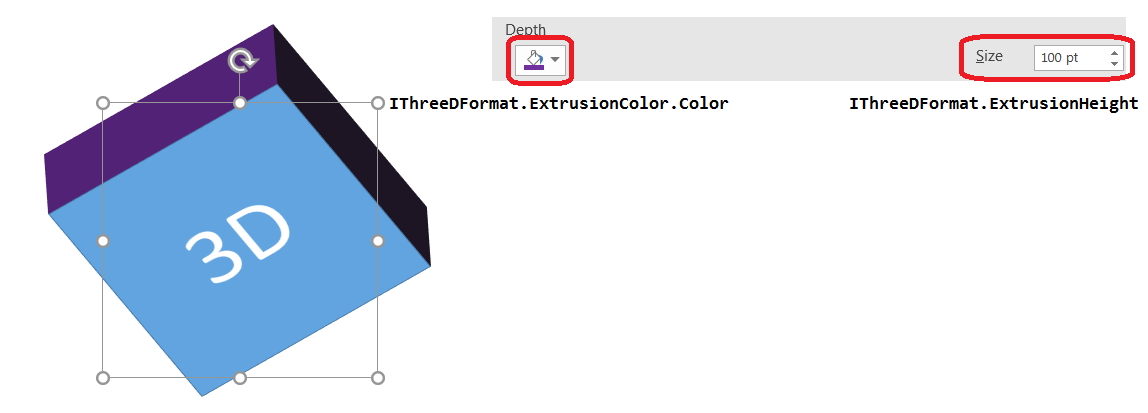
Utiliza IThreeDFormat.setExtrusionHeight para establecer el grosor y IThreeDFormat.getExtrusionColor para acceder al color de los lados. Este ejemplo da a un rectángulo una extrusión de 100 puntos con lados púrpuras y rota la cámara para revelar su grosor. Configura la forma en memoria sin guardar un archivo:
import com.aspose.slides.*;
import java.awt.Color;

Presentation presentation = new Presentation();
try {
    ISlide slide = presentation.getSlides().get_Item(0);

    IAutoShape shape = slide.getShapes().addAutoShape(ShapeType.Rectangle, 200, 150, 200, 200);

    Color extrusionColor = new Color(128, 0, 128);

    shape.getThreeDFormat().getCamera().setCameraType(CameraPresetType.OrthographicFront);
    shape.getThreeDFormat().getCamera().setRotation(20, 30, 40);
    shape.getThreeDFormat().getLightRig().setLightType(LightRigPresetType.Flat);
    shape.getThreeDFormat().getLightRig().setDirection(LightingDirection.Top);
    shape.getThreeDFormat().setMaterial(MaterialPresetType.Flat);
    shape.getThreeDFormat().setExtrusionHeight(100);
    shape.getThreeDFormat().getExtrusionColor().setColor(extrusionColor);
} finally {
    presentation.dispose();
}
El método IThreeDFormat.setDepth establece la profundidad de una forma 3D. El método setExtrusionHeight controla la altura del efecto de extrusión, como se muestra en este ejemplo.
Usar rellenos de degradado o imagen con efectos 3D
El formato 3D es independiente del relleno de la forma. Puedes aplicar un color sólido, degradado, patrón o relleno de imagen a la cara frontal y seguir usando la misma configuración de cámara, luz, material y extrusión.
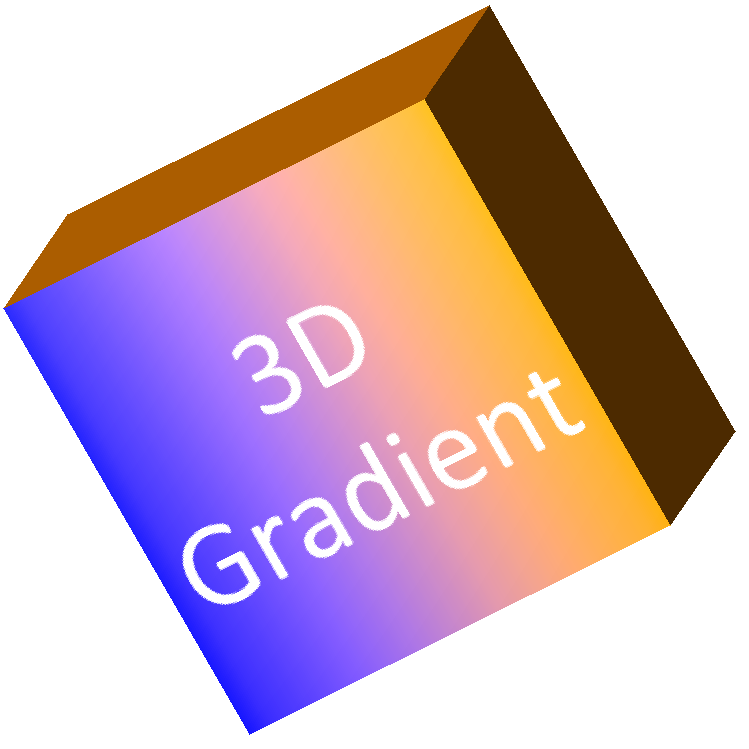
Este ejemplo aplica un degradado de azul a naranja a la cara frontal y un color naranja oscuro a la extrusión de 150 puntos. Las paradas del degradado en 0 y 100 marcan el inicio y fin del degradado. Los valores de rotación de la cámara están en grados. La diapositiva se renderiza a una imagen PNG con el doble de sus dimensiones predeterminadas:
import com.aspose.slides.*;
import java.awt.Color;

final float imageScale = 2;

Presentation presentation = new Presentation();
try {
    ISlide slide = presentation.getSlides().get_Item(0);

    IAutoShape shape = slide.getShapes().addAutoShape(ShapeType.Rectangle, 200, 150, 250, 250);

    shape.getTextFrame().setText("3D Gradient");
    shape.getTextFrame().getParagraphs().get_Item(0).getParagraphFormat().getDefaultPortionFormat().setFontHeight(64);

    shape.getFillFormat().setFillType(FillType.Gradient);
    shape.getFillFormat().getGradientFormat().getGradientStops().add(0, Color.BLUE);
    shape.getFillFormat().getGradientFormat().getGradientStops().add(100, new Color(255, 165, 0));

    shape.getThreeDFormat().getCamera().setCameraType(CameraPresetType.OrthographicFront);
    shape.getThreeDFormat().getCamera().setRotation(10, 20, 30);
    shape.getThreeDFormat().getLightRig().setLightType(LightRigPresetType.Flat);
    shape.getThreeDFormat().getLightRig().setDirection(LightingDirection.Top);
    shape.getThreeDFormat().setMaterial(MaterialPresetType.Flat);
    Color extrusionColor = new Color(255, 140, 0);
    shape.getThreeDFormat().setExtrusionHeight(150);
    shape.getThreeDFormat().getExtrusionColor().setColor(extrusionColor);

    IImage thumbnail = slide.getImage(imageScale, imageScale);
    try {
        thumbnail.save("gradient_3d.png", ImageFormat.Png);
    } finally {
        thumbnail.dispose();
    }
} finally {
    presentation.dispose();
}
La salida renderizada mantiene el degradado en la cara frontal y renderiza la extrusión por separado:
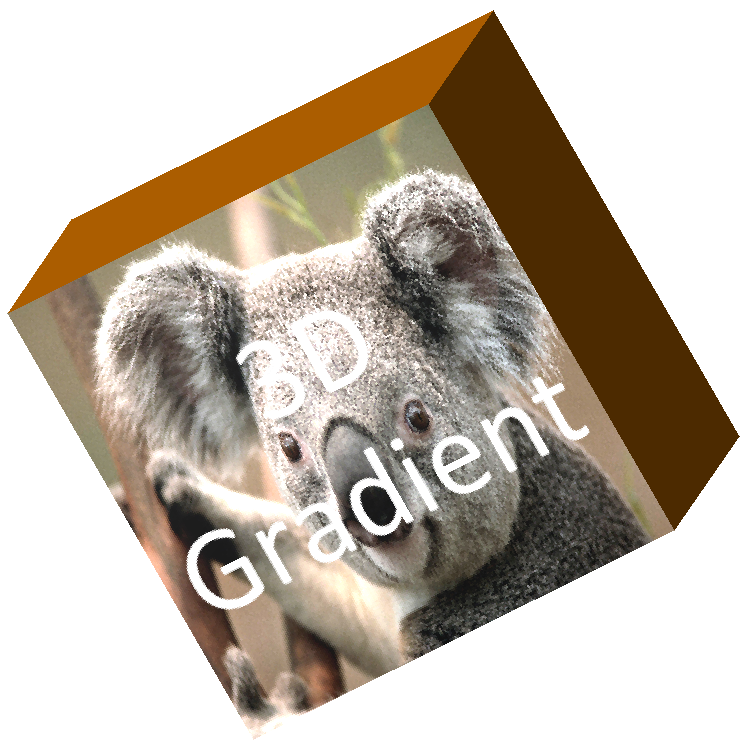
Para usar un relleno de imagen en su lugar, agrega la imagen a la presentación y asígnala al relleno de la forma. Este ejemplo requiere un archivo existente llamado “image.jpg” en el directorio de trabajo. Estira la imagen para llenar el rectángulo, aplica una extrusión de 150 puntos y establece la rotación de la cámara en grados. Configura la forma en memoria sin guardar ni renderizar un archivo:
import com.aspose.slides.*;
import java.awt.Color;
import java.nio.file.Files;
import java.nio.file.Path;
import java.nio.file.Paths;

Presentation presentation = new Presentation();
try {
    ISlide slide = presentation.getSlides().get_Item(0);

    IAutoShape shape = slide.getShapes().addAutoShape(ShapeType.Rectangle, 200, 150, 250, 250);

    Path imagePath = Paths.get("image.jpg");
    byte[] imageData = Files.readAllBytes(imagePath);
    IPPImage image = presentation.getImages().addImage(imageData);

    shape.getFillFormat().setFillType(FillType.Picture);
    shape.getFillFormat().getPictureFillFormat().getPicture().setImage(image);
    shape.getFillFormat().getPictureFillFormat().setPictureFillMode(PictureFillMode.Stretch);

    Color extrusionColor = new Color(255, 140, 0);
    shape.getThreeDFormat().getCamera().setCameraType(CameraPresetType.OrthographicFront);
    shape.getThreeDFormat().getCamera().setRotation(10, 20, 30);
    shape.getThreeDFormat().getLightRig().setLightType(LightRigPresetType.Flat);
    shape.getThreeDFormat().getLightRig().setDirection(LightingDirection.Top);
    shape.getThreeDFormat().setMaterial(MaterialPresetType.Flat);
    shape.getThreeDFormat().setExtrusionHeight(150);
    shape.getThreeDFormat().getExtrusionColor().setColor(extrusionColor);
} finally {
    presentation.dispose();
}
La imagen se renderiza en la cara frontal, mientras que la extrusión se renderiza como la superficie lateral 3D:
Aplicar formato 3D al texto
El formato 3D de la forma afecta al cuerpo de la forma. El formato 3D del texto afecta al marco de texto. Esto es útil para efectos similares a WordArt donde las propias letras necesitan extrusión, material, iluminación y configuraciones de cámara.
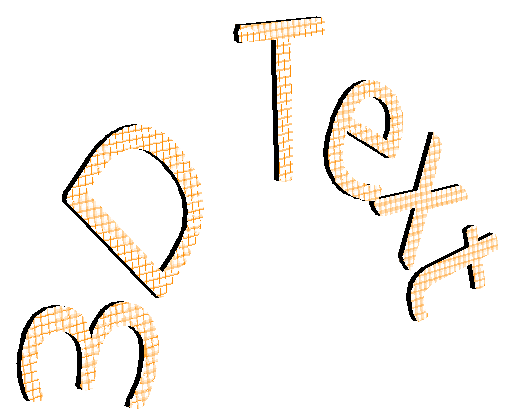
El siguiente ejemplo crea texto con un patrón de cuadrícula naranja y blanco, aplica un arco ascendente y configura los ajustes 3D a través de ITextFrameFormat.getThreeDFormat. La altura de extrusión y la profundidad están en puntos, y la rotación de la luz está en grados. El relleno y el contorno de la forma están ocultos para que solo sea visible el texto. El ejemplo renderiza una imagen PNG al doble de las dimensiones predeterminadas de la diapositiva y guarda la presentación como PPTX:
import com.aspose.slides.*;
import java.awt.Color;

final float imageScale = 2;

Presentation presentation = new Presentation();
try {
    ISlide slide = presentation.getSlides().get_Item(0);

    IAutoShape shape = slide.getShapes().addAutoShape(ShapeType.Rectangle, 200, 150, 250, 250);

    shape.getFillFormat().setFillType(FillType.NoFill);
    shape.getLineFormat().getFillFormat().setFillType(FillType.NoFill);
    shape.getTextFrame().setText("3D Text");

    IPortion portion = shape.getTextFrame().getParagraphs().get_Item(0).getPortions().get_Item(0);
    portion.getPortionFormat().getFillFormat().setFillType(FillType.Pattern);
    Color patternColor = new Color(255, 140, 0);
    portion.getPortionFormat().getFillFormat().getPatternFormat().getForeColor().setColor(patternColor);
    portion.getPortionFormat().getFillFormat().getPatternFormat().getBackColor().setColor(Color.WHITE);
    portion.getPortionFormat().getFillFormat().getPatternFormat().setPatternStyle(PatternStyle.LargeGrid);

    shape.getTextFrame().getParagraphs().get_Item(0).getParagraphFormat().getDefaultPortionFormat().setFontHeight(128);

    ITextFrameFormat textFrameFormat = shape.getTextFrame().getTextFrameFormat();
    textFrameFormat.setTransform(TextShapeType.ArchUp);
    textFrameFormat.getThreeDFormat().setExtrusionHeight(3.5f);
    textFrameFormat.getThreeDFormat().setDepth(3);
    textFrameFormat.getThreeDFormat().setMaterial(MaterialPresetType.Plastic);
    textFrameFormat.getThreeDFormat().getLightRig().setDirection(LightingDirection.Top);
    textFrameFormat.getThreeDFormat().getLightRig().setLightType(LightRigPresetType.Balanced);
    textFrameFormat.getThreeDFormat().getLightRig().setRotation(0, 0, 40);
    textFrameFormat.getThreeDFormat().getCamera().setCameraType(CameraPresetType.PerspectiveContrastingRightFacing);

    IImage thumbnail = slide.getImage(imageScale, imageScale);
    try {
        thumbnail.save("text_3d.png", ImageFormat.Png);
    } finally {
        thumbnail.dispose();
    }

    presentation.save("text_3d.pptx", SaveFormat.Pptx);
} finally {
    presentation.dispose();
}
El texto se renderiza como letras 3D curvadas y extruidas:
Mantener el texto plano en una forma 3D
Para mantener el texto legible mientras se preserva la apariencia 3D de una forma, llama a ITextFrameFormat.setKeepTextFlat a través de ITextFrame.getTextFrameFormat. Cuando el valor es true, el texto permanece fuera de la escena 3D. Cuando es false, el texto participa en la escena y sigue su orientación 3D.
Esta configuración no elimina el formato 3D de la forma: su cámara, iluminación, material y extrusión siguen configurados a través de IShape.getThreeDFormat. También es diferente de la rotación ordinaria. IShape.setRotation rota la forma en el plano de la diapositiva, mientras que ITextFrameFormat.setRotationAngle controla la rotación personalizada del texto dentro de su cuadro delimitador. Mantener el texto fuera de la escena 3D no restablece ninguno de esos ángulos.
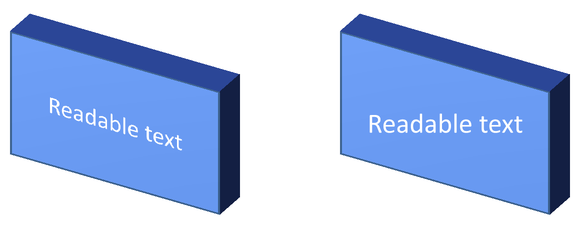
El siguiente ejemplo autocontenido crea un rectángulo azul con texto y lo clona junto al original. Ambas formas tienen el mismo formato 3D; solo difiere la configuración de texto: false a la izquierda y true a la derecha. Los ángulos de cámara están en grados, y la altura de extrusión es de 40 puntos. El ejemplo guarda la presentación como PPTX y renderiza la diapositiva de comparación a PNG con el doble de sus dimensiones predeterminadas.
import com.aspose.slides.*;
import java.awt.Color;

Presentation presentation = new Presentation();
try {
    ISlide slide = presentation.getSlides().get_Item(0);

    IAutoShape shape = slide.getShapes().addAutoShape(ShapeType.Rectangle, 70, 160, 240, 140);

    shape.getTextFrame().setText("Readable text");
    shape.getTextFrame().getParagraphs().get_Item(0).getParagraphFormat().getDefaultPortionFormat().setFontHeight(28);
    shape.getTextFrame().getParagraphs().get_Item(0).getParagraphFormat().setAlignment(TextAlignment.Center);
    shape.getTextFrame().getTextFrameFormat().setAnchoringType(TextAnchorType.Center);
    shape.getFillFormat().setFillType(FillType.Solid);
    shape.getFillFormat().getSolidFillColor().setColor(new Color(100, 149, 237));

    shape.getThreeDFormat().getCamera().setCameraType(CameraPresetType.OrthographicFront);
    shape.getThreeDFormat().getCamera().setRotation(30, 30, 0);
    shape.getThreeDFormat().getLightRig().setLightType(LightRigPresetType.Flat);
    shape.getThreeDFormat().getLightRig().setDirection(LightingDirection.Top);
    shape.getThreeDFormat().setMaterial(MaterialPresetType.Flat);
    shape.getThreeDFormat().setExtrusionHeight(40);
    shape.getThreeDFormat().getExtrusionColor().setColor(new Color(65, 105, 225));
    shape.getTextFrame().getTextFrameFormat().setKeepTextFlat(false);

    IAutoShape flatTextShape = (IAutoShape) slide.getShapes().addClone(shape, 400, 160);
    flatTextShape.getTextFrame().getTextFrameFormat().setKeepTextFlat(true);

    presentation.save("keep_text_flat.pptx", SaveFormat.Pptx);
    IImage image = slide.getImage(2, 2);
    try {
        image.save("keep_text_flat.png", ImageFormat.Png);
    } finally {
        image.dispose();
    }
} finally {
    presentation.dispose();
}
A la izquierda, el texto sigue la orientación 3D. A la derecha, permanece plano y es más fácil de leer. Ambos rectángulos conservan la misma extrusión visible y orientación 3D.
Comportamiento de exportación y renderizado
Aspose.Slides conserva el formato 3D al guardar en formatos de PowerPoint como PPTX. Al renderizar o exportar a formatos de diseño fijo, la escena 3D se rasteriza o dibuja en la salida como un resultado 2D. Esto se aplica cuando renderizas diapositivas a PNG, exportas a PDF, exportas a HTML, o generas fotogramas para la conversión de video.
- Las imágenes y PDFs exportados no son interactivos. El objeto no puede ser rotado por el espectador después de la exportación.
- La apariencia final depende de la combinación de cámara, conjunto de luces, material, extrusión, relleno y escalado de la diapositiva.
- Si necesitas inspeccionar valores de formato heredados o basados en el tema, lee las propiedades efectivas de la forma.
- Algunos formatos de salida no pueden almacenar el formato 3D editable de PowerPoint. En esos formatos, el resultado visual se renderiza en lugar de preservarse como configuraciones 3D editables.
Preguntas frecuentes
¿Puede Aspose.Slides crear presentaciones 3D interactivas?
Aspose.Slides crea y renderiza efectos 3D de PowerPoint para formas y texto. No convierte las imágenes, PDFs o páginas HTML exportadas en escenas 3D interactivas que el espectador pueda rotar. En PPTX, el formato 3D sigue siendo editable en PowerPoint siempre que el formato lo admita.
¿Cuál es la diferencia entre un modelo 3D y un efecto 3D?
Un modelo 3D es un objeto 3D independiente insertado en una presentación. Un efecto 3D es un formato aplicado a una forma o texto normal de PowerPoint, como rotación, extrusión, bisel, iluminación y material. Este artículo trata sobre efectos 3D.
¿Qué configuraciones son necesarias para una forma 3D visible?
Como mínimo, establece una rotación de cámara y ya sea extrusión o profundidad. En la práctica, también define un conjunto de luces y material para que las caras renderizadas tengan reflejos y sombras claros.
¿Puedo aplicar efectos 3D tanto a formas como a texto?
Sí. Usa IShape.getThreeDFormat para el cuerpo de la forma y ITextFrameFormat.getThreeDFormat para el texto.
¿Aparecerán los efectos 3D al exportar a imágenes, PDF, HTML o fotogramas de vídeo?
Sí. Aspose.Slides renderiza los efectos 3D al generar imágenes de diapositivas, salida PDF, salida HTML y fotogramas utilizados para la conversión de vídeo. La salida exportada contiene la apariencia renderizada, no un objeto 3D editable.
¿Puedo leer los valores 3D finales después de que se apliquen la herencia y la configuración del tema?
Sí. Utiliza las API de formato efectivo descritas en Shape Effective Properties para leer los valores finales de cámara, conjunto de luces, bisel y demás valores 3D relacionados.