
PHP का उपयोग करके प्रस्तुतियों में 3D प्रभाव बनाएँ
परिचय
Aspose.Slides for PHP via Java आकार, टेक्स्ट के लिए PowerPoint‑स्टाइल 3D फ़ॉर्मेटिंग बना, संपादित, सुरक्षित और रेंडर कर सकता है। यह लेख घूर्णन, एक्सट्रूज़न, बीवल, लाइटिंग, मैटेरियल, ग्रेडियंट या पिक्चर फ़िल, और 3D टेक्स्ट जैसे 3D प्रभावों को कवर करता है।
Note
यह लेख PowerPoint आकार और टेक्स्ट पर 3D फ़ॉर्मेटिंग प्रभावों के बारे में है। यह अलग‑अलग 3D मॉडल फ़ाइलें सम्मिलित या संपादित करने के बारे में नहीं है। जब आप स्लाइड को छवि, PDF, या HTML में निर्यात करते हैं, तो Aspose.Slides उन 3D प्रभावों को निर्यातित 2D आउटपुट में रेंडर करता है।3D फ़ॉर्मेटिंग अवधारणाएँ
एक आकार पर 3D फ़ॉर्मेटिंग लागू करने के लिए Shape::getThreeDFormat मेथड का उपयोग करें। यह मेथड ThreeDFormat लौटाता है, जो उस आकार के 3D सीन को नियंत्रित करता है।
टेक्स्ट के लिए, TextFrameFormat::getThreeDFormat मेथड का उपयोग करें। यह आकार बॉडी के बजाय टेक्स्ट फ्रेम पर 3D फ़ॉर्मेटिंग लागू करता है।
सबसे महत्वपूर्ण API सदस्य हैं:
| API सदस्य | यह क्या नियंत्रित करता है | कब उपयोग करें |
|---|---|---|
| getCamera | दृश्य बिंदु, प्रीसेट कैमरा प्रकार, घूर्णन, ज़ूम, और परिप्रेक्ष्य। | 3D स्पेस में ऑब्जेक्ट को घुमाने या PowerPoint के 3D घूर्णन प्रीसेट से मेल करने के लिए। |
| getLightRig | लाइट प्रीसेट, दिशा, और लाइट घूर्णन। | 3D सतह पर हाइलाइट और शैडो की दिखावट को बदलने के लिए। |
| getMaterial और setMaterial | सतह मैटेरियल, जैसे फ्लैट, मैट, प्लास्टिक, या मेटल। | समान ज्योमेट्री को अधिक सपाट, मुलायम, चमकदार, या धातु जैसा बनाएं। |
| getExtrusionHeight और setExtrusionHeight | आकार का आगे के फ़ेस से पीछे की ओर कितनी दूरी तक विस्तार होता है। | एक फ्लैट आकार को दृष्टिगोचर मोटी 3D वस्तु में बदलें। |
| getExtrusionColor | एक्सट्रूडेड साइड्स का रंग। | गहराई को दृश्य बनाएं या साइड रंग को सामने के फ़िल के साथ समन्वयित करें। |
| getDepth और setDepth | PowerPoint 3D फ़ॉर्मेटिंग द्वारा उपयोग की जाने वाली अतिरिक्त 3D गहराई। | आकार या टेक्स्ट के लिए गहराई को सूक्ष्म रूप से समायोजित करें, विशेषकर बीवल और मैटेरियल सेटिंग्स के साथ। |
| getBevelTop और getBevelBottom | सामने और पीछे के फ़ेस पर उभरे या गोल किनारे। | तीखा सपाट फ़ेस के बजाय मुलायम या ढाली हुई किनारी जोड़ें। |
| getContourColor और getContourWidth और setContourWidth | 3D ऑब्जेक्ट के चारों ओर आउटलाइन। | रेंडर किए गए आउटपुट में ऑब्जेक्ट की सीमा को ज़ोर देने के लिए। |
3D आकार बनाना
एक आकार को विश्वसनीय 3D दिखाने से पहले आमतौर पर चार प्रकार की सेटिंग्स की आवश्यकता होती है:
- कैमरा सेटिंग्स, क्योंकि डिफॉल्ट फ़्रंट व्यू एक्सट्रूज़न को छिपा सकती है।
- लाइट सेटिंग्स, क्योंकि लाइटिंग सतहों और किनारों को पठनीय बनाती है।
- मैटेरियल सेटिंग्स, क्योंकि सतह प्रभावित करती है कि प्रकाश कैसे रेंडर होता है।
- एक्सट्रूज़न या डेप्थ सेटिंग्स, क्योंकि फ्लैट आकार को मोटाई चाहिए।
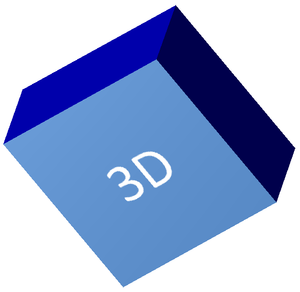
निम्न उदाहरण एक आयत बनाता है, उसके सामने के फ़ेस पर टेक्स्ट जोड़ता है, और 3D फ़ॉर्मेटिंग लागू करता है। कैमरा घूर्णन मान डिग्री में हैं, और एक्सट्रूज़न ऊँचाई 100 पॉइंट है। उदाहरण स्लाइड को दो गुना डिफ़ॉल्ट आकार में PNG छवि में रेंडर करता है और प्रेज़ेंटेशन को PPTX के रूप में सहेजता है।
use aspose\slides\CameraPresetType;
use aspose\slides\FillType;
use aspose\slides\ImageFormat;
use aspose\slides\LightingDirection;
use aspose\slides\LightRigPresetType;
use aspose\slides\MaterialPresetType;
use aspose\slides\Presentation;
use aspose\slides\SaveFormat;
use aspose\slides\ShapeType;

$imageScale = 2;

$presentation = new Presentation();
try {
    $slide = $presentation->getSlides()->get_Item(0);

    $shape = $slide->getShapes()->addAutoShape(ShapeType::Rectangle, 200, 150, 200, 200);

    $shape->getTextFrame()->setText("3D");
    $shape->getTextFrame()->getParagraphs()->get_Item(0)->getParagraphFormat()->getDefaultPortionFormat()->setFontHeight(64);

    $shape->getFillFormat()->setFillType(FillType::Solid);
    $shape->getFillFormat()->getSolidFillColor()->setColor(new Java("java.awt.Color", 100, 149, 237));

    $shape->getThreeDFormat()->getCamera()->setCameraType(CameraPresetType::OrthographicFront);
    $shape->getThreeDFormat()->getCamera()->setRotation(20, 30, 40);
    $shape->getThreeDFormat()->getLightRig()->setLightType(LightRigPresetType::Flat);
    $shape->getThreeDFormat()->getLightRig()->setDirection(LightingDirection::Top);
    $shape->getThreeDFormat()->setMaterial(MaterialPresetType::Flat);
    $shape->getThreeDFormat()->setExtrusionHeight(100);
    $shape->getThreeDFormat()->getExtrusionColor()->setColor(java("java.awt.Color")->BLUE);

    $thumbnail = $slide->getImage($imageScale, $imageScale);
    try {
        $thumbnail->save("shape_3d.png", ImageFormat::Png);
    } finally {
        $thumbnail->dispose();
    }

    $presentation->save("shape_3d.pptx", SaveFormat::Pptx);
} finally {
    $presentation->dispose();
}
रेंडर की गई स्लाइड छवि आयत को मोटी 3D ब्लॉक के रूप में दिखाती है:
कैमरा से आकार घुमाएँ
PowerPoint में, 3D घूर्णन को 3‑D Rotation पेन से कॉन्फ़िगर किया जाता है। X, Y, और Z घूर्णन मान वह घूर्णन दर्शाते हैं जो आप कैमरा API के माध्यम से सेट करते हैं।
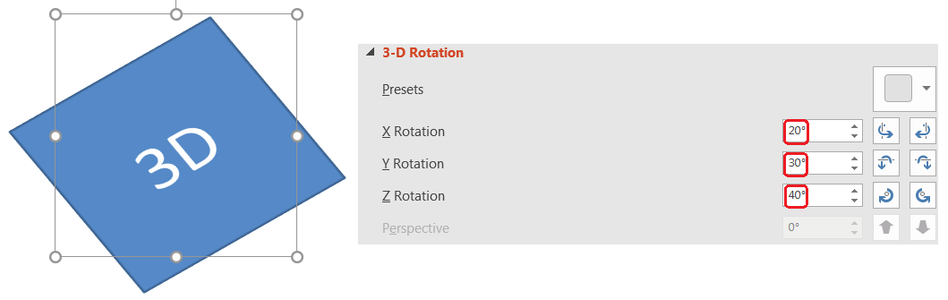
Aspose.Slides में, कैमरा तक पहुँचने के लिए ThreeDFormat::getCamera का उपयोग करें। यह उदाहरण एक आयत बनाता है, ऑर्थोग्राफ़िक फ्रंट व्यू चुनता है, और क्रमशः X, Y, Z घूर्णन को 20, 30, 40 डिग्री पर सेट करता है। यह आकार को मेमोरी में कॉन्फ़िगर करता है बिना फ़ाइल सहेजे:
use aspose\slides\CameraPresetType;
use aspose\slides\Presentation;
use aspose\slides\ShapeType;

$presentation = new Presentation();
try {
    $slide = $presentation->getSlides()->get_Item(0);

    $shape = $slide->getShapes()->addAutoShape(ShapeType::Rectangle, 200, 150, 200, 200);

    $shape->getThreeDFormat()->getCamera()->setCameraType(CameraPresetType::OrthographicFront);
    $shape->getThreeDFormat()->getCamera()->setRotation(20, 30, 40);
} finally {
    $presentation->dispose();
}
जब आपको दर्शक की ऑब्जेक्ट देखने के तरीके को बदलना हो तो कैमरा उपयोग करें। यह स्लाइड पर 2D आकार ज्योमेट्री को नहीं बदलता, बल्कि PowerPoint और Aspose.Slides द्वारा रेंडरिंग के समय उपयोग किए जाने वाले 3D दृश्य बिंदु को बदलता है।
एक्सट्रूज़न और डेप्थ जोड़ें
एक्सट्रूज़न आकार को पीछे की ओर बढ़ाकर मोटा दिखाता है। PowerPoint में, डेप्थ नियंत्रण इस दृश्यमान मोटाई को निर्धारित करता है, और रंग नियंत्रण साइड फ़ेस का रंग सेट करता है।
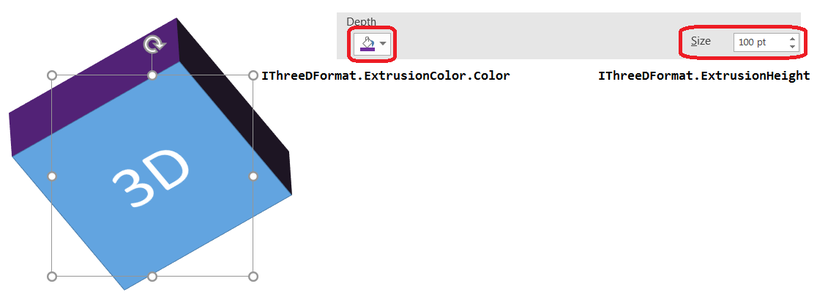
एक्सट्रूज़न मोटाई सेट करने के लिए ThreeDFormat::setExtrusionHeight का उपयोग करें और साइड का रंग प्राप्त करने के लिए ThreeDFormat::getExtrusionColor का। यह उदाहरण आयत को 100‑पॉइंट एक्सट्रूज़न, बैंगनी साइड्स, और कैमरा घूर्णन के साथ दर्शाता है ताकि मोटाई स्पष्ट हो। आकार को मेमोरी में कॉन्फ़िगर करता है बिना फ़ाइल सहेजे:
use aspose\slides\CameraPresetType;
use aspose\slides\LightingDirection;
use aspose\slides\LightRigPresetType;
use aspose\slides\MaterialPresetType;
use aspose\slides\Presentation;
use aspose\slides\ShapeType;

$presentation = new Presentation();
try {
    $slide = $presentation->getSlides()->get_Item(0);

    $shape = $slide->getShapes()->addAutoShape(ShapeType::Rectangle, 200, 150, 200, 200);

    $extrusionColor = new Java("java.awt.Color", 128, 0, 128);

    $shape->getThreeDFormat()->getCamera()->setCameraType(CameraPresetType::OrthographicFront);
    $shape->getThreeDFormat()->getCamera()->setRotation(20, 30, 40);
    $shape->getThreeDFormat()->getLightRig()->setLightType(LightRigPresetType::Flat);
    $shape->getThreeDFormat()->getLightRig()->setDirection(LightingDirection::Top);
    $shape->getThreeDFormat()->setMaterial(MaterialPresetType::Flat);
    $shape->getThreeDFormat()->setExtrusionHeight(100);
    $shape->getThreeDFormat()->getExtrusionColor()->setColor($extrusionColor);
} finally {
    $presentation->dispose();
}
ThreeDFormat::setDepth मेथड 3D आकार की गहराई सेट करता है। setExtrusionHeight मेथड एक्सट्रूज़न प्रभाव की ऊँचाई नियंत्रित करता है, जैसा कि इस उदाहरण में दिखाया गया है।
3D प्रभावों के साथ ग्रेडियंट या पिक्चर फ़िल लागू करें
3D फ़ॉर्मेटिंग आकार फ़िल से स्वतंत्र है। आप सामने के फ़ेस पर ठोस रंग, ग्रेडियंट, पैटर्न, या पिक्चर फ़िल लागू कर सकते हैं और वही कैमरा, लाइट, मैटेरियल, और एक्सट्रूज़न सेटिंग्स उपयोग कर सकते हैं।
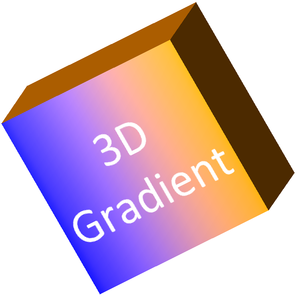
यह उदाहरण सामने के फ़ेस पर नीले‑से‑नारंगी ग्रेडियंट और 150‑पॉइंट एक्सट्रूज़न पर गहरे नारंगी रंग लागू करता है। ग्रेडियंट स्टॉप 0 और 100 पर क्रमशः ग्रेडियंट की शुरुआत और अंत को चिह्नित करते हैं। कैमरा घूर्णन मान डिग्री में हैं। स्लाइड को दो गुना डिफ़ॉल्ट आकार में PNG छवि के रूप में रेंडर किया जाता है:
use aspose\slides\CameraPresetType;
use aspose\slides\FillType;
use aspose\slides\ImageFormat;
use aspose\slides\LightingDirection;
use aspose\slides\LightRigPresetType;
use aspose\slides\MaterialPresetType;
use aspose\slides\Presentation;
use aspose\slides\ShapeType;

$imageScale = 2;

$presentation = new Presentation();
try {
    $slide = $presentation->getSlides()->get_Item(0);

    $shape = $slide->getShapes()->addAutoShape(ShapeType::Rectangle, 200, 150, 250, 250);

    $shape->getTextFrame()->setText("3D Gradient");
    $shape->getTextFrame()->getParagraphs()->get_Item(0)->getParagraphFormat()->getDefaultPortionFormat()->setFontHeight(64);

    $shape->getFillFormat()->setFillType(FillType::Gradient);
    $shape->getFillFormat()->getGradientFormat()->getGradientStops()->add(0, java("java.awt.Color")->BLUE);
    $shape->getFillFormat()->getGradientFormat()->getGradientStops()->add(100, new Java("java.awt.Color", 255, 165, 0));

    $shape->getThreeDFormat()->getCamera()->setCameraType(CameraPresetType::OrthographicFront);
    $shape->getThreeDFormat()->getCamera()->setRotation(10, 20, 30);
    $shape->getThreeDFormat()->getLightRig()->setLightType(LightRigPresetType::Flat);
    $shape->getThreeDFormat()->getLightRig()->setDirection(LightingDirection::Top);
    $shape->getThreeDFormat()->setMaterial(MaterialPresetType::Flat);
    $extrusionColor = new Java("java.awt.Color", 255, 140, 0);
    $shape->getThreeDFormat()->setExtrusionHeight(150);
    $shape->getThreeDFormat()->getExtrusionColor()->setColor($extrusionColor);

    $thumbnail = $slide->getImage($imageScale, $imageScale);
    try {
        $thumbnail->save("gradient_3d.png", ImageFormat::Png);
    } finally {
        $thumbnail->dispose();
    }
} finally {
    $presentation->dispose();
}
रेंडर आउटपुट ग्रेडियंट को सामने के फ़ेस पर रखता है और एक्सट्रूज़न को अलग से रेंडर करता है:
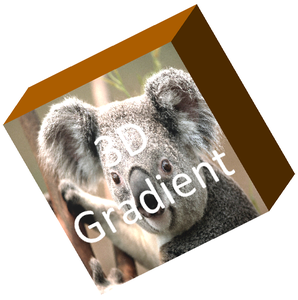
पिक्चर फ़िल उपयोग करने के लिए, छवि को प्रेज़ेंटेशन में जोड़ें और उसे आकार फ़िल में असाइन करें। यह उदाहरण कार्य निर्देशिका में मौजूद “image.jpg” फ़ाइल पर निर्भर करता है। यह चित्र को आयत के आकार में फ़िट करता है, 150‑पॉइंट एक्सट्रूज़न लागू करता है, और कैमरा घूर्णन को डिग्री में सेट करता है। आकार को मेमोरी में कॉन्फ़िगर करता है बिना सहेजे या रेंडर किए:
use aspose\slides\CameraPresetType;
use aspose\slides\FillType;
use aspose\slides\Images;
use aspose\slides\LightingDirection;
use aspose\slides\LightRigPresetType;
use aspose\slides\MaterialPresetType;
use aspose\slides\PictureFillMode;
use aspose\slides\Presentation;
use aspose\slides\ShapeType;

$presentation = new Presentation();
try {
    $slide = $presentation->getSlides()->get_Item(0);

    $shape = $slide->getShapes()->addAutoShape(ShapeType::Rectangle, 200, 150, 250, 250);

    $sourceImage = Images::fromFile("image.jpg");

    try {
        $image = $presentation->getImages()->addImage($sourceImage);
    } finally {
        $sourceImage->dispose();
    }

    $shape->getFillFormat()->setFillType(FillType::Picture);
    $shape->getFillFormat()->getPictureFillFormat()->getPicture()->setImage($image);
    $shape->getFillFormat()->getPictureFillFormat()->setPictureFillMode(PictureFillMode::Stretch);

    $extrusionColor = new Java("java.awt.Color", 255, 140, 0);
    $shape->getThreeDFormat()->getCamera()->setCameraType(CameraPresetType::OrthographicFront);
    $shape->getThreeDFormat()->getCamera()->setRotation(10, 20, 30);
    $shape->getThreeDFormat()->getLightRig()->setLightType(LightRigPresetType::Flat);
    $shape->getThreeDFormat()->getLightRig()->setDirection(LightingDirection::Top);
    $shape->getThreeDFormat()->setMaterial(MaterialPresetType::Flat);
    $shape->getThreeDFormat()->setExtrusionHeight(150);
    $shape->getThreeDFormat()->getExtrusionColor()->setColor($extrusionColor);
} finally {
    $presentation->dispose();
}
चित्र सामने के फ़ेस पर रेंडर होता है, जबकि एक्सट्रूज़न 3D साइड सतह के रूप में दिखता है:
टेक्स्ट पर 3D फ़ॉर्मेटिंग लागू करें
आकार की 3D फ़ॉर्मेटिंग आकार बॉडी को प्रभावित करती है। टेक्स्ट की 3D फ़ॉर्मेटिंग टेक्स्ट फ्रेम को प्रभावित करती है। यह WordArt‑समान प्रभावों के लिए उपयोगी है जहाँ अक्षरों को एक्सट्रूज़न, मैटेरियल, लाइटिंग, और कैमरा सेटिंग्स की आवश्यकता होती है।
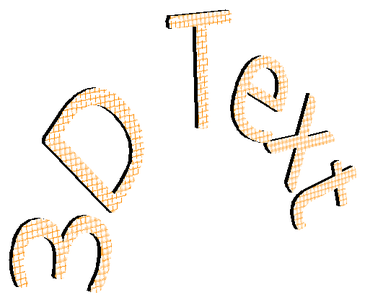
निम्न उदाहरण एक टेक्स्ट बनाता है जिसमें नारंगी‑सफ़ेद ग्रिड पैटर्न है, उपरोक्त चाप लागू करता है, और TextFrameFormat::getThreeDFormat के माध्यम से 3D सेटिंग्स कॉन्फ़िगर करता है। एक्सट्रूज़न ऊँचाई और डेप्थ पॉइंट में हैं, लाइट घूर्णन डिग्री में है। आकार फ़िल और आउटलाइन छुपाए गए हैं ताकि केवल टेक्स्ट दिखे। उदाहरण PNG छवि को दो गुना डिफ़ॉल्ट स्लाइड आकार में रेंडर करता है और प्रेज़ेंटेशन को PPTX के रूप में सहेजता है:
use aspose\slides\CameraPresetType;
use aspose\slides\FillType;
use aspose\slides\ImageFormat;
use aspose\slides\LightingDirection;
use aspose\slides\LightRigPresetType;
use aspose\slides\MaterialPresetType;
use aspose\slides\PatternStyle;
use aspose\slides\Presentation;
use aspose\slides\SaveFormat;
use aspose\slides\ShapeType;
use aspose\slides\TextShapeType;

$imageScale = 2;

$presentation = new Presentation();
try {
    $slide = $presentation->getSlides()->get_Item(0);

    $shape = $slide->getShapes()->addAutoShape(ShapeType::Rectangle, 200, 150, 250, 250);

    $shape->getFillFormat()->setFillType(FillType::NoFill);
    $shape->getLineFormat()->getFillFormat()->setFillType(FillType::NoFill);
    $shape->getTextFrame()->setText("3D Text");

    $portion = $shape->getTextFrame()->getParagraphs()->get_Item(0)->getPortions()->get_Item(0);
    $portion->getPortionFormat()->getFillFormat()->setFillType(FillType::Pattern);
    $patternColor = new Java("java.awt.Color", 255, 140, 0);
    $portion->getPortionFormat()->getFillFormat()->getPatternFormat()->getForeColor()->setColor($patternColor);
    $portion->getPortionFormat()->getFillFormat()->getPatternFormat()->getBackColor()->setColor(java("java.awt.Color")->WHITE);
    $portion->getPortionFormat()->getFillFormat()->getPatternFormat()->setPatternStyle(PatternStyle::LargeGrid);

    $shape->getTextFrame()->getParagraphs()->get_Item(0)->getParagraphFormat()->getDefaultPortionFormat()->setFontHeight(128);

    $textFrameFormat = $shape->getTextFrame()->getTextFrameFormat();
    $textFrameFormat->setTransform(TextShapeType::ArchUp);
    $textFrameFormat->getThreeDFormat()->setExtrusionHeight(3.5);
    $textFrameFormat->getThreeDFormat()->setDepth(3);
    $textFrameFormat->getThreeDFormat()->setMaterial(MaterialPresetType::Plastic);
    $textFrameFormat->getThreeDFormat()->getLightRig()->setDirection(LightingDirection::Top);
    $textFrameFormat->getThreeDFormat()->getLightRig()->setLightType(LightRigPresetType::Balanced);
    $textFrameFormat->getThreeDFormat()->getLightRig()->setRotation(0, 0, 40);
    $textFrameFormat->getThreeDFormat()->getCamera()->setCameraType(CameraPresetType::PerspectiveContrastingRightFacing);

    $thumbnail = $slide->getImage($imageScale, $imageScale);
    try {
        $thumbnail->save("text_3d.png", ImageFormat::Png);
    } finally {
        $thumbnail->dispose();
    }

    $presentation->save("text_3d.pptx", SaveFormat::Pptx);
} finally {
    $presentation->dispose();
}
टेक्स्ट कोव्ड, एक्सट्रूडेड 3D लेटरिंग के रूप में रेंडर किया गया है:
3D आकार पर टेक्स्ट को सपाट रखें
टेक्स्ट को पढ़ने योग्य रखने और आकार की 3D उपस्थिति को बनाए रखने के लिए, TextFrame::getTextFrameFormat के माध्यम से TextFrameFormat::setKeepTextFlat को कॉल करें। जब मान true हो, तो टेक्स्ट 3D सीन से बाहर रहता है। जब false हो, तो टेक्स्ट सीन में भाग लेता है और उसकी 3D अभिविन्यास का अनुसरण करता है।
यह सेटिंग आकार की 3D फ़ॉर्मेटिंग को नहीं हटाती: उसका कैमरा, लाइटिंग, मैटेरियल, और एक्सट्रूज़न Shape::getThreeDFormat द्वारा कॉन्फ़िगर रहता है। यह सामान्य घूर्णन से भी अलग है। Shape::setRotation स्लाइड प्लेन में आकार को घुमाता है, जबकि TextFrameFormat::setRotationAngle टेक्स्ट के बाउंडिंग बॉक्स के भीतर कस्टम घूर्णन को नियंत्रित करता है। टेक्स्ट को 3D सीन से बाहर रखने से इन कोणों में से कोई भी रीसेट नहीं होता।
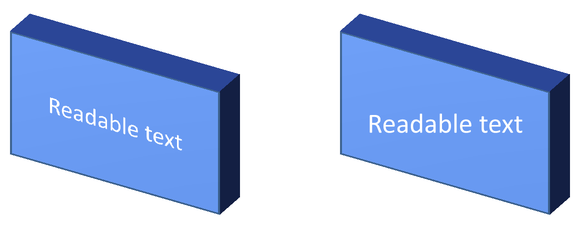
निम्न स्व-निहित उदाहरण एक नीला आयत बनाता है जिसमें टेक्स्ट है, और उसे मूल के बगल में क्लोन करता है। दोनों आकारों में समान 3D फ़ॉर्मेटिंग है; केवल टेक्स्ट सेटिंग अलग है: बाएँ पर false और दाएँ पर true। कैमरा कोण डिग्री में हैं, और एक्सट्रूज़न ऊँचाई 40 पॉइंट है। उदाहरण प्रेज़ेंटेशन को PPTX के रूप में सहेजता है और तुलना स्लाइड को दो गुना डिफ़ॉल्ट आकार में PNG के रूप में रेंडर करता है।
use aspose\slides\CameraPresetType;
use aspose\slides\FillType;
use aspose\slides\ImageFormat;
use aspose\slides\LightingDirection;
use aspose\slides\LightRigPresetType;
use aspose\slides\MaterialPresetType;
use aspose\slides\Presentation;
use aspose\slides\SaveFormat;
use aspose\slides\ShapeType;
use aspose\slides\TextAlignment;
use aspose\slides\TextAnchorType;

$presentation = new Presentation();
try {
    $slide = $presentation->getSlides()->get_Item(0);

    $shape = $slide->getShapes()->addAutoShape(ShapeType::Rectangle, 70, 160, 240, 140);

    $shape->getTextFrame()->setText("Readable text");
    $shape->getTextFrame()->getParagraphs()->get_Item(0)->getParagraphFormat()->getDefaultPortionFormat()->setFontHeight(28);
    $shape->getTextFrame()->getParagraphs()->get_Item(0)->getParagraphFormat()->setAlignment(TextAlignment::Center);
    $shape->getTextFrame()->getTextFrameFormat()->setAnchoringType(TextAnchorType::Center);
    $shape->getFillFormat()->setFillType(FillType::Solid);
    $shape->getFillFormat()->getSolidFillColor()->setColor(new Java("java.awt.Color", 100, 149, 237));

    $shape->getThreeDFormat()->getCamera()->setCameraType(CameraPresetType::OrthographicFront);
    $shape->getThreeDFormat()->getCamera()->setRotation(30, 30, 0);
    $shape->getThreeDFormat()->getLightRig()->setLightType(LightRigPresetType::Flat);
    $shape->getThreeDFormat()->getLightRig()->setDirection(LightingDirection::Top);
    $shape->getThreeDFormat()->setMaterial(MaterialPresetType::Flat);
    $shape->getThreeDFormat()->setExtrusionHeight(40);
    $shape->getThreeDFormat()->getExtrusionColor()->setColor(new Java("java.awt.Color", 65, 105, 225));
    $shape->getTextFrame()->getTextFrameFormat()->setKeepTextFlat(false);

    $flatTextShape = $slide->getShapes()->addClone($shape, 400, 160);
    $flatTextShape->getTextFrame()->getTextFrameFormat()->setKeepTextFlat(true);

    $presentation->save("keep_text_flat.pptx", SaveFormat::Pptx);
    $image = $slide->getImage(2, 2);
    try {
        $image->save("keep_text_flat.png", ImageFormat::Png);
    } finally {
        $image->dispose();
    }
} finally {
    $presentation->dispose();
}
बाएँ तरफ टेक्स्ट 3D अभिविन्यास का अनुसरण करता है। दाएँ तरफ टेक्स्ट सपाट रहता है और पढ़ने में आसान होता है। दोनों आयतें समान दृश्यमान एक्सट्रूज़न और 3D अभिविन्यास बनाए रखती हैं।
निर्यात और रेंडरिंग व्यवहार
Aspose.Slides PPTX जैसे PowerPoint फ़ॉर्मेट में 3D फ़ॉर्मेटिंग को सुरक्षित रखता है। जब स्थिर‑लेआउट फ़ॉर्मेट में रेंडर या निर्यात किया जाता है, तो 3D सीन को रास्टराइज़ किया जाता है या 2D परिणाम में ड्रॉ किया जाता है। यह तब लागू होता है जब आप स्लाइड को PNG में रेंडर करते हैं, PDF में निर्यात करते हैं, HTML में निर्यात करते हैं, या वीडियो कन्वर्ज़न के लिए फ्रेम उत्पन्न करते हैं।
इन बिंदुओं को याद रखें:
- निर्यातित छवियों और PDF में इंटरैक्टिविटी नहीं होती। निर्यात के बाद दर्शक ऑब्जेक्ट को घुमा नहीं सकता।
- अंतिम रूप कैमरा, लाइट रिग, मैटेरियल, एक्सट्रूज़न, फ़िल, और स्लाइड स्केलिंग के संयोजन पर निर्भर करता है।
- यदि आपको इनहेरिटेड या थीम‑आधारित फ़ॉर्मेटिंग मानों को जांचना हो, तो effective shape properties पढ़ें।
- कुछ आउटपुट फ़ॉर्मेट संपादन योग्य PowerPoint 3D फ़ॉर्मेटिंग को संग्रहीत नहीं कर सकते। ऐसे फ़ॉर्मेट में दृश्य परिणाम रेंडर किया जाता है, न कि संपादन योग्य 3D सेटिंग्स के रूप में संरक्षित।
FAQ
क्या Aspose.Slides इंटरैक्टिव 3D प्रेज़ेंटेशन बना सकता है?
Aspose.Slides आकार और टेक्स्ट के लिए PowerPoint 3D प्रभाव बनाता और रेंडर करता है। यह निर्यातित छवियों, PDF, या HTML पेजों को इंटरैक्टिव 3D सीन नहीं बनाता जिसे दर्शक घुमा सके। PPTX में, जहाँ फ़ॉर्मेट समर्थन करता है, 3D फ़ॉर्मेटिंग PowerPoint में संपादन योग्य रहती है।
3D मॉडल और 3D प्रभाव में क्या अंतर है?
3D मॉडल एक अलग 3D ऑब्जेक्ट है जिसे प्रेज़ेंटेशन में सम्मिलित किया जाता है। 3D प्रभाव सामान्य PowerPoint आकार या टेक्स्ट पर लागू किया गया फ़ॉर्मेटिंग है, जैसे घूर्णन, एक्सट्रूज़न, बीवल, लाइटिंग, और मैटेरियल। यह लेख 3D प्रभावों को कवर करता है।
दृश्यमान 3D आकार के लिए कौन सी सेटिंग्स आवश्यक हैं?
कम से कम कैमरा घूर्णन और या तो एक्सट्रूज़न या डेप्थ सेट करें। प्रायोगिक रूप से, लाइट रिग और मैटेरियल भी सेट करना उपयोगी है ताकि रेंडर किए गए फ़ेसेस में स्पष्ट हाइलाइट और शैडो हों।
क्या मैं दोनों आकार और टेक्स्ट पर 3D प्रभाव लागू कर सकता हूँ?
हां। आकार बॉडी के लिए Shape::getThreeDFormat और टेक्स्ट के लिए TextFrameFormat::getThreeDFormat उपयोग करें।
क्या 3D प्रभाव छवियों, PDF, HTML, या वीडियो फ्रेम में निर्यात करने पर दिखेंगे?
हां। Aspose.Slides स्लाइड छवियों, PDF आउटपुट, HTML आउटपुट, और वीडियो कन्वर्ज़न के लिए उपयोग किए जाने वाले फ्रेम उत्पन्न करते समय 3D प्रभाव रेंडर करता है। निर्यातित आउटपुट रेंडर किया हुआ दृश्य रखता है, न कि संपादन योग्य 3D ऑब्जेक्ट।
क्या मैं इनहेरिटेंस और थीम सेटिंग्स लागू होने के बाद अंतिम 3D मान पढ़ सकता हूँ?
हां। अंतिम कैमरा, लाइट रिग, बीवल, और संबंधित 3D मान पढ़ने के लिए Shape Effective Properties में वर्णित प्रभावी फ़ॉर्मेटिंग API उपयोग करें।