
在 Android 上優化簡報的影像管理
簡介
Aspose.Slides for Android via Java 提供了多種處理影像的方式,每種方式皆有不同的用途。您可以將影像儲存在簡報中、在圖片框中顯示、用作投影片背景、連結至外部影像、取代共享的影像資源,或將 SVG 內容轉換為可編輯的形狀。
本文聚焦於影像資源以及它們在整個簡報中的使用方式。若要了解對單一圖片框套用的裁切、透明度、效果、拉伸等格式設定,請參閱圖片框。
了解影像模型
以下 API 概念密切相關但不可互換:
- 簡報影像集合 用於儲存簡報使用的影像資源。使用ImageCollection.addImage 可加入影像資料並取得IPPImage資源。
- 圖片框 是一種在投影片、版面或母片上顯示影像的形狀。使用IShapeCollection.addPictureFrame 可將影像資源放置於投影片上。
- 投影片背景使用影像作為投影片填充的一部份,而非形狀。因此其行為不同於圖片框。
- IPPImage.replaceImage 可取代影像資源。若多個簡報元素使用該資源,皆會改為使用取代後的影像。
- 將 SVG 轉換為形狀會產生可編輯的投影片形狀。轉換後,內容不再作為單一圖片資源管理。
因此,一般的工作流程為:將影像資料加入影像集合,取得[IPPImage],然後在一個或多個圖片框或填充中使用該資源。
新增嵌入式影像
若要插入本機影像,先載入檔案,將其加入影像集合,並建立使用返回的IPPImage的圖片框。
import com.aspose.slides.*;

Presentation presentation = new Presentation();
try {
    IPPImage image;
    IImage sourceImage = Images.fromFile("photo.png");
    try {
        image = presentation.getImages().addImage(sourceImage);
    } finally {
        if (sourceImage != null) sourceImage.dispose();
    }

    ISlide slide = presentation.getSlides().get_Item(0);
    slide.getShapes().addPictureFrame(ShapeType.Rectangle, 20, 20, 320, 180, image);

    presentation.save("presentation.pptx", SaveFormat.Pptx);
} finally {
    presentation.dispose();
}
以此方式加入的影像會嵌入簡報中,產生的檔案不會依賴原始影像檔案的可用性。
從網路新增影像
當影像可透過 HTTP 或 HTTPS 取得時,先下載其位元組,加入簡報影像集合,然後以與本機影像相同的方式使用返回的影像資源。
import com.aspose.slides.*;
import java.io.ByteArrayOutputStream;
import java.io.IOException;
import java.io.InputStream;
import java.net.HttpURLConnection;
import java.net.URI;
import java.net.URL;

Presentation presentation = new Presentation();
try {
    URL imageUrl = URI.create("https://example.com/image.png").toURL();
    HttpURLConnection connection = (HttpURLConnection) imageUrl.openConnection();
    connection.setConnectTimeout(10000);
    connection.setReadTimeout(10000);

    try (InputStream inputStream = connection.getInputStream();
         ByteArrayOutputStream outputStream = new ByteArrayOutputStream()) {
        byte[] buffer = new byte[8192];
        int bytesRead;
        while ((bytesRead = inputStream.read(buffer)) != -1) outputStream.write(buffer, 0, bytesRead);

        IPPImage image = presentation.getImages().addImage(outputStream.toByteArray());
        ISlide slide = presentation.getSlides().get_Item(0);
        slide.getShapes().addPictureFrame(ShapeType.Rectangle, 20, 20, 320, 180, image);
    }

    presentation.save("presentation-from-web.pptx", SaveFormat.Pptx);
} finally {
    presentation.dispose();
}
在長時間執行的應用程式中,請重複使用 HTTP 用戶端或適合該應用程式的連線管理策略,而不要一次又一次建立不必要的網路基礎設施。當來源不受信任時,亦請驗證遠端 URL、回應大小與內容類型。
在多張投影片間重複使用影像
若同一影像需要使用多次,請只在簡報中加入一次,並在建立其他圖片框時重複使用返回的[IPPImage]。這樣可避免重複載入相同的來源資料,且能明確表示共享影像資源與其使用之間的關係。
對於需自動出現在多張投影片上的圖形(例如公司商標),建議將圖片框放置於投影片母片或版面上,而不是在每張投影片中各別加入等效形狀。
將影像用作投影片背景
背景影像是指派給投影片填充,而不是以圖片框形狀加入。當影像需要覆蓋整個投影片背景且不需像普通投影片物件那樣進行操作時,此方式特別有用。
import com.aspose.slides.*;

Presentation presentation = new Presentation();
try {
    ISlide slide = presentation.getSlides().get_Item(0);

    IPPImage image;
    IImage sourceImage = Images.fromFile("background.jpg");
    try {
        image = presentation.getImages().addImage(sourceImage);
    } finally {
        if (sourceImage != null) sourceImage.dispose();
    }

    slide.getBackground().setType(BackgroundType.OwnBackground);
    slide.getBackground().getFillFormat().setFillType(FillType.Picture);
    slide.getBackground().getFillFormat().getPictureFillFormat().setPictureFillMode(PictureFillMode.Stretch);
    slide.getBackground().getFillFormat().getPictureFillFormat().getPicture().setImage(image);

    presentation.save("background-image.pptx", SaveFormat.Pptx);
} finally {
    presentation.dispose();
}
欲取得更多背景選項(包括母片與版面背景),請參閱簡報背景。
嵌入式影像與連結影像
嵌入式與連結影像在可移植性與檔案大小上各有取捨:
- 嵌入式影像:影像資料儲存在簡報內。簡報為自包含檔案,但檔案大小會包含影像資料。
- 連結影像:簡報僅儲存指向外部影像的路徑或 URL。可減少簡報大小,但外部資源必須在開啟或呈現簡報時仍然可存取。
可透過ISlidesPicture.setLinkPathLong 指定外部路徑或 URL,來建立連結圖片,而非嵌入影像資料。
import com.aspose.slides.*;

Presentation presentation = new Presentation();
try {
    ISlide slide = presentation.getSlides().get_Item(0);
    IPictureFrame pictureFrame = slide.getShapes().addPictureFrame(ShapeType.Rectangle, 20, 20, 320, 180, null);
    pictureFrame.getPictureFormat().getPicture().setLinkPathLong("https://example.com/image.png");

    presentation.save("linked-image.pptx", SaveFormat.Pptx);
} finally {
    presentation.dispose();
}
僅在部署環境能可靠存取外部資源時才使用連結影像。若簡報必須離線使用或在不同系統間搬移,嵌入式影像通常較安全。
處理 SVG 影像
SVG 為向量格式,適用於圖示、圖表及其他需在放大時保持細節的圖形。Aspose.Slides 同時支援將 SVG 作為影像資源與作為可編輯投影片形狀的來源。
將 SVG 加入為影像
建立一個SvgImage,將其加入影像集合,然後在圖片框中使用產生的影像資源。
import com.aspose.slides.*;
import java.nio.charset.StandardCharsets;
import java.nio.file.Files;
import java.nio.file.Paths;

Presentation presentation = new Presentation();
try {
    byte[] imageData = Files.readAllBytes(Paths.get("icon.svg"));
    String svgContent = new String(imageData, StandardCharsets.UTF_8);
    ISvgImage svgImage = new SvgImage(svgContent);

    IPPImage image = presentation.getImages().addImage(svgImage);
    ISlide slide = presentation.getSlides().get_Item(0);
    slide.getShapes().addPictureFrame(ShapeType.Rectangle, 20, 20, 200, 200, image);

    presentation.save("svg-image.pptx", SaveFormat.Pptx);
} finally {
    presentation.dispose();
}
含外部資源的 SVG 檔案
SVG 可能會參考外部影像、樣式表或字型。對於此類情況,SvgImage 提供接受IExternalResourceResolver 與基底 URI 的建構函式。解析器可將相對 URI 轉換為允許的絕對 URI,並回傳該資源的串流。
解析器會在 Aspose.Slides 處理 SVG 時提供外部資源,但不會將 SVG 重新寫入為自包含文件。若 SVG 必須保持可移植,請將所需資源嵌入 SVG 本身,例如使用 data: URI 連結影像。
當 SVG 檔案來自不受信任來源時,請限制解析器可存取的協定、檔案位置與主機。網路解析器亦應套用逾時、回應大小限制與內容驗證。
將 SVG 轉換為可編輯形狀
Aspose.Slides 能將 SVG 轉換為一組可編輯的投影片形狀,類似 PowerPoint 的對應指令。
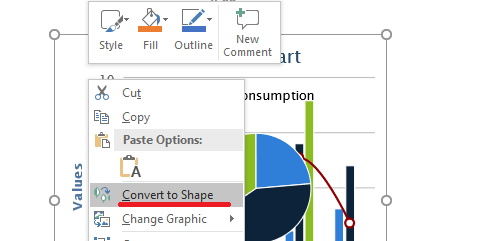
使用接受ISvgImage 的IShapeCollection.addGroupShape 重載來執行轉換。
import com.aspose.slides.*;
import com.aspose.slides.android.SizeF;
import java.nio.charset.StandardCharsets;
import java.nio.file.Files;
import java.nio.file.Paths;

Presentation presentation = new Presentation();
try {
    byte[] imageData = Files.readAllBytes(Paths.get("diagram.svg"));
    String svgContent = new String(imageData, StandardCharsets.UTF_8);
    ISvgImage svgImage = new SvgImage(svgContent);

    SizeF slideSize = presentation.getSlideSize().getSize();
    ISlide slide = presentation.getSlides().get_Item(0);
    slide.getShapes().addGroupShape(svgImage, 0, 0, (float) slideSize.getWidth(), (float) slideSize.getHeight());

    presentation.save("editable-svg-shapes.pptx", SaveFormat.Pptx);
} finally {
    presentation.dispose();
}
當個別向量元素需要以 PowerPoint 形狀編輯時,請使用 SVG 到形狀的轉換。若 SVG 僅需顯示,保留為影像較為簡單,且可避免產生大量獨立形狀。
取代現有影像資源
當您想取代既有影像資源時,請使用IPPImage.replaceImage。這在取代共用圖形(例如商標)時特別有用。
import com.aspose.slides.*;

Presentation presentation = new Presentation("input.pptx");
try {
    IPPImage imageToReplace = presentation.getImages().get_Item(0);

    IImage replacementImage = Images.fromFile("new-logo.png");
    try {
        imageToReplace.replaceImage(replacementImage);
    } finally {
        if (replacementImage != null) replacementImage.dispose();
    }

    presentation.save("output.pptx", SaveFormat.Pptx);
} finally {
    presentation.dispose();
}
如果多個圖片框、背景、母片或版面使用相同的影像資源,取代該資源會同時更新所有使用處。若僅希望變更單一圖片框,請為該框指定不同的影像,而非取代共享資源。
replaceImage 亦提供接受位元組陣列或其他[IPPImage]的重載。
實務影像管理指引
控制簡報大小
大型點陣圖會使簡報檔案過大。請使用與預期顯示尺寸相符的來源影像,盡可能重複使用共享影像資源,並避免嵌入多份相同的全解析度圖形。
對於已置於圖片框中的點陣圖,您可以使用IPictureFillFormat.compressImage 依選取的解析度與裁切設定壓縮影像資料。這屬於圖片框的處理,而非影像集合管理,相關格式化操作請參閱圖片框。
選擇嵌入或連結內容
嵌入可使簡報具備可移植性,因為所有必要的影像資料隨檔案一起搬遷。連結可減少檔案大小,但會產生外部依賴。僅在該依賴可接受且穩定時才使用連結。
重複使用共享品牌形象
對於重複出現的商標、水印或裝飾圖形,請只使用一個影像資源並重複使用。若該圖形屬於簡報設計而非投影片內容,請將其放置於母片或版面上,以便由相應的投影片繼承。
保持 SVG 資源可移植
自包含的 SVG 較易搬移且能一致呈現,較不依賴外部檔案或網路資源。若可能,請在匯入 SVG 前先將所需資源嵌入。僅在必須編輯個別向量元素時才將 SVG 轉換為形狀。
使用現代跨平台影像 API
對於新開發的 Android via Java 程式碼,請使用 Aspose.Slides 的IImage 與Images API,取代基於 android.graphics.Bitmap 的舊版公共 API。遷移指南請參閱現代 API。
WMF 與 EMF 需特別考量。當這些格式透過IImage 傳遞時,ImageCollection.addImage 會先將中繼檔轉換為點陣 PNG 再插入。若必須保留中繼檔資料,請改用接受串流的ImageCollection.addImage 重載。從試算表或其他產品產生 EMF 內容屬於獨立的整合工作流程,超出本文範圍。
常見問題與解答
影像集合與圖片框有何不同?
影像集合用於儲存可重複使用的影像資源。圖片框則是投影片上的一種形狀,用來顯示其中一個資源,並提供如裁切與效果等圖片專屬的格式設定。
如何一次性取代所有相同的商標?
如果該商標已作為單一影像資源共享,請使用IPPImage.replaceImage 取代該資源。若要在整個簡報層面統一品牌,亦可將商標放置於母片或版面上,以減少重複的投影片內容。
為什麼連結影像在另一台電腦上會消失?
連結圖片依賴其外部檔案或 URL。若在其他電腦上無法存取該資源,連結影像就會不可用。當簡報必須自包含時,請將影像嵌入。
插入的 SVG 能否編輯為 PowerPoint 形狀?
能。使用IShapeCollection.addGroupShape 轉換 SVG;轉換後的群組會包含可編輯的投影片形狀,而非單一 SVG 圖片。
如何讓包含大量影像的簡報保持較小體積?
重複使用共享影像資源、避免使用過大的點陣來源、在適當時壓縮點陣圖片、將重複的品牌圖形放在母片或版面上,並僅在外部依賴可接受時才使用連結影像。