
在 PHP 中為簡報圖表新增趨勢線
概述
本文說明如何使用 Aspose.Slides 為簡報圖表加入趨勢線。它展示了如何建立圖表、為圖表系列加入趨勢線,以及如何使用多種趨勢線類型,包括指數、線性、對數、移動平均、多項式和冪次。
同時說明如何透過插入線條形狀為圖表新增自訂線,並提供一段簡短的 FAQ,說明 forward 與 backward 趨勢線投射值的意義,以及在匯出為 PDF、SVG 或將圖表渲染為影像時,趨勢線是否會被保留。
加入趨勢線
使用 TrendlineCollection::add 為圖表系列加入趨勢線,並使用 TrendlineType 選擇其類型。範例建立一個預設資料的群組直條圖,並為其三個系列各加入兩條趨勢線。
指數趨勢線透過 setDisplayEquation 與 setDisplayRSquaredValue 隱藏其公式與 R 平方值,而線性趨勢線則設定為紅色。對數趨勢線使用 addTextFrameForOverriding 來自訂標籤。移動平均則使用 setPeriod 設為三個資料點,並透過 setTrendlineName 設定自訂名稱。
多項式趨勢線的階數為三,透過 setOrder 設定,並透過 setForward 向前延伸一個類別。冪次趨勢線則透過 setBackward 向後延伸一個類別。
use aspose\slides\Presentation;
use aspose\slides\ChartType;
use aspose\slides\TrendlineType;
use aspose\slides\FillType;
use aspose\slides\SaveFormat;

$presentation = new Presentation();
try {
    $slide = $presentation->getSlides()->get_Item(0);

    $chart = $slide->getShapes()->addChart(ChartType::ClusteredColumn, 20, 20, 500, 400);

    $firstSeries = $chart->getChartData()->getSeries()->get_Item(0);

    $exponentialTrendline = $firstSeries->getTrendLines()->add(TrendlineType::Exponential);
    $exponentialTrendline->setDisplayEquation(false);
    $exponentialTrendline->setDisplayRSquaredValue(false);

    $linearTrendline = $firstSeries->getTrendLines()->add(TrendlineType::Linear);
    $linearTrendline->getFormat()->getLine()->getFillFormat()->setFillType(FillType::Solid);
    $linearTrendline->getFormat()->getLine()->getFillFormat()->getSolidFillColor()->setColor(java("java.awt.Color")->RED);

    $secondSeries = $chart->getChartData()->getSeries()->get_Item(1);

    $logarithmicTrendline = $secondSeries->getTrendLines()->add(TrendlineType::Logarithmic);
    $logarithmicTrendline->addTextFrameForOverriding("New log trend line");

    $movingAverageTrendline = $secondSeries->getTrendLines()->add(TrendlineType::MovingAverage);
    $movingAverageTrendline->setPeriod(3);
    $movingAverageTrendline->setTrendlineName("New TrendLine Name");

    $thirdSeries = $chart->getChartData()->getSeries()->get_Item(2);

    $polynomialTrendline = $thirdSeries->getTrendLines()->add(TrendlineType::Polynomial);
    $polynomialTrendline->setForward(1);
    $polynomialTrendline->setOrder(3);

    $powerTrendline = $thirdSeries->getTrendLines()->add(TrendlineType::Power);
    $powerTrendline->setBackward(1);

    $presentation->save("ChartTrendLines.pptx", SaveFormat::Pptx);
} finally {
    $presentation->dispose();
}
設定趨勢線截距
使用 setIntercept 於 X = 0 時固定趨勢線的 Y 值。此設定支援線性、指數與多項式趨勢線。
例如,生產成本模型可能需要在已知固定成本 100 的情況下開始,即使非零產量的測量值暗示不同的基準線。對於線性趨勢線,固定截距會將方程式 y = ax + b 約束為 b = 100;斜率在此約束下依資料擬合。它不會僅僅移動已擬合的直線。軸交叉設定控制圖表軸的交點位置,並不會改變已擬合趨勢線的係數。
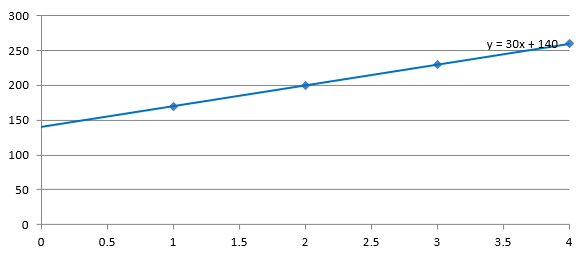
以下範例建立一個散佈 (XY) 圖表,產量從 1 到 4,成本分別為 170、200、230 與 260。它先以預設自動截距儲存圖表,然後將截距設為 100 再儲存第二個 PPTX。兩個檔案唯一的差異在於截距設定。趨勢線會顯示其公式,並延伸回 X = 0。
use aspose\slides\Presentation;
use aspose\slides\ChartType;
use aspose\slides\TrendlineType;
use aspose\slides\SaveFormat;

$presentation = new Presentation();
try {
    $slide = $presentation->getSlides()->get_Item(0);

    $chart = $slide->getShapes()->addChart(ChartType::ScatterWithMarkers, 20, 20, 480, 210);
    $chart->setLegend(false);

    $chart->getChartData()->getSeries()->clear();
    $chart->getChartData()->getCategories()->clear();

    $workbook = $chart->getChartData()->getChartDataWorkbook();
    $workbook->clear(0);

    $nameCell = $workbook->getCell(0, 0, 1, "Production cost");
    $series = $chart->getChartData()->getSeries()->add($nameCell, ChartType::ScatterWithMarkers);
    $costs = [170, 200, 230, 260];

    for ($i = 0; $i < count($costs); $i++) {
        $xCell = $workbook->getCell(0, $i + 1, 0, $i + 1);
        $yCell = $workbook->getCell(0, $i + 1, 1, $costs[$i]);
        $series->getDataPoints()->addDataPointForScatterSeries($xCell, $yCell);
    }

    $trendline = $series->getTrendLines()->add(TrendlineType::Linear);
    $trendline->setDisplayEquation(true);
    $trendline->setBackward(1);

    $presentation->save("AutomaticIntercept.pptx", SaveFormat::Pptx);

    $trendline->setIntercept(100);
    $presentation->save("FixedIntercept.pptx", SaveFormat::Pptx);
} finally {
    $presentation->dispose();
}
使用自動計算時,這些資料產生 y = 30x + 140。將截距設為 100 則約得到 y = 43.33x + 100:在零點的擬合值符合已知基線,但線條不再穿過每個資料點。
| 自動截距 | 固定截距 100 |
|---|---|
 |
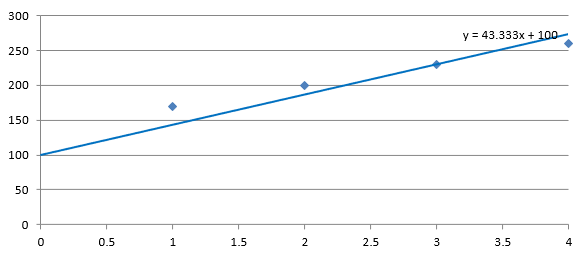 |
兩張圖使用相同的資料與軸比例。趨勢線皆向 X = 0 延伸以顯示其截距。
預設情況下,getIntercept 會回傳 NaN,代表未指定的截距,而非零。此時截距會自動根據資料計算。
加入自訂線
自訂線是繪製在圖表之上的形狀,而非由系列資料計算出的趨勢線。此範例使用 ShapeCollection::addAutoShape 在投影片上於圖表上方加入一條水平線。線條位置以投影片座標(單位為點)指定,從圖表左邊緣開始,垂直位於圖表中間。其寬度與圖表寬度相同。透過 getLineFormat 為線條設定實心紅色。
use aspose\slides\Presentation;
use aspose\slides\ChartType;
use aspose\slides\FillType;
use aspose\slides\ShapeType;
use aspose\slides\SaveFormat;

$presentation = new Presentation();
try {
    $slide = $presentation->getSlides()->get_Item(0);

    $chart = $slide->getShapes()->addChart(ChartType::ClusteredColumn, 100, 100, 500, 400);

    $lineY = java_values($chart->getY()) + java_values($chart->getHeight()) / 2;
    $line = $slide->getShapes()->addAutoShape(ShapeType::Line, $chart->getX(), $lineY, $chart->getWidth(), 0);
    $line->getLineFormat()->getFillFormat()->setFillType(FillType::Solid);
    $line->getLineFormat()->getFillFormat()->getSolidFillColor()->setColor(java("java.awt.Color")->RED);

    $presentation->save("AddCustomLines.pptx", SaveFormat::Pptx);
} finally {
    $presentation->dispose();
}
FAQ
「forward」和「backward」對趨勢線意味著什麼?
它們是趨勢線向前/向後投射的長度:對散佈 (XY) 圖表而言,以軸單位計算;對非散佈圖表而言,以類別數計算。僅接受非負值。
匯出簡報為 PDF 或 SVG,或將投影片渲染為影像時,趨勢線會被保留嗎?
會。Aspose.Slides 可將簡報轉換為 PDF 或 SVG,並將圖表渲染為影像;趨勢線作為圖表的一部份,在這些操作中皆會被保留。也提供可將圖表本身 匯出為影像 的方法。