یک جدول ایجاد کنید
Aspose.Words به کاربران اجازه می دهد تا جداول را در یک سند از ابتدا ایجاد کنند و چندین روش مختلف برای انجام این کار فراهم می کند. در این مقاله توضیحاتی در مورد نحوه افزودن جداول فرمت شده به سند خود با استفاده از هر روش و همچنین مقایسه هر روش در پایان مقاله ارائه شده است.
سبک های جدول پیش فرض
جدول تازه ایجاد شده به مقادیر پیش فرض مشابه با آنهایی که در Microsoft Wordاستفاده می شود داده شده است:
ویژگی جدول | پیش فرض در Aspose.Words |
---|---|
Border Style |
Single |
Border Width |
1/2 pt |
رنگ مرزی | Black |
Left and Right Padding |
5.4 pts |
AutoFit Mode |
AutoFit to Window |
Allow AutoFit |
True |
یک جدول می تواند خطی باشد اگر به شدت قرار گرفته باشد، یا شناور باشد اگر می تواند در هر نقطه از صفحه قرار گیرد. به طور پیش فرض ،Aspose.Words همیشه جداول خطی ایجاد می کند.
|
ایجاد یک جدول با DocumentBuilder
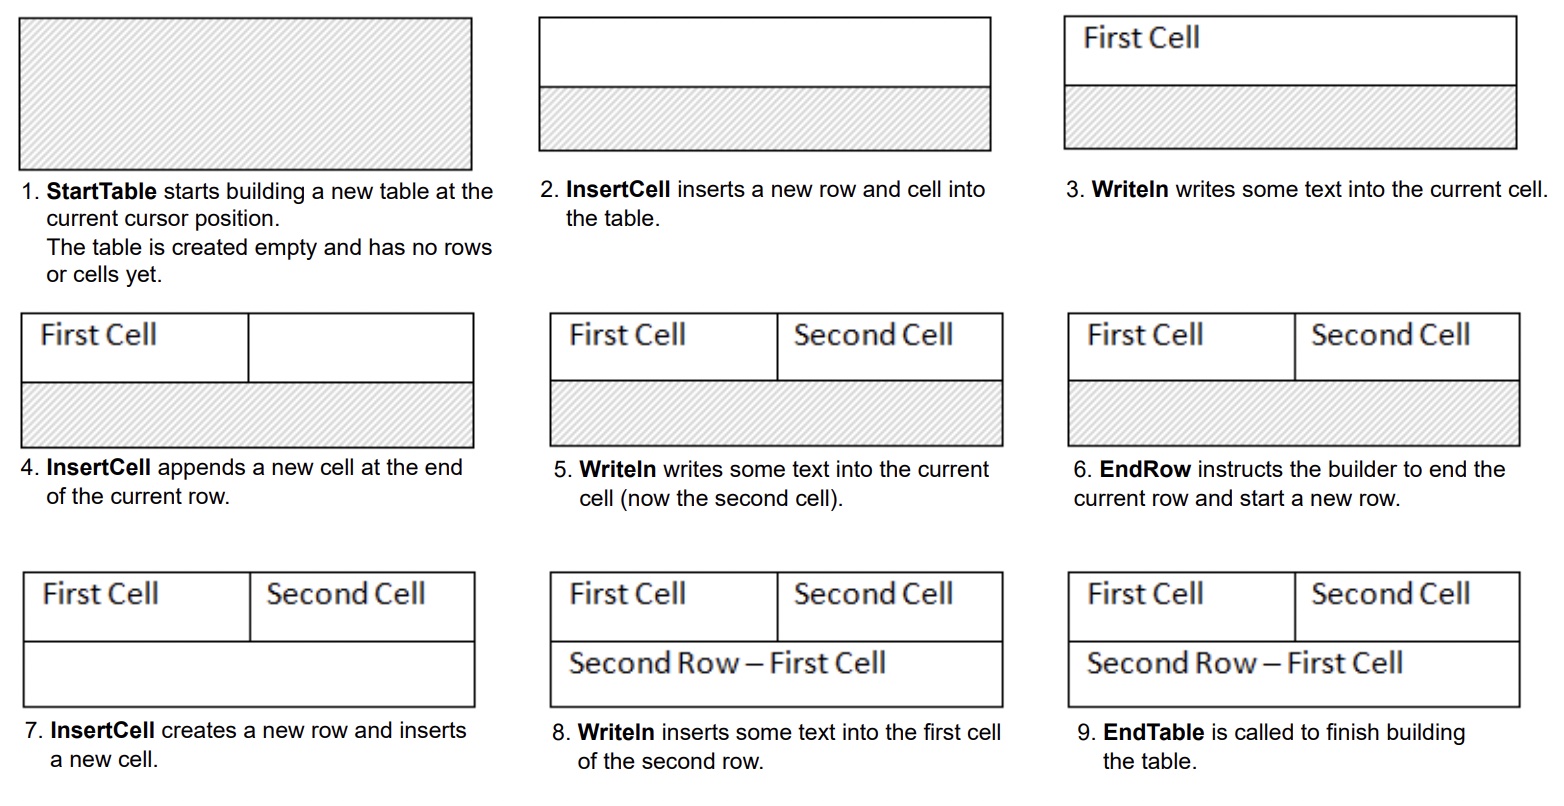
در Aspose.Words، کاربران می توانند یک جدول در یک سند با استفاده از DocumentBuilder ایجاد کنند. الگوریتم اصلی برای ایجاد یک جدول به شرح زیر است:
- جدول را با StartTableشروع کنید
- با استفاده از InsertCell یک سلول به جدول اضافه کنید-این به طور خودکار یک ردیف جدید را شروع می کند
- به صورت اختیاری، از ویژگی CellFormat برای مشخص کردن قالب بندی سلول استفاده کنید
- محتوای سلول را با استفاده از روش های مناسب DocumentBuilder مانند Writeln، InsertImage و دیگران وارد کنید
- مراحل 2-4 را تکرار کنید تا ردیف کامل شود
- برای پایان دادن به ردیف فعلی با EndRow تماس بگیرید
- به صورت اختیاری، از ویژگی RowFormat برای مشخص کردن قالب بندی ردیف استفاده کنید
- مراحل 2-7 را تکرار کنید تا جدول کامل شود
- برای اتمام ساخت میز با EndTable تماس بگیرید
جزئیات مهم:
- StartTable همچنین می تواند در داخل یک سلول فراخوانده شود، در این صورت ایجاد یک جدول آشیانه ای در داخل سلول را آغاز می کند.
- پس از فراخوانی InsertCell، یک سلول جدید ایجاد می شود و هر محتوایی که با استفاده از روش های دیگر کلاس DocumentBuilder اضافه می کنید به سلول فعلی اضافه می شود. برای ایجاد یک سلول جدید در همان ردیف، دوباره با InsertCell تماس بگیرید.
- اگر InsertCell بلافاصله پس از EndRow و پایان یک ردیف فراخوانده شود، جدول در یک ردیف جدید ادامه خواهد یافت.
- روش EndTable برای پایان دادن به جدول فقط باید یک بار پس از فراخوانی EndRow فراخوانده شود. فراخوانی EndTable نشانگر را از سلول فعلی به موقعیت بلافاصله پس از جدول منتقل می کند.
روند ایجاد یک جدول را می توان به وضوح در تصویر زیر مشاهده کرد:
مثال کد زیر نشان می دهد که چگونه یک جدول ساده با استفاده از DocumentBuilder با قالب بندی پیش فرض ایجاد کنید:
// For complete examples and data files, please go to https://github.com/aspose-words/Aspose.Words-for-Java.git. | |
Document doc = new Document(); | |
DocumentBuilder builder = new DocumentBuilder(doc); | |
// Start building the table. | |
builder.startTable(); | |
builder.insertCell(); | |
builder.write("Row 1, Cell 1 Content."); | |
// Build the second cell. | |
builder.insertCell(); | |
builder.write("Row 1, Cell 2 Content."); | |
// Call the following method to end the row and start a new row. | |
builder.endRow(); | |
// Build the first cell of the second row. | |
builder.insertCell(); | |
builder.write("Row 2, Cell 1 Content"); | |
// Build the second cell. | |
builder.insertCell(); | |
builder.write("Row 2, Cell 2 Content."); | |
builder.endRow(); | |
// Signal that we have finished building the table. | |
builder.endTable(); | |
doc.save(getArtifactsDir() + "WorkingWithTables.CreateSimpleTable.docx"); |
مثال کد زیر نشان می دهد که چگونه یک جدول فرمت شده با استفاده از DocumentBuilderایجاد کنیم:
// For complete examples and data files, please go to https://github.com/aspose-words/Aspose.Words-for-Java.git. | |
Document doc = new Document(); | |
DocumentBuilder builder = new DocumentBuilder(doc); | |
Table table = builder.startTable(); | |
builder.insertCell(); | |
// Table wide formatting must be applied after at least one row is present in the table. | |
table.setLeftIndent(20.0); | |
// Set height and define the height rule for the header row. | |
builder.getRowFormat().setHeight(40.0); | |
builder.getRowFormat().setHeightRule(HeightRule.AT_LEAST); | |
builder.getCellFormat().getShading().setBackgroundPatternColor(new Color((198), (217), (241))); | |
builder.getParagraphFormat().setAlignment(ParagraphAlignment.CENTER); | |
builder.getFont().setSize(16.0); | |
builder.getFont().setName("Arial"); | |
builder.getFont().setBold(true); | |
builder.getCellFormat().setWidth(100.0); | |
builder.write("Header Row,\n Cell 1"); | |
// We don't need to specify this cell's width because it's inherited from the previous cell. | |
builder.insertCell(); | |
builder.write("Header Row,\n Cell 2"); | |
builder.insertCell(); | |
builder.getCellFormat().setWidth(200.0); | |
builder.write("Header Row,\n Cell 3"); | |
builder.endRow(); | |
builder.getCellFormat().getShading().setBackgroundPatternColor(Color.WHITE); | |
builder.getCellFormat().setWidth(100.0); | |
builder.getCellFormat().setVerticalAlignment(CellVerticalAlignment.CENTER); | |
// Reset height and define a different height rule for table body. | |
builder.getRowFormat().setHeight(30.0); | |
builder.getRowFormat().setHeightRule(HeightRule.AUTO); | |
builder.insertCell(); | |
// Reset font formatting. | |
builder.getFont().setSize(12.0); | |
builder.getFont().setBold(false); | |
builder.write("Row 1, Cell 1 Content"); | |
builder.insertCell(); | |
builder.write("Row 1, Cell 2 Content"); | |
builder.insertCell(); | |
builder.getCellFormat().setWidth(200.0); | |
builder.write("Row 1, Cell 3 Content"); | |
builder.endRow(); | |
builder.insertCell(); | |
builder.getCellFormat().setWidth(100.0); | |
builder.write("Row 2, Cell 1 Content"); | |
builder.insertCell(); | |
builder.write("Row 2, Cell 2 Content"); | |
builder.insertCell(); | |
builder.getCellFormat().setWidth(200.0); | |
builder.write("Row 2, Cell 3 Content."); | |
builder.endRow(); | |
builder.endTable(); | |
doc.save(getArtifactsDir() + "WorkingWithTables.FormattedTable.docx"); |
مثال کد زیر نشان می دهد که چگونه یک جدول آشیانه ای را با استفاده از DocumentBuilderوارد کنید:
// For complete examples and data files, please go to https://github.com/aspose-words/Aspose.Words-for-Java.git. | |
Document doc = new Document(); | |
DocumentBuilder builder = new DocumentBuilder(doc); | |
Cell cell = builder.insertCell(); | |
builder.writeln("Outer Table Cell 1"); | |
builder.insertCell(); | |
builder.writeln("Outer Table Cell 2"); | |
// This call is important to create a nested table within the first table. | |
// Without this call, the cells inserted below will be appended to the outer table. | |
builder.endTable(); | |
// Move to the first cell of the outer table. | |
builder.moveTo(cell.getFirstParagraph()); | |
// Build the inner table. | |
builder.insertCell(); | |
builder.writeln("Inner Table Cell 1"); | |
builder.insertCell(); | |
builder.writeln("Inner Table Cell 2"); | |
builder.endTable(); | |
doc.save(getArtifactsDir() + "WorkingWithTables.NestedTable.docx"); |
ایجاد یک جدول از طریق DOM (مدل شیء سند)
شما می توانید جداول را مستقیما به DOM با اضافه کردن یک گره Table جدید در یک موقعیت خاص وارد کنید.
لطفا توجه داشته باشید که بلافاصله پس از ایجاد گره جدول، خود جدول کاملا خالی خواهد بود، یعنی هنوز ردیف ها و سلول ها را شامل نمی شود. برای قرار دادن ردیف ها و سلول ها در یک جدول، گره های مناسب Row و Cell child را به DOM اضافه کنید.
مثال کد زیر نشان می دهد که چگونه یک جدول جدید را از ابتدا با اضافه کردن گره های مناسب کودک به درخت سند بسازید:
// For complete examples and data files, please go to https://github.com/aspose-words/Aspose.Words-for-Java.git. | |
Document doc = new Document(); | |
// We start by creating the table object. Note that we must pass the document object | |
// to the constructor of each node. This is because every node we create must belong | |
// to some document. | |
Table table = new Table(doc); | |
doc.getFirstSection().getBody().appendChild(table); | |
// Here we could call EnsureMinimum to create the rows and cells for us. This method is used | |
// to ensure that the specified node is valid. In this case, a valid table should have at least one Row and one cell. | |
// Instead, we will handle creating the row and table ourselves. | |
// This would be the best way to do this if we were creating a table inside an algorithm. | |
Row row = new Row(doc); | |
row.getRowFormat().setAllowBreakAcrossPages(true); | |
table.appendChild(row); | |
// We can now apply any auto fit settings. | |
table.autoFit(AutoFitBehavior.FIXED_COLUMN_WIDTHS); | |
Cell cell = new Cell(doc); | |
cell.getCellFormat().getShading().setBackgroundPatternColor(Color.BLUE); | |
cell.getCellFormat().setWidth(80.0); | |
cell.appendChild(new Paragraph(doc)); | |
cell.getFirstParagraph().appendChild(new Run(doc, "Row 1, Cell 1 Text")); | |
row.appendChild(cell); | |
// We would then repeat the process for the other cells and rows in the table. | |
// We can also speed things up by cloning existing cells and rows. | |
row.appendChild(cell.deepClone(false)); | |
row.getLastCell().appendChild(new Paragraph(doc)); | |
row.getLastCell().getFirstParagraph().appendChild(new Run(doc, "Row 1, Cell 2 Text")); | |
doc.save(getArtifactsDir() + "WorkingWithTables.InsertTableDirectly.docx"); |
یک جدول از HTMLایجاد کنید
Aspose.Words از وارد کردن محتوا به یک سند از یک منبع HTML با استفاده از روش InsertHtml پشتیبانی می کند. ورودی می تواند یک صفحه کامل HTML یا فقط یک قطعه جزئی باشد.
با استفاده از این روش InsertHtml، کاربران می توانند جداول را از طریق برچسب های جدول مانند <table>
, <tr>
, <td>
.
مثال کد زیر نشان می دهد که چگونه یک جدول را از یک رشته حاوی برچسب های HTML در یک سند قرار دهید:
// For complete examples and data files, please go to https://github.com/aspose-words/Aspose.Words-for-Java.git. | |
Document doc = new Document(); | |
DocumentBuilder builder = new DocumentBuilder(doc); | |
// Note that AutoFitSettings does not apply to tables inserted from HTML. | |
builder.insertHtml("<table>" + | |
"<tr>" + | |
"<td>Row 1, Cell 1</td>" + | |
"<td>Row 1, Cell 2</td>" + | |
"</tr>" + | |
"<tr>" + | |
"<td>Row 2, Cell 2</td>" + | |
"</tr>" + | |
"</table>"); | |
doc.save(getArtifactsDir() + "WorkingWithTables.InsertTableFromHtml.docx"); |
یک کپی از یک جدول موجود را وارد کنید
اغلب اوقات زمانی وجود دارد که شما نیاز به ایجاد یک جدول بر اساس یک جدول موجود در یک سند دارید. ساده ترین راه برای کپی کردن یک جدول در حالی که تمام قالب بندی ها را حفظ می کند، شبیه سازی گره جدول با استفاده از روش deepClone است.
همین تکنیک را می توان برای اضافه کردن نسخه های یک ردیف یا سلول موجود به یک جدول استفاده کرد.
مثال کد زیر نشان می دهد که چگونه یک جدول را با استفاده از node constructors تکرار کنیم:
// For complete examples and data files, please go to https://github.com/aspose-words/Aspose.Words-for-Java.git. | |
Document doc = new Document(getMyDir() + "Tables.docx"); | |
Table table = (Table) doc.getChild(NodeType.TABLE, 0, true); | |
// Clone the table and insert it into the document after the original. | |
Table tableClone = (Table) table.deepClone(true); | |
table.getParentNode().insertAfter(tableClone, table); | |
// Insert an empty paragraph between the two tables, | |
// or else they will be combined into one upon saving this has to do with document validation. | |
table.getParentNode().insertAfter(new Paragraph(doc), table); | |
doc.save(getArtifactsDir() + "WorkingWithTables.CloneCompleteTable.docx"); |
مثال کد زیر نشان می دهد که چگونه آخرین ردیف یک جدول را کلان کنیم و آن را به جدول اضافه کنیم:
// For complete examples and data files, please go to https://github.com/aspose-words/Aspose.Words-for-Java.git. | |
Document doc = new Document(getMyDir() + "Tables.docx"); | |
Table table = (Table) doc.getChild(NodeType.TABLE, 0, true); | |
Row clonedRow = (Row) table.getLastRow().deepClone(true); | |
// Remove all content from the cloned row's cells. This makes the row ready for new content to be inserted into. | |
for (Cell cell : (Iterable<Cell>) clonedRow.getCells()) | |
cell.removeAllChildren(); | |
table.appendChild(clonedRow); | |
doc.save(getArtifactsDir() + "WorkingWithTables.CloneLastRow.docx"); |
اگر شما به دنبال ایجاد جداول در یک سند هستید که با هر رکورد از منبع داده شما به صورت پویا رشد می کند، روش فوق توصیه نمی شود. در عوض، خروجی مورد نظر با استفاده از Mail merge با مناطق به راحتی به دست می آید. شما می توانید در مورد این تکنیک در Mail Merge با مناطق بخش.
روش های ایجاد جدول را مقایسه کنید
Aspose.Words چندین روش برای ایجاد جداول جدید در یک سند فراهم می کند. هر روش مزایا و معایب خاص خود را دارد، بنابراین انتخاب آن برای استفاده اغلب به وضعیت خاص بستگی دارد.
بیایید نگاهی دقیق تر به این روش های ایجاد جداول بیندازیم و مزایا و معایب آنها را مقایسه کنیم:
روش | مزایا | معایب |
---|---|---|
از طریق DocumentBuilder |
روش استاندارد برای قرار دادن جداول و سایر محتوای اسناد | گاهی اوقات دشوار است که انواع مختلفی از جداول را در همان زمان با همان نمونه سازنده ایجاد کنید |
از طریق DOM | با کد اطراف که گره ها را مستقیما به DOM بدون استفاده از DocumentBuilderایجاد و وارد می کند، بهتر مطابقت دارد | جدول “خالی” ایجاد شده است: قبل از انجام بیشتر عملیات، باید با EnsureMinimum تماس بگیرید تا هر گره کودک گمشده ای ایجاد کنید |
از HTML | می تواند یک جدول جدید از منبع HTML با استفاده از برچسب هایی مانند <table> , <tr> , <td> |
همه فرمت های جدول Microsoft Word را نمی توان به HTMLاعمال کرد |
شبیه سازی یک جدول موجود | شما می توانید یک کپی از یک جدول موجود را ایجاد کنید در حالی که تمام ردیف ها و قالب بندی سلول را حفظ می کنید | گره های مناسب کودک باید قبل از آماده شدن جدول برای استفاده برداشته شوند |