Создайте таблицу
Aspose.Words позволяет пользователям создавать таблицы в документе с нуля и предоставляет несколько различных методов для этого. В этой статье представлены подробные сведения о том, как добавлять отформатированные таблицы в документ, используя каждый из методов, а также сравнение каждого метода в конце статьи.
Стили таблиц по умолчанию
Вновь созданной таблице присваиваются значения по умолчанию, аналогичные тем, которые используются в Microsoft Word:
Свойство таблицы | Значение по умолчанию в Aspose.Words |
---|---|
Border Style |
Single |
Border Width |
1/2 pt |
Цвет границы | Black |
Left and Right Padding |
5.4 pts |
AutoFit Mode |
AutoFit to Window |
Allow AutoFit |
True |
Таблица может быть встроенной, если она расположена плотно, или плавающей, если ее можно разместить в любом месте страницы. По умолчанию Aspose.Words всегда создает встроенные таблицы.
|
Создайте таблицу с DocumentBuilder
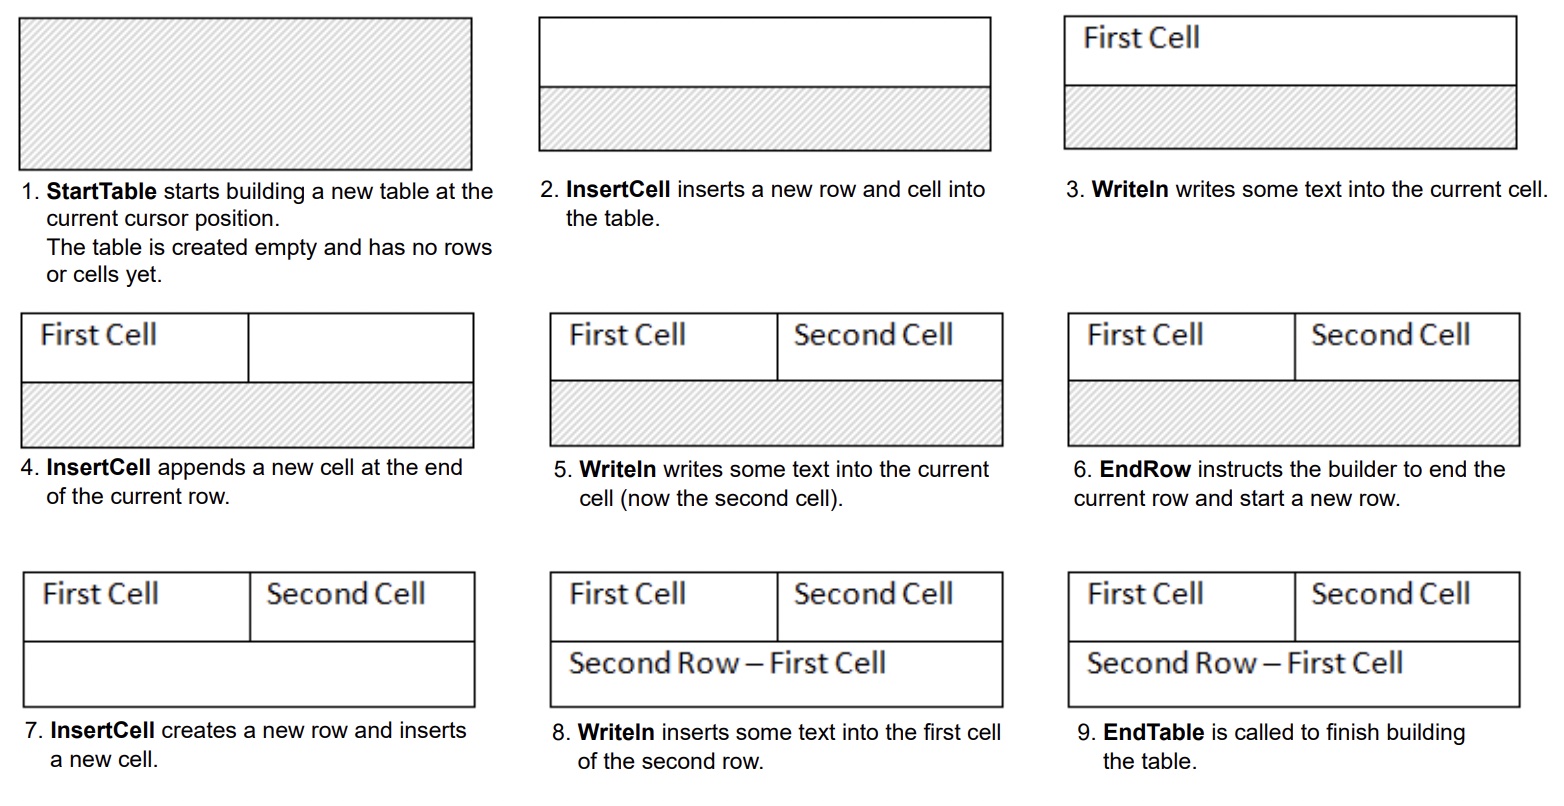
В Aspose.Words пользователи могут создать таблицу в документе, используя DocumentBuilder. Основной алгоритм создания таблицы следующий:
- Начните таблицу с StartTable
- Добавьте ячейку в таблицу, используя InsertCell – при этом автоматически начнется новая строка
- При необходимости используйте свойство CellFormat, чтобы задать форматирование ячеек
- Вставьте содержимое ячейки, используя соответствующие методы DocumentBuilder, такие как Writeln, InsertImage и другие
- Повторяйте шаги 2-4, пока строка не будет завершена
- Вызовите EndRow, чтобы завершить текущую строку
- При необходимости используйте свойство RowFormat, чтобы задать форматирование строк
- Повторяйте шаги 2-7 до тех пор, пока таблица не будет заполнена
- Вызовите EndTable, чтобы завершить построение таблицы
Важные детали:
- StartTable также может быть вызван внутри ячейки, и в этом случае он запускает создание вложенной таблицы внутри ячейки.
- После вызова InsertCell создается новая ячейка, и любое содержимое, добавленное с помощью других методов класса DocumentBuilder, будет добавлено в текущую ячейку. Чтобы создать новую ячейку в той же строке, снова вызовите InsertCell.
- Если InsertCell вызывается сразу после EndRow и в конце строки, таблица будет продолжена в новой строке.
- Метод EndTable для завершения работы с таблицей следует вызывать только один раз после вызова EndRow. Вызов EndTable перемещает курсор из текущей ячейки в позицию, расположенную сразу за таблицей.
Процесс создания таблицы можно наглядно увидеть на следующем рисунке:
В следующем примере кода показано, как создать простую таблицу, используя DocumentBuilder с форматированием по умолчанию:
// For complete examples and data files, please go to https://github.com/aspose-words/Aspose.Words-for-Java.git. | |
Document doc = new Document(); | |
DocumentBuilder builder = new DocumentBuilder(doc); | |
// Start building the table. | |
builder.startTable(); | |
builder.insertCell(); | |
builder.write("Row 1, Cell 1 Content."); | |
// Build the second cell. | |
builder.insertCell(); | |
builder.write("Row 1, Cell 2 Content."); | |
// Call the following method to end the row and start a new row. | |
builder.endRow(); | |
// Build the first cell of the second row. | |
builder.insertCell(); | |
builder.write("Row 2, Cell 1 Content"); | |
// Build the second cell. | |
builder.insertCell(); | |
builder.write("Row 2, Cell 2 Content."); | |
builder.endRow(); | |
// Signal that we have finished building the table. | |
builder.endTable(); | |
doc.save(getArtifactsDir() + "WorkingWithTables.CreateSimpleTable.docx"); |
В следующем примере кода показано, как создать отформатированную таблицу, используя DocumentBuilder:
// For complete examples and data files, please go to https://github.com/aspose-words/Aspose.Words-for-Java.git. | |
Document doc = new Document(); | |
DocumentBuilder builder = new DocumentBuilder(doc); | |
Table table = builder.startTable(); | |
builder.insertCell(); | |
// Table wide formatting must be applied after at least one row is present in the table. | |
table.setLeftIndent(20.0); | |
// Set height and define the height rule for the header row. | |
builder.getRowFormat().setHeight(40.0); | |
builder.getRowFormat().setHeightRule(HeightRule.AT_LEAST); | |
builder.getCellFormat().getShading().setBackgroundPatternColor(new Color((198), (217), (241))); | |
builder.getParagraphFormat().setAlignment(ParagraphAlignment.CENTER); | |
builder.getFont().setSize(16.0); | |
builder.getFont().setName("Arial"); | |
builder.getFont().setBold(true); | |
builder.getCellFormat().setWidth(100.0); | |
builder.write("Header Row,\n Cell 1"); | |
// We don't need to specify this cell's width because it's inherited from the previous cell. | |
builder.insertCell(); | |
builder.write("Header Row,\n Cell 2"); | |
builder.insertCell(); | |
builder.getCellFormat().setWidth(200.0); | |
builder.write("Header Row,\n Cell 3"); | |
builder.endRow(); | |
builder.getCellFormat().getShading().setBackgroundPatternColor(Color.WHITE); | |
builder.getCellFormat().setWidth(100.0); | |
builder.getCellFormat().setVerticalAlignment(CellVerticalAlignment.CENTER); | |
// Reset height and define a different height rule for table body. | |
builder.getRowFormat().setHeight(30.0); | |
builder.getRowFormat().setHeightRule(HeightRule.AUTO); | |
builder.insertCell(); | |
// Reset font formatting. | |
builder.getFont().setSize(12.0); | |
builder.getFont().setBold(false); | |
builder.write("Row 1, Cell 1 Content"); | |
builder.insertCell(); | |
builder.write("Row 1, Cell 2 Content"); | |
builder.insertCell(); | |
builder.getCellFormat().setWidth(200.0); | |
builder.write("Row 1, Cell 3 Content"); | |
builder.endRow(); | |
builder.insertCell(); | |
builder.getCellFormat().setWidth(100.0); | |
builder.write("Row 2, Cell 1 Content"); | |
builder.insertCell(); | |
builder.write("Row 2, Cell 2 Content"); | |
builder.insertCell(); | |
builder.getCellFormat().setWidth(200.0); | |
builder.write("Row 2, Cell 3 Content."); | |
builder.endRow(); | |
builder.endTable(); | |
doc.save(getArtifactsDir() + "WorkingWithTables.FormattedTable.docx"); |
В следующем примере кода показано, как вставить вложенную таблицу, используя DocumentBuilder:
// For complete examples and data files, please go to https://github.com/aspose-words/Aspose.Words-for-Java.git. | |
Document doc = new Document(); | |
DocumentBuilder builder = new DocumentBuilder(doc); | |
Cell cell = builder.insertCell(); | |
builder.writeln("Outer Table Cell 1"); | |
builder.insertCell(); | |
builder.writeln("Outer Table Cell 2"); | |
// This call is important to create a nested table within the first table. | |
// Without this call, the cells inserted below will be appended to the outer table. | |
builder.endTable(); | |
// Move to the first cell of the outer table. | |
builder.moveTo(cell.getFirstParagraph()); | |
// Build the inner table. | |
builder.insertCell(); | |
builder.writeln("Inner Table Cell 1"); | |
builder.insertCell(); | |
builder.writeln("Inner Table Cell 2"); | |
builder.endTable(); | |
doc.save(getArtifactsDir() + "WorkingWithTables.NestedTable.docx"); |
Создайте таблицу с помощью DOM (объектная модель документа)
Вы можете вставить таблицы непосредственно в DOM, добавив новый узел Table в определенном месте.
Обратите внимание, что сразу после создания узла таблицы сама таблица будет полностью пустой, то есть в ней еще не будет строк и ячеек. Чтобы вставить строки и ячейки в таблицу, добавьте соответствующие дочерние узлы Row и Cell в DOM.
В следующем примере кода показано, как создать новую таблицу с нуля, добавив соответствующие дочерние узлы в дерево документа:
// For complete examples and data files, please go to https://github.com/aspose-words/Aspose.Words-for-Java.git. | |
Document doc = new Document(); | |
// We start by creating the table object. Note that we must pass the document object | |
// to the constructor of each node. This is because every node we create must belong | |
// to some document. | |
Table table = new Table(doc); | |
doc.getFirstSection().getBody().appendChild(table); | |
// Here we could call EnsureMinimum to create the rows and cells for us. This method is used | |
// to ensure that the specified node is valid. In this case, a valid table should have at least one Row and one cell. | |
// Instead, we will handle creating the row and table ourselves. | |
// This would be the best way to do this if we were creating a table inside an algorithm. | |
Row row = new Row(doc); | |
row.getRowFormat().setAllowBreakAcrossPages(true); | |
table.appendChild(row); | |
// We can now apply any auto fit settings. | |
table.autoFit(AutoFitBehavior.FIXED_COLUMN_WIDTHS); | |
Cell cell = new Cell(doc); | |
cell.getCellFormat().getShading().setBackgroundPatternColor(Color.BLUE); | |
cell.getCellFormat().setWidth(80.0); | |
cell.appendChild(new Paragraph(doc)); | |
cell.getFirstParagraph().appendChild(new Run(doc, "Row 1, Cell 1 Text")); | |
row.appendChild(cell); | |
// We would then repeat the process for the other cells and rows in the table. | |
// We can also speed things up by cloning existing cells and rows. | |
row.appendChild(cell.deepClone(false)); | |
row.getLastCell().appendChild(new Paragraph(doc)); | |
row.getLastCell().getFirstParagraph().appendChild(new Run(doc, "Row 1, Cell 2 Text")); | |
doc.save(getArtifactsDir() + "WorkingWithTables.InsertTableDirectly.docx"); |
Создайте таблицу из HTML
Aspose.Words поддерживает вставку содержимого в документ из источника HTML с использованием метода InsertHtml. Входными данными могут быть полная страница HTML или только частичный фрагмент.
Используя этот метод InsertHtml, пользователи могут вставлять таблицы в документ с помощью тегов таблиц, таких как <table>
, <tr>
, <td>
.
В следующем примере кода показано, как вставить таблицу в документ из строки, содержащей теги HTML:
// For complete examples and data files, please go to https://github.com/aspose-words/Aspose.Words-for-Java.git. | |
Document doc = new Document(); | |
DocumentBuilder builder = new DocumentBuilder(doc); | |
// Note that AutoFitSettings does not apply to tables inserted from HTML. | |
builder.insertHtml("<table>" + | |
"<tr>" + | |
"<td>Row 1, Cell 1</td>" + | |
"<td>Row 1, Cell 2</td>" + | |
"</tr>" + | |
"<tr>" + | |
"<td>Row 2, Cell 2</td>" + | |
"</tr>" + | |
"</table>"); | |
doc.save(getArtifactsDir() + "WorkingWithTables.InsertTableFromHtml.docx"); |
Вставьте копию существующей таблицы
Часто возникает необходимость создать таблицу на основе уже существующей таблицы в документе. Самый простой способ скопировать таблицу с сохранением всего форматирования - это клонировать узел таблицы, используя метод deepClone.
Тот же метод можно использовать для добавления копий существующей строки или ячейки в таблицу.
В следующем примере кода показано, как дублировать таблицу с помощью конструкторов узлов:
// For complete examples and data files, please go to https://github.com/aspose-words/Aspose.Words-for-Java.git. | |
Document doc = new Document(getMyDir() + "Tables.docx"); | |
Table table = (Table) doc.getChild(NodeType.TABLE, 0, true); | |
// Clone the table and insert it into the document after the original. | |
Table tableClone = (Table) table.deepClone(true); | |
table.getParentNode().insertAfter(tableClone, table); | |
// Insert an empty paragraph between the two tables, | |
// or else they will be combined into one upon saving this has to do with document validation. | |
table.getParentNode().insertAfter(new Paragraph(doc), table); | |
doc.save(getArtifactsDir() + "WorkingWithTables.CloneCompleteTable.docx"); |
В следующем примере кода показано, как клонировать последнюю строку таблицы и добавить ее в таблицу:
// For complete examples and data files, please go to https://github.com/aspose-words/Aspose.Words-for-Java.git. | |
Document doc = new Document(getMyDir() + "Tables.docx"); | |
Table table = (Table) doc.getChild(NodeType.TABLE, 0, true); | |
Row clonedRow = (Row) table.getLastRow().deepClone(true); | |
// Remove all content from the cloned row's cells. This makes the row ready for new content to be inserted into. | |
for (Cell cell : (Iterable<Cell>) clonedRow.getCells()) | |
cell.removeAllChildren(); | |
table.appendChild(clonedRow); | |
doc.save(getArtifactsDir() + "WorkingWithTables.CloneLastRow.docx"); |
Если вы планируете создавать таблицы в документе, которые динамически увеличиваются с каждой записью из вашего источника данных, то описанный выше метод не рекомендуется. Вместо этого желаемый результат проще получить, используя Mail merge с регионами. Вы можете узнать больше об этом методе в Mail Merge с регионами раздел.
Сравните способы создания таблицы
Aspose.Words предоставляет несколько методов для создания новых таблиц в документе. Каждый метод имеет свои преимущества и недостатки, поэтому выбор того, какой из них использовать, часто зависит от конкретной ситуации.
Давайте подробнее рассмотрим эти способы создания таблиц и сравним их плюсы и минусы:
Метод | Преимущества | Недостатки |
---|---|---|
Через DocumentBuilder |
Стандартный метод вставки таблиц и другого содержимого документа | Иногда бывает сложно создать множество разновидностей таблиц одновременно с помощью одного и того же экземпляра конструктора |
Через DOM | Лучше вписывается в окружающий код, который создает и вставляет узлы непосредственно в DOM без использования DocumentBuilder | Таблица создается “пустой”: перед выполнением большинства операций вы должны вызвать EnsureMinimum, чтобы создать все отсутствующие дочерние узлы |
Из HTML | Можно создать новую таблицу из источника HTML, используя такие теги, как <table> , <tr> , <td> |
Не все возможные форматы таблиц Microsoft Word могут быть применены к HTML |
Клонирование существующей таблицы | Вы можете создать копию существующей таблицы, сохранив все форматирование строк и ячеек | Соответствующие дочерние узлы должны быть удалены, прежде чем таблица будет готова к использованию |