สร้างตาราง
Aspose.Wordsอนุญาตให้ผู้ใช้สร้างตารางในเอกสารจากรอยขีดข่วนและมีวิธีการที่แตกต่างกันหลายอย่า บทความนี้แสดงรายละเอียดเกี่ยวกับวิธีการเพิ่มตารางที่จัดรูปแบบเอกสารของคุณโดยใช้.
รูปแบบตารางเริ่มต้น
ตารางที่สร้างขึ้นใหม่จะได้รับค่าดีฟอลต์คล้ายกับที่ใช้ในMicrosoft Word:
คุณสมบัติตาราง | ค่าปริยายในAspose.Words |
---|---|
Border Style |
Single |
Border Width |
1/2 pt |
สีเส้นขอบ | Black |
Left and Right Padding |
5.4 pts |
AutoFit Mode |
AutoFit to Window |
Allow AutoFit |
True |
ตารางสามารถเป็นแบบอินไลน์ถ้ามันอยู่ในตำแหน่งแน่น,หรือลอยถ้ามันสามารถวางตำแหน่งที่ใดก็ได้บนหน้าเว็บ. โดยค่าเริ่มต้นAspose.Wordsจะสร้างตารางแบบอินไลน์เสมอ.
|
สร้างตารางด้วยDocumentBuilder
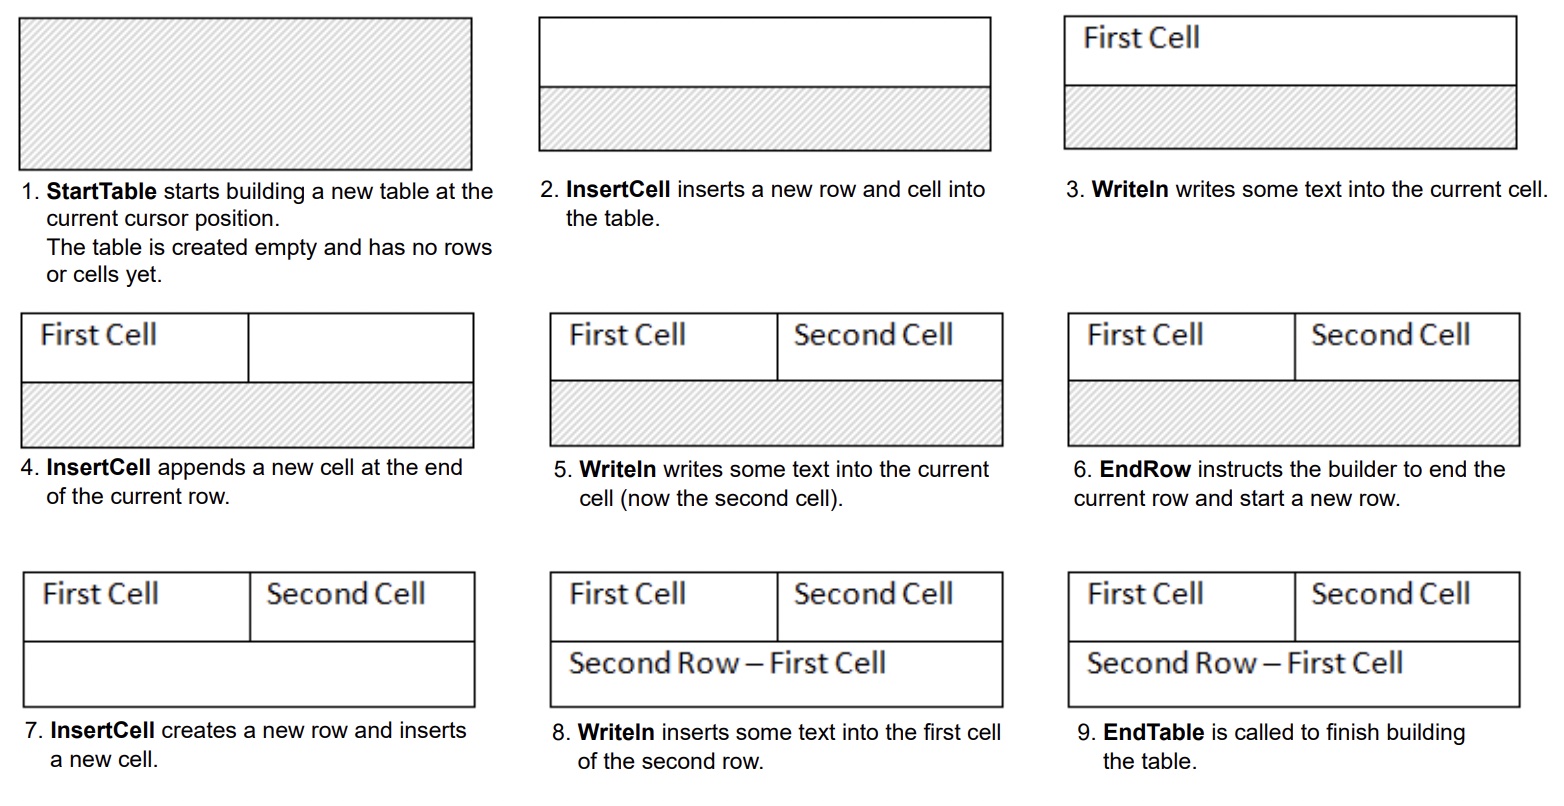
ในAspose.Wordsผู้ใช้สามารถสร้างตารางในเอกสารโดยใช้DocumentBuilder ขั้นตอนวิธีการพื้นฐานสำหรับการสร้างตารางมีดังนี้:
- เริ่มต้นตารางด้วยStartTable
- เพิ่มเซลล์ลงในตารางโดยใช้InsertCellซึ่งจะเริ่มแถวใหม่โดยอัตโนมัติ
- คุณสามารถเลือกใช้คุณสมบัติCellFormatเพื่อระบุการจัดรูปแบบเซลล์
- แทรกเนื้อหาของเซลล์โดยใช้วิธีการที่เหมาะสมDocumentBuilderเช่นWriteln,InsertImageและอื่นๆ
- ทำซ้ำขั้นตอนที่ 2-4 จนกว่าแถวจะเสร็จสมบูรณ์
- โทรEndRowเพื่อสิ้นสุดแถวปัจจุบัน
- คุณสามารถเลือกใช้คุณสมบัติRowFormatเพื่อระบุการจัดรูปแบบแถว
- ทำซ้ำขั้นตอนที่ 2-7 จนกว่าตารางจะเสร็จสมบูรณ์
- โทรEndTableเพื่อเสร็จสิ้นการสร้างตาราง
รายละเอียดที่สำคัญ:
- StartTableยังสามารถเรียกภายในเซลล์,ซึ่งในกรณีนี้จะเริ่มต้นการสร้างตารางที่ซ้อนกันภายในเซลล์.
- หลังจากโทรInsertCellเซลล์ใหม่จะถูกสร้างขึ้นและเนื้อหาใดๆที่คุณเพิ่มโดยใช้วิธีการอื่นๆของชั้นเรียนDocumentBuilderจะถูกเพิ่มเข้าไปในเซลล์ปัจจุบัน เมื่อต้องการสร้างเซลล์ใหม่ในแถวเดียวกันให้โทรInsertCellอีกครั้ง.
- ถ้าInsertCellถูกเรียกทันทีหลังจากEndRowและจุดสิ้นสุดของแถวตารางจะดำเนินการต่อในแถวใหม่.
- วิธีการEndTableเพื่อสิ้นสุดตารางควรจะเรียกเพียงครั้งเดียวหลังจากโทรEndRow การโทรEndTableย้ายเคอร์เซอร์จากเซลล์ปัจจุบันไปยังตำแหน่งหลังจากตาราง.
กระบวนการของการสร้างตารางสามารถมองเห็นได้อย่างชัดเจนในภาพต่อไปนี้:
ตัวอย่างรหัสต่อไปนี้แสดงวิธีการสร้างตารางอย่างง่ายโดยใช้DocumentBuilderด้วยการจัดรูปแบบเริ่มต้น:
// For complete examples and data files, please go to https://github.com/aspose-words/Aspose.Words-for-Java.git. | |
Document doc = new Document(); | |
DocumentBuilder builder = new DocumentBuilder(doc); | |
// Start building the table. | |
builder.startTable(); | |
builder.insertCell(); | |
builder.write("Row 1, Cell 1 Content."); | |
// Build the second cell. | |
builder.insertCell(); | |
builder.write("Row 1, Cell 2 Content."); | |
// Call the following method to end the row and start a new row. | |
builder.endRow(); | |
// Build the first cell of the second row. | |
builder.insertCell(); | |
builder.write("Row 2, Cell 1 Content"); | |
// Build the second cell. | |
builder.insertCell(); | |
builder.write("Row 2, Cell 2 Content."); | |
builder.endRow(); | |
// Signal that we have finished building the table. | |
builder.endTable(); | |
doc.save(getArtifactsDir() + "WorkingWithTables.CreateSimpleTable.docx"); |
ตัวอย่างรหัสต่อไปนี้แสดงวิธีสร้างตารางที่จัดรูปแบบโดยใช้DocumentBuilder:
// For complete examples and data files, please go to https://github.com/aspose-words/Aspose.Words-for-Java.git. | |
Document doc = new Document(); | |
DocumentBuilder builder = new DocumentBuilder(doc); | |
Table table = builder.startTable(); | |
builder.insertCell(); | |
// Table wide formatting must be applied after at least one row is present in the table. | |
table.setLeftIndent(20.0); | |
// Set height and define the height rule for the header row. | |
builder.getRowFormat().setHeight(40.0); | |
builder.getRowFormat().setHeightRule(HeightRule.AT_LEAST); | |
builder.getCellFormat().getShading().setBackgroundPatternColor(new Color((198), (217), (241))); | |
builder.getParagraphFormat().setAlignment(ParagraphAlignment.CENTER); | |
builder.getFont().setSize(16.0); | |
builder.getFont().setName("Arial"); | |
builder.getFont().setBold(true); | |
builder.getCellFormat().setWidth(100.0); | |
builder.write("Header Row,\n Cell 1"); | |
// We don't need to specify this cell's width because it's inherited from the previous cell. | |
builder.insertCell(); | |
builder.write("Header Row,\n Cell 2"); | |
builder.insertCell(); | |
builder.getCellFormat().setWidth(200.0); | |
builder.write("Header Row,\n Cell 3"); | |
builder.endRow(); | |
builder.getCellFormat().getShading().setBackgroundPatternColor(Color.WHITE); | |
builder.getCellFormat().setWidth(100.0); | |
builder.getCellFormat().setVerticalAlignment(CellVerticalAlignment.CENTER); | |
// Reset height and define a different height rule for table body. | |
builder.getRowFormat().setHeight(30.0); | |
builder.getRowFormat().setHeightRule(HeightRule.AUTO); | |
builder.insertCell(); | |
// Reset font formatting. | |
builder.getFont().setSize(12.0); | |
builder.getFont().setBold(false); | |
builder.write("Row 1, Cell 1 Content"); | |
builder.insertCell(); | |
builder.write("Row 1, Cell 2 Content"); | |
builder.insertCell(); | |
builder.getCellFormat().setWidth(200.0); | |
builder.write("Row 1, Cell 3 Content"); | |
builder.endRow(); | |
builder.insertCell(); | |
builder.getCellFormat().setWidth(100.0); | |
builder.write("Row 2, Cell 1 Content"); | |
builder.insertCell(); | |
builder.write("Row 2, Cell 2 Content"); | |
builder.insertCell(); | |
builder.getCellFormat().setWidth(200.0); | |
builder.write("Row 2, Cell 3 Content."); | |
builder.endRow(); | |
builder.endTable(); | |
doc.save(getArtifactsDir() + "WorkingWithTables.FormattedTable.docx"); |
ตัวอย่างรหัสต่อไปนี้แสดงวิธีการแทรกตารางที่ซ้อนกันโดยใช้DocumentBuilder:
// For complete examples and data files, please go to https://github.com/aspose-words/Aspose.Words-for-Java.git. | |
Document doc = new Document(); | |
DocumentBuilder builder = new DocumentBuilder(doc); | |
Cell cell = builder.insertCell(); | |
builder.writeln("Outer Table Cell 1"); | |
builder.insertCell(); | |
builder.writeln("Outer Table Cell 2"); | |
// This call is important to create a nested table within the first table. | |
// Without this call, the cells inserted below will be appended to the outer table. | |
builder.endTable(); | |
// Move to the first cell of the outer table. | |
builder.moveTo(cell.getFirstParagraph()); | |
// Build the inner table. | |
builder.insertCell(); | |
builder.writeln("Inner Table Cell 1"); | |
builder.insertCell(); | |
builder.writeln("Inner Table Cell 2"); | |
builder.endTable(); | |
doc.save(getArtifactsDir() + "WorkingWithTables.NestedTable.docx"); |
สร้างตารางผ่านDOM(รูปแบบวัตถุเอกสาร)
คุณสามารถแทรกตารางลงในDOMโดยตรงโดยการเพิ่มโหนดใหม่Tableในตำแหน่งที่เฉพาะเจาะจง.
โปรดทราบว่าทันทีหลังจากการสร้างโหนดตารางตารางตัวเองจะว่างเปล่าอย่างสมบูรณ์ เมื่อต้องการแทรกแถวและเซลล์ลงในตารางให้เพิ่มโหนดลูกที่เหมาะสมRowและCellลงในDOM.
ตัวอย่างรหัสต่อไปนี้แสดงวิธีการสร้างตารางใหม่จากรอยขีดข่วนโดยการเพิ่มโหนดลูกที่เ:
// For complete examples and data files, please go to https://github.com/aspose-words/Aspose.Words-for-Java.git. | |
Document doc = new Document(); | |
// We start by creating the table object. Note that we must pass the document object | |
// to the constructor of each node. This is because every node we create must belong | |
// to some document. | |
Table table = new Table(doc); | |
doc.getFirstSection().getBody().appendChild(table); | |
// Here we could call EnsureMinimum to create the rows and cells for us. This method is used | |
// to ensure that the specified node is valid. In this case, a valid table should have at least one Row and one cell. | |
// Instead, we will handle creating the row and table ourselves. | |
// This would be the best way to do this if we were creating a table inside an algorithm. | |
Row row = new Row(doc); | |
row.getRowFormat().setAllowBreakAcrossPages(true); | |
table.appendChild(row); | |
// We can now apply any auto fit settings. | |
table.autoFit(AutoFitBehavior.FIXED_COLUMN_WIDTHS); | |
Cell cell = new Cell(doc); | |
cell.getCellFormat().getShading().setBackgroundPatternColor(Color.BLUE); | |
cell.getCellFormat().setWidth(80.0); | |
cell.appendChild(new Paragraph(doc)); | |
cell.getFirstParagraph().appendChild(new Run(doc, "Row 1, Cell 1 Text")); | |
row.appendChild(cell); | |
// We would then repeat the process for the other cells and rows in the table. | |
// We can also speed things up by cloning existing cells and rows. | |
row.appendChild(cell.deepClone(false)); | |
row.getLastCell().appendChild(new Paragraph(doc)); | |
row.getLastCell().getFirstParagraph().appendChild(new Run(doc, "Row 1, Cell 2 Text")); | |
doc.save(getArtifactsDir() + "WorkingWithTables.InsertTableDirectly.docx"); |
สร้างตารางจากHTML
Aspose.Wordsรองรับการแทรกเนื้อหาลงในเอกสารจากแหล่งที่มาHTMLโดยใช้วิธีการInsertHtml การป้อนข้อมูลอาจเป็นหน้าเต็มHTMLหรือเพียงแค่ตัวอย่างบางส่วน.
โดยใช้วิธีการนี้InsertHtmlผู้ใช้สามารถแทรกตารางลงในเอกสารผ่านแท็กตารางเช่น<table>
, <tr>
, <td>
.
ตัวอย่างรหัสต่อไปนี้แสดงวิธีการแทรกตารางลงในเอกสารจากสตริงที่มีแท็กHTML:
// For complete examples and data files, please go to https://github.com/aspose-words/Aspose.Words-for-Java.git. | |
Document doc = new Document(); | |
DocumentBuilder builder = new DocumentBuilder(doc); | |
// Note that AutoFitSettings does not apply to tables inserted from HTML. | |
builder.insertHtml("<table>" + | |
"<tr>" + | |
"<td>Row 1, Cell 1</td>" + | |
"<td>Row 1, Cell 2</td>" + | |
"</tr>" + | |
"<tr>" + | |
"<td>Row 2, Cell 2</td>" + | |
"</tr>" + | |
"</table>"); | |
doc.save(getArtifactsDir() + "WorkingWithTables.InsertTableFromHtml.docx"); |
แทรกสำเนาของตารางที่มีอยู่
บ่อยครั้งที่คุณจำเป็นต้องสร้างตารางตามตารางที่มีอยู่แล้วในเอกสาร วิธีที่ง่ายที่สุดในการทำซ้ำตารางขณะที่ยังคงการจัดรูปแบบทั้งหมดคือการโคลนโหนดตารางโดยใช้วิธีการdeepClone.
เทคนิคเดียวกันสามารถใช้ในการเพิ่มสำเนาของแถวที่มีอยู่หรือเซลล์ในตาราง.
ตัวอย่างรหัสต่อไปนี้แสดงวิธีการทำซ้ำตารางโดยใช้ตัวสร้างโหนด:
// For complete examples and data files, please go to https://github.com/aspose-words/Aspose.Words-for-Java.git. | |
Document doc = new Document(getMyDir() + "Tables.docx"); | |
Table table = (Table) doc.getChild(NodeType.TABLE, 0, true); | |
// Clone the table and insert it into the document after the original. | |
Table tableClone = (Table) table.deepClone(true); | |
table.getParentNode().insertAfter(tableClone, table); | |
// Insert an empty paragraph between the two tables, | |
// or else they will be combined into one upon saving this has to do with document validation. | |
table.getParentNode().insertAfter(new Paragraph(doc), table); | |
doc.save(getArtifactsDir() + "WorkingWithTables.CloneCompleteTable.docx"); |
ตัวอย่างรหัสต่อไปนี้แสดงวิธีการโคลนแถวสุดท้ายของตารางและผนวกเข้ากับตาราง:
// For complete examples and data files, please go to https://github.com/aspose-words/Aspose.Words-for-Java.git. | |
Document doc = new Document(getMyDir() + "Tables.docx"); | |
Table table = (Table) doc.getChild(NodeType.TABLE, 0, true); | |
Row clonedRow = (Row) table.getLastRow().deepClone(true); | |
// Remove all content from the cloned row's cells. This makes the row ready for new content to be inserted into. | |
for (Cell cell : (Iterable<Cell>) clonedRow.getCells()) | |
cell.removeAllChildren(); | |
table.appendChild(clonedRow); | |
doc.save(getArtifactsDir() + "WorkingWithTables.CloneLastRow.docx"); |
หากคุณกำลังมองที่การสร้างตารางในเอกสารที่เติบโตแบบไดนามิกกับแต่ละระเบียนจาก แต่ผลลัพธ์ที่ต้องการทำได้ง่ายขึ้นโดยใช้Mail mergeกับภูมิภาค คุณสามารถเรียนรู้เพิ่มเติมเกี่ยวกับเทคนิคนี้ใน Mail Mergeกับภูมิภาค มาตรา.
เปรียบเทียบวิธีการสร้างตาราง
Aspose.Wordsมีหลายวิธีในการสร้างตารางใหม่ในเอกสาร แต่ละวิธีมีข้อดีของตัวเองและข้อเสียดังนั้นทางเลือกของการที่จะใช้มักจะขึ้นอยู่กับสถานกา.
ลองมาดูที่วิธีการเหล่านี้ในการสร้างตารางและเปรียบเทียบข้อดีและข้อเสียของพวกเขา:
วิธีการ | ข้อดี | ข้อเสีย |
---|---|---|
ผ่านDocumentBuilder |
วิธีการมาตรฐานสำหรับการแทรกตารางและเนื้อหาเอกสารอื่นๆ | บางครั้งยากที่จะสร้างหลายพันธุ์ของตารางในเวลาเดียวกันกับอินสแตนซ์สร้างเดียวกัน |
ผ่านDOM | เหมาะกับโค้ดโดยรอบที่สร้างและแทรกโหนดลงในDOMโดยไม่ต้องใช้DocumentBuilder | ตารางถูกสร้างขึ้น"ว่างเปล่า":ก่อนดำเนินการส่วนใหญ่คุณต้องโทรEnsureMinimumเพื่อสร้างโหนดเด็กที่ขาด |
จากHTML | สามารถสร้างตารางใหม่จากHTMLแหล่งที่มาโดยใช้แท็กเช่น<table> , <tr> , <td> |
ไม่สามารถใช้รูปแบบตารางMicrosoft Wordได้กับHTML |
การโคลนตารางที่มีอยู่ | คุณสามารถสร้างสำเนาของตารางที่มีอยู่ขณะที่ยังคงจัดรูปแบบแถวและเซลล์ทั้งหมด | โหนดลูกที่เหมาะสมต้องถูกลบออกก่อนที่ตารางจะพร้อมสำหรับการใช้งาน |