
จัดการกล่องข้อความในงานนำเสนอด้วย JavaScript
บทนำ
ใน Aspose.Slides for Node.js via Java, ข้อความของสไลด์จะถูกเก็บในเฟรมข้อความที่เป็นของรูปร่าง คลาส AutoShape แทนรูปแบบรูปร่างที่บรรจุข้อความที่พบบ่อยที่สุดและทำให้ข้อความของมันเปิดเผยผ่านเมธอด AutoShape.getTextFrame。
Note
ทุกรูปร่างอัตโนมัติสืบทอดมาจาก Shape,แต่ไม่ใช่ทุกรูปร่างคือรูปร่างอัตโนมัติหรือรองรับเฟรมข้อความ เมื่อประมวลผลพรีเซนเทชันที่มีอยู่ ให้ตรวจสอบว่ารูปร่างเป็นอินสแตนซ์ของ AutoShape ก่อนเข้าถึงข้อความของมัน。สร้างกล่องข้อความบนสไลด์
เพื่อสร้างกล่องข้อความ ให้เพิ่มรูปร่างอัตโนมัติลงในสไลด์ เพิ่มข้อความลงในเฟรมข้อความของมัน และบันทึกพรีเซนเทชัน ตัวอย่างต่อไปนี้สร้างกล่องข้อความสี่เหลี่ยมผืนผ้า:
const aspose = { slides: require("aspose.slides.via.java") };

const presentation = new aspose.slides.Presentation();
try {
    const slide = presentation.getSlides().get_Item(0);
    const textBox = slide.getShapes().addAutoShape(aspose.slides.ShapeType.Rectangle, 150, 75, 300, 50);
    textBox.addTextFrame("Aspose TextBox");

    presentation.save("TextBox.pptx", aspose.slides.SaveFormat.Pptx);
} finally {
    presentation.dispose();
}
พิกัดและขนาดที่ส่งให้ ShapeCollection.addAutoShape วัดเป็นพอยต์ AutoShape.addTextFrame จะเริ่มต้นเฟรมข้อความด้วยข้อความที่ระบุ
ตรวจสอบรูปแบบกล่องข้อความ
ใช้เมธอด AutoShape.isTextBox เพื่อตรวจสอบว่ารูปร่างอัตโนมัติถูกพิจารณาว่าเป็นกล่องข้อความหรือไม่ สิ่งนี้มีประโยชน์เมื่อพรีเซนเทชันมีทั้งรูปร่างอัตโนมัติที่บรรจุข้อความและรูปร่างกราฟิกเท่านั้น
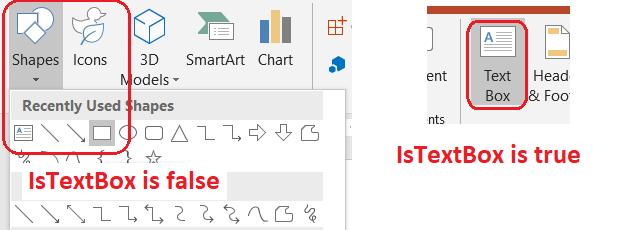
ตัวอย่างต่อไปนี้ตรวจสอบทุกรูปร่างอัตโนมัติในพรีเซนเทชัน:
const aspose = { slides: require("aspose.slides.via.java") };
const java = require("java");

const presentation = new aspose.slides.Presentation();
try {
    const slide = presentation.getSlides().get_Item(0);
    const textBox = slide.getShapes().addAutoShape(aspose.slides.ShapeType.Rectangle, 10, 10, 120, 40);
    textBox.addTextFrame("Text box");
    slide.getShapes().addAutoShape(aspose.slides.ShapeType.Ellipse, 150, 10, 40, 40);

    for (let slideIndex = 0; slideIndex < presentation.getSlides().size(); slideIndex++) {
        const currentSlide = presentation.getSlides().get_Item(slideIndex);
        for (let shapeIndex = 0; shapeIndex < currentSlide.getShapes().size(); shapeIndex++) {
            const shape = currentSlide.getShapes().get_Item(shapeIndex);
            if (java.instanceOf(shape, "com.aspose.slides.AutoShape")) {
                console.log(shape.isTextBox() ? "The shape is a text box." : "The shape is not a text box.");
            }
        }
    }
} finally {
    presentation.dispose();
}
รูปร่างอัตโนมัติที่เพิ่งเพิ่มใหม่จะไม่ถูกพิจารณาว่าเป็นกล่องข้อความจนกว่าจะมีข้อความที่ไม่ว่างเปล่า คุณสามารถกำหนดข้อความนั้นผ่าน AutoShape.addTextFrame หรือ TextFrame.setText การเพิ่มหรือกำหนดสตริงว่างทำให้ AutoShape.isTextBox คืนค่า false:
const aspose = { slides: require("aspose.slides.via.java") };

const presentation = new aspose.slides.Presentation();
try {
    const slide = presentation.getSlides().get_Item(0);

    const shape1 = slide.getShapes().addAutoShape(aspose.slides.ShapeType.Rectangle, 10, 10, 100, 40);
    shape1.addTextFrame("Shape 1");
    console.log(shape1.isTextBox());

    const shape2 = slide.getShapes().addAutoShape(aspose.slides.ShapeType.Rectangle, 10, 70, 100, 40);
    shape2.getTextFrame().setText("Shape 2");
    console.log(shape2.isTextBox());

    const shape3 = slide.getShapes().addAutoShape(aspose.slides.ShapeType.Rectangle, 10, 130, 100, 40);
    shape3.addTextFrame("");
    console.log(shape3.isTextBox());

    const shape4 = slide.getShapes().addAutoShape(aspose.slides.ShapeType.Rectangle, 10, 190, 100, 40);
    shape4.getTextFrame().setText("");
    console.log(shape4.isTextBox());
} finally {
    presentation.dispose();
}
การเรียกแรกสองครั้งพิมพ์ true; การเรียกสุดท้ายสองครั้งพิมพ์ false
ค้นหารูปร่างที่เป็นเจ้าของเฟรมข้อความ
โค้ดประมวลผลข้อความทั่วไปอาจได้รับ TextFrame โดยไม่รู้ว่ามีออบเจ็กต์พรีเซนเทชันใดเป็นเจ้าของ ใช้เมธอดอ่านอย่างเดียว TextFrame.getParentShape เพื่อย้อนไปยัง Shape ที่เป็นเจ้าของ
สำหรับเฟรมข้อความที่เป็นของรูปร่างอัตโนมัติหรือรูปร่างที่บรรจุข้อความอื่น ๆ TextFrame.getParentShape จะคืนค่าเจ้าของและ TextFrame.getParentCell จะคืนค่า null ตรวจสอบค่าที่คืนมาก่อนเข้าถึง เพื่อระบุทั้งเจ้าของรูปร่างและเซลล์ตาราง รวมถึงรูปร่างที่เชื่อมกับโหนด SmartArt ดู Search and Replace Text
เพิ่มคอลัมน์ให้กับกล่องข้อความ
เมธอด TextFrameFormat.setColumnCount แบ่งเฟรมข้อความออกเป็นคอลัมน์ ในขณะที่ TextFrameFormat.setColumnSpacing ตั้งช่องว่างระหว่างคอลัมน์เป็นพอยต์ การตั้งค่าสองอย่างนี้อยู่ใน TextFrameFormat และสามารถเปลี่ยนแปลงได้ผ่านเฟรมข้อความของกล่องข้อความที่มีอยู่ ข้อความจะไหลใหม่ระหว่างคอลัมน์ภายในรูปร่างเดียวกัน; จะไม่ต่อเนื่องไปยังรูปร่างอื่น
ตัวอย่างต่อไปนี้สร้างกล่องข้อความสามคอลัมน์โดยมีช่องว่าง 10 พอยต์ระหว่างคอลัมน์ บันทึกพรีเซนเทชันและอ่านการตั้งค่าที่บันทึกกลับจากไฟล์ผลลัพธ์:
const aspose = { slides: require("aspose.slides.via.java") };

const presentation = new aspose.slides.Presentation();
try {
    const slide = presentation.getSlides().get_Item(0);
    const textBox = slide.getShapes().addAutoShape(aspose.slides.ShapeType.Rectangle, 100, 100, 300, 200);
    textBox.addTextFrame("This text is distributed automatically across all columns in the text box.");

    const textFrameFormat = textBox.getTextFrame().getTextFrameFormat();
    textFrameFormat.setColumnCount(3);
    textFrameFormat.setColumnSpacing(10);

    presentation.save("TextBoxColumns.pptx", aspose.slides.SaveFormat.Pptx);

    const savedPresentation = new aspose.slides.Presentation("TextBoxColumns.pptx");
    try {
        const savedTextBox = savedPresentation.getSlides().get_Item(0).getShapes().get_Item(0);
        const savedFormat = savedTextBox.getTextFrame().getTextFrameFormat();
        console.log("Columns: " + savedFormat.getColumnCount() + "; spacing: " + savedFormat.getColumnSpacing() + " points");
    } finally {
        savedPresentation.dispose();
    }
} finally {
    presentation.dispose();
}
สกัดข้อความจากคอลัมน์แต่ละคอลัมน์
ใช้เมธอด TextFrame.splitTextByColumns เพื่อดึงข้อความที่กำหนดให้แต่ละคอลัมน์ที่มองเห็นได้ในเฟรมข้อความที่มีอยู่ วิธีนี้จะคืนสตริงหนึ่งสตริงต่อหนึ่งคอลัมน์ตามลำดับการอ่านแบบคอลัมน์ เฟรมข้อความแบบคอลัมน์เดียวจะสร้างอาเรย์ที่มีหนึ่งองค์ประกอบ และคอลัมน์ที่ว่างจะเป็นสตริงว่าง สตริงเหล่านี้มีเพียงข้อความธรรมดา; การจัดรูปแบบระดับส่วนจะไม่ถูกรักษา
สิ่งนี้มีประโยชน์เมื่อคุณต้องการ:
- สกัดข้อความขณะรักษาลำดับการอ่านแบบคอลัมน์
- ทำดัชนีหรือเปรียบเทียบเนื้อหาของสไลด์หลายคอลัมน์
- ส่งออกแต่ละคอลัมน์ไปยังไฟล์แยก, ฟิลด์ฐานข้อมูล หรือปลายทางอื่น
- ตรวจสอบวิธีการกระจายข้อความหลังจากเปลี่ยนจำนวนคอลัมน์ด้วย TextFrameFormat.setColumnCount, ช่องว่างด้วย TextFrameFormat.setColumnSpacing, แบบอักษร หรือขนาดของเฟรมข้อความ
เมธอดนี้รายงานข้อความที่กระจายใน TextFrame ปัจจุบัน; มันจะไม่ไหลอัตโนมัติระหว่างรูปร่างหรือกล่องข้อความแยกต่างหาก การกระจายคอลัมน์อาจขึ้นอยู่กับแบบอักษรที่มีและการตั้งค่าเลเอาต์ข้อความอื่น ๆ ดังนั้นควรตรวจสอบให้แน่ใจว่าแบบอักษรที่ต้องการพร้อมใช้งานเมื่อผลลัพธ์ที่สอดคล้องเป็นสิ่งสำคัญ
ตัวอย่างต่อไปนี้โหลดพรีเซนเทชัน, ค้นหารูปร่างอัตโนมัติหลายคอลัมน์แรกที่มีเฟรมข้อความ, อ่านจำนวนคอลัมน์ที่ตั้งค่าไว้, และเขียนข้อความจากแต่ละคอลัมน์ไปยังไฟล์แยก รูปร่างที่ไม่มีเฟรมข้อความจะถูกข้าม
const aspose = { slides: require("aspose.slides.via.java") };
const java = require("java");
const fs = require("fs");

const presentation = new aspose.slides.Presentation("MultiColumnText.pptx");
try {
    const slide = presentation.getSlides().get_Item(0);
    let textBox = null;
    for (let shapeIndex = 0; shapeIndex < slide.getShapes().size(); shapeIndex++) {
        const shape = slide.getShapes().get_Item(shapeIndex);
        if (java.instanceOf(shape, "com.aspose.slides.AutoShape")) {
            const textFrame = shape.getTextFrame();
            if (textFrame != null) {
                const columnCount = textFrame.getTextFrameFormat().getColumnCount();
                if (columnCount > 1) {
                    textBox = shape;
                    break;
                }
            }
        }
    }

    if (textBox == null) {
        console.log("No multi-column text frame was found.");
    } else {
        const textFrame = textBox.getTextFrame();
        const configuredColumnCount = textFrame.getTextFrameFormat().getColumnCount();
        const columnTexts = textFrame.splitTextByColumns();

        console.log("Configured columns: " + configuredColumnCount);

        for (let columnIndex = 0; columnIndex < columnTexts.length; columnIndex++) {
            const columnNumber = columnIndex + 1;
            const columnText = columnTexts[columnIndex];
            console.log("Column " + columnNumber + ": " + columnText);
            const outputPath = "Column-" + columnNumber + ".txt";
            try {
                fs.writeFileSync(outputPath, columnText, "utf8");
            } catch (error) {
                console.log("Could not write column " + columnNumber + ": " + error.message);
            }
        }
    }
} finally {
    presentation.dispose();
}
อัปเดตข้อความ
เพื่ออัปเดตข้อความทั่วพรีเซนเทชัน ให้วนลูปผ่านสไลด์และรูปร่าง เลือกรูปร่างอัตโนมัติ แล้วแก้ไขส่วนข้อความของมัน การทำงานที่ระดับส่วนทำให้คุณสามารถเปลี่ยนทั้งข้อความและการจัดรูปแบบตัวอักษรได้
ตัวอย่างต่อไปนี้แทนที่ทุกการปรากฏของ years ด้วย months ในข้อความของรูปร่างอัตโนมัติและทำให้ส่วนที่ได้รับผลกระทบหนา:
const aspose = { slides: require("aspose.slides.via.java") };
const java = require("java");

const fontBold = java.newByte(aspose.slides.NullableBool.True);
const presentation = new aspose.slides.Presentation("Text.pptx");
try {
    for (let slideIndex = 0; slideIndex < presentation.getSlides().size(); slideIndex++) {
        const slide = presentation.getSlides().get_Item(slideIndex);
        for (let shapeIndex = 0; shapeIndex < slide.getShapes().size(); shapeIndex++) {
            const shape = slide.getShapes().get_Item(shapeIndex);
            if (!java.instanceOf(shape, "com.aspose.slides.AutoShape")) {
                continue;
            }

            const textFrame = shape.getTextFrame();
            if (textFrame == null) {
                continue;
            }

            for (let paragraphIndex = 0; paragraphIndex < textFrame.getParagraphs().getCount(); paragraphIndex++) {
                const paragraph = textFrame.getParagraphs().get_Item(paragraphIndex);
                for (let portionIndex = 0; portionIndex < paragraph.getPortions().getCount(); portionIndex++) {
                    const portion = paragraph.getPortions().get_Item(portionIndex);
                    const text = portion.getText();
                    if (text != null && text.includes("years")) {
                        portion.setText(text.replace(/years/g, "months"));
                        portion.getPortionFormat().setFontBold(fontBold);
                    }
                }
            }
        }
    }

    presentation.save("TextChanged.pptx", aspose.slides.SaveFormat.Pptx);
} finally {
    presentation.dispose();
}
การวนลูปนี้อัปเดตข้อความเฉพาะในรูปร่างอัตโนมัติ ข้อความที่จัดเก็บในตาราง, แผนภูมิ, SmartArt หรือรูปร่างที่จัดกลุ่มต้องวนลูปผ่านคอลเล็กชันของออบเจ็กต์เหล่านั้นแยกต่างหาก
เพิ่มกล่องข้อความพร้อมไฮเปอร์ลิงก์
ไฮเปอร์ลิงก์สามารถกำหนดให้กับส่วนข้อความเฉพาะได้ ดังนั้นข้อความส่วนนั้นเท่านั้นจะทำหน้าที่เป็นลิงก์ที่คลิกได้ ใช้เมธอด HyperlinkManager.setExternalHyperlinkClick เพื่อเชื่อมส่วนนั้นกับ URL ภายนอก
ตัวอย่างต่อไปนี้สร้างข้อความเชื่อมโยงและบันทึกลงพรีเซนเทชัน:
const aspose = { slides: require("aspose.slides.via.java") };

const presentation = new aspose.slides.Presentation();
try {
    const slide = presentation.getSlides().get_Item(0);
    const textBox = slide.getShapes().addAutoShape(aspose.slides.ShapeType.Rectangle, 150, 150, 200, 50);
    textBox.addTextFrame("Aspose.Slides");

    const textPortion = textBox.getTextFrame().getParagraphs().get_Item(0).getPortions().get_Item(0);
    textPortion.getPortionFormat().getHyperlinkManager().setExternalHyperlinkClick("https://www.aspose.com/");

    presentation.save("Hyperlink.pptx", aspose.slides.SaveFormat.Pptx);
} finally {
    presentation.dispose();
}
คำถามที่พบบ่อย
ความแตกต่างระหว่างกล่องข้อความและตัวเก็บตำแหน่งข้อความบนสไลด์มาสเตอร์หรือเลเอาท์คืออะไร?
placeholder สามารถสืบทอดตำแหน่งและการจัดรูปแบบจาก master slide หรือ layout slide กล่องข้อความทั่วไปเป็นรูปร่างอิสระบนสไลด์ที่สร้างขึ้นและจะไม่รับพฤติกรรมของตัวเก็บตำแหน่งเมื่อเลเอาท์เปลี่ยนแปลง
ฉันจะแทนที่ข้อความโดยไม่กระทบข้อความในแผนภูมิ, ตาราง หรือ SmartArt อย่างไร?
จำกัดการวนลูปให้กับรูปร่างที่เป็นอินสแตนซ์ของ AutoShape ตามที่แสดงในตัวอย่างอัปเดตข้อความ แผนภูมิ, ตาราง, และ SmartArt จัดเก็บข้อความในโมเดลออบเจ็กต์ของตนเอง ดังนั้นจึงไม่ได้ถูกแก้ไขโดยลูปนั้น