
Java का उपयोग करके प्रस्तुतियों में टेक्स्ट बॉक्स प्रबंधित करें
परिचय
Aspose.Slides for Java में, स्लाइड का पाठ टेक्स्ट फ्रेम में संग्रहीत होता है जो आकारों से जुड़ा होता है। IAutoShape इंटरफ़ेस सबसे आम टेक्स्ट‑धारण करने वाले आकार को दर्शाता है और अपना पाठ IAutoShape.getTextFrame मेथड के माध्यम से प्रस्तुत करता है।
नोट
हर ऑटो शेप IShape को लागू करता है, लेकिन हर आकार ऑटो शेप नहीं होता या टेक्स्ट फ्रेम का समर्थन नहीं करता। मौजूदा प्रस्तुति को प्रोसेस करते समय, टेक्स्ट तक पहुँचने से पहले जाँचें कि आकार IAutoShape को लागू करता है या नहीं।स्लाइड पर टेक्स्ट बॉक्स बनाएं
एक टेक्स्ट बॉक्स बनाने के लिए, स्लाइड पर एक ऑटो शेप जोड़ें, उसके टेक्स्ट फ्रेम में पाठ डालें, और प्रस्तुति को सहेजें। निम्न उदाहरण आयताकार टेक्स्ट बॉक्स बनाता है:
import com.aspose.slides.*;

Presentation presentation = new Presentation();
try {
    ISlide slide = presentation.getSlides().get_Item(0);
    IAutoShape textBox = slide.getShapes().addAutoShape(ShapeType.Rectangle, 150, 75, 300, 50);
    textBox.addTextFrame("Aspose TextBox");

    presentation.save("TextBox.pptx", SaveFormat.Pptx);
} finally {
    presentation.dispose();
}
IShapeCollection.addAutoShape को पास किए गए निर्देशांक और आयाम बिंदुओं (points) में मापे जाते हैं। IAutoShape.addTextFrame प्रदान किए गए पाठ के साथ टेक्स्ट फ्रेम को प्रारंभ करता है।
टेक्स्ट बॉक्स आकार की जांच करें
यह निर्धारित करने के लिए कि कोई ऑटो शेप टेक्स्ट बॉक्स के रूप में माना जाता है या नहीं, IAutoShape.isTextBox मेथड का उपयोग करें। यह उपयोगी है जब प्रस्तुति में टेक्स्ट‑धारण करने वाले और केवल ग्राफ़िक ऑटो शेप दोनों होते हैं।
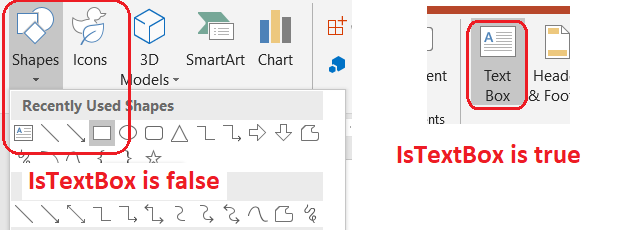
निम्न उदाहरण प्रस्तुति में प्रत्येक ऑटो शेप का निरीक्षण करता है:
import com.aspose.slides.*;

Presentation presentation = new Presentation();
try {
    ISlide slide = presentation.getSlides().get_Item(0);
    IAutoShape textBox = slide.getShapes().addAutoShape(ShapeType.Rectangle, 10, 10, 120, 40);
    textBox.addTextFrame("Text box");
    slide.getShapes().addAutoShape(ShapeType.Ellipse, 150, 10, 40, 40);

    for (ISlide currentSlide : presentation.getSlides()) {
        for (IShape shape : currentSlide.getShapes()) {
            if (shape instanceof IAutoShape) {
                IAutoShape autoShape = (IAutoShape) shape;
                System.out.println(autoShape.isTextBox() ? "The shape is a text box." : "The shape is not a text box.");
            }
        }
    }
} finally {
    presentation.dispose();
}
एक नया जोड़ा गया ऑटो शेप तब तक टेक्स्ट बॉक्स नहीं माना जाता जब तक उसमें गैर‑खाली टेक्स्ट न हो। आप वह टेक्स्ट IAutoShape.addTextFrame या ITextFrame.setText के माध्यम से प्रदान कर सकते हैं। खाली स्ट्रिंग जोड़ने या असाइन करने पर IAutoShape.isTextBox false लौटाता है:
import com.aspose.slides.*;

Presentation presentation = new Presentation();
try {
    ISlide slide = presentation.getSlides().get_Item(0);

    IAutoShape shape1 = slide.getShapes().addAutoShape(ShapeType.Rectangle, 10, 10, 100, 40);
    shape1.addTextFrame("Shape 1");
    System.out.println(shape1.isTextBox());

    IAutoShape shape2 = slide.getShapes().addAutoShape(ShapeType.Rectangle, 10, 70, 100, 40);
    shape2.getTextFrame().setText("Shape 2");
    System.out.println(shape2.isTextBox());

    IAutoShape shape3 = slide.getShapes().addAutoShape(ShapeType.Rectangle, 10, 130, 100, 40);
    shape3.addTextFrame("");
    System.out.println(shape3.isTextBox());

    IAutoShape shape4 = slide.getShapes().addAutoShape(ShapeType.Rectangle, 10, 190, 100, 40);
    shape4.getTextFrame().setText("");
    System.out.println(shape4.isTextBox());
} finally {
    presentation.dispose();
}
पहले दो कॉल true प्रिंट करते हैं; अंतिम दो false प्रिंट करते हैं।
टेक्स्ट फ्रेम के मालिक आकार को खोजें
सामान्य टेक्स्ट‑प्रोसेसिंग कोड को कभी‑कभी एक ITextFrame मिल सकता है बिना यह जाने कि वह कौन से प्रस्तुति वस्तु में स्थित है। उसकी मालिक IShape तक वापस नेविगेट करने के लिए पढ़‑के‑सिर्फ ITextFrame.getParentShape मेथड का उपयोग करें।
ऑटो शेप या किसी अन्य टेक्स्ट‑धारण करने वाले आकार द्वारा स्वामित्व वाला टेक्स्ट फ्रेम होने पर, ITextFrame.getParentShape मालिक लौटाता है और ITextFrame.getParentCell null लौटाता है। उपयोग से पहले लौटाई गई मान की जांच करें। आकार और टेबल‑सेल दोनों मालिकों की पहचान करने के लिए, जिसमें SmartArt नोड्स से जुड़े आकार भी शामिल हैं, देखें Search and Replace Text।
टेक्स्ट बॉक्स में कॉलम जोड़ें
ITextFrameFormat.setColumnCount मेथड टेक्स्ट फ्रेम को कॉलम में विभाजित करता है, जबकि ITextFrameFormat.setColumnSpacing कॉलमों के बीच का अंतराल बिंदुओं (points) में निर्धारित करता है। दोनों सेटिंग्स ITextFrameFormat का हिस्सा हैं और मौजूदा टेक्स्ट बॉक्स के टेक्स्ट फ्रेम के माध्यम से बदली जा सकती हैं। टेक्स्ट उसी आकार के भीतर कॉलमों के बीच रिफ्लो होता है; यह अन्य आकार में जारी नहीं रहता।
निम्न उदाहरण 10 बिंदु अंतराल वाले तीन‑कॉलम टेक्स्ट बॉक्स बनाता है, प्रस्तुति को सहेजता है, और आउटपुट फ़ाइल से संग्रहीत सेटिंग वापस पढ़ता है:
import com.aspose.slides.*;

Presentation presentation = new Presentation();
try {
    ISlide slide = presentation.getSlides().get_Item(0);
    IAutoShape textBox = slide.getShapes().addAutoShape(ShapeType.Rectangle, 100, 100, 300, 200);
    textBox.addTextFrame("This text is distributed automatically across all columns in the text box.");

    ITextFrameFormat textFrameFormat = textBox.getTextFrame().getTextFrameFormat();
    textFrameFormat.setColumnCount(3);
    textFrameFormat.setColumnSpacing(10);

    presentation.save("TextBoxColumns.pptx", SaveFormat.Pptx);

    Presentation savedPresentation = new Presentation("TextBoxColumns.pptx");
    try {
        IAutoShape savedTextBox = (IAutoShape) savedPresentation.getSlides().get_Item(0).getShapes().get_Item(0);
        ITextFrameFormat savedFormat = savedTextBox.getTextFrame().getTextFrameFormat();
        System.out.println("Columns: " + savedFormat.getColumnCount() + "; spacing: " + savedFormat.getColumnSpacing() + " points");
    } finally {
        savedPresentation.dispose();
    }
} finally {
    presentation.dispose();
}
व्यक्तिगत कॉलम से टेक्स्ट निकालें
ITextFrame.splitTextByColumns का उपयोग करके मौजूदा टेक्स्ट फ्रेम में प्रत्येक दृश्यात्मक कॉलम को सौंपा गया टेक्स्ट प्राप्त किया जा सकता है। मेथड प्रत्येक कॉलम के लिए एक स्ट्रिंग लौटाता है, कॉलम‑आधारित पढ़ने के क्रम में। एक‑कॉलम टेक्स्ट फ्रेम एक तत्व वाला एरे देता है, और खाली कॉलम एक खाली स्ट्रिंग द्वारा दर्शाया जाता है। स्ट्रिंग्स में केवल साधा टेक्स्ट होता है; भाग‑स्तर का फॉर्मेटिंग संरक्षित नहीं रहता।
यह उपयोगी है जब आपको आवश्यकता हो:
- कॉलम‑आधारित पढ़ने के क्रम को बनाए रखते हुए टेक्स्ट निकालना।
- मल्टी‑कॉलम स्लाइड की सामग्री को अनुक्रमित या तुलना करना।
- प्रत्येक कॉलम को अलग फ़ाइल, डेटाबेस फ़ील्ड या अन्य गंतव्य में निर्यात करना।
- कॉलम संख्या को बदलकर, स्पेसिंग को बदलकर, फ़ॉन्ट या टेक्स्ट‑फ्रेम आकार को बदलकर टेक्स्ट के पुनर्वितरण का निरीक्षण करना।
मेथड वर्तमान ITextFrame के भीतर वितरित टेक्स्ट की रिपोर्ट करता है; यह अलग-अलग आकारों या टेक्स्ट बॉक्सों के बीच स्वतः प्रवाहित नहीं करता। कॉलम वितरण उपलब्ध फ़ॉन्ट और अन्य टेक्स्ट‑लेआउट सेटिंग्स पर निर्भर हो सकता है, इसलिए संगत परिणामों के लिए आवश्यक फ़ॉन्ट उपलब्ध हों यह सुनिश्चित करें।
निम्न उदाहरण एक प्रस्तुति लोड करता है, टेक्स्ट फ्रेम वाला पहला मल्टी‑कॉलम ऑटो शेप खोजता है, उसकी कॉन्फ़िगर की गई कॉलम संख्या पढ़ता है, और प्रत्येक कॉलम का टेक्स्ट अलग‑अलग फ़ाइल में लिखता है। जिन आकारों में टेक्स्ट फ्रेम नहीं है उन्हें छोड़ दिया जाता है।
import com.aspose.slides.*;
import java.io.IOException;
import java.nio.charset.StandardCharsets;
import java.nio.file.Files;
import java.nio.file.Path;
import java.nio.file.Paths;

Presentation presentation = new Presentation("MultiColumnText.pptx");
try {
    IAutoShape textBox = null;
    for (IShape shape : presentation.getSlides().get_Item(0).getShapes()) {
        if (shape instanceof IAutoShape) {
            IAutoShape autoShape = (IAutoShape) shape;
            if (autoShape.getTextFrame() != null) {
                int columnCount = autoShape.getTextFrame().getTextFrameFormat().getColumnCount();
                if (columnCount > 1) {
                    textBox = autoShape;
                    break;
                }
            }
        }
    }

    if (textBox == null) {
        System.out.println("No multi-column text frame was found.");
    } else {
        ITextFrame textFrame = textBox.getTextFrame();
        int configuredColumnCount = textFrame.getTextFrameFormat().getColumnCount();
        String[] columnTexts = textFrame.splitTextByColumns();

        System.out.println("Configured columns: " + configuredColumnCount);

        for (int columnIndex = 0; columnIndex < columnTexts.length; columnIndex++) {
            int columnNumber = columnIndex + 1;
            String columnText = columnTexts[columnIndex];
            System.out.println("Column " + columnNumber + ": " + columnText);
            Path outputPath = Paths.get("Column-" + columnNumber + ".txt");
            byte[] textBytes = columnText.getBytes(StandardCharsets.UTF_8);
            try {
                Files.write(outputPath, textBytes);
            } catch (IOException exception) {
                System.out.println("Could not write column " + columnNumber + ": " + exception.getMessage());
            }
        }
    }
} finally {
    presentation.dispose();
}
टेक्स्ट अपडेट करें
पूरी प्रस्तुति में टेक्स्ट अपडेट करने के लिए, स्लाइड और आकारों के माध्यम से क्रमबद्ध रूप से चलें, ऑटो शेप चुनें, और फिर उनके टेक्स्ट भागों को संपादित करें। भाग‑स्तर पर कार्य करने से आप टेक्स्ट और अक्षर फॉर्मेटिंग दोनों बदल सकते हैं।
निम्न उदाहरण ऑटो‑शेप टेक्स्ट में प्रत्येक years को months से बदलता है और प्रभावित प्रत्येक भाग को बोल्ड बनाता है:
import com.aspose.slides.*;

Presentation presentation = new Presentation("Text.pptx");
try {
    for (ISlide slide : presentation.getSlides()) {
        for (IShape shape : slide.getShapes()) {
            if (!(shape instanceof IAutoShape)) {
                continue;
            }

            IAutoShape autoShape = (IAutoShape) shape;
            ITextFrame textFrame = autoShape.getTextFrame();
            if (textFrame == null) {
                continue;
            }

            for (IParagraph paragraph : textFrame.getParagraphs()) {
                for (IPortion portion : paragraph.getPortions()) {
                    String text = portion.getText();
                    if (text != null && text.contains("years")) {
                        portion.setText(text.replace("years", "months"));
                        portion.getPortionFormat().setFontBold(NullableBool.True);
                    }
                }
            }
        }
    }

    presentation.save("TextChanged.pptx", SaveFormat.Pptx);
} finally {
    presentation.dispose();
}
यह ट्रैवर्सल केवल ऑटो शेप में टेक्स्ट को अपडेट करता है। तालिकाओं, चार्ट्स, SmartArt या समूहित आकारों में संग्रहीत टेक्स्ट को अपडेट करने के लिए उन वस्तुओं के अपने संग्रहों की भी ट्रैवर्सल की आवश्यकता होती है।
हाइपरलिंक के साथ टेक्स्ट बॉक्स जोड़ें
हाइपरलिंक को किसी विशेष टेक्स्ट भाग से जोड़ा जा सकता है, ताकि केवल वही टेक्स्ट क्लिक‑योग्य लिंक बन जाए। IHyperlinkManager.setExternalHyperlinkClick का उपयोग करके भाग को बाहरी URL से संबद्ध करें।
निम्न उदाहरण लिंक्ड टेक्स्ट बनाता है और उसे प्रस्तुति में सहेजता है:
import com.aspose.slides.*;

Presentation presentation = new Presentation();
try {
    ISlide slide = presentation.getSlides().get_Item(0);
    IAutoShape textBox = slide.getShapes().addAutoShape(ShapeType.Rectangle, 150, 150, 200, 50);
    textBox.addTextFrame("Aspose.Slides");

    IPortion textPortion = textBox.getTextFrame().getParagraphs().get_Item(0).getPortions().get_Item(0);
    textPortion.getPortionFormat().getHyperlinkManager().setExternalHyperlinkClick("https://www.aspose.com/");

    presentation.save("Hyperlink.pptx", SaveFormat.Pptx);
} finally {
    presentation.dispose();
}
FAQ
एक मास्टर या लेआउट स्लाइड पर टेक्स्ट बॉक्स और टेक्स्ट प्लेसहोल्डर में क्या अंतर है?
एक प्लेसहोल्डर अपनी स्थिति और फ़ॉर्मेटिंग को एक मास्टर स्लाइड या लेआउट स्लाइड से विरासत में ले सकता है। एक सामान्य टेक्स्ट बॉक्स वह स्वतंत्र आकार है जो उस स्लाइड पर बना होता है जहाँ इसे जोड़ा गया था और लेआउट बदलने पर प्लेसहोल्डर व्यवहार नहीं अपनाता।
मैं चार्ट, टेबल या SmartArt में टेक्स्ट बदले बिना टेक्स्ट कैसे बदल सकता हूँ?
ट्रैवर्सल को केवल उन आकारों तक सीमित रखें जो IAutoShape को लागू करते हैं, जैसा कि टेक्स्ट अपडेट उदाहरण में दिखाया गया है। चार्ट, टेबल और SmartArt अपना टेक्स्ट अपने स्वयं के ऑब्जेक्ट मॉडल में संग्रहीत करते हैं, इसलिए वे उस लूप द्वारा संशोधित नहीं होते।