
จัดการ Text Box ในพรีเซนเทชันด้วย Java
บทนำ
ใน Aspose.Slides for Java ข้อความบนสไลด์จะถูกเก็บไว้ใน text frame ที่เป็นส่วนหนึ่งของ shape. อินเทอร์เฟซ IAutoShape แสดงถึง shape ที่มักจะบรรจุข้อความและเปิดเผยข้อความผ่านเมธอด IAutoShape.getTextFrame.
Note
ทุก auto shape จะทำงานตาม IShape, แต่ไม่ได้หมายความว่า shape ทุกแบบคือ auto shape หรือสนับสนุน text frame. เมื่อประมวลผลพรีเซนเทชันที่มีอยู่ ให้ตรวจสอบว่า shape นั้นทำงานตาม IAutoShape ก่อนเข้าถึงข้อความของมัน.สร้าง Text Box บนสไลด์
เพื่อสร้าง text box ให้เพิ่ม auto shape ลงบนสไลด์, ใส่ข้อความใน text frame ของมัน, แล้วบันทึกพรีเซนเทชัน. ตัวอย่างต่อไปนี้สร้าง text box แบบสี่เหลี่ยมผืนผ้า:
import com.aspose.slides.*;

Presentation presentation = new Presentation();
try {
    ISlide slide = presentation.getSlides().get_Item(0);
    IAutoShape textBox = slide.getShapes().addAutoShape(ShapeType.Rectangle, 150, 75, 300, 50);
    textBox.addTextFrame("Aspose TextBox");

    presentation.save("TextBox.pptx", SaveFormat.Pptx);
} finally {
    presentation.dispose();
}
ค่าพิกัดและขนาดที่ส่งให้เมธอด IShapeCollection.addAutoShape วัดเป็นจุด. เมธอด IAutoShape.addTextFrame จะเริ่มต้น text frame ด้วยข้อความที่กำหนด.
ตรวจสอบว่าเป็น Text Box Shape หรือไม่
ใช้เมธอด IAutoShape.isTextBox เพื่อตรวจสอบว่า auto shape นั้นถือเป็น text box หรือไม่. วิธีนี้มีประโยชน์เมื่อพรีเซนเทชันมีทั้ง shape ที่บรรจุข้อความและ shape กราฟิกเท่านั้น.
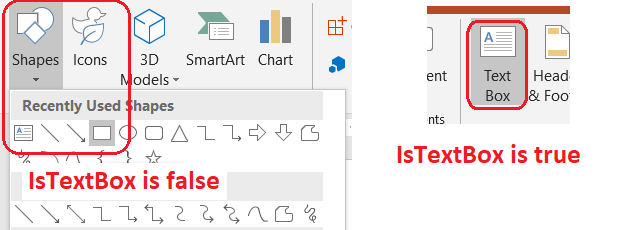
ตัวอย่างต่อไปนี้ตรวจสอบทุก auto shape ในพรีเซนเทชัน:
import com.aspose.slides.*;

Presentation presentation = new Presentation();
try {
    ISlide slide = presentation.getSlides().get_Item(0);
    IAutoShape textBox = slide.getShapes().addAutoShape(ShapeType.Rectangle, 10, 10, 120, 40);
    textBox.addTextFrame("Text box");
    slide.getShapes().addAutoShape(ShapeType.Ellipse, 150, 10, 40, 40);

    for (ISlide currentSlide : presentation.getSlides()) {
        for (IShape shape : currentSlide.getShapes()) {
            if (shape instanceof IAutoShape) {
                IAutoShape autoShape = (IAutoShape) shape;
                System.out.println(autoShape.isTextBox() ? "The shape is a text box." : "The shape is not a text box.");
            }
        }
    }
} finally {
    presentation.dispose();
}
auto shape ที่เพิ่มใหม่จะไม่ถือเป็น text box จนกว่าจะมีข้อความที่ไม่ว่างเปล่า. คุณสามารถใส่ข้อความนั้นผ่าน IAutoShape.addTextFrame หรือ ITextFrame.setText. การเพิ่มหรือกำหนดสตริงว่างจะทำให้ IAutoShape.isTextBox คืนค่า false:
import com.aspose.slides.*;

Presentation presentation = new Presentation();
try {
    ISlide slide = presentation.getSlides().get_Item(0);

    IAutoShape shape1 = slide.getShapes().addAutoShape(ShapeType.Rectangle, 10, 10, 100, 40);
    shape1.addTextFrame("Shape 1");
    System.out.println(shape1.isTextBox());

    IAutoShape shape2 = slide.getShapes().addAutoShape(ShapeType.Rectangle, 10, 70, 100, 40);
    shape2.getTextFrame().setText("Shape 2");
    System.out.println(shape2.isTextBox());

    IAutoShape shape3 = slide.getShapes().addAutoShape(ShapeType.Rectangle, 10, 130, 100, 40);
    shape3.addTextFrame("");
    System.out.println(shape3.isTextBox());

    IAutoShape shape4 = slide.getShapes().addAutoShape(ShapeType.Rectangle, 10, 190, 100, 40);
    shape4.getTextFrame().setText("");
    System.out.println(shape4.isTextBox());
} finally {
    presentation.dispose();
}
คำเรียกแรกสองครั้งพิมพ์ true; คำเรียกสุดท้ายสองครั้งพิมพ์ false.
ค้นหา Shape ที่เป็นเจ้าของ Text Frame
โค้ดการประมวลผลข้อความทั่วไปอาจได้รับ ITextFrame โดยไม่ทราบว่าออบเจกต์พรีเซนเทชันใดเป็นเจ้าของ. ใช้เมธอดอ่านอย่างเดียว ITextFrame.getParentShape เพื่อกลับไปยัง IShape ที่เป็นเจ้าของ.
สำหรับ text frame ที่เป็นของ auto shape หรือ shape ที่บรรจุข้อความอื่น, เมธอด ITextFrame.getParentShape จะคืนค่าเจ้าของและเมธอด ITextFrame.getParentCell จะคืนค่า null. ตรวจสอบค่าที่คืนมาก่อนใช้งาน. เพื่อระบุทั้งเจ้าของ shape และเซลล์ตาราง, รวมถึง shape ที่เชื่อมกับโหนด SmartArt, ดูหัวข้อ Search and Replace Text.
เพิ่มคอลัมน์ให้กับ Text Box
เมธอด ITextFrameFormat.setColumnCount จะแบ่ง text frame เป็นคอลัมน์, ขณะที่เมธอด ITextFrameFormat.setColumnSpacing กำหนดระยะห่างระหว่างคอลัมน์เป็นจุด. การตั้งค่าสองอย่างนี้เป็นส่วนของ ITextFrameFormat และสามารถเปลี่ยนแปลงได้ผ่าน text frame ของ text box ที่มีอยู่. ข้อความจะไหลใหม่ระหว่างคอลัมน์ภายใน shape เดียว; จะไม่ไหลต่อไปยัง shape อื่น.
ตัวอย่างต่อไปนี้สร้าง text box ที่มีสามคอลัมน์และระยะห่าง 10 จุดระหว่างคอลัมน์, บันทึกพรีเซนเทชัน, แล้วอ่านการตั้งค่าที่บันทึกไว้จากไฟล์ผลลัพธ์:
import com.aspose.slides.*;

Presentation presentation = new Presentation();
try {
    ISlide slide = presentation.getSlides().get_Item(0);
    IAutoShape textBox = slide.getShapes().addAutoShape(ShapeType.Rectangle, 100, 100, 300, 200);
    textBox.addTextFrame("This text is distributed automatically across all columns in the text box.");

    ITextFrameFormat textFrameFormat = textBox.getTextFrame().getTextFrameFormat();
    textFrameFormat.setColumnCount(3);
    textFrameFormat.setColumnSpacing(10);

    presentation.save("TextBoxColumns.pptx", SaveFormat.Pptx);

    Presentation savedPresentation = new Presentation("TextBoxColumns.pptx");
    try {
        IAutoShape savedTextBox = (IAutoShape) savedPresentation.getSlides().get_Item(0).getShapes().get_Item(0);
        ITextFrameFormat savedFormat = savedTextBox.getTextFrame().getTextFrameFormat();
        System.out.println("Columns: " + savedFormat.getColumnCount() + "; spacing: " + savedFormat.getColumnSpacing() + " points");
    } finally {
        savedPresentation.dispose();
    }
} finally {
    presentation.dispose();
}
ดึงข้อความจากแต่ละคอลัมน์
ใช้เมธอด ITextFrame.splitTextByColumns เพื่อรับข้อความที่กำหนดให้แต่ละคอลัมน์ใน text frame ที่มีอยู่. เมธอดจะคืนสตริงหนึ่งค่าให้แต่ละคอลัมน์ตามลำดับการอ่านแบบคอลัมน์. text frame ที่มีหนึ่งคอลัมน์จะให้แอเรย์ที่มีหนึ่งองค์ประกอบ, และคอลัมน์ที่ว่างเปล่าจะถูกแทนด้วยสตริงว่าง. สตริงเหล่านี้มีเพียงข้อความธรรมดา; การจัดรูปแบบระดับส่วนจะไม่ถูกรักษา.
วิธีนี้มีประโยชน์เมื่อคุณต้องการ:
- ดึงข้อความพร้อมคงลำดับการอ่านแบบคอลัมน์.
- ทำดัชนีหรือเปรียบเทียบเนื้อหาของสไลด์หลายคอลัมน์.
- ส่งออกแต่ละคอลัมน์ไปยังไฟล์, ฟิลด์ฐานข้อมูล, หรือปลายทางอื่นแยกกัน.
- ตรวจสอบว่าข้อความถูกจัดสรรใหม่อย่างไรหลังจากเปลี่ยนจำนวนคอลัมน์ด้วย ITextFrameFormat.setColumnCount, ระยะห่างด้วย ITextFrameFormat.setColumnSpacing, ฟอนต์, หรือขนาดของ text frame.
เมธอดจะรายงานข้อความที่กระจายใน ITextFrame ปัจจุบัน; มันไม่ได้ทำให้ข้อความไหลอัตโนมัติระหว่าง shape หรือ text box แยกกัน. การกระจายคอลัมน์อาจขึ้นกับฟอนต์ที่มีและการตั้งค่าเลย์เอาต์อื่น, ดังนั้นให้แน่ใจว่ามีฟอนต์ที่ต้องการเมื่อผลลัพธ์ที่สอดคล้องกันเป็นเรื่องสำคัญ.
ตัวอย่างต่อไปนี้โหลดพรีเซนเทชัน, ค้นหา auto shape หลายคอลัมน์แรกที่มี text frame, อ่านจำนวนคอลัมน์ที่กำหนด, แล้วเขียนข้อความจากแต่ละคอลัมน์ไปยังไฟล์แยกต่างหาก. Shape ที่ไม่มี text frame จะถูกข้าม.
import com.aspose.slides.*;
import java.io.IOException;
import java.nio.charset.StandardCharsets;
import java.nio.file.Files;
import java.nio.file.Path;
import java.nio.file.Paths;

Presentation presentation = new Presentation("MultiColumnText.pptx");
try {
    IAutoShape textBox = null;
    for (IShape shape : presentation.getSlides().get_Item(0).getShapes()) {
        if (shape instanceof IAutoShape) {
            IAutoShape autoShape = (IAutoShape) shape;
            if (autoShape.getTextFrame() != null) {
                int columnCount = autoShape.getTextFrame().getTextFrameFormat().getColumnCount();
                if (columnCount > 1) {
                    textBox = autoShape;
                    break;
                }
            }
        }
    }

    if (textBox == null) {
        System.out.println("No multi-column text frame was found.");
    } else {
        ITextFrame textFrame = textBox.getTextFrame();
        int configuredColumnCount = textFrame.getTextFrameFormat().getColumnCount();
        String[] columnTexts = textFrame.splitTextByColumns();

        System.out.println("Configured columns: " + configuredColumnCount);

        for (int columnIndex = 0; columnIndex < columnTexts.length; columnIndex++) {
            int columnNumber = columnIndex + 1;
            String columnText = columnTexts[columnIndex];
            System.out.println("Column " + columnNumber + ": " + columnText);
            Path outputPath = Paths.get("Column-" + columnNumber + ".txt");
            byte[] textBytes = columnText.getBytes(StandardCharsets.UTF_8);
            try {
                Files.write(outputPath, textBytes);
            } catch (IOException exception) {
                System.out.println("Could not write column " + columnNumber + ": " + exception.getMessage());
            }
        }
    }
} finally {
    presentation.dispose();
}
อัปเดตข้อความ
เพื่ออัปเดตข้อความทั่วพรีเซนเทชัน, ทำการวนลูปผ่านสไลด์และ shape, เลือก auto shape, แล้วแก้ไขส่วนข้อความของมัน. การทำงานในระดับส่วนช่วยให้คุณเปลี่ยนได้ทั้งข้อความและการจัดรูปแบบอักขระ.
ตัวอย่างต่อไปนี้แทนที่ทุกการปรากฏของ years ด้วย months ในข้อความของ auto shape และทำให้ส่วนที่ได้รับผลกระทบเป็นตัวหนา:
import com.aspose.slides.*;

Presentation presentation = new Presentation("Text.pptx");
try {
    for (ISlide slide : presentation.getSlides()) {
        for (IShape shape : slide.getShapes()) {
            if (!(shape instanceof IAutoShape)) {
                continue;
            }

            IAutoShape autoShape = (IAutoShape) shape;
            ITextFrame textFrame = autoShape.getTextFrame();
            if (textFrame == null) {
                continue;
            }

            for (IParagraph paragraph : textFrame.getParagraphs()) {
                for (IPortion portion : paragraph.getPortions()) {
                    String text = portion.getText();
                    if (text != null && text.contains("years")) {
                        portion.setText(text.replace("years", "months"));
                        portion.getPortionFormat().setFontBold(NullableBool.True);
                    }
                }
            }
        }
    }

    presentation.save("TextChanged.pptx", SaveFormat.Pptx);
} finally {
    presentation.dispose();
}
การวนลูปนี้อัปเดตข้อความเฉพาะใน auto shape. ข้อความที่เก็บในตาราง, แผนภูมิ, SmartArt, หรือ shape ที่จัดกลุ่มจะต้องวนลูปผ่านคอลเลกชันของออบเจกต์เหล่านั้นแยกต่างหาก.
เพิ่ม Text Box พร้อมไฮเปอร์ลิงก์
ไฮเปอร์ลิงก์สามารถกำหนดให้กับส่วนข้อความเฉพาะ, ทำให้เฉพาะข้อความนั้นทำหน้าที่เป็นลิงก์ที่คลิกได้. ใช้เมธอด IHyperlinkManager.setExternalHyperlinkClick เพื่อเชื่อมส่วนดังกล่าวกับ URL ภายนอก.
ตัวอย่างต่อไปนี้สร้างข้อความที่มีลิงก์และบันทึกลงในพรีเซนเทชัน:
import com.aspose.slides.*;

Presentation presentation = new Presentation();
try {
    ISlide slide = presentation.getSlides().get_Item(0);
    IAutoShape textBox = slide.getShapes().addAutoShape(ShapeType.Rectangle, 150, 150, 200, 50);
    textBox.addTextFrame("Aspose.Slides");

    IPortion textPortion = textBox.getTextFrame().getParagraphs().get_Item(0).getPortions().get_Item(0);
    textPortion.getPortionFormat().getHyperlinkManager().setExternalHyperlinkClick("https://www.aspose.com/");

    presentation.save("Hyperlink.pptx", SaveFormat.Pptx);
} finally {
    presentation.dispose();
}
คำถามที่พบบ่อย
ความแตกต่างระหว่าง text box กับ placeholder ข้อความบนสไลด์มาสเตอร์หรือเลเอาต์คืออะไร?
placeholder สามารถสืบทอดตำแหน่งและการจัดรูปแบบจาก master slide หรือ layout slide. text box ปกติเป็น shape ที่เป็นอิสระบนสไลด์ที่สร้างขึ้นและจะไม่รับพฤติกรรม placeholder เมื่อเลเอาต์เปลี่ยนแปลง.
ฉันจะแทนที่ข้อความโดยไม่กระทบข้อความในแผนภูมิ, ตาราง, หรือ SmartArt อย่างไร?
จำกัดการวนลูปให้กับ shape ที่ทำตาม IAutoShape, อย่างที่แสดงในตัวอย่างอัปเดตข้อความ. แผนภูมิ, ตาราง, และ SmartArt เก็บข้อความในโมเดลออบเจกต์ของตนเอง, ดังนั้นจึงไม่ถูกแก้ไขโดยลูปนั้น.