
Python を使用したプレゼンテーションでの 3D エフェクトの作成
概要
Aspose.Slides for Python via Java は、シェイプやテキストに対して PowerPoint スタイルの 3D 書式設定を作成、編集、保持、レンダリングできます。本記事では、回転、押し出し、ベベル、ライティング、マテリアル、グラデーションまたは画像の塗りつぶし、3D テキストなどの 3D エフェクトについて説明します。
注
この記事は PowerPoint のシェイプとテキストに対する 3D 書式設定エフェクトについて説明しています。単独の 3D モデルファイルの挿入や編集については扱いません。スライドを画像、PDF、または HTML にエクスポートすると、Aspose.Slides はそれらの 3D エフェクトをエクスポートされた 2D 出力にレンダリングします。3D 書式設定の概念
シェイプに 3D 書式設定を適用するには、Shape.getThreeDFormat メソッドを使用します。このメソッドは ThreeDFormat を返し、シェイプの 3D シーンを制御します。
テキストの場合は、TextFrameFormat.getThreeDFormat メソッドを使用します。これにより、シェイプ本体ではなくテキストフレームに 3D 書式設定が適用されます。
最も重要な API メンバーは次のとおりです:
| API メンバー | 制御対象 | 使用タイミング |
|---|---|---|
| getCamera | 視点、プリセットのカメラタイプ、回転、ズーム、パースペクティブ。 | 3D 空間でオブジェクトを回転させる、または PowerPoint の 3D 回転プリセットに合わせる場合。 |
| getLightRig | ライトのプリセット、方向、回転。 | 3D 表面のハイライトや影の表示を変更する場合。 |
| getMaterial と setMaterial | フラット、マット、プラスチック、金属などの表面素材。 | 同じ形状をより平坦に、柔らかく、光沢のある、または金属的に見せる場合。 |
| getExtrusionHeight と setExtrusionHeight | シェイプが正面からどれだけ後方に伸びるか。 | 平面シェイプを目に見える厚みのある 3D オブジェクトに変える場合。 |
| getExtrusionColor | 押し出された側面の色。 | 深さを可視化する、または側面の色を前面の塗りつぶしと合わせる場合。 |
| getDepth と setDepth | PowerPoint の 3D 書式設定で使用される追加の 3D 深さ。 | ベベルやマテリアル設定と組み合わせて、シェイプやテキストの深さを微調整する場合。 |
| getBevelTop と getBevelBottom | 正面と背面のエッジを持ち上げたり丸めたりしたもの。 | 鋭利で平坦な面ではなく、柔らかく成形されたエッジを追加する場合。 |
| getContourColor と getContourWidth と setContourWidth | 3D オブジェクトの輪郭線。 | レンダリング出力でオブジェクトの境界を強調する場合。 |
3D シェイプの作成
シェイプが説得力のある 3D に見えるまでには、通常 4 種類の設定が必要です:
- カメラ設定(デフォルトの正面ビューでは押し出しが隠れてしまうため)。
- ライト設定(ライティングにより面や側面が見やすくなるため)。
- マテリアル設定(表面が光の描画に影響するため)。
- 押し出しまたは深さ設定(平面シェイプに厚みが必要なため)。
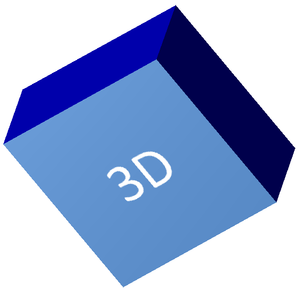
次の例は長方形を作成し、正面にテキストを追加し、3D 書式設定を適用します。カメラの回転値は度単位で、押し出し高さは 100 ポイントです。この例はスライドをデフォルトサイズの 2 倍の PNG 画像としてレンダリングし、プレゼンテーションを PPTX として保存します。
import jpype
import asposeslides

if not jpype.isJVMStarted():
    jpype.startJVM()

from asposeslides.api import CameraPresetType, FillType, ImageFormat, LightRigPresetType, LightingDirection, MaterialPresetType, Presentation, SaveFormat, ShapeType
from java.awt import Color

image_scale = 2.0

presentation = Presentation()
try:
    slide = presentation.getSlides().get_Item(0)

    shape = slide.getShapes().addAutoShape(ShapeType.Rectangle, 200, 150, 200, 200)
    shape.getTextFrame().setText("3D")
    shape.getTextFrame().getParagraphs().get_Item(0).getParagraphFormat().getDefaultPortionFormat().setFontHeight(64)

    shape.getFillFormat().setFillType(FillType.Solid)
    shape.getFillFormat().getSolidFillColor().setColor(Color(100, 149, 237))

    shape.getThreeDFormat().getCamera().setCameraType(CameraPresetType.OrthographicFront)
    shape.getThreeDFormat().getCamera().setRotation(20, 30, 40)
    shape.getThreeDFormat().getLightRig().setLightType(LightRigPresetType.Flat)
    shape.getThreeDFormat().getLightRig().setDirection(LightingDirection.Top)
    shape.getThreeDFormat().setMaterial(MaterialPresetType.Flat)
    shape.getThreeDFormat().setExtrusionHeight(100)
    shape.getThreeDFormat().getExtrusionColor().setColor(Color.BLUE)

    thumbnail = slide.getImage(image_scale, image_scale)
    try:
        thumbnail.save("shape_3d.png", ImageFormat.Png)
    finally:
        thumbnail.dispose()

    presentation.save("shape_3d.pptx", SaveFormat.Pptx)
finally:
    presentation.dispose()
レンダリングされたスライド画像は、長方形が厚い 3D ブロックとして表示されます:
カメラでシェイプを回転させる
PowerPoint では、3D 回転は「3-D 回転」ペインで設定します。X、Y、Z の回転値はカメラ API を通じて設定する回転に対応しています。
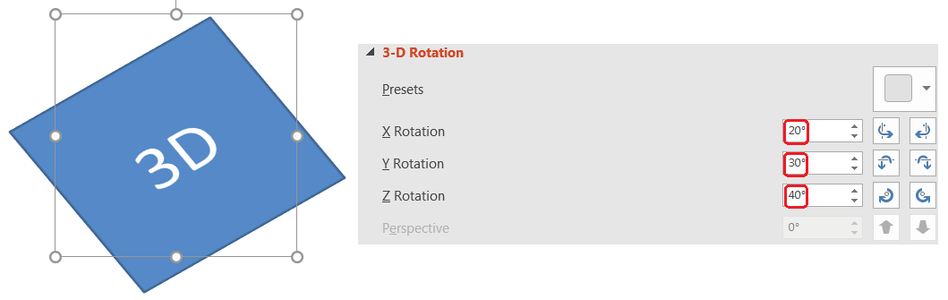
Aspose.Slides では、ThreeDFormat.getCamera を使用してカメラにアクセスします。この例は長方形を作成し、正投影の正面ビューを選択し、X、Y、Z の回転をそれぞれ 20、30、40 度に設定します。ファイルを保存せずにメモリ上でシェイプを構成します:
import jpype
import asposeslides

if not jpype.isJVMStarted():
    jpype.startJVM()

from asposeslides.api import CameraPresetType, Presentation, ShapeType

presentation = Presentation()
try:
    slide = presentation.getSlides().get_Item(0)

    shape = slide.getShapes().addAutoShape(ShapeType.Rectangle, 200, 150, 200, 200)

    shape.getThreeDFormat().getCamera().setCameraType(CameraPresetType.OrthographicFront)
    shape.getThreeDFormat().getCamera().setRotation(20, 30, 40)
finally:
    presentation.dispose()
カメラは、ビューアがオブジェクトを見る視点を変更したいときに使用します。スライド上の 2D シェイプジオメトリは変更されません。PowerPoint および Aspose.Slides がレンダリング時に使用する 3D 視点が変更されます。
押し出しと深さの追加
押し出しは、シェイプを正面から後方に伸ばすことで厚みを持たせます。PowerPoint では、深さコントロールがこの可視的な厚さを設定し、色コントロールが側面の色を設定します。
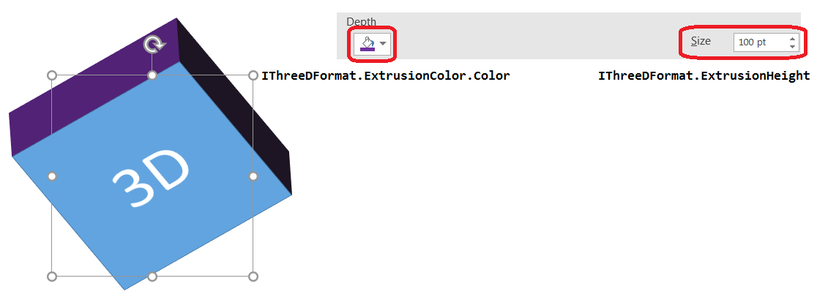
ThreeDFormat.setExtrusionHeight を使用して厚さを設定し、ThreeDFormat.getExtrusionColor で側面の色を取得します。この例は長方形に 100 ポイントの押し出しを設定し、側面を紫色にし、カメラを回転させて厚さを示します。ファイルを保存せずにメモリ上でシェイプを構成します:
import jpype
import asposeslides

if not jpype.isJVMStarted():
    jpype.startJVM()

from asposeslides.api import CameraPresetType, LightRigPresetType, LightingDirection, MaterialPresetType, Presentation, ShapeType
from java.awt import Color

presentation = Presentation()
try:
    slide = presentation.getSlides().get_Item(0)

    shape = slide.getShapes().addAutoShape(ShapeType.Rectangle, 200, 150, 200, 200)

    extrusion_color = Color(128, 0, 128)

    shape.getThreeDFormat().getCamera().setCameraType(CameraPresetType.OrthographicFront)
    shape.getThreeDFormat().getCamera().setRotation(20, 30, 40)
    shape.getThreeDFormat().getLightRig().setLightType(LightRigPresetType.Flat)
    shape.getThreeDFormat().getLightRig().setDirection(LightingDirection.Top)
    shape.getThreeDFormat().setMaterial(MaterialPresetType.Flat)
    shape.getThreeDFormat().setExtrusionHeight(100)
    shape.getThreeDFormat().getExtrusionColor().setColor(extrusion_color)
finally:
    presentation.dispose()
ThreeDFormat.setDepth メソッドは 3D シェイプの深さを設定します。setExtrusionHeight メソッドは、下の例に示すように、押し出し効果の高さを制御します。
3D エフェクトでグラデーションまたは画像塗りつぶしを使用する
3D 書式設定はシェイプの塗りつぶしとは独立しています。正面に単色、グラデーション、パターン、または画像塗りつぶしを適用しながら、同じカメラ、ライト、マテリアル、押し出し設定を使用できます。
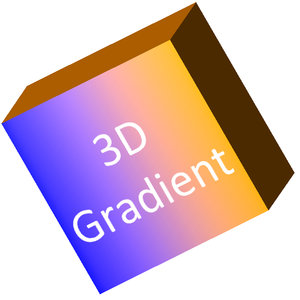
この例は正面に青からオレンジへのグラデーションを適用し、150 ポイントの押し出しに濃いオレンジ色を設定します。グラデーションの停止位置は 0 と 100 で、グラデーションの開始と終了を示します。カメラの回転値は度単位です。スライドはデフォルトサイズの 2 倍の PNG 画像としてレンダリングされます:
import jpype
import asposeslides

if not jpype.isJVMStarted():
    jpype.startJVM()

from asposeslides.api import CameraPresetType, FillType, ImageFormat, LightRigPresetType, LightingDirection, MaterialPresetType, Presentation, ShapeType
from java.awt import Color

image_scale = 2.0

presentation = Presentation()
try:
    slide = presentation.getSlides().get_Item(0)

    shape = slide.getShapes().addAutoShape(ShapeType.Rectangle, 200, 150, 250, 250)
    shape.getTextFrame().setText("3D Gradient")
    shape.getTextFrame().getParagraphs().get_Item(0).getParagraphFormat().getDefaultPortionFormat().setFontHeight(64)

    shape.getFillFormat().setFillType(FillType.Gradient)
    shape.getFillFormat().getGradientFormat().getGradientStops().add(0, Color.BLUE)
    shape.getFillFormat().getGradientFormat().getGradientStops().add(100, Color(255, 165, 0))

    shape.getThreeDFormat().getCamera().setCameraType(CameraPresetType.OrthographicFront)
    shape.getThreeDFormat().getCamera().setRotation(10, 20, 30)
    shape.getThreeDFormat().getLightRig().setLightType(LightRigPresetType.Flat)
    shape.getThreeDFormat().getLightRig().setDirection(LightingDirection.Top)
    shape.getThreeDFormat().setMaterial(MaterialPresetType.Flat)
    extrusion_color = Color(255, 140, 0)
    shape.getThreeDFormat().setExtrusionHeight(150)
    shape.getThreeDFormat().getExtrusionColor().setColor(extrusion_color)

    thumbnail = slide.getImage(image_scale, image_scale)
    try:
        thumbnail.save("gradient_3d.png", ImageFormat.Png)
    finally:
        thumbnail.dispose()
finally:
    presentation.dispose()
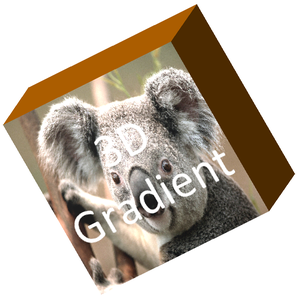
レンダリングされた出力は正面のグラデーションを保持し、押し出しを別々にレンダリングします:
画像塗りつぶしを使用する場合は、画像をプレゼンテーションに追加し、シェイプの塗りつぶしに割り当てます。この例は作業ディレクトリに「image.jpg」という名前の既存ファイルが必要です。画像を長方形全体に伸ばし、150 ポイントの押し出しを適用し、カメラの回転を度単位で設定します。ファイルを保存またはレンダリングせずにメモリ上でシェイプを構成します:
import jpype
import asposeslides

if not jpype.isJVMStarted():
    jpype.startJVM()

from asposeslides.api import CameraPresetType, FillType, LightRigPresetType, LightingDirection, MaterialPresetType, PictureFillMode, Presentation, ShapeType
from java.awt import Color
from pathlib import Path

presentation = Presentation()
try:
    slide = presentation.getSlides().get_Item(0)

    shape = slide.getShapes().addAutoShape(ShapeType.Rectangle, 200, 150, 250, 250)

    image_data = Path("image.jpg").read_bytes()
    java_image_data = jpype.JArray(jpype.JByte)(image_data)
    image = presentation.getImages().addImage(java_image_data)

    shape.getFillFormat().setFillType(FillType.Picture)
    shape.getFillFormat().getPictureFillFormat().getPicture().setImage(image)
    shape.getFillFormat().getPictureFillFormat().setPictureFillMode(PictureFillMode.Stretch)

    extrusion_color = Color(255, 140, 0)
    shape.getThreeDFormat().getCamera().setCameraType(CameraPresetType.OrthographicFront)
    shape.getThreeDFormat().getCamera().setRotation(10, 20, 30)
    shape.getThreeDFormat().getLightRig().setLightType(LightRigPresetType.Flat)
    shape.getThreeDFormat().getLightRig().setDirection(LightingDirection.Top)
    shape.getThreeDFormat().setMaterial(MaterialPresetType.Flat)
    shape.getThreeDFormat().setExtrusionHeight(150)
    shape.getThreeDFormat().getExtrusionColor().setColor(extrusion_color)
finally:
    presentation.dispose()
画像は正面にレンダリングされ、押し出しは 3D 側面としてレンダリングされます:
テキストへの 3D 書式設定の適用
シェイプの 3D 書式設定はシェイプ本体に影響し、テキストの 3D 書式設定はテキストフレームに影響します。文字自体に押し出し、マテリアル、ライティング、カメラ設定が必要な WordArt のような効果に役立ちます。
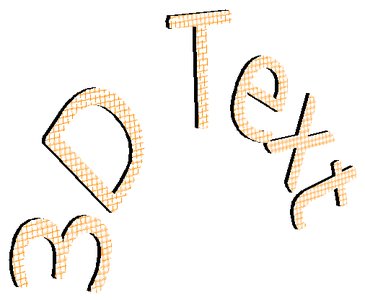
以下の例は、オレンジと白のグリッドパターンのテキストを作成し、上向きのアーチを適用し、TextFrameFormat.getThreeDFormat を通じて 3D 設定を構成します。押し出し高さと深さはポイント単位、ライトの回転は度単位です。シェイプの塗りつぶしと輪郭は非表示にしてテキストのみが見えるようにします。例はデフォルトスライドサイズの 2 倍の PNG 画像をレンダリングし、プレゼンテーションを PPTX として保存します:
import jpype
import asposeslides

if not jpype.isJVMStarted():
    jpype.startJVM()

from asposeslides.api import CameraPresetType, FillType, ImageFormat, LightRigPresetType, LightingDirection, MaterialPresetType, PatternStyle, Presentation, SaveFormat, ShapeType, TextShapeType
from java.awt import Color

image_scale = 2.0

presentation = Presentation()
try:
    slide = presentation.getSlides().get_Item(0)

    shape = slide.getShapes().addAutoShape(ShapeType.Rectangle, 200, 150, 250, 250)
    shape.getFillFormat().setFillType(FillType.NoFill)
    shape.getLineFormat().getFillFormat().setFillType(FillType.NoFill)
    shape.getTextFrame().setText("3D Text")

    portion = shape.getTextFrame().getParagraphs().get_Item(0).getPortions().get_Item(0)
    portion.getPortionFormat().getFillFormat().setFillType(FillType.Pattern)
    pattern_color = Color(255, 140, 0)
    portion.getPortionFormat().getFillFormat().getPatternFormat().getForeColor().setColor(pattern_color)
    portion.getPortionFormat().getFillFormat().getPatternFormat().getBackColor().setColor(Color.WHITE)
    portion.getPortionFormat().getFillFormat().getPatternFormat().setPatternStyle(PatternStyle.LargeGrid)

    shape.getTextFrame().getParagraphs().get_Item(0).getParagraphFormat().getDefaultPortionFormat().setFontHeight(128)

    text_frame_format = shape.getTextFrame().getTextFrameFormat()
    text_frame_format.setTransform(TextShapeType.ArchUp)
    text_frame_format.getThreeDFormat().setExtrusionHeight(3.5)
    text_frame_format.getThreeDFormat().setDepth(3)
    text_frame_format.getThreeDFormat().setMaterial(MaterialPresetType.Plastic)
    text_frame_format.getThreeDFormat().getLightRig().setDirection(LightingDirection.Top)
    text_frame_format.getThreeDFormat().getLightRig().setLightType(LightRigPresetType.Balanced)
    text_frame_format.getThreeDFormat().getLightRig().setRotation(0, 0, 40)
    text_frame_format.getThreeDFormat().getCamera().setCameraType(CameraPresetType.PerspectiveContrastingRightFacing)

    thumbnail = slide.getImage(image_scale, image_scale)
    try:
        thumbnail.save("text_3d.png", ImageFormat.Png)
    finally:
        thumbnail.dispose()

    presentation.save("text_3d.pptx", SaveFormat.Pptx)
finally:
    presentation.dispose()
テキストは曲線状に押し出された 3D 文字としてレンダリングされます:
3D シェイプ上でテキストを平坦に保つ
シェイプの 3D 外観を保ちつつテキストを読みやすくするには、TextFrame.getTextFrameFormat 経由で TextFrameFormat.setKeepTextFlat を呼び出します。値が True の場合、テキストは 3D シーンから除外されます。False の場合、テキストはシーンに参加し、3D の向きに従います。
この設定はシェイプの 3D 書式設定(カメラ、ライティング、マテリアル、押し出し)を削除しません。これらは Shape.getThreeDFormat を通じて構成されたままです。また、通常の回転とは異なります。Shape.setRotation はスライド平面上でシェイプを回転させ、TextFrameFormat.setRotationAngle はテキストのバウンディングボックス内でのカスタム回転を制御します。テキストを 3D シーンから除外しても、これらの角度はリセットされません。
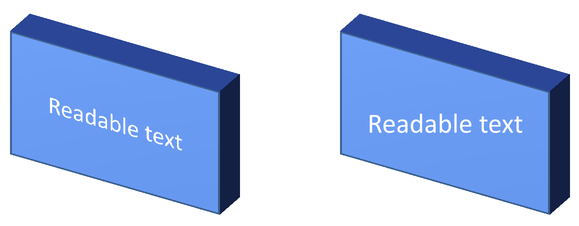
次の自己完結型例は、テキスト付きの青い長方形を作成し、元の横にクローンを作ります。両方のシェイプは同じ 3D 書式設定を持ち、テキスト設定だけが異なります:左側は False、右側は True。カメラ角度は度単位で、押し出し高さは 40 ポイントです。この例はプレゼンテーションを PPTX として保存し、比較用スライドをデフォルトサイズの 2 倍の PNG としてレンダリングします。
import jpype
import asposeslides

if not jpype.isJVMStarted():
    jpype.startJVM()

from asposeslides.api import CameraPresetType, FillType, ImageFormat, LightRigPresetType, LightingDirection, MaterialPresetType, Presentation, SaveFormat, ShapeType, TextAlignment, TextAnchorType
from java.awt import Color

presentation = Presentation()
try:
    slide = presentation.getSlides().get_Item(0)

    shape = slide.getShapes().addAutoShape(ShapeType.Rectangle, 70, 160, 240, 140)

    shape.getTextFrame().setText("Readable text")
    shape.getTextFrame().getParagraphs().get_Item(0).getParagraphFormat().getDefaultPortionFormat().setFontHeight(28)
    shape.getTextFrame().getParagraphs().get_Item(0).getParagraphFormat().setAlignment(TextAlignment.Center)
    shape.getTextFrame().getTextFrameFormat().setAnchoringType(TextAnchorType.Center)
    shape.getFillFormat().setFillType(FillType.Solid)
    shape.getFillFormat().getSolidFillColor().setColor(Color(100, 149, 237))

    shape.getThreeDFormat().getCamera().setCameraType(CameraPresetType.OrthographicFront)
    shape.getThreeDFormat().getCamera().setRotation(30, 30, 0)
    shape.getThreeDFormat().getLightRig().setLightType(LightRigPresetType.Flat)
    shape.getThreeDFormat().getLightRig().setDirection(LightingDirection.Top)
    shape.getThreeDFormat().setMaterial(MaterialPresetType.Flat)
    shape.getThreeDFormat().setExtrusionHeight(40)
    shape.getThreeDFormat().getExtrusionColor().setColor(Color(65, 105, 225))
    shape.getTextFrame().getTextFrameFormat().setKeepTextFlat(False)

    flat_text_shape = slide.getShapes().addClone(shape, 400, 160)
    flat_text_shape.getTextFrame().getTextFrameFormat().setKeepTextFlat(True)

    presentation.save("keep_text_flat.pptx", SaveFormat.Pptx)
    image = slide.getImage(2, 2)
    try:
        image.save("keep_text_flat.png", ImageFormat.Png)
    finally:
        image.dispose()
finally:
    presentation.dispose()
左側ではテキストが 3D の向きに従います。右側ではテキストが平坦に保たれ、読みやすくなります。両方の長方形は同じ見える押し出しと 3D の向きを保持しています。
エクスポートとレンダリングの動作
Aspose.Slides は PPTX などの PowerPoint 形式で保存する際に 3D 書式設定を保持します。固定レイアウト形式にレンダリングまたはエクスポートする場合、3D シーンはラスター化され、2D 結果として出力に描画されます。これは、スライドを PNG にレンダリングする、PDF にエクスポートする、HTML にエクスポートする、または video conversion 用のフレームを生成する場合にも該当します。
以下の点に留意してください:
- エクスポートされた画像や PDF はインタラクティブではありません。エクスポート後にビューアがオブジェクトを回転させることはできません。
- 最終的な外観は、カメラ、ライトリグ、マテリアル、押し出し、塗りつぶし、スライドのスケーリングの組み合わせに依存します。
- 継承されたまたはテーマベースの書式設定値を確認する必要がある場合は、effective shape properties を参照してください。
- 一部の出力形式では編集可能な PowerPoint 3D 書式設定を保存できません。そのような形式では、視覚的な結果がレンダリングされ、編集可能な 3D 設定として保持されません。
FAQ
Aspose.Slides はインタラクティブな 3D プレゼンテーションを作成できますか?
Aspose.Slides はシェイプとテキストの PowerPoint 3D エフェクトを作成・レンダリングしますが、エクスポートされた画像、PDF、HTML ページをビューアが回転させられるインタラクティブな 3D シーンにすることはできません。PPTX では、フォーマットがサポートしている場合に PowerPoint で 3D 書式設定が編集可能なまま保持されます。
3D モデルと 3D エフェクトの違いは何ですか?
3D モデルはプレゼンテーションに挿入される別個の 3D オブジェクトです。3D エフェクトは、回転、押し出し、ベベル、ライティング、マテリアルなどの通常の PowerPoint シェイプやテキストに適用される書式設定です。本記事は 3D エフェクトについて解説しています。
見える 3D シェイプを作成するために必要な設定は何ですか?
最低限、カメラの回転と押し出しまたは深さのいずれかを設定します。実際には、ライトリグとマテリアルも設定して、レンダリングされた面に明確なハイライトと影を付けます。
シェイプとテキストの両方に 3D エフェクトを適用できますか?
はい。シェイプ本体には Shape.getThreeDFormat を、テキストには TextFrameFormat.getThreeDFormat を使用します。
画像、PDF、HTML、またはビデオフレームにエクスポートするときに 3D エフェクトは表示されますか?
はい。Aspose.Slides はスライド画像、PDF 出力、HTML 出力、ビデオ変換用フレームを生成する際に 3D エフェクトをレンダリングします。エクスポートされた出力にはレンダリングされた外観が含まれ、編集可能な 3D オブジェクトは含まれません。
継承やテーマ設定が適用された後の最終的な 3D 値を取得できますか?
はい。Shape Effective Properties で説明されている有効な書式設定 API を使用して、最終的なカメラ、ライトリグ、ベベル、その他の 3D 値を取得できます。