
C++에서 프레젠테이션 슬라이드 마스터 관리
개요
슬라이드 마스터는 슬라이드 그룹에 대한 공유 디자인 설정을 정의합니다. 공통 도형, 로고, 배경, 텍스트 스타일, 테마 설정 및 바닥글 설정을 포함할 수 있습니다. PowerPoint에서 슬라이드 마스터를 편집하는 것이 프레젠테이션을 일관되게 유지하고 모든 슬라이드마다 동일한 서식을 반복하지 않는 일반적인 방법입니다.
Aspose.Slides for C++도 동일한 모델을 지원합니다. 프레젠테이션은 하나 이상의 마스터 슬라이드를 포함할 수 있으며, 각 마스터 슬라이드는 여러 레이아웃 슬라이드를 포함할 수 있습니다. 일반 슬라이드는 보통 마스터 슬라이드를 직접 참조하지 않습니다. 대신 일반 슬라이드는 레이아웃 슬라이드를 사용하고, 해당 레이아웃 슬라이드는 마스터 슬라이드에 속합니다.
계층 구조는 다음과 같습니다:
- Slide master - 공유 디자인과 테마를 정의합니다.
- Layout slide - 자리 표시자와 레이아웃 수준 서식을 특정하게 배열합니다.
- Normal slide - 실제 프레젠테이션 콘텐츠를 포함하고 하나의 레이아웃 슬라이드를 사용합니다.
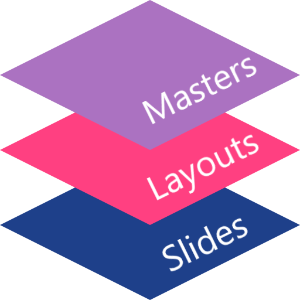
Aspose.Slides에서 슬라이드 마스터는 IMasterSlide 인터페이스로 표현됩니다. 프레젠테이션의 모든 마스터 슬라이드는 Presentation::get_Masters 컬렉션을 통해 접근할 수 있으며, 이 컬렉션은 IMasterSlideCollection을 구현합니다.
Inheritance
여러 수준에서 동일한 속성이 정의된 경우, 더 구체적인 수준이 우선합니다. 예를 들어, 마스터 슬라이드와 레이아웃 슬라이드 모두 배경을 정의하면 해당 레이아웃을 기반으로 하는 슬라이드는 레이아웃 배경을 사용합니다. 레이아웃 슬라이드에 대한 자세한 내용은 Apply or Change Slide Layouts를 참조하십시오.슬라이드 마스터 액세스
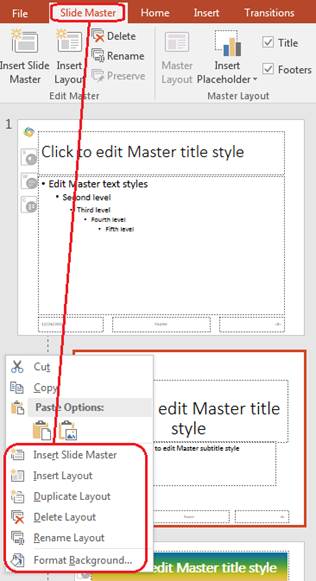
PowerPoint에서는 View > Slide Master에서 슬라이드 마스터 보기를 열 수 있습니다.
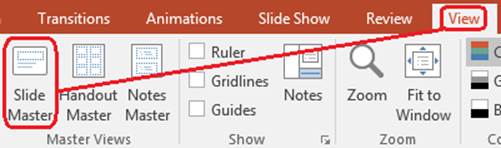
Aspose.Slides에서는 get_Masters() 컬렉션을 사용하여 마스터 슬라이드에 접근합니다:
#include <DOM/IMasterLayoutSlideCollection.h>
#include <DOM/IMasterSlide.h>
#include <DOM/IMasterSlideCollection.h>
#include <DOM/Presentation.h>
#include <system/console.h>
using namespace Aspose::Slides;
using namespace System;

auto presentation = System::MakeObject<Presentation>(u"presentation.pptx");

auto firstMasterSlide = presentation->get_Master(0);
auto masterSlideCount = presentation->get_Masters()->get_Count();
auto firstMasterLayoutSlideCount = firstMasterSlide->get_LayoutSlides()->get_Count();

System::Console::WriteLine(System::String(u"Master slides: ") + masterSlideCount);
System::Console::WriteLine(System::String(u"Layouts in the first master: ") + firstMasterLayoutSlideCount);

presentation->Dispose();
일반 슬라이드가 사용하는 레이아웃을 통해 해당 슬라이드에 적용된 마스터 슬라이드를 가져올 수도 있습니다:
#include <DOM/ILayoutSlide.h>
#include <DOM/IMasterSlide.h>
#include <DOM/ISlide.h>
#include <DOM/Presentation.h>
#include <system/console.h>
using namespace Aspose::Slides;
using namespace System;

auto presentation = System::MakeObject<Presentation>(u"presentation.pptx");

auto slide = presentation->get_Slide(0);
auto layoutSlide = slide->get_LayoutSlide();
auto masterSlide = layoutSlide->get_MasterSlide();
auto masterSlideName = masterSlide->get_Name();

System::Console::WriteLine(masterSlideName);

presentation->Dispose();
슬라이드 마스터가 포함하는 내용
마스터 슬라이드는 슬라이드와 유사한 객체입니다. IBaseSlide을 구현하므로 일반 슬라이드와 레이아웃 슬라이드에서 사용되는 많은 슬라이드 속성을 노출합니다. 마스터 전용 멤버는 IMasterSlide API 페이지에 나열되어 있습니다.
주요 마스터 슬라이드 멤버는 다음과 같습니다:
| 멤버 | 용도 |
|---|---|
get_Background() |
마스터 수준 슬라이드 배경을 설정합니다. |
get_Shapes() |
로고, 그림 프레임, 공유 텍스트 등 마스터에 배치된 도형을 저장합니다. |
get_LayoutSlides() |
마스터에 속한 레이아웃 슬라이드를 저장합니다. |
get_ThemeManager() |
마스터 테마 API에 대한 접근을 제공합니다. |
get_HeaderFooterManager() |
마스터와 해당 하위 레이아웃의 머리글, 바닥글, 날짜 및 슬라이드 번호를 제어합니다. |
GetDependingSlides() |
레이아웃을 통해 마스터에 의존하는 일반 슬라이드를 반환합니다. |
슬라이드 마스터에 이미지 추가
마스터 슬라이드에 이미지를 추가하면 해당 마스터의 레이아웃을 사용하는 슬라이드에 표시됩니다. 로고, 워터마크, 장식 밴드 등 반복되는 시각 요소에 유용합니다.
다음 예제는 첫 번째 마스터 슬라이드에 로고를 추가합니다:
#include <DOM/IImageCollection.h>
#include <DOM/IMasterSlide.h>
#include <DOM/IShapeCollection.h>
#include <DOM/Presentation.h>
#include <DOM/ShapeType.h>
#include <Export/SaveFormat.h>
#include <system/io/file.h>
using namespace Aspose::Slides;
using namespace Aspose::Slides::Export;
using namespace System::IO;

auto presentation = System::MakeObject<Presentation>(u"presentation.pptx");

auto masterSlide = presentation->get_Master(0);
auto logoBytes = System::IO::File::ReadAllBytes(u"logo.png");
auto logoImage = presentation->get_Images()->AddImage(logoBytes);

masterSlide->get_Shapes()->AddPictureFrame(
    ShapeType::Rectangle,
    20.0f,
    20.0f,
    80.0f,
    80.0f,
    logoImage);

presentation->Save(u"presentation-with-logo.pptx", SaveFormat::Pptx);
presentation->Dispose();
그림 프레임에 대한 자세한 내용은 Picture Frame를 참조하십시오.
마스터 그래픽 가시성 제어
IBaseSlide::set_ShowMasterShapes를 사용하면 마스터 그래픽(예: 로고, 장식 도형)을 삭제하지 않고 숨길 수 있습니다. 해당 그래픽을 표시하지 않아야 하는 슬라이드에서는 Slide::set_ShowMasterShapes에 false를 전달하고, 표시해야 하는 슬라이드에서는 true를 전달합니다.
다음 자체 포함 예제는 마스터에 파란색 장식 밴드를 만들고, 동일한 빈 레이아웃을 사용하는 두 슬라이드에 적용합니다. 첫 번째 슬라이드에서는 밴드가 보이고, 두 번째 슬라이드에서는 숨겨집니다. 입력 프레젠테이션이나 이미지가 필요하지 않습니다.
#include <DOM/FillType.h>
#include <DOM/IAutoShape.h>
#include <DOM/IColorFormat.h>
#include <DOM/IFillFormat.h>
#include <DOM/ILayoutSlide.h>
#include <DOM/ILineFormat.h>
#include <DOM/IMasterLayoutSlideCollection.h>
#include <DOM/IMasterSlide.h>
#include <DOM/IShapeCollection.h>
#include <DOM/ISlide.h>
#include <DOM/ISlideCollection.h>
#include <DOM/ISlideSize.h>
#include <DOM/Presentation.h>
#include <DOM/ShapeType.h>
#include <DOM/SlideLayoutType.h>
#include <Export/SaveFormat.h>
#include <drawing/color.h>

using namespace Aspose::Slides;
using namespace Aspose::Slides::Export;
using namespace System;
using namespace System::Drawing;

auto presentation = MakeObject<Presentation>();
auto masterSlide = presentation->get_Master(0);
auto layoutSlide = masterSlide->get_LayoutSlides()->GetByType(SlideLayoutType::Blank);
layoutSlide->set_ShowMasterShapes(true);

auto slideHeight = presentation->get_SlideSize()->get_Size().get_Height();
auto band = masterSlide->get_Shapes()->AddAutoShape(ShapeType::Rectangle, 0.0f, 0.0f, 60.0f, slideHeight);
band->get_FillFormat()->set_FillType(FillType::Solid);
band->get_FillFormat()->get_SolidFillColor()->set_Color(Color::get_SteelBlue());
band->get_LineFormat()->get_FillFormat()->set_FillType(FillType::NoFill);

auto visibleSlide = presentation->get_Slide(0);
visibleSlide->set_LayoutSlide(layoutSlide);
visibleSlide->get_Shapes()->Clear();

auto hiddenSlide = presentation->get_Slides()->AddEmptySlide(layoutSlide);

visibleSlide->set_ShowMasterShapes(true);
hiddenSlide->set_ShowMasterShapes(false);

presentation->Save(u"master-graphics.pptx", SaveFormat::Pptx);
presentation->Dispose();
예제는 새 프레젠테이션에 포함된 Blank 레이아웃을 사용하고 초기 슬라이드의 자체 자리 표시자를 제거합니다.
설정 범위 선택
일반 슬라이드는 ISlide::get_LayoutSlide와 ILayoutSlide::get_MasterSlide를 통해 마스터에 접근합니다. 개별 슬라이드에 속성을 설정하면 해당 슬라이드에만 영향을 미칩니다. LayoutSlide::set_ShowMasterShapes에 false를 전달하면 해당 레이아웃을 사용하는 모든 슬라이드에서 마스터 그래픽이 숨겨지며, 슬라이드 자체 설정이 true여도 적용됩니다. 하나의 슬라이드만 숨기려면 슬라이드 속성을 변경하고 공유 레이아웃은 그대로 두세요.
마스터 슬라이드 자체에서는 가시성 제어가 지원되지 않습니다. 마스터에서는 항상 false를 반환하고, true를 할당하면 System::NotSupportedException이 발생합니다. 일반 슬라이드나 레이아웃에 적용하십시오.
그래픽과 배경 구분
| 작업 | 효과 |
|---|---|
| 마스터 그래픽 숨기기 | 마스터 도형을 삭제하거나 슬라이드 자체 도형을 변경하지 않고 가시성을 제어합니다. |
| 슬라이드 배경 채우기 변경 | 배경 색상, 그라디언트 또는 이미지를 변경합니다. 마스터 그래픽은 별도 도형이므로 배경 위에 그대로 표시될 수 있습니다. 자세한 내용은 Presentation Background를 확인하십시오. |
| 마스터에서 도형 삭제 | 공유 소스 도형을 제거하여 해당 마스터를 사용하는 모든 슬라이드에서 사용할 수 없게 합니다. |
자리 표시자 작업
자리 표시자는 일반적으로 레이아웃 슬라이드에서 정의됩니다. 마스터 슬라이드는 해당 레이아웃이 상속받는 공유 스타일과 테마를 제공하며, 각 레이아웃은 어떤 자리 표시자를 사용할지와 위치를 결정합니다.
PowerPoint에서는 슬라이드 마스터 보기에서 자리 표시자 명령을 사용할 수 있습니다.
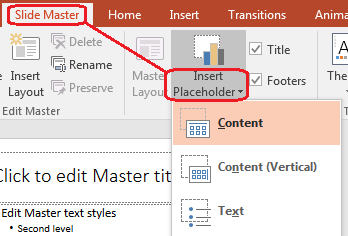
Aspose.Slides에서 새 자리 표시자를 추가하려면 마스터에 속한 레이아웃 슬라이드를 작업하세요:
#include <DOM/ILayoutPlaceholderManager.h>
#include <DOM/ILayoutSlide.h>
#include <DOM/IMasterLayoutSlideCollection.h>
#include <DOM/IMasterSlide.h>
#include <DOM/ISlideCollection.h>
#include <DOM/Presentation.h>
#include <DOM/SlideLayoutType.h>
#include <Export/SaveFormat.h>
using namespace Aspose::Slides;
using namespace Aspose::Slides::Export;

auto presentation = System::MakeObject<Presentation>(u"presentation.pptx");

auto masterSlide = presentation->get_Master(0);
auto blankLayoutSlide = masterSlide->get_LayoutSlides()->GetByType(SlideLayoutType::Blank);

if (blankLayoutSlide == nullptr)
{
    blankLayoutSlide = masterSlide->get_LayoutSlides()->Add(SlideLayoutType::Blank, u"Blank");
}

blankLayoutSlide->get_PlaceholderManager()->AddTextPlaceholder(
    60.0f,
    120.0f,
    600.0f,
    80.0f);

presentation->get_Slides()->AddEmptySlide(blankLayoutSlide);
presentation->Save(u"presentation-with-placeholder.pptx", SaveFormat::Pptx);
presentation->Dispose();
이미 마스터 슬라이드에 존재하는 자리 표시자 도형을 서식화할 수도 있습니다. 다음 예제는 제목 자리 표시자를 찾아 선형 그라디언트 채우기를 적용합니다:
#include <DOM/FillType.h>
#include <DOM/GradientShape.h>
#include <DOM/IAutoShape.h>
#include <DOM/IFillFormat.h>
#include <DOM/IGradientFormat.h>
#include <DOM/IGradientStopCollection.h>
#include <DOM/IMasterSlide.h>
#include <DOM/IPlaceholder.h>
#include <DOM/IShapeCollection.h>
#include <DOM/PlaceholderType.h>
#include <DOM/Presentation.h>
#include <Export/SaveFormat.h>
#include <drawing/color.h>
using namespace Aspose::Slides;
using namespace Aspose::Slides::Export;
using namespace System::Drawing;

auto presentation = System::MakeObject<Presentation>(u"presentation.pptx");

auto masterSlide = presentation->get_Master(0);
System::SharedPtr<IAutoShape> titlePlaceholder;

for (auto&& shape : masterSlide->get_Shapes())
{
    auto autoShape = System::AsCast<IAutoShape>(shape);

    if (autoShape != nullptr &&
        autoShape->get_Placeholder() != nullptr &&
        autoShape->get_Placeholder()->get_Type() == PlaceholderType::Title)
    {
        titlePlaceholder = autoShape;
        break;
    }
}

if (titlePlaceholder != nullptr)
{
    auto fillFormat = titlePlaceholder->get_FillFormat();
    fillFormat->set_FillType(FillType::Gradient);

    auto gradientFormat = fillFormat->get_GradientFormat();
    gradientFormat->set_GradientShape(GradientShape::Linear);

    auto gradientStops = gradientFormat->get_GradientStops();
    auto redGradientColor = System::Drawing::Color::FromArgb(255, 0, 0);
    auto purpleGradientColor = System::Drawing::Color::FromArgb(128, 0, 128);

    gradientStops->Add(0.0f, redGradientColor);
    gradientStops->Add(255.0f, purpleGradientColor);
}

presentation->Save(u"presentation-title-style.pptx", SaveFormat::Pptx);
presentation->Dispose();
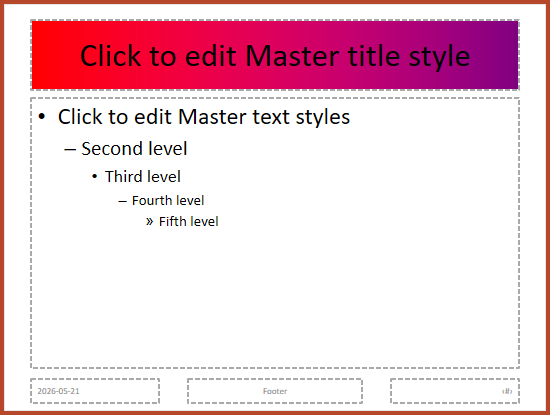
더 많은 자리 표시자 및 텍스트 서식 옵션은 Set Prompt Text in Placeholder와 Text Formatting을 참고하십시오.
슬라이드 마스터 배경 변경
마스터 배경은 레이아웃 및 해당 배경을 재정의하지 않은 슬라이드에 상속됩니다. 다음 예제는 첫 번째 마스터 슬라이드에 단색 배경 색을 설정합니다:
#include <DOM/BackgroundType.h>
#include <DOM/FillType.h>
#include <DOM/IBackground.h>
#include <DOM/IColorFormat.h>
#include <DOM/IFillFormat.h>
#include <DOM/IMasterSlide.h>
#include <DOM/Presentation.h>
#include <Export/SaveFormat.h>
#include <drawing/color.h>
using namespace Aspose::Slides;
using namespace Aspose::Slides::Export;
using namespace System::Drawing;

auto presentation = System::MakeObject<Presentation>(u"presentation.pptx");

auto masterSlide = presentation->get_Master(0);
auto masterBackgroundColor = System::Drawing::Color::get_ForestGreen();

masterSlide->get_Background()->set_Type(BackgroundType::OwnBackground);
masterSlide->get_Background()->get_FillFormat()->set_FillType(FillType::Solid);
masterSlide->get_Background()->get_FillFormat()->get_SolidFillColor()->set_Color(masterBackgroundColor);

presentation->Save(u"presentation-master-background.pptx", SaveFormat::Pptx);
presentation->Dispose();
관련 주제는 Presentation Background와 Presentation Theme를 참조하십시오.
슬라이드 마스터를 다른 프레젠테이션으로 복제
IMasterSlideCollection::AddClone를 사용하면 마스터 슬라이드를 다른 프레젠테이션으로 복사할 수 있습니다. 복사된 마스터는 대상 프레젠테이션의 레이아웃 및 슬라이드에서 사용할 수 있습니다.
#include <DOM/IMasterSlideCollection.h>
#include <DOM/Presentation.h>
#include <Export/SaveFormat.h>
using namespace Aspose::Slides;
using namespace Aspose::Slides::Export;

auto sourcePresentation = System::MakeObject<Presentation>(u"source.pptx");
auto destinationPresentation = System::MakeObject<Presentation>(u"destination.pptx");

auto sourceMasterSlide = sourcePresentation->get_Master(0);
auto clonedMasterSlide = destinationPresentation->get_Masters()->AddClone(sourceMasterSlide);

destinationPresentation->Save(u"destination-with-master.pptx", SaveFormat::Pptx);
destinationPresentation->Dispose();
sourcePresentation->Dispose();
마스터와 함께 일반 슬라이드를 복제하려면 Clone Slides를 확인하십시오.
여러 슬라이드 마스터 추가
프레젠테이션에 여러 마스터 슬라이드를 포함할 수 있습니다. 이는 섹션마다 다른 브랜딩, 페이지 구조 또는 테마 설정이 필요할 때 유용합니다.
다음 예제는 기본 마스터를 복제하고 복제본에 다른 배경을 지정한 뒤, 해당 복제 마스터 아래에 레이아웃을 만들고, 그 레이아웃을 기반으로 새 슬라이드를 추가합니다:
#include <DOM/BackgroundType.h>
#include <DOM/FillType.h>
#include <DOM/IBackground.h>
#include <DOM/IColorFormat.h>
#include <DOM/IFillFormat.h>
#include <DOM/IMasterLayoutSlideCollection.h>
#include <DOM/IMasterSlide.h>
#include <DOM/IMasterSlideCollection.h>
#include <DOM/ISlideCollection.h>
#include <DOM/Presentation.h>
#include <DOM/SlideLayoutType.h>
#include <Export/SaveFormat.h>
#include <drawing/color.h>
using namespace Aspose::Slides;
using namespace Aspose::Slides::Export;
using namespace System::Drawing;

auto presentation = System::MakeObject<Presentation>(u"presentation.pptx");

auto defaultMasterSlide = presentation->get_Master(0);
auto sectionMasterSlide = presentation->get_Masters()->AddClone(defaultMasterSlide);
auto sectionMasterBackgroundColor = System::Drawing::Color::get_LightSteelBlue();

sectionMasterSlide->get_Background()->set_Type(BackgroundType::OwnBackground);
sectionMasterSlide->get_Background()->get_FillFormat()->set_FillType(FillType::Solid);
sectionMasterSlide->get_Background()->get_FillFormat()->get_SolidFillColor()->set_Color(sectionMasterBackgroundColor);

auto sourceBlankLayout = defaultMasterSlide->get_LayoutSlides()->GetByType(SlideLayoutType::Blank);

if (sourceBlankLayout == nullptr)
{
    sourceBlankLayout = defaultMasterSlide->get_LayoutSlide(0);
}

auto sectionBlankLayout = sectionMasterSlide->get_LayoutSlides()->AddClone(sourceBlankLayout);

presentation->get_Slides()->AddEmptySlide(sectionBlankLayout);
presentation->Save(u"presentation-with-multiple-masters.pptx", SaveFormat::Pptx);
presentation->Dispose();
슬라이드 마스터 비교
마스터 슬라이드는 IBaseSlide에서 상속받은 Equals 메서드를 사용해 비교할 수 있습니다. 비교는 도형, 텍스트, 서식, 애니메이션 및 기타 슬라이드 설정과 같은 구조와 정적 콘텐츠를 검사합니다. 슬라이드 ID와 같은 고유 식별자나 현재 날짜와 같은 동적 자리 표시자 값은 비교하지 않습니다.
#include <DOM/IMasterSlide.h>
#include <DOM/IMasterSlideCollection.h>
#include <DOM/Presentation.h>
#include <system/console.h>
using namespace Aspose::Slides;
using namespace System;

auto firstPresentation = System::MakeObject<Presentation>(u"first.pptx");
auto secondPresentation = System::MakeObject<Presentation>(u"second.pptx");
auto firstPresentationMasterCount = firstPresentation->get_Masters()->get_Count();
auto secondPresentationMasterCount = secondPresentation->get_Masters()->get_Count();

for (int32_t firstMasterIndex = 0;
     firstMasterIndex < firstPresentationMasterCount;
     firstMasterIndex++)
{
    for (int32_t secondMasterIndex = 0;
         secondMasterIndex < secondPresentationMasterCount;
         secondMasterIndex++)
    {
        auto firstMasterSlide = firstPresentation->get_Master(firstMasterIndex);
        auto secondMasterSlide = secondPresentation->get_Master(secondMasterIndex);
        auto areMasterSlidesEqual = firstMasterSlide->Equals(secondMasterSlide);

        if (areMasterSlidesEqual)
        {
            System::Console::WriteLine(
                System::String::Format(
                    u"first.pptx master #{0} equals second.pptx master #{1}",
                    firstMasterIndex,
                    secondMasterIndex));
        }
    }
}

secondPresentation->Dispose();
firstPresentation->Dispose();
자세한 내용은 Compare Presentation Slides를 참고하십시오.
슬라이드 마스터 보기를 기본 보기로 설정
ViewProperties의 set_LastView 메서드를 사용하면 PowerPoint가 처음 열 때 보이는 뷰를 제어할 수 있습니다. 다음 예제는 프레젠테이션을 슬라이드 마스터 보기로 엽니다:
#include <DOM/IViewProperties.h>
#include <DOM/Presentation.h>
#include <Export/SaveFormat.h>
#include <ViewType.h>
using namespace Aspose::Slides;
using namespace Aspose::Slides::Export;

auto presentation = System::MakeObject<Presentation>(u"presentation.pptx");

presentation->get_ViewProperties()->set_LastView(ViewType::SlideMasterView);
presentation->Save(u"presentation-master-view.pptx", SaveFormat::Pptx);
presentation->Dispose();
다른 뷰 설정은 Save Presentation를 확인하십시오.
사용되지 않는 마스터 슬라이드 제거
프레젠테이션에 사용되지 않는 마스터 슬라이드가 포함될 수 있습니다. 사용되지 않는 마스터를 제거하면 파일 크기를 줄이고 템플릿 유지 관리가 용이해집니다.
get_Masters() 컬렉션에서 사용되지 않는 마스터를 제거하려면 MasterSlideCollection::RemoveUnused를 사용하십시오:
#include <DOM/IMasterSlideCollection.h>
#include <DOM/Presentation.h>
#include <Export/SaveFormat.h>
using namespace Aspose::Slides;
using namespace Aspose::Slides::Export;

auto presentation = System::MakeObject<Presentation>(u"presentation.pptx");

presentation->get_Masters()->RemoveUnused(true);
presentation->Save(u"presentation-clean.pptx", SaveFormat::Pptx);
presentation->Dispose();
또는 저코드 방법인 Compress::RemoveUnusedMasterSlides 메서드를 사용할 수 있습니다:
#include <DOM/Presentation.h>
#include <Export/SaveFormat.h>
#include <LowCode/Compress.h>
using namespace Aspose::Slides;
using namespace Aspose::Slides::Export;
using namespace Aspose::Slides::LowCode;

auto presentation = System::MakeObject<Presentation>(u"presentation.pptx");

LowCode::Compress::RemoveUnusedMasterSlides(presentation);
presentation->Save(u"presentation-clean.pptx", SaveFormat::Pptx);
presentation->Dispose();
FAQ
슬라이드 마스터와 레이아웃 슬라이드의 차이점은 무엇인가요?
슬라이드 마스터는 테마, 배경, 공통 도형 및 텍스트 스타일과 같은 공유 디자인 설정을 정의합니다. 레이아웃 슬라이드는 마스터에 속하며 자리 표시자의 특정 배열을 정의합니다. 일반 슬라이드는 레이아웃 슬라이드를 사용하므로 레이아웃과 마스터 모두에서 상속받습니다.
하나의 프레젠테이션에 여러 슬라이드 마스터를 포함할 수 있나요?
예. 프레젠테이션에 여러 슬라이드 마스터를 포함할 수 있습니다. 섹션마다 다른 시각 체계나 브랜딩이 필요할 때 여러 마스터를 사용하십시오.
자리 표시자는 마스터 슬라이드에 추가해야 하나요, 레이아웃 슬라이드에 추가해야 하나요?
대부분의 경우 레이아웃 슬라이드에 자리 표시자를 추가합니다. 공유 시각 요소와 공유 서식은 마스터 슬라이드에 두고, 실제 콘텐츠 자리 표시자는 일반 슬라이드가 사용할 레이아웃에 배치하십시오.
여전히 사용 중인 마스터 슬라이드를 삭제할 수 있나요?
아니요. 종속 슬라이드가 있는 마스터 슬라이드는 직접 삭제하면 안 됩니다. 먼저 해당 슬라이드들을 다른 마스터의 레이아웃으로 이동하거나, 사용되지 않은 마스터만 제거하는 정리 방법을 사용하십시오.