
จัดการ Slide Masters ของงานนำเสนอใน C++
ภาพรวม
slide master กำหนดการตั้งค่าการออกแบบที่ใช้ร่วมกันสำหรับกลุ่มสไลด์ สามารถบรรจุรูปร่างทั่วไป โลโก้ พื้นหลัง รูปแบบข้อความ การตั้งค่าธีม และการตั้งค่าลูกหนังสือ ใน PowerPoint การแก้ไข slide master เป็นวิธีปกติในการทำให้การนำเสนอสอดคล้องกันโดยไม่ต้องทำรูปแบบเดียวกันซ้ำบนทุกสไลด์
Aspose.Slides for C++ รองรับโมเดลเดียวกัน การนำเสนอสามารถมี slide master หนึ่งหรือหลายหน้า และแต่ละ slide master สามารถมี layout slide หลายหน้า สไลด์ปกติโดยทั่วไปจะไม่ได้อ้างอิง slide master โดยตรง แต่จะใช้ layout slide ซึ่ง layout slide นั้นเป็นส่วนหนึ่งของ slide master
ลำดับชั้นคือ:
- Slide master – กำหนดการออกแบบและธีมที่ใช้ร่วมกัน
- Layout slide – กำหนดการวางตำแหน่งของ placeholder และการจัดรูปแบบระดับ layout
- Normal slide – มีเนื้อหาการนำเสนอจริงและใช้ layout slide หนึ่งหน้า
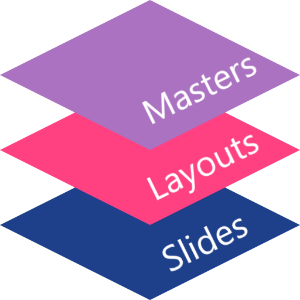
ใน Aspose.Slides slide master แทนด้วยอินเทอร์เฟซ IMasterSlide slide master ทั้งหมดในงานนำเสนอสามารถเข้าถึงได้ผ่านคอลเลกชัน Presentation::get_Masters ซึ่งเป็นการนำไปใช้ของ IMasterSlideCollection
Inheritance
เมื่อคุณสมบัติเดียวกันถูกกำหนดที่ระดับหลายระดับ ระดับที่เจาะจงมากกว่าจะชนะ ตัวอย่างเช่น หาก slide master และ layout slide ทั้งสองกำหนดพื้นหลัง สไลด์ที่อิงจาก layout นั้นจะใช้พื้นหลังของ layout ดูข้อมูลเพิ่มเติมเกี่ยวกับ layout slide ได้ที่ Apply or Change Slide Layoutsการเข้าถึง Slide Masters
ใน PowerPoint คุณสามารถเปิดมุมมอง Slide Master ได้จาก View > Slide Master
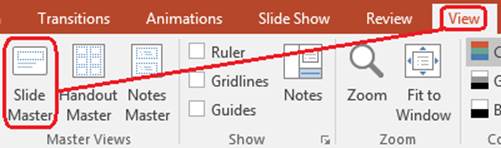
ใน Aspose.Slides ใช้คอลเลกชัน get_Masters() เพื่อเข้าถึง slide master:
#include <DOM/IMasterLayoutSlideCollection.h>
#include <DOM/IMasterSlide.h>
#include <DOM/IMasterSlideCollection.h>
#include <DOM/Presentation.h>
#include <system/console.h>
using namespace Aspose::Slides;
using namespace System;

auto presentation = System::MakeObject<Presentation>(u"presentation.pptx");

auto firstMasterSlide = presentation->get_Master(0);
auto masterSlideCount = presentation->get_Masters()->get_Count();
auto firstMasterLayoutSlideCount = firstMasterSlide->get_LayoutSlides()->get_Count();

System::Console::WriteLine(System::String(u"Master slides: ") + masterSlideCount);
System::Console::WriteLine(System::String(u"Layouts in the first master: ") + firstMasterLayoutSlideCount);

presentation->Dispose();
คุณยังสามารถรับ slide master ที่ใช้โดยสไลด์ปกติผ่าน layout ของมันได้:
#include <DOM/ILayoutSlide.h>
#include <DOM/IMasterSlide.h>
#include <DOM/ISlide.h>
#include <DOM/Presentation.h>
#include <system/console.h>
using namespace Aspose::Slides;
using namespace System;

auto presentation = System::MakeObject<Presentation>(u"presentation.pptx");

auto slide = presentation->get_Slide(0);
auto layoutSlide = slide->get_LayoutSlide();
auto masterSlide = layoutSlide->get_MasterSlide();
auto masterSlideName = masterSlide->get_Name();

System::Console::WriteLine(masterSlideName);

presentation->Dispose();
สิ่งที่ Slide Master มีอยู่
slide master คือวัตถุลักษณะคล้ายสไลด์ มันทำหน้าเป็น IBaseSlide ดังนั้นจึงเปิดเผยคุณสมบัติของสไลด์หลายอย่างที่ใช้โดยสไลด์ปกติและ layout สมาชิกเฉพาะของ master สามารถดูได้ในหน้า API ของ IMasterSlide
สมาชิกของ slide master ที่ใช้บ่อยได้แก่:
| Member | Purpose |
|---|---|
get_Background() |
ตั้งค่าพื้นหลังระดับ master |
get_Shapes() |
เก็บรูปร่างที่วางบน master เช่น โลโก้ เฟรมภาพ และข้อความที่ใช้ร่วมกัน |
get_LayoutSlides() |
เก็บ layout slide ที่เป็นของ master |
get_ThemeManager() |
ให้เข้าถึง API ธีมของ master |
get_HeaderFooterManager() |
ควบคุมหัวกระดาษ, ท้ายกระดาษ, วันที่ และหมายเลขสไลด์สำหรับ master และ layout ลูก |
GetDependingSlides() |
คืนค่าสไลด์ปกติที่พึ่งพา master ผ่าน layout ของมัน |
เพิ่มรูปภาพไปยัง Slide Master
เมื่อคุณเพิ่มรูปภาพไปยัง slide master รูปภาพนั้นจะปรากฏบนสไลด์ที่ใช้ layout จาก master นั้น มีประโยชน์สำหรับโลโก้, โดมน้ำ, แถบตกแต่ง, และองค์ประกอบภาพที่ต้องทำซ้ำ
ตัวอย่างต่อไปนี้เพิ่มโลโก้ไปยัง slide master แรก:
#include <DOM/IImageCollection.h>
#include <DOM/IMasterSlide.h>
#include <DOM/IShapeCollection.h>
#include <DOM/Presentation.h>
#include <DOM/ShapeType.h>
#include <Export/SaveFormat.h>
#include <system/io/file.h>
using namespace Aspose::Slides;
using namespace Aspose::Slides::Export;
using namespace System::IO;

auto presentation = System::MakeObject<Presentation>(u"presentation.pptx");

auto masterSlide = presentation->get_Master(0);
auto logoBytes = System::IO::File::ReadAllBytes(u"logo.png");
auto logoImage = presentation->get_Images()->AddImage(logoBytes);

masterSlide->get_Shapes()->AddPictureFrame(
    ShapeType::Rectangle,
    20.0f,
    20.0f,
    80.0f,
    80.0f,
    logoImage);

presentation->Save(u"presentation-with-logo.pptx", SaveFormat::Pptx);
presentation->Dispose();
ดูข้อมูลเพิ่มเติมเกี่ยวกับ picture frame ได้ที่ Picture Frame
ควบคุมการมองเห็นของกราฟิกจาก Master
ใช้ IBaseSlide::set_ShowMasterShapes เพื่อซ่อนกราฟิกที่สืบทอดจาก master เช่น โลโก้หรือรูปแบบตกแต่งโดยไม่ต้องลบออกจาก master ส่งค่า false ไปยัง Slide::set_ShowMasterShapes บนสไลด์ที่ต้องการซ่อนกราฟิกเหล่านั้น และ true บนสไลด์ที่ต้องการแสดง
ตัวอย่างต่อไปนี้สร้างแถบตกแต่งสีฟ้าบน master และสไลด์สองหน้าที่ใช้ layout เปล่าเดียวกัน แถบจะมองเห็นได้บนสไลด์แรกแต่ซ่อนบนสไลด์ที่สอง ไม่ต้องใช้ไฟล์นำเข้าหรือรูปภาพใด ๆ
#include <DOM/FillType.h>
#include <DOM/IAutoShape.h>
#include <DOM/IColorFormat.h>
#include <DOM/IFillFormat.h>
#include <DOM/ILayoutSlide.h>
#include <DOM/ILineFormat.h>
#include <DOM/IMasterLayoutSlideCollection.h>
#include <DOM/IMasterSlide.h>
#include <DOM/IShapeCollection.h>
#include <DOM/ISlide.h>
#include <DOM/ISlideCollection.h>
#include <DOM/ISlideSize.h>
#include <DOM/Presentation.h>
#include <DOM/ShapeType.h>
#include <DOM/SlideLayoutType.h>
#include <Export/SaveFormat.h>
#include <drawing/color.h>

using namespace Aspose::Slides;
using namespace Aspose::Slides::Export;
using namespace System;
using namespace System::Drawing;

auto presentation = MakeObject<Presentation>();
auto masterSlide = presentation->get_Master(0);
auto layoutSlide = masterSlide->get_LayoutSlides()->GetByType(SlideLayoutType::Blank);
layoutSlide->set_ShowMasterShapes(true);

auto slideHeight = presentation->get_SlideSize()->get_Size().get_Height();
auto band = masterSlide->get_Shapes()->AddAutoShape(ShapeType::Rectangle, 0.0f, 0.0f, 60.0f, slideHeight);
band->get_FillFormat()->set_FillType(FillType::Solid);
band->get_FillFormat()->get_SolidFillColor()->set_Color(Color::get_SteelBlue());
band->get_LineFormat()->get_FillFormat()->set_FillType(FillType::NoFill);

auto visibleSlide = presentation->get_Slide(0);
visibleSlide->set_LayoutSlide(layoutSlide);
visibleSlide->get_Shapes()->Clear();

auto hiddenSlide = presentation->get_Slides()->AddEmptySlide(layoutSlide);

visibleSlide->set_ShowMasterShapes(true);
hiddenSlide->set_ShowMasterShapes(false);

presentation->Save(u"master-graphics.pptx", SaveFormat::Pptx);
presentation->Dispose();
ตัวอย่างใช้ layout Blank ที่มาพร้อมกับการสร้างงานนำเสนอใหม่ และลบ placeholder ของสไลด์แรกออก
เลือกขอบเขตของการตั้งค่า
สไลด์ปกติใช้ master ผ่าน ISlide::get_LayoutSlide และ ILayoutSlide::get_MasterSlide. การตั้งค่าคุณสมบัติบนสไลด์แต่ละอันจะส่งผลต่อสไลด์นั้นเท่านั้น การส่งค่า false ไปยัง LayoutSlide::set_ShowMasterShapes จะซ่อนกราฟิก master สำหรับสไลด์ที่ใช้ layout นั้น แม้ว่าการตั้งค่าของสไลด์เองเป็น true ก็ตาม หากต้องการซ่อนกราฟิกบนสไลด์เดียว ให้เปลี่ยนคุณสมบัติสไลด์และไม่แตะต้อง layout ที่ใช้ร่วมกัน
การตั้งค่านี้ไม่ได้รับการสนับสนุนเป็นการควบคุมการมองเห็นบน slide master ด้วยตัวเอง บน master จะคืนค่า false เสมอ และการกำหนดค่า true จะทำให้เกิด System::NotSupportedException ให้ใช้บนสไลด์ปกติหรือ layout แทน
แยกกราฟิกจากพื้นหลัง
| Operation | Effect |
|---|---|
| Hide master graphics | ควบคุมการมองเห็นของรูปแบบที่สืบทอดจาก master โดยไม่ลบหรือเปลี่ยนรูปร่างของสไลด์ |
| Change the slide background fill | เปลี่ยนสี, ไมโครกราเดียนหรือรูปภาพพื้นหลัง กราฟิก master เป็นรูปร่างแยกต่างหากและสามารถมองเห็นเหนือพื้นหลังนั้นได้ ดู Presentation Background |
| Delete a shape from the master | ลบรูปร่างต้นแบบที่ใช้ร่วมกัน ทำให้ไม่สามารถใช้ได้กับสไลด์ใด ๆ ที่อิง master นี้แล้ว |
ทำงานกับ Placeholder
Placeholder ปกติกำหนดบน layout slide slide master ให้สไตล์และธีมที่ใช้ร่วมกัน ซึ่ง layout จะสืบทอดและกำหนดว่า placeholder ใดบ้างที่ใช้งานและวางไว้ที่ไหน
ใน PowerPoint คำสั่ง placeholder สามารถใช้ได้ในมุมมอง Slide Master
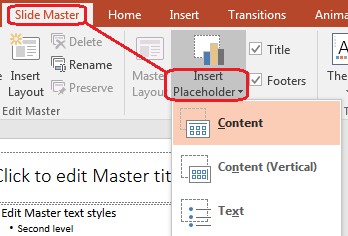
เพื่อเพิ่ม placeholder ใหม่ด้วย Aspose.Slides ให้ทำงานกับ layout slide ที่เป็นของ master:
#include <DOM/ILayoutPlaceholderManager.h>
#include <DOM/ILayoutSlide.h>
#include <DOM/IMasterLayoutSlideCollection.h>
#include <DOM/IMasterSlide.h>
#include <DOM/ISlideCollection.h>
#include <DOM/Presentation.h>
#include <DOM/SlideLayoutType.h>
#include <Export/SaveFormat.h>
using namespace Aspose::Slides;
using namespace Aspose::Slides::Export;

auto presentation = System::MakeObject<Presentation>(u"presentation.pptx");

auto masterSlide = presentation->get_Master(0);
auto blankLayoutSlide = masterSlide->get_LayoutSlides()->GetByType(SlideLayoutType::Blank);

if (blankLayoutSlide == nullptr)
{
    blankLayoutSlide = masterSlide->get_LayoutSlides()->Add(SlideLayoutType::Blank, u"Blank");
}

blankLayoutSlide->get_PlaceholderManager()->AddTextPlaceholder(
    60.0f,
    120.0f,
    600.0f,
    80.0f);

presentation->get_Slides()->AddEmptySlide(blankLayoutSlide);
presentation->Save(u"presentation-with-placeholder.pptx", SaveFormat::Pptx);
presentation->Dispose();
คุณยังสามารถจัดรูปแบบรูปร่าง placeholder ที่มีอยู่บน slide master ได้ ตัวอย่างต่อไปนี้ค้นหา placeholder ของหัวเรื่องและใช้การไล่สีเชิงเส้น:
#include <DOM/FillType.h>
#include <DOM/GradientShape.h>
#include <DOM/IAutoShape.h>
#include <DOM/IFillFormat.h>
#include <DOM/IGradientFormat.h>
#include <DOM/IGradientStopCollection.h>
#include <DOM/IMasterSlide.h>
#include <DOM/IPlaceholder.h>
#include <DOM/IShapeCollection.h>
#include <DOM/PlaceholderType.h>
#include <DOM/Presentation.h>
#include <Export/SaveFormat.h>
#include <drawing/color.h>
using namespace Aspose::Slides;
using namespace Aspose::Slides::Export;
using namespace System::Drawing;

auto presentation = System::MakeObject<Presentation>(u"presentation.pptx");

auto masterSlide = presentation->get_Master(0);
System::SharedPtr<IAutoShape> titlePlaceholder;

for (auto&& shape : masterSlide->get_Shapes())
{
    auto autoShape = System::AsCast<IAutoShape>(shape);

    if (autoShape != nullptr &&
        autoShape->get_Placeholder() != nullptr &&
        autoShape->get_Placeholder()->get_Type() == PlaceholderType::Title)
    {
        titlePlaceholder = autoShape;
        break;
    }
}

if (titlePlaceholder != nullptr)
{
    auto fillFormat = titlePlaceholder->get_FillFormat();
    fillFormat->set_FillType(FillType::Gradient);

    auto gradientFormat = fillFormat->get_GradientFormat();
    gradientFormat->set_GradientShape(GradientShape::Linear);

    auto gradientStops = gradientFormat->get_GradientStops();
    auto redGradientColor = System::Drawing::Color::FromArgb(255, 0, 0);
    auto purpleGradientColor = System::Drawing::Color::FromArgb(128, 0, 128);

    gradientStops->Add(0.0f, redGradientColor);
    gradientStops->Add(255.0f, purpleGradientColor);
}

presentation->Save(u"presentation-title-style.pptx", SaveFormat::Pptx);
presentation->Dispose();
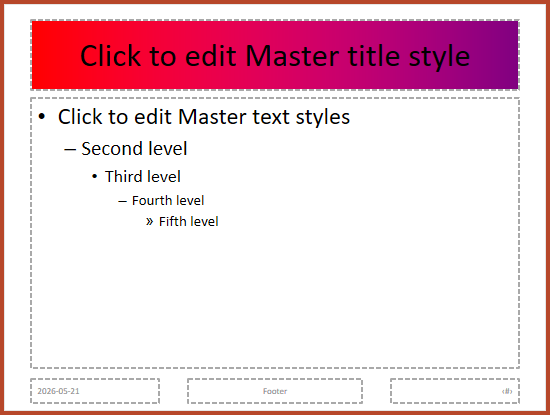
ดูตัวเลือกการจัดรูปแบบ placeholder และข้อความเพิ่มเติมได้ที่ Set Prompt Text in Placeholder และ Text Formatting
เปลี่ยนพื้นหลังของ Slide Master
พื้นหลังของ master จะสืบทอดไปยัง layout และสไลด์ที่ไม่ได้กำหนดทับ ตัวอย่างต่อไปนี้ตั้งค่าสีพื้นหลังชนิดทึบสำหรับ slide master แรก:
#include <DOM/BackgroundType.h>
#include <DOM/FillType.h>
#include <DOM/IBackground.h>
#include <DOM/IColorFormat.h>
#include <DOM/IFillFormat.h>
#include <DOM/IMasterSlide.h>
#include <DOM/Presentation.h>
#include <Export/SaveFormat.h>
#include <drawing/color.h>
using namespace Aspose::Slides;
using namespace Aspose::Slides::Export;
using namespace System::Drawing;

auto presentation = System::MakeObject<Presentation>(u"presentation.pptx");

auto masterSlide = presentation->get_Master(0);
auto masterBackgroundColor = System::Drawing::Color::get_ForestGreen();

masterSlide->get_Background()->set_Type(BackgroundType::OwnBackground);
masterSlide->get_Background()->get_FillFormat()->set_FillType(FillType::Solid);
masterSlide->get_Background()->get_FillFormat()->get_SolidFillColor()->set_Color(masterBackgroundColor);

presentation->Save(u"presentation-master-background.pptx", SaveFormat::Pptx);
presentation->Dispose();
ดูหัวข้อที่เกี่ยวข้องได้ที่ Presentation Background และ Presentation Theme
คัดลอก Slide Master ไปยังงานนำเสนออื่น
ใช้ IMasterSlideCollection::AddClone เพื่อคัดลอก slide master ไปยังงานนำเสนออื่น master ที่คัดลอกแล้วสามารถนำไปใช้โดย layout และสไลด์ในงานนำหมายที่ปลายทางได้
#include <DOM/IMasterSlideCollection.h>
#include <DOM/Presentation.h>
#include <Export/SaveFormat.h>
using namespace Aspose::Slides;
using namespace Aspose::Slides::Export;

auto sourcePresentation = System::MakeObject<Presentation>(u"source.pptx");
auto destinationPresentation = System::MakeObject<Presentation>(u"destination.pptx");

auto sourceMasterSlide = sourcePresentation->get_Master(0);
auto clonedMasterSlide = destinationPresentation->get_Masters()->AddClone(sourceMasterSlide);

destinationPresentation->Save(u"destination-with-master.pptx", SaveFormat::Pptx);
destinationPresentation->Dispose();
sourcePresentation->Dispose();
หากต้องการคัดลอกสไลด์ปกติกับ master ของมันด้วย ดูที่ Clone Slides
เพิ่มหลาย Slide Masters
งานนำเสนอสามารถมีหลาย slide master การใช้ master หลายชุดมีประโยชน์เมื่อส่วนต่าง ๆ ต้องการแบรนด์, โครงสร้างหน้า หรือการตั้งค่าธีมที่ต่างกัน
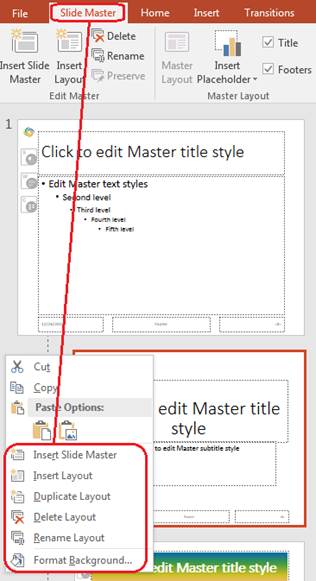
ตัวอย่างต่อไปนี้คัดลอก master เริ่มต้น, ตั้งค่าพื้นหลังที่แตกต่าง, สร้าง layout ใต้ master ที่คัดลอก แล้วเพิ่มสไลด์ใหม่ที่อิงจาก layout นั้น:
#include <DOM/BackgroundType.h>
#include <DOM/FillType.h>
#include <DOM/IBackground.h>
#include <DOM/IColorFormat.h>
#include <DOM/IFillFormat.h>
#include <DOM/IMasterLayoutSlideCollection.h>
#include <DOM/IMasterSlide.h>
#include <DOM/IMasterSlideCollection.h>
#include <DOM/ISlideCollection.h>
#include <DOM/Presentation.h>
#include <DOM/SlideLayoutType.h>
#include <Export/SaveFormat.h>
#include <drawing/color.h>
using namespace Aspose::Slides;
using namespace Aspose::Slides::Export;
using namespace System::Drawing;

auto presentation = System::MakeObject<Presentation>(u"presentation.pptx");

auto defaultMasterSlide = presentation->get_Master(0);
auto sectionMasterSlide = presentation->get_Masters()->AddClone(defaultMasterSlide);
auto sectionMasterBackgroundColor = System::Drawing::Color::get_LightSteelBlue();

sectionMasterSlide->get_Background()->set_Type(BackgroundType::OwnBackground);
sectionMasterSlide->get_Background()->get_FillFormat()->set_FillType(FillType::Solid);
sectionMasterSlide->get_Background()->get_FillFormat()->get_SolidFillColor()->set_Color(sectionMasterBackgroundColor);

auto sourceBlankLayout = defaultMasterSlide->get_LayoutSlides()->GetByType(SlideLayoutType::Blank);

if (sourceBlankLayout == nullptr)
{
    sourceBlankLayout = defaultMasterSlide->get_LayoutSlide(0);
}

auto sectionBlankLayout = sectionMasterSlide->get_LayoutSlides()->AddClone(sourceBlankLayout);

presentation->get_Slides()->AddEmptySlide(sectionBlankLayout);
presentation->Save(u"presentation-with-multiple-masters.pptx", SaveFormat::Pptx);
presentation->Dispose();
เปรียบเทียบ Slide Masters
สามารถเปรียบเทียบ slide master ด้วยเมธอด Equals ที่สืบทอดจาก IBaseSlide การเปรียบเทียบตรวจสอบโครงสร้างและเนื้อหาแบบคงที่ เช่น รูปร่าง, ข้อความ, การจัดรูปแบบ, แอนิเมชัน และการตั้งค่าอื่น ๆ ของสไลด์ ไม่ได้เปรียบเทียบตัวระบุเฉพาะ เช่น slide ID หรือค่าของ placeholder ที่เป็นแบบไดนามิก เช่น วันที่ปัจจุบัน
#include <DOM/IMasterSlide.h>
#include <DOM/IMasterSlideCollection.h>
#include <DOM/Presentation.h>
#include <system/console.h>
using namespace Aspose::Slides;
using namespace System;

auto firstPresentation = System::MakeObject<Presentation>(u"first.pptx");
auto secondPresentation = System::MakeObject<Presentation>(u"second.pptx");
auto firstPresentationMasterCount = firstPresentation->get_Masters()->get_Count();
auto secondPresentationMasterCount = secondPresentation->get_Masters()->get_Count();

for (int32_t firstMasterIndex = 0;
     firstMasterIndex < firstPresentationMasterCount;
     firstMasterIndex++)
{
    for (int32_t secondMasterIndex = 0;
         secondMasterIndex < secondPresentationMasterCount;
         secondMasterIndex++)
    {
        auto firstMasterSlide = firstPresentation->get_Master(firstMasterIndex);
        auto secondMasterSlide = secondPresentation->get_Master(secondMasterIndex);
        auto areMasterSlidesEqual = firstMasterSlide->Equals(secondMasterSlide);

        if (areMasterSlidesEqual)
        {
            System::Console::WriteLine(
                System::String::Format(
                    u"first.pptx master #{0} equals second.pptx master #{1}",
                    firstMasterIndex,
                    secondMasterIndex));
        }
    }
}

secondPresentation->Dispose();
firstPresentation->Dispose();
ดูข้อมูลเพิ่มเติมได้ที่ Compare Presentation Slides
ตั้งค่า Slide Master View เป็นมุมมองเริ่มต้น
ใช้เมธอด set_LastView บน ViewProperties เพื่อกำหนดมุมมองที่ PowerPoint เปิดเป็นแรก ตัวอย่างต่อไปนี้เปิดงานนำเสนอในมุมมอง Slide Master:
#include <DOM/IViewProperties.h>
#include <DOM/Presentation.h>
#include <Export/SaveFormat.h>
#include <ViewType.h>
using namespace Aspose::Slides;
using namespace Aspose::Slides::Export;

auto presentation = System::MakeObject<Presentation>(u"presentation.pptx");

presentation->get_ViewProperties()->set_LastView(ViewType::SlideMasterView);
presentation->Save(u"presentation-master-view.pptx", SaveFormat::Pptx);
presentation->Dispose();
ดูการตั้งค่ามุมมองเพิ่มเติมได้ที่ Save Presentation
ลบ Slide Masters ที่ไม่ได้ใช้
บางครั้งงานนำเสนอมี slide master ที่ไม่ได้ถูกสไลด์ปกติใดใช้ การลบ master ที่ไม่ใช้จะช่วยลดขนาดไฟล์และทำให้การดูแลเทมเพลตง่ายขึ้น
ใช้ MasterSlideCollection::RemoveUnused เพื่อลบ master ที่ไม่ได้ใช้จากคอลเลกชัน get_Masters():
#include <DOM/IMasterSlideCollection.h>
#include <DOM/Presentation.h>
#include <Export/SaveFormat.h>
using namespace Aspose::Slides;
using namespace Aspose::Slides::Export;

auto presentation = System::MakeObject<Presentation>(u"presentation.pptx");

presentation->get_Masters()->RemoveUnused(true);
presentation->Save(u"presentation-clean.pptx", SaveFormat::Pptx);
presentation->Dispose();
คุณยังสามารถใช้เมธอด low‑code Compress::RemoveUnusedMasterSlides ได้:
#include <DOM/Presentation.h>
#include <Export/SaveFormat.h>
#include <LowCode/Compress.h>
using namespace Aspose::Slides;
using namespace Aspose::Slides::Export;
using namespace Aspose::Slides::LowCode;

auto presentation = System::MakeObject<Presentation>(u"presentation.pptx");

LowCode::Compress::RemoveUnusedMasterSlides(presentation);
presentation->Save(u"presentation-clean.pptx", SaveFormat::Pptx);
presentation->Dispose();
FAQ
Slide master กับ layout slide แตกต่างกันอย่างไร?
slide master กำหนดการตั้งค่าการออกแบบที่ใช้ร่วมกัน เช่น ธีม, พื้นหลัง, รูปร่างทั่วไป, และรูปแบบข้อความ layout slide เป็นส่วนหนึ่งของ slide master และกำหนดการจัดเรียง placeholder เฉพาะ สไลด์ปกติใช้ layout slide จึงสืบทอดทั้งจาก layout และ master
งานนำเสนอหนึ่งสามารถมี slide master หลายตัวได้หรือไม่?
ได้ งานนำเสนอสามารถมี slide master หลายตัว ใช้หลาย master เมื่อส่วนต่าง ๆ ต้องการระบบภาพหรือแบรนด์ที่ต่างกัน
ควรเพิ่ม placeholder ไปที่ slide master หรือ layout slide?
ส่วนใหญ่ให้เพิ่ม placeholder ไปที่ layout slide ใส่องค์ประกอบภาพและการกำหนดรูปแบบร่วมบน slide master แล้วใส่ placeholder ของเนื้อหาไว้บน layout ที่สไลด์ปกติจะใช้
สามารถลบ slide master ที่ยังถูกใช้ได้หรือไม่?
ไม่ สามารถลบ slide master ที่มีสไลด์ขึ้นอยู่ได้อย่างปลอดภัย ต้องย้ายสไลด์เหล่านั้นไปยัง layout ของ master อื่นก่อนหรือใช้วิธีทำความสะอาด master ไม่ใช้ที่ลบเฉพาะ master ที่ไม่มีการอ้างอิงเท่านั้น