
새 HTML 내보내기 시스템 - Aspose.Slides.WebExtensions
소개
- 이전 Aspose.Slides API 빌드에서는 PowerPoint를 HTML로 내보낼 때, 결과 HTML이 SVG 마크업과 HTML이 결합된 형태로 나타났습니다. 각 슬라이드는 SVG 컨테이너로 내보내졌습니다.
- 새로운 Aspose.Slides 버전에서는 WebExtensions 시스템을 사용하여 PowerPoint 프레젠테이션을 HTML로 내보낼 때 HTML 내보내기 설정을 사용자 정의하여 최상의 결과를 얻을 수 있습니다.
새로운 WebExtensions 시스템을 사용하면 CSS 클래스와 JavaScript 애니메이션 세트를 포함한 단일 HTML 파일로 전체 프레젠테이션을 내보낼 수 있으며(SVG 없이), 새로운 내보내기 시스템은 내보내기 프로세스를 정의하는 무제한 옵션과 메서드를 제공합니다.
WebExtensions 시스템은 다음과 같은 경우와 상황에서 프레젠테이션을 HTML로 생성하는 데 사용됩니다.
- 사용자 정의 CSS 스타일이나 애니메이션을 사용할 때; 특정 종류의 도형에 대한 마크업을 재정의할 때.
- 문서 구조를 재정의할 때, 예를 들어 페이지 간 사용자 정의 탐색을 구현할 때.
- .html, .css, .js 파일을 사용자 지정 계층 구조가 있는 폴더에 저장할 때, 예를 들어 섹션 이름을 기준으로 슬라이드를 폴더에 내보낼 때.
- 기본적으로 CSS 및 JS 파일을 별도 폴더에 저장한 뒤 HTML 파일에 포함할 때. 이미지와 임베디드 폰트도 별도 파일로 저장됩니다. 다만 HTML 파일에 base64 형식으로 임베드할 수도 있습니다. 리소스의 일부는 파일에 저장하고 다른 리소스는 base64로 HTML에 임베드할 수 있습니다.
PowerPoint를 HTML로 변환하는 예제는 Aspose.Slides.WebExtensions 프로젝트에서 확인할 수 있습니다. 이 프로젝트는 Examples\SinglePageApp와 Examples\MultiPageApp 두 부분으로 구성됩니다. 본 문서에서 사용된 다른 예제도 GitHub 리포지토리에서 찾을 수 있습니다.
템플릿
HTML 내보내기 기능을 더욱 확장하려면 ASP.NET Razor 템플릿 시스템을 사용하는 것을 권장합니다. Presentation 클래스 인스턴스를 템플릿 집합과 함께 사용하면 HTML 문서를 내보내기 결과로 얻을 수 있습니다.
시연
이 예제에서는 프레젠테이션의 텍스트를 HTML로 내보냅니다. 먼저 템플릿을 만들겠습니다:
<!DOCTYPE html>
<body>
    @foreach (Slide slide in Model.Object.Slides)
    {
        foreach (Shape shape in slide.Shapes)
        {
            if(shape is AutoShape)
            {
                ITextFrame textFrame = ((AutoShape)shape).TextFrame;
                <div class="text">@textFrame.Text</div>
            }
        }
    }
</body>
</html>
이 템플릿은 디스크에 shape-template-hello-world.html 파일명으로 저장되며, 다음 단계에서 사용됩니다.
템플릿에서는 프레젠테이션 도형의 텍스트 프레임을 순회하면서 텍스트를 표시합니다. WebDocument를 사용해 HTML 파일을 생성한 뒤 프레젠테이션을 파일에 내보냅니다:
using (Presentation pres = new Presentation())
{
    IAutoShape shape = pres.Slides[0].Shapes.AddAutoShape(ShapeType.Rectangle, 10, 10, 100, 150);
    shape.TextFrame.Text = "Hello World";

    WebDocumentOptions options = new WebDocumentOptions
    {
        TemplateEngine = new RazorTemplateEngine(), // Razor 템플릿 엔진을 사용하려고 합니다. ITemplateEngine을 구현하여 다른 템플릿 엔진을 사용할 수 있습니다
        OutputSaver = new FileOutputSaver() // IOutputSaver 인터페이스를 구현하여 다른 결과 저장자를 사용할 수 있습니다
    };
    WebDocument document = new WebDocument(options);

    // 문서 "input"을 추가합니다 - HTML 문서를 생성하는 데 사용될 소스
    document.Input
        .AddTemplate<Presentation>( // 템플릿은 Presentation을 "model" 객체 (Model.Object) 로 가집니다
        "index", // 템플릿 키 - 템플릿 엔진이 객체 (Presentation)를 디스크에서 로드된 템플릿 ("shape-template-hello-world.html")과 매핑하는 데 필요합니다
        @"custom-templates\shape-template-hello-world.html"); // 앞서 만든 템플릿

    // 출력 추가 - 결과 HTML 문서가 디스크에 내보내질 때 어떻게 보일지
    document.Output.Add(
        "hello-world.html", // 출력 파일 경로
        "index", // 이 파일에 사용할 템플릿 키 (이전 문장에서 설정함)
        pres); // 실제 Model.Object 인스턴스

    document.Save();
}
예를 들어 내보내기 결과에 텍스트 색상을 빨간색으로 바꾸는 CSS 스타일을 추가하고 싶다면 CSS 템플릿을 추가합니다:
.text {
    color: red;
}
그런 다음 입력과 출력에 적용합니다:
using (Presentation pres = new Presentation())
{
    IAutoShape shape = pres.Slides[0].Shapes.AddAutoShape(ShapeType.Rectangle, 10, 10, 100, 150);
    shape.TextFrame.Text = "Hello World";

    WebDocumentOptions options = new WebDocumentOptions { TemplateEngine = new RazorTemplateEngine(), OutputSaver = new FileOutputSaver() };
    WebDocument document = new WebDocument(options);

    document.Input.AddTemplate<Presentation>("index", @"custom-templates\shape-template-hello-world.html");
    document.Input.AddTemplate<Presentation>("styles", @"custom-templates\styles\shape-template-hello-world.css");
    document.Output.Add("hello-world.html", "index", pres);
    document.Output.Add("hello-world.css", "styles", pres);

    document.Save();
}
템플릿과 클래스 text에 스타일 참조를 추가합니다:
<!DOCTYPE html>
<head>
    <link rel="stylesheet" type="text/css" href="hello-world.css" />
</head>
...
</html>
기본 템플릿
WebExtensions은 프레젠테이션을 HTML로 내보내기 위한 두 가지 기본 템플릿 세트를 제공합니다.
- Single-page: 모든 프레젠테이션 내용이 하나의 HTML 파일에 내보내집니다. 이미지, 폰트, 스타일 등 기타 리소스는 별도 파일로 내보내집니다.
- Multi-page: 각 슬라이드가 개별 HTML 파일로 내보내집니다. 리소스 내보내기 논리는 싱글 페이지와 동일합니다.
PresentationExtensions 클래스를 사용하면 템플릿을 이용한 프레젠테이션 내보내기 과정을 간소화할 수 있습니다. PresentationExtensions 클래스는 Presentation 클래스용 확장 메서드 집합을 포함하고 있습니다. 단일 페이지로 내보내려면 Aspose.Slides.WebExtensions 네임스페이스를 포함하고 두 메서드를 호출하면 됩니다. 첫 번째 메서드 ToSinglePageWebDocument는 WebDocument 인스턴스를 생성하고, 두 번째 메서드는 HTML 문서를 저장합니다:
using (Presentation pres = new Presentation("demo.pptx"))
{
    WebDocument document = pres.ToSinglePageWebDocument("templates\\single-page", @"single-page-output");
    document.Save();
}
ToSinglePageWebDocument 메서드는 템플릿 폴더와 내보내기 폴더 두 매개변수를 받을 수 있습니다.
멀티 페이지로 내보내려면 같은 매개변수를 사용해 ToMultiPageWebDocument 메서드를 호출합니다:
using (Presentation pres = new Presentation("demo.pptx"))
{
    WebDocument document = pres.ToMultiPageWebDocument("templates\\multi-page", @"mutil-page-output");
    document.Save();
}
WebExtensions에서는 마크업 생성에 사용되는 각 템플릿이 키에 바인딩됩니다. 키는 템플릿 안에서도 사용할 수 있습니다. 예를 들어 @Include 지시문에서 키를 통해 특정 템플릿을 다른 템플릿에 삽입할 수 있습니다.
텍스트 부분 템플릿을 단락 템플릿 안에서 사용하는 절차를 예시로 보여드립니다. 해당 예시는 Aspose.Slides.WebExtensions 프로젝트의 Templates\common\paragraph.html에서 확인할 수 있습니다. 단락의 부분을 그리기 위해 Razor Engine의 @foreach 지시문으로 순회합니다:
@foreach (Portion portion in contextObject.Portions)
{
    var subModel = Model.SubModel(portion);
    subModel.Local.Put("parentTextFrame", parentTextFrame);
    subModel.Local.Put("tableContent", tableContentFlag);
	@Raw(Include("portion", subModel).ToString().Replace(Environment.NewLine, ""));
}
부분은 자체 템플릿 portion.html과 모델이 생성됩니다. 해당 모델은 출력 paragraph.html 템플릿에 추가됩니다:
@Raw(Include("portion", subModel).ToString().Replace(Environment.NewLine, ""));
각 도형 유형마다 사용자 정의 템플릿을 사용하며, 이는 Aspose.Slides.WebExtensions 프로젝트의 일반 템플릿 집합에 추가됩니다. 템플릿은 ToSinglePageWebDocument와 ToMultiPageWebDocument 메서드에서 결합되어 최종 결과를 제공합니다. 다음은 싱글 페이지와 멀티 페이지 모두에서 사용되는 공통 템플릿입니다.
- templates
+-common
¦ +-scripts: 슬라이드 전환 애니메이션용 JavaScript 스크립트.
¦ +-styles: 공통 CSS 스타일.
+-multi-page: 멀티 페이지 출력용 인덱스, 메뉴, 슬라이드 템플릿.
+-single-page: 싱글 페이지 출력용 인덱스, 슬라이드 템플릿.
모든 템플릿에 대한 공통 부분이 어떻게 바인딩되는지는 PresentationExtensions.AddCommonInputOutput 메서드(여기)에서 확인할 수 있습니다.
기본 템플릿 커스터마이징
공통 모델 템플릿의任意 요소를 수정할 수 있습니다. 예를 들어 표 서식 스타일만 변경하고 싱글 페이지의 다른 스타일은 그대로 유지하고 싶을 때 사용합니다.
기본적으로 Templates\common\table.html이 사용되며, 표는 PowerPoint 표와 동일한 외형을 가집니다. 사용자 정의 CSS 스타일로 표 서식을 변경해 보겠습니다:
.custom-table {
    border: 1px solid black;
}
.custom-table tr:nth-child(even) {background: #CCC}
.custom-table tr:nth-child(odd) {background: #ffb380}
PresentationExtensions.ToSinglePageWebDocument 메서드를 호출하면서 입력 템플릿과 출력 파일 구조를 동일하게 만들 수 있습니다. 이를 위해 ExportCustomTableStyles_AddCommonStructure 메서드를 추가합니다. 이 메서드와 ToSinglePageWebDocument 메서드의 차이는 표와 메인 인덱스 페이지에 대한 표준 템플릿을 추가할 필요가 없으며, 대신 사용자 정의 표 스타일에 대한 참조가 포함됩니다:
private static void ExportCustomTableStyles_AddCommonStructure(
    Presentation pres,
    WebDocument document,
    string templatesPath,
    string outputPath,
    bool embedImages)
{
    AddCommonStylesTemplates(document, templatesPath);

    document.Input.AddTemplate<Slide>("slide", Path.Combine(templatesPath, "slide.html"));
    document.Input.AddTemplate<AutoShape>("autoshape", Path.Combine(templatesPath, "autoshape.html"));
    document.Input.AddTemplate<TextFrame>("textframe", Path.Combine(templatesPath, "textframe.html"));
    document.Input.AddTemplate<Paragraph>("paragraph", Path.Combine(templatesPath, "paragraph.html"));
    document.Input.AddTemplate<Paragraph>("bullet", Path.Combine(templatesPath, "bullet.html"));
    document.Input.AddTemplate<Portion>("portion", Path.Combine(templatesPath, "portion.html"));
    document.Input.AddTemplate<VideoFrame>("videoframe", Path.Combine(templatesPath, "videoframe.html"));
    document.Input.AddTemplate<PictureFrame>("pictureframe", Path.Combine(templatesPath, "pictureframe.html")); ;
    document.Input.AddTemplate<Shape>("shape", Path.Combine(templatesPath, "shape.html"));

    AddSinglePageCommonOutput(pres, document, outputPath);

    AddResourcesOutput(pres, document, embedImages);

    AddScriptsOutput(document, templatesPath);
}
대신 사용자 정의 템플릿을 추가합니다:
using (Presentation pres = new Presentation("table.pptx"))
{
    const string templatesPath = "templates\\single-page";
    const string outputPath = "custom-table-styles";

    var options = new WebDocumentOptions
    {
        TemplateEngine = new RazorTemplateEngine(),
        OutputSaver = new FileOutputSaver(),
        EmbedImages = false
    };

    // 전역 문서 값을 설정합니다
    WebDocument document = new WebDocument(options);
    SetupGlobals(document, options, outputPath);

    // 공통 구조를 추가합니다 (테이블 템플릿 제외)
    ExportCustomTableStyles_AddCommonStructure(pres, document, templatesPath, outputPath, options.EmbedImages);

    // 사용자 정의 테이블 템플릿을 추가합니다
    document.Input.AddTemplate<Table>("table", @"custom-templates\table-custom-style.html");

    // 사용자 정의 테이블 스타일을 추가합니다
    document.Input.AddTemplate<Presentation>("table-custom-style", @"custom-templates\styles\table-custom-style.css");
    document.Output.Add(Path.Combine(outputPath, "table-custom-style.css"), "table-custom-style", pres);

    // 사용자 정의 인덱스를 추가합니다 - 표준 "index.html"을 복사한 것이며, "table-custom-style.css"에 대한 참조를 포함합니다
    document.Input.AddTemplate<Presentation>("index", @"custom-templates\index-table-custom-style.html");

    document.Save();
}
@model TemplateContext<Table>

@{
	Table contextObject = Model.Object;

	var origin = Model.Local.Get<Point>("origin");
	var positionStyle = string.Format("left: {0}px; top: {1}px; width: {2}px; height: {3}px;",
										(int)contextObject.X + origin.X,
										(int)contextObject.Y + origin.Y,
										(int)contextObject.Width,
										(int)contextObject.Height);
}

	<table class="table custom-table" style="@positionStyle">
	@for (int i = 0; i < contextObject.Rows.Count; i++)
	{
		var rowHeight = string.Format("height: {0}px", contextObject.Rows[i].Height);
		<tr style="@rowHeight">
		@for (int j = 0; j < contextObject.Columns.Count; j++)
		{
			var cell = contextObject[j, i];
			if (cell.FirstRowIndex ==  i && cell.FirstColumnIndex == j)
			{
				var spans = cell.IsMergedCell ? string.Format("rowspan=\"{0}\" colspan=\"{1}\"", cell.RowSpan, cell.ColSpan) : "";
				<td width="@cell.Width px" @Raw(spans)>
					@{
						for(int k = 0; k < cell.TextFrame.Paragraphs.Count; k++)
						{
							var para = (Paragraph)cell.TextFrame.Paragraphs[k];

							var subModel = Model.SubModel(para);
							double[] margins = new double[] { cell.MarginLeft, cell.MarginTop, cell.MarginRight, cell.MarginBottom };
							subModel.Local.Put("margins", margins);
							subModel.Local.Put("parent", cell.TextFrame);
							subModel.Local.Put("parentContainerSize", new SizeF((float)cell.Width, (float)cell.Height));
                            subModel.Local.Put("tableContent", true);

							@Include("paragraph", subModel)
						}
					}
				</td>
			}
		}
		</tr>
	}
</table>
Note: 사용자 정의 표 템플릿은 표준 표와 동일한 “table” 키로 추가되었습니다. 따라서 기본 템플릿을 재작성하지 않고 교체할 수 있습니다. 동일한 키를 사용해 기본 구조의 템플릿을 그대로 사용할 수도 있습니다. 예를 들어 표 템플릿 안에 표준 단락 템플릿을 사용하거나 키를 통해 교체할 수 있습니다. index.html에 사용자 정의 표 CSS 스타일에 대한 참조를 포함하려면 다음과 같이 합니다:
<!DOCTYPE html>

<html
    xmlns="http://www.w3.org/1999/xhtml"
    xmlns:svg="http://www.w3.org/2000/svg"
    xmlns:xlink="http://www.w3.org/1999/xlink">
<head>
     ...
    <link rel="stylesheet" type="text/css" href="table-custom-style.css" />
    ...
</head>
<body>
    ...
</body>
</html>
스크래치에서 프로젝트 만들기: 애니메이션 슬라이드 전환
WebExtensions을 사용하면 애니메이션 슬라이드 전환이 포함된 프레젠테이션을 내보낼 수 있습니다. WebDocumentOptions의 AnimateTransitions 속성을 true로 설정하면 됩니다:
WebDocumentOptions options = new WebDocumentOptions
{
    // ... 다른 옵션들
    AnimateTransitions = true
};
다음은 Aspose.Slides와 Aspose.Slides.WebExtensions를 사용해 부드러운 애니메이션 페이지 전환이 가능한 HTML 뷰어를 만들기 위한 새 프로젝트를 만드는 과정입니다. 여기서는 Aspose.Slides의 PDF 가져오기 기능이 필요합니다.
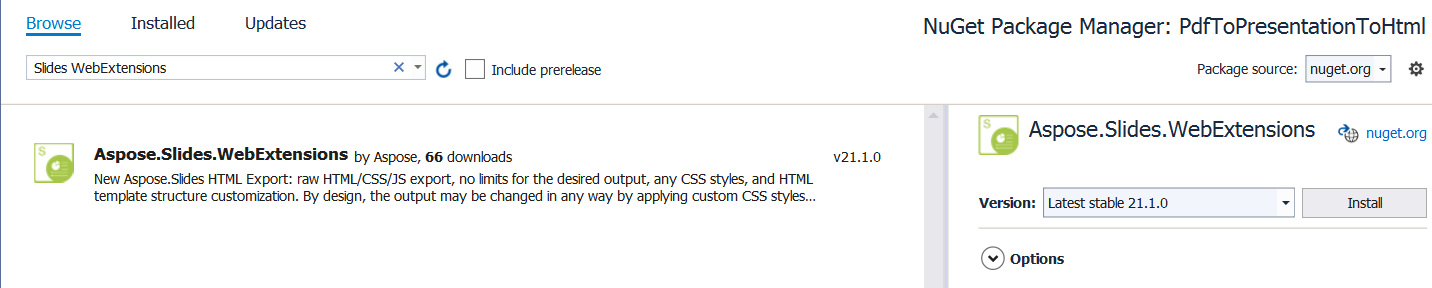
PdfToPresentationToHtml 프로젝트를 만들고 Aspose.Slides.WebExtensions NuGet 패키지를 추가합니다(Aspose.Slides 패키지도 종속성으로 자동 추가됩니다):
우선 PDF 문서를 가져옵니다. 이 문서는 애니메이션이 적용되어 HTML 프레젠테이션으로 내보내집니다:
using (Presentation pres = new Presentation())
{
    pres.Slides.RemoveAt(0);
    pres.Slides.AddFromPdf("sample.pdf");
}
이제 슬라이드 전환을 설정합니다(각 슬라이드는 가져온 PDF 페이지). 샘플 PDF 문서에 9개의 슬라이드가 포함되어 있습니다. 각 슬라이드에 전환 효과를 추가합니다(HTML을 보면서 시연):
pres.Slides[0].SlideShowTransition.Type = TransitionType.Fade;
pres.Slides[1].SlideShowTransition.Type = TransitionType.RandomBar;
pres.Slides[2].SlideShowTransition.Type = TransitionType.Cover;
pres.Slides[3].SlideShowTransition.Type = TransitionType.Dissolve;
pres.Slides[4].SlideShowTransition.Type = TransitionType.Switch;
pres.Slides[5].SlideShowTransition.Type = TransitionType.Pan;
pres.Slides[6].SlideShowTransition.Type = TransitionType.Ferris;
pres.Slides[7].SlideShowTransition.Type = TransitionType.Pull;
pres.Slides[8].SlideShowTransition.Type = TransitionType.Plus;
마지막으로 WebDocument와 AnimateTransitions 속성을 true로 설정해 HTML로 내보냅니다:
WebDocumentOptions options = new WebDocumentOptions
{
    TemplateEngine = new RazorTemplateEngine(),
    OutputSaver = new FileOutputSaver(),
    AnimateTransitions = true
};

WebDocument document = pres.ToSinglePageWebDocument(options, "templates\\single-page", "animated-pdf");
document.Save();
전체 소스 코드 예제:
using (Presentation pres = new Presentation())
{
    pres.Slides.RemoveAt(0);
    pres.Slides.AddFromPdf("sample.pdf");

    pres.Slides[0].SlideShowTransition.Type = TransitionType.Fade;
    pres.Slides[1].SlideShowTransition.Type = TransitionType.RandomBar;
    pres.Slides[2].SlideShowTransition.Type = TransitionType.Cover;
    pres.Slides[3].SlideShowTransition.Type = TransitionType.Dissolve;
    pres.Slides[4].SlideShowTransition.Type = TransitionType.Switch;
    pres.Slides[5].SlideShowTransition.Type = TransitionType.Pan;
    pres.Slides[6].SlideShowTransition.Type = TransitionType.Ferris;
    pres.Slides[7].SlideShowTransition.Type = TransitionType.Pull;
    pres.Slides[8].SlideShowTransition.Type = TransitionType.Plus;

    WebDocumentOptions options = new WebDocumentOptions
    {
        TemplateEngine = new RazorTemplateEngine(),
        OutputSaver = new FileOutputSaver(),
        AnimateTransitions = true
    };

    WebDocument document = pres.ToSinglePageWebDocument(options, "templates\\single-page", "animated-pdf");
    document.Save();
}
이렇게 하면 PDF 문서에서 생성된 애니메이션 페이지 전환이 포함된 HTML을 만들 수 있습니다.