
Hệ thống Xuất HTML mới - Aspose.Slides.WebExtensions
Giới thiệu
- Trong các phiên bản API Aspose.Slides cũ, khi bạn xuất PowerPoint sang HTML, HTML tạo ra được biểu diễn dưới dạng mã SVG kết hợp với HTML. Mỗi slide được xuất dưới dạng một container SVG.
- Trong các phiên bản Aspose.Slides mới, khi bạn sử dụng hệ thống WebExtensions để xuất bài thuyết trình PowerPoint sang HTML, bạn có thể tùy chỉnh các thiết lập xuất HTML để đạt kết quả tốt nhất.
Sử dụng hệ thống WebExtensions mới, bạn có thể xuất toàn bộ bài thuyết trình thành HTML với một tập hợp các lớp CSS và hoạt ảnh JavaScript (không có SVG). Hệ thống xuất mới cũng cung cấp số lượng không giới hạn các tùy chọn và phương thức định nghĩa quy trình xuất.
Hệ thống WebExtensions được sử dụng để tạo HTML từ bài thuyết trình trong các trường hợp và sự kiện sau:
- khi sử dụng các kiểu CSS hoặc hoạt ảnh tùy chỉnh; ghi đè markup cho một số loại hình dạng nhất định.
- khi ghi đè cấu trúc tài liệu, ví dụ: sử dụng điều hướng tùy chỉnh giữa các trang.
- khi lưu các tệp .html, .css, .js vào các thư mục có cấu trúc phân cấp tùy chỉnh, bao gồm các loại tệp cụ thể trong các thư mục khác nhau. Ví dụ, xuất các slide vào một thư mục dựa trên tên phần.
- khi lưu các tệp CSS và JS vào các thư mục riêng biệt theo mặc định và sau đó thêm chúng vào tệp HTML. Hình ảnh và phông chữ nhúng cũng được lưu vào các tệp riêng. Tuy nhiên, chúng có thể được nhúng trong tệp HTML (ở định dạng base64). Bạn có thể lưu một số phần của tài nguyên vào các tệp và nhúng các tài nguyên khác vào HTML dưới dạng base64.
Bạn có thể xem các ví dụ PowerPoint sang HTML trong Aspose.Slides.WebExtensions project trên GitHub. Dự án này chứa 2 phần: Examples\SinglePageApp và Examples\MultiPageApp. Các ví dụ khác được sử dụng trong bài viết này cũng có thể tìm thấy trong repo trên GitHub.
Mẫu
Để mở rộng hơn khả năng xuất HTML, chúng tôi khuyến nghị bạn sử dụng hệ thống mẫu Razor của ASP.NET. Thực thể lớp Presentation có thể được sử dụng cùng với một tập hợp các mẫu để nhận tài liệu HTML như kết quả xuất.
Mô tả
Trong ví dụ này, chúng ta sẽ xuất văn bản từ một bài thuyết trình sang HTML. Đầu tiên, hãy tạo mẫu:
<!DOCTYPE html>
<body>
    @foreach (Slide slide in Model.Object.Slides)
    {
        foreach (Shape shape in slide.Shapes)
        {
            if(shape is AutoShape)
            {
                ITextFrame textFrame = ((AutoShape)shape).TextFrame;
                <div class="text">@textFrame.Text</div>
            }
        }
    }
</body>
</html>
Mẫu này được lưu trên đĩa dưới tên “shape-template-hello-world.html”, sẽ được sử dụng ở bước tiếp theo.
Trong mẫu này, chúng ta lặp qua các khung văn bản trong các hình dạng của bài thuyết trình để hiển thị văn bản. Hãy tạo tệp HTML bằng WebDocument và sau đó xuất Presentation vào tệp:
using (Presentation pres = new Presentation())
{
    IAutoShape shape = pres.Slides[0].Shapes.AddAutoShape(ShapeType.Rectangle, 10, 10, 100, 150);
    shape.TextFrame.Text = "Hello World";

    WebDocumentOptions options = new WebDocumentOptions
    {
        TemplateEngine = new RazorTemplateEngine(), // Chúng tôi dự định sử dụng công cụ mẫu Razor. Các công cụ mẫu khác có thể được sử dụng bằng cách triển khai ITemplateEngine
        OutputSaver = new FileOutputSaver() // Các bộ lưu kết quả khác có thể được sử dụng bằng cách triển khai giao diện IOutputSaver
    };
    WebDocument document = new WebDocument(options);

    // thêm tài liệu "input" - nguồn nào sẽ được sử dụng để tạo tài liệu HTML
    document.Input
        .AddTemplate<Presentation>( // mẫu sẽ có Presentation làm đối tượng "model" (Model.Object)
        "index", // khóa mẫu - cần thiết cho công cụ mẫu để khớp một đối tượng (Presentation) với mẫu được tải từ đĩa ("shape-template-hello-world.html")
        @"custom-templates\shape-template-hello-world.html"); // mẫu chúng tôi đã tạo trước đó

    // thêm đầu ra - cách tài liệu HTML kết quả sẽ trông như thế nào khi được xuất ra đĩa
    document.Output.Add(
        "hello-world.html", // đường dẫn tệp đầu ra
        "index", // khóa mẫu sẽ được sử dụng cho tệp này (chúng tôi đã đặt nó trong câu lệnh trước đó)
        pres); // một thực thể Model.Object thực tế

    document.Save();
}
Ví dụ, chúng ta muốn thêm các kiểu CSS vào kết quả xuất để thay đổi màu văn bản thành đỏ. Hãy thêm mẫu CSS:
.text {
    color: red;
}
Bây giờ, chúng ta chèn nó vào phần đầu vào và đầu ra:
using (Presentation pres = new Presentation())
{
    IAutoShape shape = pres.Slides[0].Shapes.AddAutoShape(ShapeType.Rectangle, 10, 10, 100, 150);
    shape.TextFrame.Text = "Hello World";

    WebDocumentOptions options = new WebDocumentOptions { TemplateEngine = new RazorTemplateEngine(), OutputSaver = new FileOutputSaver() };
    WebDocument document = new WebDocument(options);

    document.Input.AddTemplate<Presentation>("index", @"custom-templates\shape-template-hello-world.html");
    document.Input.AddTemplate<Presentation>("styles", @"custom-templates\styles\shape-template-hello-world.css");
    document.Output.Add("hello-world.html", "index", pres);
    document.Output.Add("hello-world.css", "styles", pres);

    document.Save();
}
Thêm tham chiếu tới các kiểu vào mẫu và lớp “text”:
<!DOCTYPE html>
<head>
    <link rel="stylesheet" type="text/css" href="hello-world.css" />
</head>
...
</html>
Mẫu mặc định
WebExtensions cung cấp 2 bộ mẫu cơ bản để xuất bài thuyết trình sang HTML:
- Single-page: tất cả nội dung bài thuyết trình được xuất vào một tệp HTML duy nhất. Tất cả các tài nguyên khác (hình ảnh, phông chữ, kiểu dáng, v.v.) được xuất vào các tệp riêng.
- Multi-page: mỗi slide của bài thuyết trình được xuất vào một tệp HTML riêng. Logic mặc định để xuất tài nguyên giống như trong chế độ single-page.
Lớp PresentationExtensions có thể được sử dụng để đơn giản hoá quy trình xuất bài thuyết trình bằng các mẫu. Lớp PresentationExtensions chứa một tập hợp các phương thức mở rộng cho lớp Presentation. Để xuất một bài thuyết trình thành một trang duy nhất, chỉ cần thêm không gian tên Aspose.Slides.WebExtensions và gọi hai phương thức. Phương thức đầu tiên, ToSinglePageWebDocument, tạo một thực thể WebDocument. Phương thức thứ hai lưu tài liệu HTML:
using (Presentation pres = new Presentation("demo.pptx"))
{
    WebDocument document = pres.ToSinglePageWebDocument("templates\\single-page", @"single-page-output");
    document.Save();
}
Phương thức ToSinglePageWebDocument có thể nhận hai tham số: thư mục mẫu và thư mục xuất.
Để xuất bài thuyết trình thành đa trang, sử dụng phương thức ToMultiPageWebDocument với cùng các tham số:
using (Presentation pres = new Presentation("demo.pptx"))
{
    WebDocument document = pres.ToMultiPageWebDocument("templates\\multi-page", @"mutil-page-output");
    document.Save();
}
Trong WebExtensions, mỗi mẫu dùng để tạo markup được ràng buộc với một khoá. Khoá có thể được sử dụng trong các mẫu. Ví dụ, trong chỉ thị @Include, bạn có thể chèn một mẫu nhất định vào mẫu khác bằng khoá.
Chúng tôi có thể minh hoạ quy trình này bằng ví dụ về việc sử dụng mẫu phần văn bản trong mẫu đoạn. Bạn có thể tìm ví dụ trong dự án Aspose.Slides.WebExtensions: Templates\common\paragraph.html. Để vẽ các phần trong một đoạn, chúng ta lặp chúng bằng chỉ thị @foreach của Razor Engine:
@foreach (Portion portion in contextObject.Portions)
{
    var subModel = Model.SubModel(portion);
    subModel.Local.Put("parentTextFrame", parentTextFrame);
    subModel.Local.Put("tableContent", tableContentFlag);
	@Raw(Include("portion", subModel).ToString().Replace(Environment.NewLine, ""));
}
Phần có mẫu riêng portion.html và một mô hình được tạo cho nó. Mô hình đó sẽ được thêm vào mẫu output paragraph.html:
@Raw(Include("portion", subModel).ToString().Replace(Environment.NewLine, ""));
Đối với mỗi loại hình dạng, chúng ta sử dụng một mẫu tùy chỉnh, được thêm vào tập hợp mẫu chung từ dự án Aspose.Slides.WebExtensions. Các mẫu được kết hợp trong các phương thức ToSinglePageWebDocument và ToMultiPageWebDocument để tạo ra kết quả cuối cùng. Đây là các mẫu chung được sử dụng trong cả single-page và multi-page:
- templates
+-common
¦ +-scripts: các script javascript cho hoạt ảnh chuyển đổi slide, như ví dụ.
¦ +-styles: các kiểu CSS chung.
+-multi-page: index, menu, slide templates cho đầu ra đa trang.
+-single-page: index, slide templates cho đầu ra một trang.
Bạn có thể xem cách phần chung được ràng buộc cho tất cả các mẫu trong phương thức PresentationExtensions.AddCommonInputOutput tại đây.
Tùy chỉnh mẫu mặc định
Bạn có thể sửa đổi bất kỳ thành phần nào trong mẫu của mô hình chung. Ví dụ, bạn có thể muốn thay đổi các kiểu định dạng bảng nhưng vẫn giữ nguyên các kiểu khác của trang đơn.
Mặc định, mẫu Templates\common\table.html được sử dụng, và bảng có cùng giao diện với bảng trong PowerPoint. Hãy thay đổi định dạng bảng bằng các kiểu CSS tùy chỉnh:
.custom-table {
    border: 1px solid black;
}
.custom-table tr:nth-child(even) {background: #CCC}
.custom-table tr:nth-child(odd) {background: #ffb380}
Chúng ta có thể tạo cùng cấu trúc các mẫu đầu vào và các tệp đầu ra (như khi được tạo) trong khi gọi phương thức PresentationExtensions.ToSinglePageWebDocument. Hãy thêm phương thức ExportCustomTableStyles_AddCommonStructure cho việc này. Sự khác nhau giữa phương thức này và phương thức ToSinglePageWebDocument—chúng ta không cần thêm mẫu chuẩn cho bảng và trang chỉ mục chính (nó sẽ được thay thế để chèn tham chiếu tới các kiểu bảng tùy chỉnh):
private static void ExportCustomTableStyles_AddCommonStructure(
    Presentation pres,
    WebDocument document,
    string templatesPath,
    string outputPath,
    bool embedImages)
{
    AddCommonStylesTemplates(document, templatesPath);

    document.Input.AddTemplate<Slide>("slide", Path.Combine(templatesPath, "slide.html"));
    document.Input.AddTemplate<AutoShape>("autoshape", Path.Combine(templatesPath, "autoshape.html"));
    document.Input.AddTemplate<TextFrame>("textframe", Path.Combine(templatesPath, "textframe.html"));
    document.Input.AddTemplate<Paragraph>("paragraph", Path.Combine(templatesPath, "paragraph.html"));
    document.Input.AddTemplate<Paragraph>("bullet", Path.Combine(templatesPath, "bullet.html"));
    document.Input.AddTemplate<Portion>("portion", Path.Combine(templatesPath, "portion.html"));
    document.Input.AddTemplate<VideoFrame>("videoframe", Path.Combine(templatesPath, "videoframe.html"));
    document.Input.AddTemplate<PictureFrame>("pictureframe", Path.Combine(templatesPath, "pictureframe.html")); ;
    document.Input.AddTemplate<Shape>("shape", Path.Combine(templatesPath, "shape.html"));

    AddSinglePageCommonOutput(pres, document, outputPath);

    AddResourcesOutput(pres, document, embedImages);

    AddScriptsOutput(document, templatesPath);
}
Thêm một mẫu tùy chỉnh thay thế:
using (Presentation pres = new Presentation("table.pptx"))
{
    const string templatesPath = "templates\\single-page";
    const string outputPath = "custom-table-styles";

    var options = new WebDocumentOptions
    {
        TemplateEngine = new RazorTemplateEngine(),
        OutputSaver = new FileOutputSaver(),
        EmbedImages = false
    };

    // cài đặt giá trị toàn cục cho tài liệu
    WebDocument document = new WebDocument(options);
    SetupGlobals(document, options, outputPath);

    // thêm cấu trúc chung (ngoại trừ mẫu bảng)
    ExportCustomTableStyles_AddCommonStructure(pres, document, templatesPath, outputPath, options.EmbedImages);

    // thêm mẫu bảng tùy chỉnh
    document.Input.AddTemplate<Table>("table", @"custom-templates\table-custom-style.html");

    // thêm kiểu bảng tùy chỉnh
    document.Input.AddTemplate<Presentation>("table-custom-style", @"custom-templates\styles\table-custom-style.css");
    document.Output.Add(Path.Combine(outputPath, "table-custom-style.css"), "table-custom-style", pres);

    // thêm chỉ mục tùy chỉnh - chỉ là bản sao của "index.html" tiêu chuẩn, nhưng bao gồm tham chiếu tới "table-custom-style.css"
    document.Input.AddTemplate<Presentation>("index", @"custom-templates\index-table-custom-style.html");

    document.Save();
}
@model TemplateContext<Table>

@{
	Table contextObject = Model.Object;

	var origin = Model.Local.Get<Point>("origin");
	var positionStyle = string.Format("left: {0}px; top: {1}px; width: {2}px; height: {3}px;",
										(int)contextObject.X + origin.X,
										(int)contextObject.Y + origin.Y,
										(int)contextObject.Width,
										(int)contextObject.Height);
}

	<table class="table custom-table" style="@positionStyle">
	@for (int i = 0; i < contextObject.Rows.Count; i++)
	{
		var rowHeight = string.Format("height: {0}px", contextObject.Rows[i].Height);
		<tr style="@rowHeight">
		@for (int j = 0; j < contextObject.Columns.Count; j++)
		{
			var cell = contextObject[j, i];
			if (cell.FirstRowIndex ==  i && cell.FirstColumnIndex == j)
			{
				var spans = cell.IsMergedCell ? string.Format("rowspan=\"{0}\" colspan=\"{1}\"", cell.RowSpan, cell.ColSpan) : "";
				<td width="@cell.Width px" @Raw(spans)>
					@{
						for(int k = 0; k < cell.TextFrame.Paragraphs.Count; k++)
						{
							var para = (Paragraph)cell.TextFrame.Paragraphs[k];

							var subModel = Model.SubModel(para);
							double[] margins = new double[] { cell.MarginLeft, cell.MarginTop, cell.MarginRight, cell.MarginBottom };
							subModel.Local.Put("margins", margins);
							subModel.Local.Put("parent", cell.TextFrame);
							subModel.Local.Put("parentContainerSize", new SizeF((float)cell.Width, (float)cell.Height));
                            subModel.Local.Put("tableContent", true);

							@Include("paragraph", subModel)
						}
					}
				</td>
			}
		}
		</tr>
	}
</table>
Lưu ý rằng mẫu bảng tùy chỉnh được thêm với cùng khoá “table” như bảng chuẩn. Do đó, bạn có thể thay thế một mẫu mặc định nhất định mà không cần viết lại toàn bộ. Bạn cũng có thể sử dụng các mẫu từ cấu trúc mặc định với cùng các khoá. Ví dụ, bạn có thể sử dụng một mẫu đoạn chuẩn trong mẫu bảng; bạn cũng có thể thay thế nó bằng khoá tương tự.
Bạn cũng có thể dùng index.html để chèn tham chiếu tới các kiểu CSS bảng tùy chỉnh vào nó:
<!DOCTYPE html>

<html
    xmlns="http://www.w3.org/1999/xhtml"
    xmlns:svg="http://www.w3.org/2000/svg"
    xmlns:xlink="http://www.w3.org/1999/xlink">
<head>
     ...
    <link rel="stylesheet" type="text/css" href="table-custom-style.css" />
    ...
</head>
<body>
    ...
</body>
</html>
Tạo dự án từ đầu: Chuyển đổi slide có hoạt ảnh
WebExtensions cho phép bạn xuất bài thuyết trình với các chuyển đổi slide có hoạt ảnh—bạn chỉ cần đặt thuộc tính AnimateTransitions trong WebDocumentOptions thành true:
WebDocumentOptions options = new WebDocumentOptions
{
    // ... các tùy chọn khác
    AnimateTransitions = true
};
Hãy tạo một dự án mới sử dụng Aspose.Slides và Aspose.Slides.WebExtensions để tạo trình xem HTML cho PDF với các chuyển đổi trang mượt mà. Ở đây, chúng ta cần sử dụng tính năng nhập PDF của Aspose.Slides.
Tạo dự án PdfToPresentationToHtml và thêm gói NuGet Aspose.Slides.WebExtensions (gói Aspose.Slides sẽ cũng được thêm làm phụ thuộc):
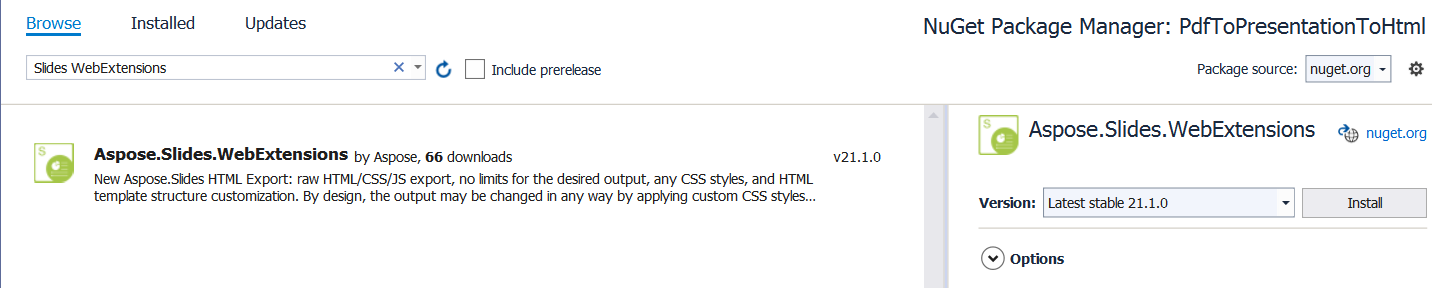
Bắt đầu bằng việc nhập tài liệu PDF, tài liệu sẽ được hoạt ảnh và xuất thành một bài thuyết trình HTML:
using (Presentation pres = new Presentation())
{
    pres.Slides.RemoveAt(0);
    pres.Slides.AddFromPdf("sample.pdf");
}
Bây giờ, chúng ta có thể thiết lập các chuyển đổi slide có hoạt ảnh (mỗi slide là một trang PDF đã nhập). Chúng tôi đã sử dụng 9 slide trong tài liệu PDF mẫu. Hãy thêm chuyển đổi slide vào từng slide (trình diễn khi xem HTML):
pres.Slides[0].SlideShowTransition.Type = TransitionType.Fade;
pres.Slides[1].SlideShowTransition.Type = TransitionType.RandomBar;
pres.Slides[2].SlideShowTransition.Type = TransitionType.Cover;
pres.Slides[3].SlideShowTransition.Type = TransitionType.Dissolve;
pres.Slides[4].SlideShowTransition.Type = TransitionType.Switch;
pres.Slides[5].SlideShowTransition.Type = TransitionType.Pan;
pres.Slides[6].SlideShowTransition.Type = TransitionType.Ferris;
pres.Slides[7].SlideShowTransition.Type = TransitionType.Pull;
pres.Slides[8].SlideShowTransition.Type = TransitionType.Plus;
Cuối cùng, hãy xuất ra HTML bằng WebDocument với thuộc tính AnimateTransitions được đặt thành true:
WebDocumentOptions options = new WebDocumentOptions
{
    TemplateEngine = new RazorTemplateEngine(),
    OutputSaver = new FileOutputSaver(),
    AnimateTransitions = true
};

WebDocument document = pres.ToSinglePageWebDocument(options, "templates\\single-page", "animated-pdf");
document.Save();
Mã nguồn mẫu đầy đủ:
using (Presentation pres = new Presentation())
{
    pres.Slides.RemoveAt(0);
    pres.Slides.AddFromPdf("sample.pdf");

    pres.Slides[0].SlideShowTransition.Type = TransitionType.Fade;
    pres.Slides[1].SlideShowTransition.Type = TransitionType.RandomBar;
    pres.Slides[2].SlideShowTransition.Type = TransitionType.Cover;
    pres.Slides[3].SlideShowTransition.Type = TransitionType.Dissolve;
    pres.Slides[4].SlideShowTransition.Type = TransitionType.Switch;
    pres.Slides[5].SlideShowTransition.Type = TransitionType.Pan;
    pres.Slides[6].SlideShowTransition.Type = TransitionType.Ferris;
    pres.Slides[7].SlideShowTransition.Type = TransitionType.Pull;
    pres.Slides[8].SlideShowTransition.Type = TransitionType.Plus;

    WebDocumentOptions options = new WebDocumentOptions
    {
        TemplateEngine = new RazorTemplateEngine(),
        OutputSaver = new FileOutputSaver(),
        AnimateTransitions = true
    };

    WebDocument document = pres.ToSinglePageWebDocument(options, "templates\\single-page", "animated-pdf");
    document.Save();
}
Đó là tất cả những gì bạn cần để tạo HTML với các chuyển đổi trang có hoạt ảnh được sinh ra từ tài liệu PDF.