
ระบบส่งออก HTML ใหม่ - Aspose.Slides.WebExtensions
บทนำ
- ในรุ่นเก่าของ Aspose.Slides API เมื่อคุณส่งออก PowerPoint เป็น HTML HTML ที่ได้จะถูกแสดงเป็น markup SVG ร่วมกับ HTML แต่ละสไลด์จะถูกส่งออกเป็นคอนเทนเนอร์ SVG
- ในเวอร์ชันใหม่ของ Aspose.Slides เมื่อคุณใช้ระบบ WebExtensions สำหรับการส่งออกงานนำเสนอ PowerPoint เป็น HTML คุณสามารถปรับแต่งการตั้งค่าการส่งออก HTML เพื่อให้ได้ผลลัพธ์ที่ดีที่สุด
โดยใช้ระบบ WebExtensions ใหม่ คุณสามารถส่งออกงานนำเสนอทั้งหมดเป็น HTML พร้อมชุดคลาส CSS และแอนิเมชัน JavaScript (โดยไม่มี SVG) ระบบส่งออกใหม่ยังให้ตัวเลือกและเมธอดที่ไม่มีขีดจำกัดในการกำหนดกระบวนการส่งออก
ระบบ WebExtensions จะถูกใช้เพื่อสร้าง HTML จากงานนำเสนอในกรณีและเหตุการณ์ต่อไปนี้
- เมื่อใช้สไตล์ CSS หรือแอนิเมชันที่กำหนดเอง; การแทนที่ markup สำหรับชนิดของรูปร่างบางประเภท
- เมื่อแทนที่โครงสร้างเอกสาร เช่น การนำทางระหว่างหน้าแบบกำหนดเอง
- เมื่อบันทึกไฟล์ .html, .css, .js ลงในโฟลเดอร์ที่มีลำดับชั้นกำหนดเอง รวมถึงไฟล์ประเภทเฉพาะในโฟลเดอร์ต่าง ๆ ตัวอย่างเช่น การส่งออกสไลด์ไปยังโฟลเดอร์ตามชื่อส่วน
- เมื่อบันทึกไฟล์ CSS และ JS ลงในโฟลเดอร์แยกโดยค่าเริ่มต้นแล้วนำไปเชื่อมต่อกับไฟล์ HTML ภาพและฟอนต์ที่ฝังอยู่ก็จะบันทึกเป็นไฟล์แยกเช่นกัน อย่างไรก็ตามสามารถฝังลงในไฟล์ HTML (รูปแบบ base64) ได้ คุณสามารถบันทึกส่วนของทรัพยากรบางอย่างลงไฟล์และฝังทรัพยากรอื่นเป็น base64
คุณสามารถดูตัวอย่าง PowerPoint เป็น HTML ในโครงการ Aspose.Slides.WebExtensionsบน GitHub โครงการนี้ประกอบด้วย 2 ส่วน: Examples\SinglePageApp และ Examples\MultiPageApp ตัวอย่างอื่น ๆ ที่ใช้ในบทความนี้ก็สามารถพบได้ใน repo ของ GitHub
แม่แบบ
เพื่อขยายความสามารถของการส่งออก HTML ให้มากยิ่งขึ้น เราแนะนำให้คุณใช้ระบบเทมแพลต์ Razor ของ ASP.NET เทมแพลต์ Presentation (https://reference.aspose.com/slides/th/net/aspose.slides/presentation) สามารถใช้ร่วมกับชุดเทมแพลต์เพื่อให้ได้เอกสาร HTML เป็นผลลัพธ์การส่งออก
การสาธิต
ในตัวอย่างนี้ เราจะส่งออกข้อความจากงานนำเสนอเป็น HTML ก่อนอื่นให้สร้างเทมแพลต์ต่อไปนี้:
<!DOCTYPE html>
<body>
    @foreach (Slide slide in Model.Object.Slides)
    {
        foreach (Shape shape in slide.Shapes)
        {
            if(shape is AutoShape)
            {
                ITextFrame textFrame = ((AutoShape)shape).TextFrame;
                <div class="text">@textFrame.Text</div>
            }
        }
    }
</body>
</html>
เทมแพลต์นี้จะถูกบันทึกลงดิสก์เป็น “shape-template-hello-world.html” ซึ่งจะใช้ในขั้นตอนต่อไป
ในเทมแพลต์นี้ เราจะวนลูป text frames ในรูปร่างของงานนำเสนอเพื่อแสดงข้อความ จากนั้นให้สร้างไฟล์ HTML ด้วย WebDocument แล้วส่งออก Presentation ลงในไฟล์:
using (Presentation pres = new Presentation())
{
    IAutoShape shape = pres.Slides[0].Shapes.AddAutoShape(ShapeType.Rectangle, 10, 10, 100, 150);
    shape.TextFrame.Text = "Hello World";

    WebDocumentOptions options = new WebDocumentOptions
    {
        TemplateEngine = new RazorTemplateEngine(), // เราตั้งใจใช้เครื่องยนต์เทมเพลต Razor. สามารถใช้เครื่องยนต์เทมเพลตอื่นได้โดยการทำตาม ITemplateEngine
        OutputSaver = new FileOutputSaver() // สามารถใช้ตัวบันทึกผลลัพธ์อื่นได้โดยการทำตาม IOutputSaver interface
    };
    WebDocument document = new WebDocument(options);

    // เพิ่มเอกสาร "input" - แหล่งข้อมูลใดที่จะใช้ในการสร้างเอกสาร HTML
    document.Input
        .AddTemplate<Presentation>( // เทมเพลตจะมี Presentation เป็นอ็อบเจกต์ "model" (Model.Object)
        "index", // คีย์เทมเพลต - จำเป็นสำหรับเครื่องยนต์เทมเพลตเพื่อจับคู่อ็อบเจกต์ (Presentation) กับเทมเพลตที่โหลดจากดิสก์ ("shape-template-hello-world.html")
        @"custom-templates\shape-template-hello-world.html"); // เทมเพลตที่เราสร้างไว้ก่อนหน้า

    // เพิ่มผลลัพธ์ - ลักษณะของเอกสาร HTML ที่ได้เมื่อส่งออกไปยังดิสก์
    document.Output.Add(
        "hello-world.html", // เส้นทางไฟล์ผลลัพธ์
        "index", // คีย์เทมเพลตที่จะใช้สำหรับไฟล์นี้ (เราตั้งไว้ในคำสั่งก่อนหน้า)
        pres); // อ็อบเจกต์ Model.Object ที่แท้จริง

    document.Save();
}
เช่น เราต้องการเพิ่มสไตล์ CSS ให้ผลลัพธ์การส่งออกเพื่อเปลี่ยนสีข้อความเป็นสีแดง ให้เพิ่มเทมแพลต์ CSS:
.text {
    color: red;
}
จากนั้นให้ใส่เข้าไปในอินพุตและเอาต์พุต:
using (Presentation pres = new Presentation())
{
    IAutoShape shape = pres.Slides[0].Shapes.AddAutoShape(ShapeType.Rectangle, 10, 10, 100, 150);
    shape.TextFrame.Text = "Hello World";

    WebDocumentOptions options = new WebDocumentOptions { TemplateEngine = new RazorTemplateEngine(), OutputSaver = new FileOutputSaver() };
    WebDocument document = new WebDocument(options);

    document.Input.AddTemplate<Presentation>("index", @"custom-templates\shape-template-hello-world.html");
    document.Input.AddTemplate<Presentation>("styles", @"custom-templates\styles\shape-template-hello-world.css");
    document.Output.Add("hello-world.html", "index", pres);
    document.Output.Add("hello-world.css", "styles", pres);

    document.Save();
}
เพิ่มการอ้างอิงสไตล์ลงในเทมแพลต์และคลาส “text”:
<!DOCTYPE html>
<head>
    <link rel="stylesheet" type="text/css" href="hello-world.css" />
</head>
...
</html>
แม่แบบเริ่มต้น
WebExtensions มีชุดเทมแพลต์พื้นฐาน 2 ชุดสำหรับการส่งออกงานนำเสนอเป็น HTML
- หน้าเดียว: เนื้อหาทั้งหมดของงานนำเสนอจะถูกส่งออกเป็นไฟล์ HTML ไฟล์เดียว ทรัพยากรอื่น ๆ (รูปภาพ, ฟอนต์, สไตล์ ฯลฯ) จะถูกส่งออกเป็นไฟล์แยก
- หลายหน้า: แต่ละสไลด์ของงานนำเสนอจะถูกส่งออกเป็นไฟล์ HTML แยกกัน โลจิกการส่งออกทรัพยากรเริ่มต้นเหมือนกับหน้าเดียว
คลาส PresentationExtensions สามารถใช้เพื่อทำให้กระบวนการส่งออกงานนำเร็วขึ้นด้วยเทมแพลต์ คลาส PresentationExtensions มีชุดเมธอดส่วนขยายสำหรับคลาส Presentation เพื่อส่งออกงานนำเสนอเป็นหน้าเดียว เพียงแค่รวมเนมสเปซ Aspose.Slides.WebExtensions แล้วเรียกเมธอดสองตัว เมธอดแรก ToSinglePageWebDocument สร้างอินสแตนซ์ WebDocument เมธอดที่สองบันทึกเอกสาร HTML:
using (Presentation pres = new Presentation("demo.pptx"))
{
    WebDocument document = pres.ToSinglePageWebDocument("templates\\single-page", @"single-page-output");
    document.Save();
}
เมธอด ToSinglePageWebDocument สามารถรับพารามิเตอร์สองค่าได้: โฟลเดอร์เทมแพลต์และโฟลเดอร์ส่งออก
เพื่อส่งออกงานนำเสนอเป็นหลายหน้า ให้ใช้เมธอด ToMultiPageWebDocument พร้อมพารามิเตอร์เดียวกัน:
using (Presentation pres = new Presentation("demo.pptx"))
{
    WebDocument document = pres.ToMultiPageWebDocument("templates\\multi-page", @"mutil-page-output");
    document.Save();
}
ใน WebExtensions เทมแพลต์แต่ละอันที่ใช้สำหรับการสร้าง markup จะถูกผูกกับคีย์ คีย์นี้สามารถใช้ในเทมแพลต์ได้ ตัวอย่างเช่น ในไดเร็กทีฟ @Include คุณสามารถแทรกเทมแพลต์หนึ่งไปยังอีกเทมแพลต์โดยใช้คีย์
เราสามารถสาธิตกระบวนการนี้ด้วยตัวอย่างการใช้เทมแพลต์ส่วนข้อความภายในเทมแพลต์ย่อหน้า คุณสามารถพบตัวอย่างในโครงการ Aspose.Slides.WebExtensions: Templates\common\paragraph.html การวาดส่วนในย่อหน้าจะวนลูปด้วยไดเร็กทีฟ @foreach ของ Razor Engine:
@foreach (Portion portion in contextObject.Portions)
{
    var subModel = Model.SubModel(portion);
    subModel.Local.Put("parentTextFrame", parentTextFrame);
    subModel.Local.Put("tableContent", tableContentFlag);
	@Raw(Include("portion", subModel).ToString().Replace(Environment.NewLine, ""));
}
ส่วนย่อหน้ามีเทมแพลต์ของตนเอง portion.html และโมเดลจะถูกสร้างสำหรับมัน โมเดลนั้นจะถูกเพิ่มลงในเทมแพลต์ output paragraph.html:
@Raw(Include("portion", subModel).ToString().Replace(Environment.NewLine, ""));
สำหรับแต่ละชนิดของรูปร่าง เราใช้เทมแพลต์กำหนดเอง ซึ่งจะถูกเพิ่มเข้าไปในชุดเทมแพลต์ทั่วไปจากโครงการ Aspose.Slides.WebExtensions เทมแพลต์เหล่านี้จะถูกรวมในเมธอด ToSinglePageWebDocument และ ToMultiPageWebDocument เพื่อให้ได้ผลลัพธ์สุดท้าย เหล่านี้คือเทมแพลต์ที่ใช้ร่วมกันในหน้าเดียวและหลายหน้า:
- templates
+-common
¦ +-scripts: สคริปต์ JavaScript สำหรับแอนิเมชันการเปลี่ยนสไลด์
¦ +-styles: สไตล์ CSS ทั่วไป
+-multi-page: index, menu, slide templates สำหรับเอาต์พุตหลายหน้า
+-single-page: index, slide templates สำหรับเอาต์พุตหน้าเดียว
คุณสามารถดูว่าบางส่วนที่ใช้ร่วมกันถูกผูกกับเทมแพลต์ทั้งหมดได้ในเมธอด PresentationExtensions.AddCommonInputOutput ที่นี่
การปรับแต่งแม่แบบเริ่มต้น
คุณสามารถแก้ไของค์ประกอบใด ๆ ในเทมแพลต์ของโมเดลทั่วไปได้ ตัวอย่างเช่น หากต้องการเปลี่ยนสไตล์การจัดรูปแบบตารางแต่ต้องการให้สไตล์อื่น ๆ ของหน้าเดียวคงเดิม
โดยค่าเริ่มต้นเทมแพลต์ Templates\common\table.html จะถูกใช้และตารางจะมีลักษณะเดียวกับตารางใน PowerPoint ให้เปลี่ยนการจัดรูปแบบตารางด้วย CSS กำหนดเอง:
.custom-table {
    border: 1px solid black;
}
.custom-table tr:nth-child(even) {background: #CCC}
.custom-table tr:nth-child(odd) {background: #ffb380}
เราสามารถสร้างโครงสร้างเทมแพลต์อินพุตและไฟล์เอาต์พุตเดียวกัน (ตามที่สร้าง) ขณะเรียกเมธอด PresentationExtensions.ToSinglePageWebDocument ให้เพิ่มเมธอด ExportCustomTableStyles_AddCommonStructure สำหรับงานนี้ ความแตกต่างระหว่างเมธอดนี้และ ToSinglePageWebDocument คือ เราไม่ต้องเพิ่มเทมแพลต์มาตรฐานสำหรับตารางและหน้า index หลัก (มันจะถูกแทนที่เพื่อรวมการอ้างอิงสไตล์ตารางกำหนดเอง):
private static void ExportCustomTableStyles_AddCommonStructure(
    Presentation pres,
    WebDocument document,
    string templatesPath,
    string outputPath,
    bool embedImages)
{
    AddCommonStylesTemplates(document, templatesPath);

    document.Input.AddTemplate<Slide>("slide", Path.Combine(templatesPath, "slide.html"));
    document.Input.AddTemplate<AutoShape>("autoshape", Path.Combine(templatesPath, "autoshape.html"));
    document.Input.AddTemplate<TextFrame>("textframe", Path.Combine(templatesPath, "textframe.html"));
    document.Input.AddTemplate<Paragraph>("paragraph", Path.Combine(templatesPath, "paragraph.html"));
    document.Input.AddTemplate<Paragraph>("bullet", Path.Combine(templatesPath, "bullet.html"));
    document.Input.AddTemplate<Portion>("portion", Path.Combine(templatesPath, "portion.html"));
    document.Input.AddTemplate<VideoFrame>("videoframe", Path.Combine(templatesPath, "videoframe.html"));
    document.Input.AddTemplate<PictureFrame>("pictureframe", Path.Combine(templatesPath, "pictureframe.html")); ;
    document.Input.AddTemplate<Shape>("shape", Path.Combine(templatesPath, "shape.html"));

    AddSinglePageCommonOutput(pres, document, outputPath);

    AddResourcesOutput(pres, document, embedImages);

    AddScriptsOutput(document, templatesPath);
}
เพิ่มเทมแพลต์กำหนดเองแทน:
using (Presentation pres = new Presentation("table.pptx"))
{
    const string templatesPath = "templates\\single-page";
    const string outputPath = "custom-table-styles";

    var options = new WebDocumentOptions
    {
        TemplateEngine = new RazorTemplateEngine(),
        OutputSaver = new FileOutputSaver(),
        EmbedImages = false
    };

    // ตั้งค่าค่าทั่วไปของเอกสาร
    WebDocument document = new WebDocument(options);
    SetupGlobals(document, options, outputPath);

    // เพิ่มโครงสร้างทั่วไป (ยกเว้นเทมเพลตตาราง)
    ExportCustomTableStyles_AddCommonStructure(pres, document, templatesPath, outputPath, options.EmbedImages);

    // เพิ่มเทมเพลตตารางที่กำหนดเอง
    document.Input.AddTemplate<Table>("table", @"custom-templates\table-custom-style.html");

    // เพิ่มสไตล์ตารางที่กำหนดเอง
    document.Input.AddTemplate<Presentation>("table-custom-style", @"custom-templates\styles\table-custom-style.css");
    document.Output.Add(Path.Combine(outputPath, "table-custom-style.css"), "table-custom-style", pres);

    // เพิ่ม index ที่กำหนดเอง - เป็นเพียงสำเนาของ "index.html" มาตรฐาน แต่รวมการอ้างอิงถึง "table-custom-style.css"
    document.Input.AddTemplate<Presentation>("index", @"custom-templates\index-table-custom-style.html");

    document.Save();
}
@model TemplateContext<Table>

@{
	Table contextObject = Model.Object;

	var origin = Model.Local.Get<Point>("origin");
	var positionStyle = string.Format("left: {0}px; top: {1}px; width: {2}px; height: {3}px;",
										(int)contextObject.X + origin.X,
										(int)contextObject.Y + origin.Y,
										(int)contextObject.Width,
										(int)contextObject.Height);
}

	<table class="table custom-table" style="@positionStyle">
	@for (int i = 0; i < contextObject.Rows.Count; i++)
	{
		var rowHeight = string.Format("height: {0}px", contextObject.Rows[i].Height);
		<tr style="@rowHeight">
		@for (int j = 0; j < contextObject.Columns.Count; j++)
		{
			var cell = contextObject[j, i];
			if (cell.FirstRowIndex ==  i && cell.FirstColumnIndex == j)
			{
				var spans = cell.IsMergedCell ? string.Format("rowspan=\"{0}\" colspan=\"{1}\"", cell.RowSpan, cell.ColSpan) : "";
				<td width="@cell.Width px" @Raw(spans)>
					@{
						for(int k = 0; k < cell.TextFrame.Paragraphs.Count; k++)
						{
							var para = (Paragraph)cell.TextFrame.Paragraphs[k];

							var subModel = Model.SubModel(para);
							double[] margins = new double[] { cell.MarginLeft, cell.MarginTop, cell.MarginRight, cell.MarginBottom };
							subModel.Local.Put("margins", margins);
							subModel.Local.Put("parent", cell.TextFrame);
							subModel.Local.Put("parentContainerSize", new SizeF((float)cell.Width, (float)cell.Height));
                            subModel.Local.Put("tableContent", true);

							@Include("paragraph", subModel)
						}
					}
				</td>
			}
		}
		</tr>
	}
</table>
หมายเหตุว่าเทมแพลต์ตารางกำหนดเองถูกเพิ่มด้วยคีย์ “table” เดียวกับตารางมาตรฐาน ดังนั้นคุณสามารถแทนที่เทมแพลต์เริ่มต้นบางส่วนได้โดยไม่ต้องเขียนใหม่ คุณยังสามารถใช้เทมแพลต์จากโครงสร้างเริ่มต้นด้วยคีย์เดียวกันได้ ตัวอย่างเช่น คุณอาจใช้เทมแพลต์ย่อหน้ามาตรฐานในเทมแพลต์ตาราง หรือแทนที่ด้วยคีย์เดียวกัน
คุณยังสามารถใช้ index.html เพื่อรวมการอ้างอิงสไตล์ CSS ของตารางกำหนดเองได้:
<!DOCTYPE html>

<html
    xmlns="http://www.w3.org/1999/xhtml"
    xmlns:svg="http://www.w3.org/2000/svg"
    xmlns:xlink="http://www.w3.org/1999/xlink">
<head>
     ...
    <link rel="stylesheet" type="text/css" href="table-custom-style.css" />
    ...
</head>
<body>
    ...
</body>
</html>
สร้างโปรเจกต์จากศูนย์: การเปลี่ยนสไลด์แบบเคลื่อนไหว
WebExtensions อนุญาตให้คุณส่งออกงานนำเสนอพร้อมแอนิเมชันการเปลี่ยนสไลด์—คุณเพียงแค่ตั้งค่า AnimateTransitions ใน WebDocumentOptions เป็น true:
WebDocumentOptions options = new WebDocumentOptions
{
    // ... ตัวเลือกอื่น
    AnimateTransitions = true
};
ให้สร้างโปรเจกต์ใหม่ที่ใช้ Aspose.Slides และ Aspose.Slides.WebExtensions เพื่อสร้าง HTML‑viewer สำหรับ PDF พร้อมการเปลี่ยนหน้าที่สลับเคลื่อนไหวอย่างราบรื่น ที่นี้เราต้องใช้ฟีเจอร์นำเข้า PDF ของ Aspose.Slides
สร้างโปรเจกต์ PdfToPresentationToHtml และเพิ่มแพคเกจ NuGet Aspose.Slides.WebExtensions (แพคเกจ Aspose.Slides จะถูกเพิ่มเป็น dependency ด้วย):
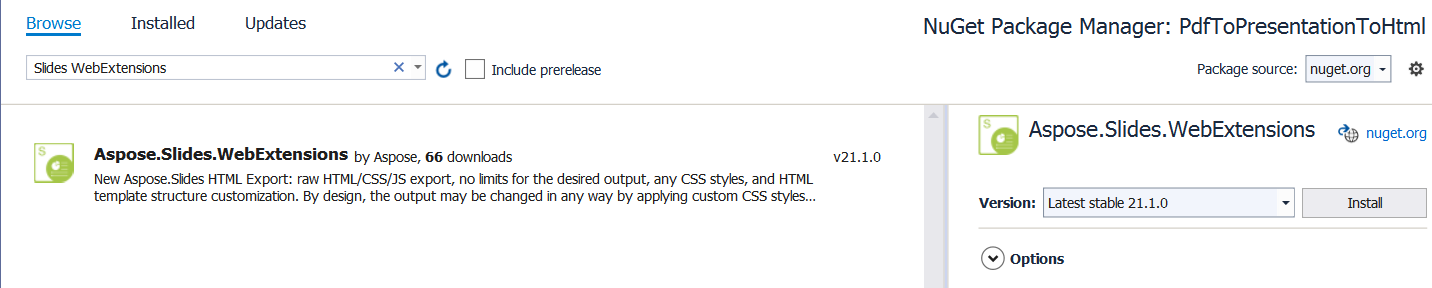
เราเริ่มต้นด้วยการนำเข้าเอกสาร PDF ซึ่งจะถูกแอนิเมชันและส่งออกเป็นงานนำเสนอ HTML:
using (Presentation pres = new Presentation())
{
    pres.Slides.RemoveAt(0);
    pres.Slides.AddFromPdf("sample.pdf");
}
ต่อไปเราตั้งค่าการเปลี่ยนสไลด์แบบเคลื่อนไหว (แต่ละสไลด์คือหน้าของ PDF ที่นำเข้า) ตัวอย่าง PDF มี 9 หน้า เราเพิ่มการเปลี่ยนสไลด์ให้แต่ละหน้า (สาธิตขณะดู HTML):
pres.Slides[0].SlideShowTransition.Type = TransitionType.Fade;
pres.Slides[1].SlideShowTransition.Type = TransitionType.RandomBar;
pres.Slides[2].SlideShowTransition.Type = TransitionType.Cover;
pres.Slides[3].SlideShowTransition.Type = TransitionType.Dissolve;
pres.Slides[4].SlideShowTransition.Type = TransitionType.Switch;
pres.Slides[5].SlideShowTransition.Type = TransitionType.Pan;
pres.Slides[6].SlideShowTransition.Type = TransitionType.Ferris;
pres.Slides[7].SlideShowTransition.Type = TransitionType.Pull;
pres.Slides[8].SlideShowTransition.Type = TransitionType.Plus;
สุดท้ายให้ส่งออกเป็น HTML ด้วย WebDocument โดยตั้งค่า AnimateTransitions เป็น true:
WebDocumentOptions options = new WebDocumentOptions
{
    TemplateEngine = new RazorTemplateEngine(),
    OutputSaver = new FileOutputSaver(),
    AnimateTransitions = true
};

WebDocument document = pres.ToSinglePageWebDocument(options, "templates\\single-page", "animated-pdf");
document.Save();
ตัวอย่างโค้ดเต็ม:
using (Presentation pres = new Presentation())
{
    pres.Slides.RemoveAt(0);
    pres.Slides.AddFromPdf("sample.pdf");

    pres.Slides[0].SlideShowTransition.Type = TransitionType.Fade;
    pres.Slides[1].SlideShowTransition.Type = TransitionType.RandomBar;
    pres.Slides[2].SlideShowTransition.Type = TransitionType.Cover;
    pres.Slides[3].SlideShowTransition.Type = TransitionType.Dissolve;
    pres.Slides[4].SlideShowTransition.Type = TransitionType.Switch;
    pres.Slides[5].SlideShowTransition.Type = TransitionType.Pan;
    pres.Slides[6].SlideShowTransition.Type = TransitionType.Ferris;
    pres.Slides[7].SlideShowTransition.Type = TransitionType.Pull;
    pres.Slides[8].SlideShowTransition.Type = TransitionType.Plus;

    WebDocumentOptions options = new WebDocumentOptions
    {
        TemplateEngine = new RazorTemplateEngine(),
        OutputSaver = new FileOutputSaver(),
        AnimateTransitions = true
    };

    WebDocument document = pres.ToSinglePageWebDocument(options, "templates\\single-page", "animated-pdf");
    document.Save();
}
เท่านี้คุณก็มี HTML ที่มีการเปลี่ยนหน้าที่เคลื่อนไหวสร้างจากเอกสาร PDF แล้ว