Format Presentation Text in JavaScript
Overview
This article shows how to format text in PowerPoint and OpenDocument presentations using Aspose.Slides for Node.js via Java. It covers highlighting, background colors, transparency, character spacing, font properties, rotation, paragraph spacing, autofit behavior, text anchoring, tab stops, and language settings.
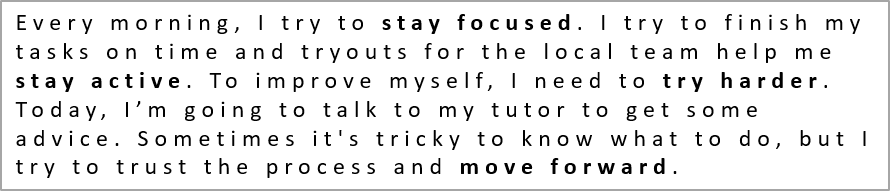
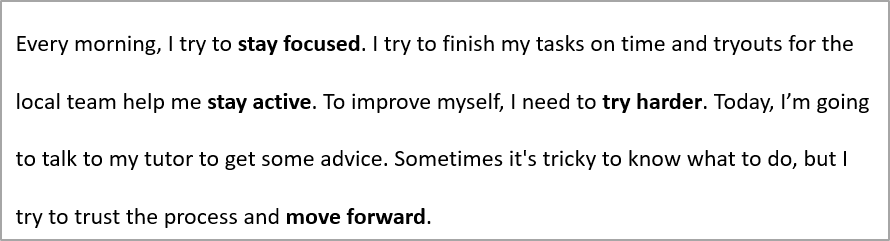
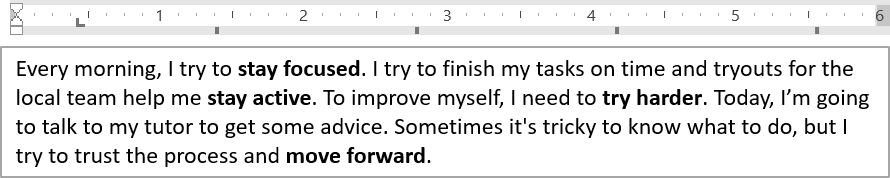
In the examples below, we’ll use a file named “sample.pptx”, which contains a single text box on the first slide with the following text:

Highlight Text
Use the TextFrame.highlightText method when you need to highlight text that matches a specific sample within a text frame. The method applies a highlight color to matching text fragments and can be used with TextSearchOptions to control how the search is performed, for example, to match only whole words.
The code example below highlights all occurrences of the characters “try” and then highlights only the full word “to”.
const presentation = new aspose.slides.Presentation("sample.pptx");
try {
    const shape = presentation.getSlides().get_Item(0).getShapes().get_Item(0);
    const textFrame = shape.getTextFrame();

    // Highlight the word "try" in the shape.
    textFrame.highlightText("try", java.getStaticFieldValue("java.awt.Color", "LIGHT_GRAY"));

    const searchOptions = new aspose.slides.TextSearchOptions();
    searchOptions.setWholeWordsOnly(true);

    // Highlight the word "to" in the shape.
    textFrame.highlightText("to", java.getStaticFieldValue("java.awt.Color", "MAGENTA"), searchOptions, null);

    presentation.save("highlighted_text.pptx", aspose.slides.SaveFormat.Pptx);
} finally {
    presentation.dispose();
}
The result:

Highlight Text Using Regular Expressions
The TextFrame.highlightRegex method highlights text matches found by a regular expression. In Node.js via Java, this API is exposed on TextFrame.
The code example below highlights all words that contain seven or more characters:
const Pattern = java.import("java.util.regex.Pattern");
const presentation = new aspose.slides.Presentation("sample.pptx");
try {
    const shape = presentation.getSlides().get_Item(0).getShapes().get_Item(0);
    const regex = Pattern.compile("\\b[^\\s]{7,}\\b");

    // Highlight all words with seven or more characters.
    shape.getTextFrame().highlightRegex(regex, java.getStaticFieldValue("java.awt.Color", "YELLOW"), null);

    presentation.save("highlighted_text_using_regex.pptx", aspose.slides.SaveFormat.Pptx);
} finally {
    presentation.dispose();
}
The result:

Set Text Background Color
Use ParagraphFormat.getDefaultPortionFormat to set the default highlight color for a paragraph, or use PortionFormat.getHighlightColor for individual text portions.
The following code example shows how to set the background color for the entire paragraph:
const presentation = new aspose.slides.Presentation("sample.pptx");
try {
    const autoShape = presentation.getSlides().get_Item(0).getShapes().get_Item(0);
    const paragraph = autoShape.getTextFrame().getParagraphs().get_Item(0);

    // Set the highlight color for the entire paragraph.
    paragraph.getParagraphFormat().getDefaultPortionFormat().getHighlightColor().setColor(java.getStaticFieldValue("java.awt.Color", "LIGHT_GRAY"));

    presentation.save("gray_paragraph.pptx", aspose.slides.SaveFormat.Pptx);
} finally {
    presentation.dispose();
}
The result:

The code example below demonstrates how to set the background color for text portions with a bold font:
const presentation = new aspose.slides.Presentation("sample.pptx");
try {
    const autoShape = presentation.getSlides().get_Item(0).getShapes().get_Item(0);
    const paragraph = autoShape.getTextFrame().getParagraphs().get_Item(0);
    const portions = paragraph.getPortions();
    const portionCount = portions.getCount();

    for (let portionIndex = 0; portionIndex < portionCount; portionIndex++) {
        const portion = portions.get_Item(portionIndex);
        if (portion.getPortionFormat().getEffective().getFontBold()) {
            // Set the highlight color for the text portion.
            portion.getPortionFormat().getHighlightColor().setColor(java.getStaticFieldValue("java.awt.Color", "LIGHT_GRAY"));
        }
    }

    presentation.save("gray_text_portions.pptx", aspose.slides.SaveFormat.Pptx);
} finally {
    presentation.dispose();
}
The result:

Align Text Paragraphs
Use ParagraphFormat.setAlignment to set paragraph alignment within a text frame. The value can be centered, left-aligned, right-aligned, justified, and so on.
The following code example shows how to align the paragraph to the center:
const presentation = new aspose.slides.Presentation("sample.pptx");
try {
    const autoShape = presentation.getSlides().get_Item(0).getShapes().get_Item(0);
    const paragraph = autoShape.getTextFrame().getParagraphs().get_Item(0);

    // Set the alignment of the paragraph to center.
    paragraph.getParagraphFormat().setAlignment(aspose.slides.TextAlignment.Center);

    presentation.save("aligned_paragraph.pptx", aspose.slides.SaveFormat.Pptx);
} finally {
    presentation.dispose();
}
The result:

Set Transparency for Text
Text transparency is controlled through the alpha component of the color assigned to PortionFormat.getFillFormat. In the examples below, alpha = 50 is an ARGB alpha-channel value on the 0-255 scale, not a transparency percentage.
The code example below shows how to apply transparency to the entire paragraph:
const alpha = 50;
const transparentBlack = java.newInstanceSync("java.awt.Color", 0, 0, 0, alpha);
const presentation = new aspose.slides.Presentation("sample.pptx");
try {
    const autoShape = presentation.getSlides().get_Item(0).getShapes().get_Item(0);
    const paragraph = autoShape.getTextFrame().getParagraphs().get_Item(0);
    const fillFormat = paragraph.getParagraphFormat().getDefaultPortionFormat().getFillFormat();

    // Set the fill color of the text to transparent color.
    fillFormat.setFillType(java.newByte(aspose.slides.FillType.Solid));
    fillFormat.getSolidFillColor().setColor(transparentBlack);

    presentation.save("transparent_paragraph.pptx", aspose.slides.SaveFormat.Pptx);
} finally {
    presentation.dispose();
}
The result:

The following code example shows how to apply transparency to text portions with a bold font:
const alpha = 50;
const transparentBlack = java.newInstanceSync("java.awt.Color", 0, 0, 0, alpha);
const presentation = new aspose.slides.Presentation("sample.pptx");
try {
    const autoShape = presentation.getSlides().get_Item(0).getShapes().get_Item(0);
    const paragraph = autoShape.getTextFrame().getParagraphs().get_Item(0);
    const portions = paragraph.getPortions();
    const portionCount = portions.getCount();

    for (let portionIndex = 0; portionIndex < portionCount; portionIndex++) {
        const portion = portions.get_Item(portionIndex);
        if (portion.getPortionFormat().getEffective().getFontBold()) {
            const fillFormat = portion.getPortionFormat().getFillFormat();

            // Set the transparency of the text portion.
            fillFormat.setFillType(java.newByte(aspose.slides.FillType.Solid));
            fillFormat.getSolidFillColor().setColor(transparentBlack);
        }
    }

    presentation.save("transparent_text_portions.pptx", aspose.slides.SaveFormat.Pptx);
} finally {
    presentation.dispose();
}
The result:

Set Character Spacing for Text
Use BasePortionFormat.setSpacing to expand or condense spacing between characters in a text box.
The following JavaScript code shows how to expand the character spacing in the entire paragraph:
const presentation = new aspose.slides.Presentation("sample.pptx");
try {
    const autoShape = presentation.getSlides().get_Item(0).getShapes().get_Item(0);
    const paragraph = autoShape.getTextFrame().getParagraphs().get_Item(0);

    // Note: Use negative values to compress the character spacing.
    paragraph.getParagraphFormat().getDefaultPortionFormat().setSpacing(3); // Expand character spacing.

    presentation.save("character_spacing_in_paragraph.pptx", aspose.slides.SaveFormat.Pptx);
} finally {
    presentation.dispose();
}
The result:
The code example below shows how to expand the character spacing in text portions with a bold font:
const presentation = new aspose.slides.Presentation("sample.pptx");
try {
    const autoShape = presentation.getSlides().get_Item(0).getShapes().get_Item(0);
    const paragraph = autoShape.getTextFrame().getParagraphs().get_Item(0);
    const portions = paragraph.getPortions();
    const portionCount = portions.getCount();

    for (let portionIndex = 0; portionIndex < portionCount; portionIndex++) {
        const portion = portions.get_Item(portionIndex);
        if (portion.getPortionFormat().getEffective().getFontBold()) {
            // Note: Use negative values to compress the character spacing.
            portion.getPortionFormat().setSpacing(3); // Expand character spacing.
        }
    }

    presentation.save("character_spacing_in_text_portions.pptx", aspose.slides.SaveFormat.Pptx);
} finally {
    presentation.dispose();
}
The result:

Disable Kerning for Specific Fonts
In some cases, text rendered by Aspose.Slides may look slightly tighter than the same text displayed in PowerPoint. This can happen because PowerPoint may ignore kerning data for certain fonts, even when the font contains valid kerning information and kerning is enabled in PowerPoint settings.
To make the rendered output closer to PowerPoint in such cases, you can disable kerning for text portions that use the affected font. Set BasePortionFormat.setKerningMinimalSize to a value significantly larger than the actual font size:
const presentation = new aspose.slides.Presentation("presentation.pptx");
try {
    const autoShape = presentation.getSlides().get_Item(0).getShapes().get_Item(0);
    const paragraphs = autoShape.getTextFrame().getParagraphs();
    const paragraphCount = paragraphs.getCount();
    const targetFont = "Roboto";

    for (let paragraphIndex = 0; paragraphIndex < paragraphCount; paragraphIndex++) {
        const portions = paragraphs.get_Item(paragraphIndex).getPortions();
        const portionCount = portions.getCount();

        for (let portionIndex = 0; portionIndex < portionCount; portionIndex++) {
            const portion = portions.get_Item(portionIndex);
            const portionFormat = portion.getPortionFormat();
            const latinFont = portionFormat.getLatinFont();
            const eastAsianFont = portionFormat.getEastAsianFont();
            const complexScriptFont = portionFormat.getComplexScriptFont();

            if ((latinFont !== null && latinFont.getFontName() === targetFont) ||
                (eastAsianFont !== null && eastAsianFont.getFontName() === targetFont) ||
                (complexScriptFont !== null && complexScriptFont.getFontName() === targetFont)) {
                portionFormat.setKerningMinimalSize(100);
            }
        }
    }

    presentation.save("output.pptx", aspose.slides.SaveFormat.Pptx);
} finally {
    presentation.dispose();
}
This setting prevents kerning from being applied to matching text portions and can help align Aspose.Slides rendering with PowerPoint’s visual output for fonts affected by this PowerPoint-specific behavior.
Manage Text Font Properties
Font properties can be set at the paragraph level through ParagraphFormat.getDefaultPortionFormat or on individual portions through PortionFormat.
The following code sets the font and text style for the entire paragraph: it applies font size, bold, italic, dotted underline, and the Times New Roman font to all portions in the paragraph.
const presentation = new aspose.slides.Presentation("sample.pptx");
try {
    const autoShape = presentation.getSlides().get_Item(0).getShapes().get_Item(0);
    const paragraph = autoShape.getTextFrame().getParagraphs().get_Item(0);
    const defaultPortionFormat = paragraph.getParagraphFormat().getDefaultPortionFormat();

    // Set the font properties for the paragraph.
    defaultPortionFormat.setFontHeight(12);
    defaultPortionFormat.setFontBold(java.newByte(aspose.slides.NullableBool.True));
    defaultPortionFormat.setFontItalic(java.newByte(aspose.slides.NullableBool.True));
    defaultPortionFormat.setFontUnderline(java.newByte(aspose.slides.TextUnderlineType.Dotted));
    defaultPortionFormat.setLatinFont(new aspose.slides.FontData("Times New Roman"));

    presentation.save("font_properties_for_paragraph.pptx", aspose.slides.SaveFormat.Pptx);
} finally {
    presentation.dispose();
}
The result:

The code example below applies similar properties to text portions with a bold font:
const presentation = new aspose.slides.Presentation("sample.pptx");
try {
    const autoShape = presentation.getSlides().get_Item(0).getShapes().get_Item(0);
    const paragraph = autoShape.getTextFrame().getParagraphs().get_Item(0);
    const portions = paragraph.getPortions();
    const portionCount = portions.getCount();

    for (let portionIndex = 0; portionIndex < portionCount; portionIndex++) {
        const portion = portions.get_Item(portionIndex);
        if (portion.getPortionFormat().getEffective().getFontBold()) {
            const portionFormat = portion.getPortionFormat();

            // Set the font properties for the text portion.
            portionFormat.setFontHeight(13);
            portionFormat.setFontItalic(java.newByte(aspose.slides.NullableBool.True));
            portionFormat.setFontUnderline(java.newByte(aspose.slides.TextUnderlineType.Dotted));
            portionFormat.setLatinFont(new aspose.slides.FontData("Times New Roman"));
        }
    }

    presentation.save("font_properties_for_text_portions.pptx", aspose.slides.SaveFormat.Pptx);
} finally {
    presentation.dispose();
}
The result:

Set Text Rotation
Use TextFrameFormat.setTextVerticalType to set a predefined text orientation within a shape.
The following code example sets the text orientation in the shape to Vertical270, which rotates the text 90 degrees counterclockwise:
const presentation = new aspose.slides.Presentation("sample.pptx");
try {
    const autoShape = presentation.getSlides().get_Item(0).getShapes().get_Item(0);

    autoShape.getTextFrame().getTextFrameFormat().setTextVerticalType(java.newByte(aspose.slides.TextVerticalType.Vertical270));

    presentation.save("text_rotation.pptx", aspose.slides.SaveFormat.Pptx);
} finally {
    presentation.dispose();
}
The result:

Set Custom Rotation for Text Frames
Use TextFrameFormat.setRotationAngle to set a custom rotation angle for a TextFrame.
The code example below rotates the text frame by 3 degrees clockwise within the shape:
const presentation = new aspose.slides.Presentation("sample.pptx");
try {
    const autoShape = presentation.getSlides().get_Item(0).getShapes().get_Item(0);

    autoShape.getTextFrame().getTextFrameFormat().setRotationAngle(3);

    presentation.save("custom_text_rotation.pptx", aspose.slides.SaveFormat.Pptx);
} finally {
    presentation.dispose();
}
The result:

Set Line Spacing of Paragraphs
Aspose.Slides provides ParagraphFormat.setSpaceAfter, ParagraphFormat.setSpaceBefore, and ParagraphFormat.setSpaceWithin to control paragraph spacing. These properties are used as follows:
- Use a positive value to specify line spacing as a percentage of the line height.
- Use a negative value to specify line spacing in points.
The following code example shows how to specify the line spacing within the paragraph:
const presentation = new aspose.slides.Presentation("sample.pptx");
try {
    const autoShape = presentation.getSlides().get_Item(0).getShapes().get_Item(0);
    const paragraph = autoShape.getTextFrame().getParagraphs().get_Item(0);

    paragraph.getParagraphFormat().setSpaceWithin(200);

    presentation.save("line_spacing.pptx", aspose.slides.SaveFormat.Pptx);
} finally {
    presentation.dispose();
}
The result:
Set Autofit Type for Text Frames
TextFrameFormat.setAutofitType determines how text behaves when it exceeds the boundaries of its container. Use it to control whether the text shrinks, overflows, or resizes the shape automatically.
const presentation = new aspose.slides.Presentation("sample.pptx");
try {
    const autoShape = presentation.getSlides().get_Item(0).getShapes().get_Item(0);

    autoShape.getTextFrame().getTextFrameFormat().setAutofitType(java.newByte(aspose.slides.TextAutofitType.Shape));

    presentation.save("autofit_type.pptx", aspose.slides.SaveFormat.Pptx);
} finally {
    presentation.dispose();
}
Set Anchor of Text Frames
TextFrameFormat.setAnchoringType defines how text is positioned vertically inside a shape, for example at the top, middle, or bottom.
const presentation = new aspose.slides.Presentation("sample.pptx");
try {
    const autoShape = presentation.getSlides().get_Item(0).getShapes().get_Item(0);

    autoShape.getTextFrame().getTextFrameFormat().setAnchoringType(java.newByte(aspose.slides.TextAnchorType.Bottom));

    presentation.save("text_anchor.pptx", aspose.slides.SaveFormat.Pptx);
} finally {
    presentation.dispose();
}
Set Text Tabulation
Use ParagraphFormat.setDefaultTabSize and ParagraphFormat.getTabs to configure tab stops in a paragraph.
const presentation = new aspose.slides.Presentation("sample.pptx");
try {
    const autoShape = presentation.getSlides().get_Item(0).getShapes().get_Item(0);
    const paragraph = autoShape.getTextFrame().getParagraphs().get_Item(0);

    paragraph.getParagraphFormat().setDefaultTabSize(100);
    paragraph.getParagraphFormat().getTabs().add(30, java.newByte(aspose.slides.TabAlignment.Left));

    presentation.save("paragraph_tabs.pptx", aspose.slides.SaveFormat.Pptx);
} finally {
    presentation.dispose();
}
The result:
Set Proofing Language
Aspose.Slides provides PortionFormat.setLanguageId, which allows you to set the proofing language for a text portion. The proofing language determines the language used for spelling and grammar checks in PowerPoint.
The following code example shows how to set the proofing language for a text portion:
const presentation = new aspose.slides.Presentation("presentation.pptx");
try {
    const autoShape = presentation.getSlides().get_Item(0).getShapes().get_Item(0);
    const paragraph = autoShape.getTextFrame().getParagraphs().get_Item(0);
    paragraph.getPortions().clear();

    const font = new aspose.slides.FontData("SimSun");
    const textPortion = new aspose.slides.Portion();
    textPortion.getPortionFormat().setComplexScriptFont(font);
    textPortion.getPortionFormat().setEastAsianFont(font);
    textPortion.getPortionFormat().setLatinFont(font);

    // Set the Id of a proofing language.
    textPortion.getPortionFormat().setLanguageId("zh-CN");

    textPortion.setText("1.");
    paragraph.getPortions().add(textPortion);

    presentation.save("proofing_language.pptx", aspose.slides.SaveFormat.Pptx);
} finally {
    presentation.dispose();
}
Set Default Language
Use LoadOptions.setDefaultTextLanguage to define the default language for text created while loading or creating a presentation.
const loadOptions = new aspose.slides.LoadOptions();
loadOptions.setDefaultTextLanguage("en-US");

const presentation = new aspose.slides.Presentation(loadOptions);
try {
    const slide = presentation.getSlides().get_Item(0);

    // Add a new rectangle shape with text.
    const shape = slide.getShapes().addAutoShape(aspose.slides.ShapeType.Rectangle, 20, 20, 150, 50);
    shape.getTextFrame().setText("Sample text");

    // Check the first portion language.
    const portion = shape.getTextFrame().getParagraphs().get_Item(0).getPortions().get_Item(0);
    console.log(portion.getPortionFormat().getLanguageId());
} finally {
    presentation.dispose();
}
Set Default Text Style
To apply default text formatting at the presentation level, use Presentation.getDefaultTextStyle.
The following code example shows how to set a default bold font with a 14 pt size for all text across slides in a new presentation.
const presentation = new aspose.slides.Presentation();
try {
    // Get the top level paragraph format.
    const paragraphFormat = presentation.getDefaultTextStyle().getLevel(0);

    if (paragraphFormat !== null) {
        paragraphFormat.getDefaultPortionFormat().setFontHeight(14);
        paragraphFormat.getDefaultPortionFormat().setFontBold(java.newByte(aspose.slides.NullableBool.True));
    }

    presentation.save("default_text_style.pptx", aspose.slides.SaveFormat.Pptx);
} finally {
    presentation.dispose();
}
Extract Text with the All-Caps Effect
In PowerPoint, applying the All Caps font effect makes text appear in uppercase on the slide even when it was originally typed in lowercase. When you retrieve such a text portion with Aspose.Slides, the library returns the text exactly as it was entered. To match the displayed text, check TextCapType and convert the returned string to uppercase when the value is All.
Let’s say we have the following text box on the first slide of the sample2.pptx file.

The code example below shows how to extract the text with the All Caps effect applied:
const presentation = new aspose.slides.Presentation("sample2.pptx");
try {
    const autoShape = presentation.getSlides().get_Item(0).getShapes().get_Item(0);
    const textPortion = autoShape.getTextFrame().getParagraphs().get_Item(0).getPortions().get_Item(0);

    console.log("Original text: " + textPortion.getText());

    const textFormat = textPortion.getPortionFormat().getEffective();
    if (textFormat.getTextCapType() === aspose.slides.TextCapType.All) {
        const text = textPortion.getText().toUpperCase();
        console.log("All-Caps effect: " + text);
    }
} finally {
    presentation.dispose();
}
Output:
Original text: Hello, Aspose!
All-Caps effect: HELLO, ASPOSE!
FAQ
How to modify text in a table on a slide?
To modify text in a table on a slide, use Table. Iterate through the cells and update each cell through Cell.getTextFrame and paragraph formatting through Paragraph.getParagraphFormat.
How to apply gradient color to text in a PowerPoint slide?
To apply a gradient color to text, use PortionFormat.getFillFormat. Set FillFormat.setFillType to FillType.Gradient and configure the gradient stops, direction, and transparency.