
Formatera PowerPoint-former i C++
Introduktion
I PowerPoint kan du lägga till former på bilder. Eftersom former består av linjer kan du formatera dem genom att ändra eller tillämpa effekter på deras konturer. Dessutom kan du formatera former genom att ange inställningar som styr hur deras insida fylls.
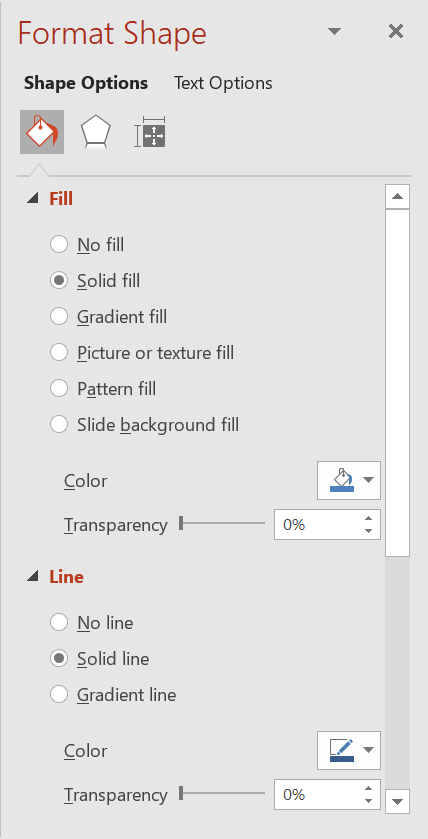
Aspose.Slides för C++ tillhandahåller gränssnitt och metoder som låter dig formatera former med samma alternativ som finns i PowerPoint.
Formatera linjer
Med Aspose.Slides kan du ange en anpassad linjestil för en form. Följande steg beskriver proceduren:
- Skapa en instans av klassen Presentation.
- Hämta en referens till en bild efter dess index.
- Lägg till en IAutoShape på bilden.
- Ställ in linjestilen för formen.
- Ställ in linjebredden.
- Ställ in streckstilen för linjen.
- Ställ in linjens färg för formen.
- Spara den ändrade presentationen som en PPTX‑fil.
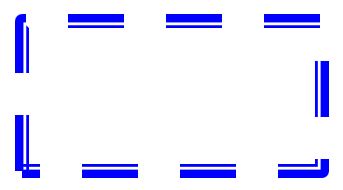
Följande kod visar hur du formaterar en rektangel‑AutoShape:
#include <DOM/FillType.h>
#include <DOM/IAutoShape.h>
#include <DOM/IColorFormat.h>
#include <DOM/IFillFormat.h>
#include <DOM/ILineFillFormat.h>
#include <DOM/ILineFormat.h>
#include <DOM/IShapeCollection.h>
#include <DOM/ISlide.h>
#include <DOM/LineDashStyle.h>
#include <DOM/LineStyle.h>
#include <DOM/Presentation.h>
#include <DOM/ShapeType.h>
#include <Export/SaveFormat.h>
#include <drawing/color.h>
#include <system/smart_ptr.h>
using namespace Aspose::Slides;
using namespace Aspose::Slides::Export;
using namespace System;
using namespace System::Drawing;

// Instansiera Presentation‑klassen som representerar en presentationsfil.
auto presentation = MakeObject<Presentation>();

// Hämta den första bilden.
auto slide = presentation->get_Slide(0);

// Lägg till en automatisk form av typen Rektangel.
auto shape = slide->get_Shapes()->AddAutoShape(ShapeType::Rectangle, 50, 150, 150, 75);

// Ställ in fyllningsfärgen för rektangelformen.
shape->get_FillFormat()->set_FillType(FillType::NoFill);

// Applicera formatering på rektangelns linjer.
shape->get_LineFormat()->set_Style(LineStyle::ThickThin);
shape->get_LineFormat()->set_Width(7);
shape->get_LineFormat()->set_DashStyle(LineDashStyle::Dash);

// Ställ in färgen för rektangelns linje.
shape->get_LineFormat()->get_FillFormat()->set_FillType(FillType::Solid);
shape->get_LineFormat()->get_FillFormat()->get_SolidFillColor()->set_Color(Color::get_Blue());

// Spara PPTX‑filen till disk.
presentation->Save(u"formatted_lines.pptx", SaveFormat::Pptx);
presentation->Dispose();
Resultatet:
Tillämpa skiss‑effekter på formlinjer
En skiss‑effekt får en formlinje att se handritad ut. Använd IShape::get_LineFormat för att komma åt linjeinställningarna, ILineFormat::get_SketchFormat för att komma åt skiss‑inställningarna och ISketchFormat::set_SketchType för att välja ett värde från uppräkningen LineSketchType.
Följande C++‑kod visar hur du tillämpar en LineSketchType::Curved‑effekt, läser det explicit tilldelade värdet och tar bort effekten med LineSketchType::None:
auto presentation = MakeObject<Presentation>();

auto slide = presentation->get_Slide(0);
auto shape = slide->get_Shapes()->AddAutoShape(ShapeType::Rectangle, 50, 50, 200, 100);

// Access the shape's line format and its sketch format.
auto sketchFormat = shape->get_LineFormat()->get_SketchFormat();

// Apply a sketch effect.
sketchFormat->set_SketchType(LineSketchType::Curved);

// Read the sketch effect assigned directly to the shape.
auto explicitSketchType = sketchFormat->get_SketchType();
Console::WriteLine(u"Explicit sketch type: {0}", explicitSketchType);

// Remove the sketch effect.
sketchFormat->set_SketchType(LineSketchType::None);

presentation->Dispose();
Värdet som returneras av ISketchFormat::get_SketchType representerar inställningen som tilldelats direkt till formen. Om linjeformatering kan ärvas från ett tema, en huvudsida eller en layout‑bild, använd ILineFormat::GetEffective, få åtkomst till ILineFormatEffectiveData::get_SketchFormat, och läs ISketchFormatEffectiveData::get_SketchType. Det effektiva värdet återspeglar den formatering som faktiskt tillämpas efter att arv har lösts:
auto presentation = MakeObject<Presentation>(u"presentation.pptx");

auto shape = presentation->get_Slide(0)->get_Shape(0);
auto lineFormat = shape->get_LineFormat();

auto explicitSketchType = lineFormat->get_SketchFormat()->get_SketchType();
auto effectiveLineFormat = lineFormat->GetEffective();
auto effectiveSketchType = effectiveLineFormat->get_SketchFormat()->get_SketchType();

Console::WriteLine(u"Explicit sketch type: {0}", explicitSketchType);
Console::WriteLine(u"Effective sketch type: {0}", effectiveSketchType);

presentation->Dispose();
Formatera anslutningsstilar
Här är de tre alternativen för anslutningstyp:
- Rund
- Snedkant
- Fasad
Som standard använder PowerPoint Rund när två linjer förenas i en vinkel (t.ex. vid en formens hörn). Om du ritar en form med skarpa vinklar kan du föredra alternativet Snedkant.
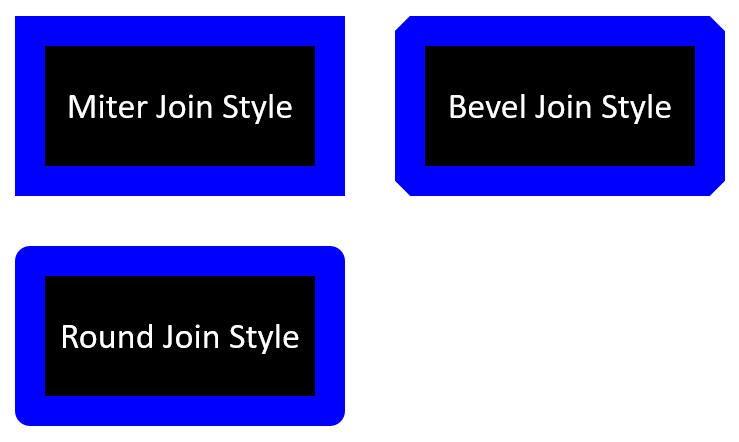
Följande C++‑kod demonstrerar hur tre rektanglar (som visas på bilden ovan) skapades med anslutningstyperna Snedkant, Fasad och Rund:
#include <DOM/FillType.h>
#include <DOM/IAutoShape.h>
#include <DOM/IColorFormat.h>
#include <DOM/IFillFormat.h>
#include <DOM/ILineFillFormat.h>
#include <DOM/ILineFormat.h>
#include <DOM/IShapeCollection.h>
#include <DOM/ISlide.h>
#include <DOM/ITextFrame.h>
#include <DOM/LineJoinStyle.h>
#include <DOM/Presentation.h>
#include <DOM/ShapeType.h>
#include <Export/SaveFormat.h>
#include <drawing/color.h>
#include <system/smart_ptr.h>
using namespace Aspose::Slides;
using namespace Aspose::Slides::Export;
using namespace System;
using namespace System::Drawing;

// Instansiera Presentation‑klassen som representerar en presentationsfil.
auto presentation = MakeObject<Presentation>();

// Hämta den första bilden.
auto slide = presentation->get_Slide(0);

// Lägg till tre automatiska former av typen Rektangel.
auto shape1 = slide->get_Shapes()->AddAutoShape(ShapeType::Rectangle, 20, 20, 150, 75);
auto shape2 = slide->get_Shapes()->AddAutoShape(ShapeType::Rectangle, 210, 20, 150, 75);
auto shape3 = slide->get_Shapes()->AddAutoShape(ShapeType::Rectangle, 20, 135, 150, 75);

// Ställ in fyllningsfärgen för varje rektangelform.
shape1->get_FillFormat()->set_FillType(FillType::Solid);
shape1->get_FillFormat()->get_SolidFillColor()->set_Color(Color::get_Black());
shape2->get_FillFormat()->set_FillType(FillType::Solid);
shape2->get_FillFormat()->get_SolidFillColor()->set_Color(Color::get_Black());
shape3->get_FillFormat()->set_FillType(FillType::Solid);
shape3->get_FillFormat()->get_SolidFillColor()->set_Color(Color::get_Black());

// Ställ in linjebredden.
shape1->get_LineFormat()->set_Width(15);
shape2->get_LineFormat()->set_Width(15);
shape3->get_LineFormat()->set_Width(15);

// Ställ in färgen för varje rektangels linje.
shape1->get_LineFormat()->get_FillFormat()->set_FillType(FillType::Solid);
shape1->get_LineFormat()->get_FillFormat()->get_SolidFillColor()->set_Color(Color::get_Blue());
shape2->get_LineFormat()->get_FillFormat()->set_FillType(FillType::Solid);
shape2->get_LineFormat()->get_FillFormat()->get_SolidFillColor()->set_Color(Color::get_Blue());
shape3->get_LineFormat()->get_FillFormat()->set_FillType(FillType::Solid);
shape3->get_LineFormat()->get_FillFormat()->get_SolidFillColor()->set_Color(Color::get_Blue());

// Ställ in anknytningsstilen.
shape1->get_LineFormat()->set_JoinStyle(LineJoinStyle::Miter);
shape2->get_LineFormat()->set_JoinStyle(LineJoinStyle::Bevel);
shape3->get_LineFormat()->set_JoinStyle(LineJoinStyle::Round);

// Lägg till text i varje rektangel.
shape1->get_TextFrame()->set_Text(u"Miter Join Style");
shape2->get_TextFrame()->set_Text(u"Bevel Join Style");
shape3->get_TextFrame()->set_Text(u"Round Join Style");

// Spara PPTX‑filen till disk.
presentation->Save(u"join_styles.pptx", SaveFormat::Pptx);
presentation->Dispose();
Gradientfyllning
I PowerPoint är Gradientfyllning ett formateringsalternativ som låter dig applicera ett kontinuerligt färgblandning på en form. Till exempel kan du applicera två eller flera färger så att den ena gradvis tonas ut i den andra.
Så här appliceras en gradientfyllning på en form med Aspose.Slides:
- Skapa en instans av klassen Presentation.
- Hämta en referens till en bild efter dess index.
- Lägg till en IAutoShape på bilden.
- Ställ in formens FillType till
Gradient. - Lägg till dina två föredragna färger med definierade positioner med hjälp av
Add‑metoderna i gradientstopp‑samlingen som exponeras av gränssnittet IGradientFormat. - Spara den ändrade presentationen som en PPTX‑fil.
Följande C++‑kod demonstrerar hur du applicerar en gradientfyllning på en ellips:
#include <DOM/FillType.h>
#include <DOM/GradientDirection.h>
#include <DOM/GradientShape.h>
#include <DOM/IAutoShape.h>
#include <DOM/IFillFormat.h>
#include <DOM/IGradientFormat.h>
#include <DOM/IGradientStopCollection.h>
#include <DOM/IShapeCollection.h>
#include <DOM/ISlide.h>
#include <DOM/Presentation.h>
#include <DOM/PresetColor.h>
#include <DOM/ShapeType.h>
#include <Export/SaveFormat.h>
#include <system/smart_ptr.h>
using namespace Aspose::Slides;
using namespace Aspose::Slides::Export;
using namespace System;

// Instansiera Presentation‑klassen som representerar en presentationsfil.
auto presentation = MakeObject<Presentation>();

// Hämta den första bilden.
auto slide = presentation->get_Slide(0);

// Lägg till en automatisk form av typen Ellips.
auto shape = slide->get_Shapes()->AddAutoShape(ShapeType::Ellipse, 50, 50, 150, 75);

// Applicera gradientformatering på ellipsen.
shape->get_FillFormat()->set_FillType(FillType::Gradient);
shape->get_FillFormat()->get_GradientFormat()->set_GradientShape(GradientShape::Linear);

// Ställ in gradientens riktning.
shape->get_FillFormat()->get_GradientFormat()->set_GradientDirection(GradientDirection::FromCorner2);

// Lägg till två gradientstopp.
shape->get_FillFormat()->get_GradientFormat()->get_GradientStops()->Add(1.0f, PresetColor::Purple);
shape->get_FillFormat()->get_GradientFormat()->get_GradientStops()->Add(0.0f, PresetColor::Red);

// Spara PPTX‑filen till disk.
presentation->Save(u"gradient_fill.pptx", SaveFormat::Pptx);
presentation->Dispose();
Resultatet:

Mönsterfyllning
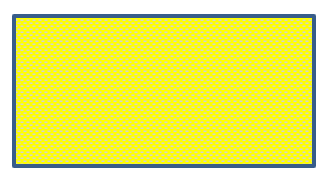
I PowerPoint är Mönsterfyllning ett formateringsalternativ som låter dig applicera en tvåfärgsdesign—såsom prickar, ränder, korsningar eller rutnät—på en form. Du kan välja egna färger för mönstrets förgrund och bakgrund.
Aspose.Slides erbjuder över 45 fördefinierade mönsterstilar som du kan applicera på former för att förbättra dina presentationers visuella intryck. Även efter att du valt ett fördefinierat mönster kan du specificera exakt vilka färger som ska användas.
Så här appliceras en mönsterfyllning på en form med Aspose.Slides:
- Skapa en instans av klassen Presentation.
- Hämta en referens till en bild efter dess index.
- Lägg till en IAutoShape på bilden.
- Ställ in formens FillType till
Pattern. - Välj en mönsterstil från de fördefinierade alternativen.
- Ställ in Background Color för mönstret.
- Ställ in Foreground Color för mönstret.
- Spara den ändrade presentationen som en PPTX‑fil.
Följande C++‑kod visar hur du applicerar en mönsterfyllning på en rektangel:
#include <DOM/FillType.h>
#include <DOM/IAutoShape.h>
#include <DOM/IColorFormat.h>
#include <DOM/IFillFormat.h>
#include <DOM/IPatternFormat.h>
#include <DOM/IShapeCollection.h>
#include <DOM/ISlide.h>
#include <DOM/PatternStyle.h>
#include <DOM/Presentation.h>
#include <DOM/ShapeType.h>
#include <Export/SaveFormat.h>
#include <drawing/color.h>
#include <system/smart_ptr.h>
using namespace Aspose::Slides;
using namespace Aspose::Slides::Export;
using namespace System;
using namespace System::Drawing;

// Instansiera Presentation‑klassen som representerar en presentationsfil.
auto presentation = MakeObject<Presentation>();

// Hämta den första bilden.
auto slide = presentation->get_Slide(0);

// Lägg till en automatisk form av typen Rektangel.
auto shape = slide->get_Shapes()->AddAutoShape(ShapeType::Rectangle, 50, 50, 150, 75);

// Ställ in fyllningstypen till Pattern.
shape->get_FillFormat()->set_FillType(FillType::Pattern);

// Ställ in mönsterstilen.
shape->get_FillFormat()->get_PatternFormat()->set_PatternStyle(PatternStyle::Trellis);

// Ställ in mönstrets bakgrunds- och förgrundsfärger.
shape->get_FillFormat()->get_PatternFormat()->get_BackColor()->set_Color(Color::get_LightGray());
shape->get_FillFormat()->get_PatternFormat()->get_ForeColor()->set_Color(Color::get_Yellow());

// Spara PPTX‑filen till disk.
presentation->Save(u"pattern_fill.pptx", SaveFormat::Pptx);
presentation->Dispose();
Resultatet:
Bildfyllning
I PowerPoint är Bildfyllning ett formateringsalternativ som låter dig infoga en bild i en form—effektivt använda bilden som formens bakgrund.
Så här använder du Aspose.Slides för att applicera en bildfyllning på en form:
- Skapa en instans av klassen Presentation.
- Hämta en referens till en bild efter dess index.
- Lägg till en IAutoShape på bilden.
- Ställ in formens FillType till
Picture. - Ställ in bildfyllningsläget till
Tile(eller ett annat föredraget läge). - Skapa ett IPPImage‑objekt från den bild du vill använda.
- Skicka bilden till metoden
ISlidesPicture.set_Image. - Spara den ändrade presentationen som en PPTX‑fil.
Låt oss säga att vi har en fil lotus.png med följande bild:

Följande C++‑kod demonstrerar hur du fyller en form med bilden:
#include <DOM/FillType.h>
#include <DOM/IAutoShape.h>
#include <DOM/IFillFormat.h>
#include <DOM/IImageCollection.h>
#include <DOM/IPictureFillFormat.h>
#include <DOM/IShapeCollection.h>
#include <DOM/ISlide.h>
#include <DOM/ISlidesPicture.h>
#include <DOM/PictureFillMode.h>
#include <DOM/Presentation.h>
#include <DOM/ShapeType.h>
#include <Export/SaveFormat.h>
#include <IImage.h>
#include <Util/Images.h>
#include <system/smart_ptr.h>
using namespace Aspose::Slides;
using namespace Aspose::Slides::Export;
using namespace System;

// Instansiera Presentation‑klassen som representerar en presentationsfil.
auto presentation = MakeObject<Presentation>();

// Hämta den första bilden.
auto slide = presentation->get_Slide(0);

// Lägg till en automatisk form av typen Rektangel.
auto shape = slide->get_Shapes()->AddAutoShape(ShapeType::Rectangle, 50, 50, 255, 130);

// Ställ in fyllningstypen till Bild.
shape->get_FillFormat()->set_FillType(FillType::Picture);

// Ställ in bildfyllningsläget.
shape->get_FillFormat()->get_PictureFillFormat()->set_PictureFillMode(PictureFillMode::Tile);

// Läs in en bild och lägg till den i presentationens resurser.
auto image = Images::FromFile(u"lotus.png");
auto picture = presentation->get_Images()->AddImage(image);
image->Dispose();

// Ställ in bilden.
shape->get_FillFormat()->get_PictureFillFormat()->get_Picture()->set_Image(picture);

// Spara PPTX‑filen till disk.
presentation->Save(u"picture_fill.pptx", SaveFormat::Pptx);
presentation->Dispose();
Resultatet:
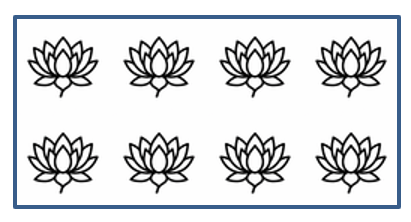
Tile Picture As Texture
Om du vill använda en kaklad bild som textur och anpassa kaklingsbeteendet kan du använda följande metoder i gränssnittet IPictureFillFormat och klassen PictureFillFormat:
- set_PictureFillMode: Ställer in bildfyllningsläget—antingen
TileellerStretch. - set_TileAlignment: Anger justeringen av kaklorna inom formen.
- set_TileFlip: Styr om kakeln vänds horisontellt, vertikalt eller båda.
- set_TileOffsetX: Ställer in horisontell förskjutning av kakeln (i punkter) från formens ursprung.
- set_TileOffsetY: Ställer in vertikal förskjutning av kakeln (i punkter) från formens ursprung.
- set_TileScaleX: Definierar horisontell skala för kakeln i procent.
- set_TileScaleY: Definierar vertikal skala för kakeln i procent.
Följande kodexempel visar hur du lägger till en rektangelform med kaklad bildfyllning och konfigurerar kakelalternativen:
#include <DOM/FillType.h>
#include <DOM/IAutoShape.h>
#include <DOM/IFillFormat.h>
#include <DOM/IImageCollection.h>
#include <DOM/IPictureFillFormat.h>
#include <DOM/IShapeCollection.h>
#include <DOM/ISlide.h>
#include <DOM/ISlidesPicture.h>
#include <DOM/PictureFillMode.h>
#include <DOM/Presentation.h>
#include <DOM/RectangleAlignment.h>
#include <DOM/ShapeType.h>
#include <DOM/TileFlip.h>
#include <Export/SaveFormat.h>
#include <IImage.h>
#include <Util/Images.h>
#include <system/smart_ptr.h>
using namespace Aspose::Slides;
using namespace Aspose::Slides::Export;
using namespace System;

// Instansiera Presentation-klassen som representerar en presentationsfil.
auto presentation = MakeObject<Presentation>();

// Hämta den första bilden.
auto firstSlide = presentation->get_Slide(0);

// Lägg till en automatisk rektangelform.
auto shape = firstSlide->get_Shapes()->AddAutoShape(ShapeType::Rectangle, 50, 50, 190, 95);

// Ställ in fyllningstypen för formen till Bild.
shape->get_FillFormat()->set_FillType(FillType::Picture);

// Läs in bilden och lägg till den i presentationens resurser.
auto sourceImage = Images::FromFile(u"lotus.png");
auto presentationImage = presentation->get_Images()->AddImage(sourceImage);
sourceImage->Dispose();

// Tilldela bilden till formen.
auto pictureFillFormat = shape->get_FillFormat()->get_PictureFillFormat();
pictureFillFormat->get_Picture()->set_Image(presentationImage);

// Konfigurera bildfyllningsläget och kaklingsegenskaperna.
pictureFillFormat->set_PictureFillMode(PictureFillMode::Tile);
pictureFillFormat->set_TileOffsetX(-32);
pictureFillFormat->set_TileOffsetY(-32);
pictureFillFormat->set_TileScaleX(50);
pictureFillFormat->set_TileScaleY(50);
pictureFillFormat->set_TileAlignment(RectangleAlignment::BottomRight);
pictureFillFormat->set_TileFlip(TileFlip::FlipBoth);

// Spara PPTX-filen till disk.
presentation->Save(u"tile.pptx", SaveFormat::Pptx);
presentation->Dispose();
Resultatet:
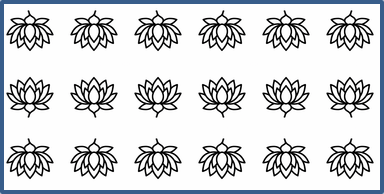
Solid Color Fill
I PowerPoint är Solid Color Fill ett formateringsalternativ som fyller en form med en enda, enhetlig färg. Denna enkla bakgrundsfärg appliceras utan några gradienter, texturer eller mönster.
För att applicera en solid färgfyllning på en form med Aspose.Slides, följ dessa steg:
- Skapa en instans av klassen Presentation.
- Hämta en referens till en bild efter dess index.
- Lägg till en IAutoShape på bilden.
- Ställ in formens FillType till
Solid. - Tilldela din föredragna fyllningsfärg till formen.
- Spara den ändrade presentationen som en PPTX‑fil.
Följande C++‑kod demonstrerar hur du applicerar en solid färgfyllning på en rektangel i en PowerPoint‑bild:
#include <DOM/FillType.h>
#include <DOM/IAutoShape.h>
#include <DOM/IColorFormat.h>
#include <DOM/IFillFormat.h>
#include <DOM/IShapeCollection.h>
#include <DOM/ISlide.h>
#include <DOM/Presentation.h>
#include <DOM/ShapeType.h>
#include <Export/SaveFormat.h>
#include <drawing/color.h>
#include <system/smart_ptr.h>
using namespace Aspose::Slides;
using namespace Aspose::Slides::Export;
using namespace System;
using namespace System::Drawing;

// Instansiera Presentation-klassen som representerar en presentationsfil.
auto presentation = MakeObject<Presentation>();

// Hämta den första bilden.
auto slide = presentation->get_Slide(0);

// Lägg till en automatisk form av typen Rektangel.
auto shape = slide->get_Shapes()->AddAutoShape(ShapeType::Rectangle, 50, 50, 150, 75);

// Ställ in fyllningstypen till Solid.
shape->get_FillFormat()->set_FillType(FillType::Solid);

// Ställ in fyllningsfärgen.
shape->get_FillFormat()->get_SolidFillColor()->set_Color(Color::get_Yellow());

// Spara PPTX-filen till disk.
presentation->Save(u"solid_color_fill.pptx", SaveFormat::Pptx);
presentation->Dispose();
Resultatet:

Ställ in transparens
I PowerPoint, när du applicerar en solid färg, gradient, bild eller texturfyllning på former, kan du också ange en transparensnivå för att kontrollera fyllningens opacitet. Ett högre transparensvärde gör formen mer genomskinlig, så att bakgrunden eller underliggande objekt delvis syns.
Aspose.Slides låter dig sätta transparensnivån genom att justera alfavärdet i den färg som används för fyllningen. Så här gör du:
- Skapa en instans av klassen Presentation.
- Hämta en referens till en bild efter dess index.
- Lägg till en IAutoShape på bilden.
- Ställ in FillType till
Solid. - Använd
Colorför att definiera en färg med transparens (alfakomponenten styr transparensen). - Spara presentationen.
Följande C++‑kod demonstrerar hur du applicerar en transparent fyllningsfärg på en rektangel:
#include <DOM/FillType.h>
#include <DOM/IAutoShape.h>
#include <DOM/IColorFormat.h>
#include <DOM/IFillFormat.h>
#include <DOM/IShapeCollection.h>
#include <DOM/ISlide.h>
#include <DOM/Presentation.h>
#include <DOM/ShapeType.h>
#include <Export/SaveFormat.h>
#include <drawing/color.h>
#include <system/smart_ptr.h>
using namespace Aspose::Slides;
using namespace Aspose::Slides::Export;
using namespace System;
using namespace System::Drawing;

// Instansiera Presentation-klassen som representerar en presentationsfil.
auto presentation = MakeObject<Presentation>();

// Hämta den första bilden.
auto slide = presentation->get_Slide(0);

// Lägg till en solid rektangulär automatisk form.
auto solidShape = slide->get_Shapes()->AddAutoShape(ShapeType::Rectangle, 50, 50, 150, 75);

// Lägg till en transparent rektangulär automatisk form ovanpå den solida formen.
auto transparentShape = slide->get_Shapes()->AddAutoShape(ShapeType::Rectangle, 80, 80, 150, 75);
transparentShape->get_FillFormat()->set_FillType(FillType::Solid);
transparentShape->get_FillFormat()->get_SolidFillColor()->set_Color(Color::FromArgb(204, 255, 255, 0));

// Spara PPTX-filen till disk.
presentation->Save(u"shape_transparency.pptx", SaveFormat::Pptx);
presentation->Dispose();
Resultatet:
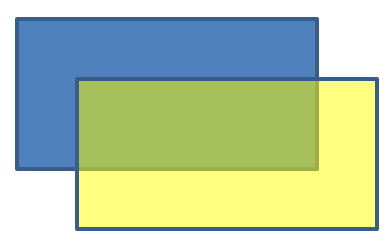
Rotera former
Aspose.Slides låter dig rotera former i PowerPoint‑presentationer. Detta kan vara användbart när du placerar visuella element med specifik justering eller designkrav.
För att rotera en form på en bild, följ dessa steg:
- Skapa en instans av klassen Presentation.
- Hämta en referens till en bild efter dess index.
- Lägg till en IAutoShape på bilden.
- Ställ in formens rotations‑egenskap till önskad vinkel.
- Spara presentationen.
Följande C++‑kod demonstrerar hur du roterar en form med 5 grader:
#include <DOM/IAutoShape.h>
#include <DOM/IShapeCollection.h>
#include <DOM/ISlide.h>
#include <DOM/Presentation.h>
#include <DOM/ShapeType.h>
#include <Export/SaveFormat.h>
#include <system/smart_ptr.h>
using namespace Aspose::Slides;
using namespace Aspose::Slides::Export;
using namespace System;

// Instansiera Presentation‑klassen som representerar en presentationsfil.
auto presentation = MakeObject<Presentation>();

// Hämta den första bilden.
auto slide = presentation->get_Slide(0);

// Lägg till en automatisk form av typen Rektangel.
auto shape = slide->get_Shapes()->AddAutoShape(ShapeType::Rectangle, 50, 50, 150, 75);

// Rotera formen med 5 grader.
shape->set_Rotation(5);

// Spara PPTX‑filen till disk.
presentation->Save(u"shape_rotation.pptx", SaveFormat::Pptx);
presentation->Dispose();
Resultatet:
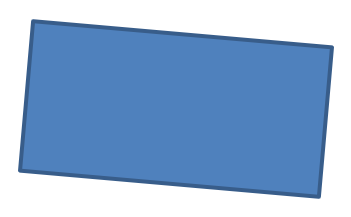
Lägg till 3D‑Bergningseffekter
Aspose.Slides gör det möjligt att tillämpa 3D‑bergningseffekter på former genom att konfigurera deras ThreeDFormat-egenskaper.
För att lägga till 3D‑bergningseffekter på en form, följ dessa steg:
- Skapa en instans av klassen Presentation.
- Hämta en referens till en bild efter dess index.
- Lägg till en IAutoShape på bilden.
- Konfigurera formens ThreeDFormat för att definiera bergningsinställningarna.
- Spara presentationen.
Följande C++‑kod visar hur du applicerar 3D‑bergningseffekter på en form:
#include <DOM/BevelPresetType.h>
#include <DOM/CameraPresetType.h>
#include <DOM/FillType.h>
#include <DOM/IAutoShape.h>
#include <DOM/ICamera.h>
#include <DOM/IColorFormat.h>
#include <DOM/IFillFormat.h>
#include <DOM/ILightRig.h>
#include <DOM/ILineFillFormat.h>
#include <DOM/ILineFormat.h>
#include <DOM/IShapeBevel.h>
#include <DOM/IShapeCollection.h>
#include <DOM/ISlide.h>
#include <DOM/IThreeDFormat.h>
#include <DOM/LightRigPresetType.h>
#include <DOM/LightingDirection.h>
#include <DOM/Presentation.h>
#include <DOM/ShapeType.h>
#include <Export/SaveFormat.h>
#include <drawing/color.h>
#include <system/smart_ptr.h>
using namespace Aspose::Slides;
using namespace Aspose::Slides::Export;
using namespace System;
using namespace System::Drawing;

// Create an instance of the Presentation class.
auto presentation = MakeObject<Presentation>();

auto slide = presentation->get_Slide(0);

// Add a shape to the slide.
auto shape = slide->get_Shapes()->AddAutoShape(ShapeType::Ellipse, 50, 50, 100, 100);
shape->get_FillFormat()->set_FillType(FillType::Solid);
shape->get_FillFormat()->get_SolidFillColor()->set_Color(Color::get_Green());
shape->get_LineFormat()->get_FillFormat()->set_FillType(FillType::Solid);
shape->get_LineFormat()->get_FillFormat()->get_SolidFillColor()->set_Color(Color::get_Orange());
shape->get_LineFormat()->set_Width(2.0);

// Set the shape's ThreeDFormat properties.
shape->get_ThreeDFormat()->set_Depth(4.0);
shape->get_ThreeDFormat()->get_BevelTop()->set_BevelType(BevelPresetType::Circle);
shape->get_ThreeDFormat()->get_BevelTop()->set_Height(6);
shape->get_ThreeDFormat()->get_BevelTop()->set_Width(6);
shape->get_ThreeDFormat()->get_Camera()->set_CameraType(CameraPresetType::OrthographicFront);
shape->get_ThreeDFormat()->get_LightRig()->set_LightType(LightRigPresetType::ThreePt);
shape->get_ThreeDFormat()->get_LightRig()->set_Direction(LightingDirection::Top);

// Save the presentation as a PPTX file.
presentation->Save(u"3D_bevel_effect.pptx", SaveFormat::Pptx);
presentation->Dispose();
Resultatet:

Lägg till 3D‑Rotations‑effekter
Aspose.Slides gör det möjligt att tillämpa 3D‑rotereffekter på former genom att konfigurera deras ThreeDFormat-egenskaper.
För att applicera 3D‑rotation på en form:
- Skapa en instans av klassen Presentation.
- Hämta en referens till en bild efter dess index.
- Lägg till en IAutoShape på bilden.
- Använd set_CameraType och set_LightType för att definiera 3D‑rotationen.
- Spara presentationen.
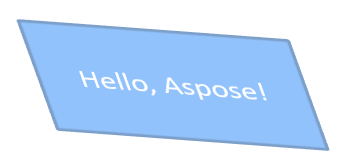
Följande C++‑kod demonstrerar hur du tillämpar 3D‑rotereffekter på en form:
#include <DOM/CameraPresetType.h>
#include <DOM/IAutoShape.h>
#include <DOM/ICamera.h>
#include <DOM/ILightRig.h>
#include <DOM/IShapeCollection.h>
#include <DOM/ISlide.h>
#include <DOM/ITextFrame.h>
#include <DOM/IThreeDFormat.h>
#include <DOM/LightRigPresetType.h>
#include <DOM/Presentation.h>
#include <DOM/ShapeType.h>
#include <Export/SaveFormat.h>
#include <system/smart_ptr.h>
using namespace Aspose::Slides;
using namespace Aspose::Slides::Export;
using namespace System;

// Skapa en instans av Presentation-klassen.
auto presentation = MakeObject<Presentation>();

auto slide = presentation->get_Slide(0);

auto shape = slide->get_Shapes()->AddAutoShape(ShapeType::Rectangle, 50, 50, 150, 75);
shape->get_TextFrame()->set_Text(u"Hello, Aspose!");

shape->get_ThreeDFormat()->set_Depth(6);
shape->get_ThreeDFormat()->get_Camera()->SetRotation(40, 35, 20);
shape->get_ThreeDFormat()->get_Camera()->set_CameraType(CameraPresetType::IsometricLeftUp);
shape->get_ThreeDFormat()->get_LightRig()->set_LightType(LightRigPresetType::Balanced);

// Spara presentationen som en PPTX-fil.
presentation->Save(u"3D_rotation_effect.pptx", SaveFormat::Pptx);
presentation->Dispose();
Resultatet:
Styr svart‑vit rendering för former
Metoden IShape::set_BlackWhiteMode specificerar hur en enskild form renderas när en presentation visas eller bearbetas i svart‑vit läge. Den aktiverar inte svart‑vit visning i sig och ändrar inte formens fyllning, linje eller annan formatering i normalt färgläge.
Använd ett värde från uppräkningen BlackWhiteMode för att välja önskat beteende. Till exempel låter Automatic renderingsprogrammet välja konverteringen, Gray och LightGray använder gråtoner, BlackWhite använder endast svart och vitt, Black och White tvingar en enda färg, Color bevarar normal färg, och Hidden utesluter formen i svart‑vit läge. NotDefined betyder att inget form‑specifikt läge är tilldelat.
Följande C++‑kod skapar en färgad form och får den att visas grå i svart‑vit visningsläge:
#include <DOM/BlackWhiteMode.h>
#include <DOM/FillType.h>
#include <DOM/IAutoShape.h>
#include <DOM/IFillFormat.h>
#include <DOM/IShapeCollection.h>
#include <DOM/ISlide.h>
#include <DOM/Presentation.h>
#include <DOM/ShapeType.h>
#include <Export/SaveFormat.h>
#include <drawing/color.h>
#include <system/smart_ptr.h>

using namespace Aspose::Slides;
using namespace Aspose::Slides::Export;
using namespace System;
using namespace System::Drawing;

auto presentation = MakeObject<Presentation>();
auto slide = presentation->get_Slide(0);

auto shape = slide->get_Shapes()->AddAutoShape(ShapeType::Rectangle, 50, 50, 200, 100);
shape->get_FillFormat()->set_FillType(FillType::Solid);
shape->get_FillFormat()->get_SolidFillColor()->set_Color(Color::get_Orange());

// Keep the orange fill in color mode, but render the shape with gray coloring in black-and-white mode.
shape->set_BlackWhiteMode(BlackWhiteMode::Gray);

presentation->Save(u"shape_black_white_mode.pptx", SaveFormat::Pptx);
presentation->Dispose();
I normalt färgläge behåller rektangeln sin orange fyllning. I ett arbetsflöde med svart‑vit visning använder den grå färg eftersom dess läge är satt till Gray. Detta låter dig behålla en färgrik bild medan du definierar ett särskilt utseende för utskrift, förhandsgranskning eller andra arbetsflöden som respekterar presentationens svart‑vita visningsinställningar.
Återställ formatering
Följande C++‑kod visar hur du återställer formateringen på en bild och återställer position, storlek och formatering för alla former med platshållare på LayoutSlide till deras standardinställningar:
#include <DOM/ISlide.h>
#include <DOM/ISlideCollection.h>
#include <DOM/Presentation.h>
#include <Export/SaveFormat.h>
#include <system/enumerator_adapter.h>
#include <system/smart_ptr.h>
using namespace Aspose::Slides;
using namespace Aspose::Slides::Export;
using namespace System;

auto presentation = MakeObject<Presentation>(u"sample.pptx");

for (auto&& slide : System::IterateOver(presentation->get_Slides()))
{
    // Återställ varje form på bilden som har en platshållare på layouten.
    slide->Reset();
}

presentation->Save(u"reset_formatting.pptx", SaveFormat::Pptx);
presentation->Dispose();
FAQ
Påverkar formateringen av former den slutgiltiga presentationsfilens storlek?
Endast marginellt. Inbäddade bilder och media upptar mest utrymme, medan formparametrar som färger, effekter och gradienter lagras som metadata och lägger i praktiken till ingen extra storlek.
Hur kan jag identifiera former på en bild som har identisk formatering så att jag kan gruppera dem?
Jämför varje forms viktigaste formaterings‑egenskaper—fyllning, linje och effektinställningar. Om alla motsvarande värden matchar, behandla deras stilar som identiska och gruppera logiskt dessa former, vilket förenklar senare stilhantering.
Kan jag spara en uppsättning anpassade formstilar i en separat fil för återanvändning i andra presentationer?
Ja. Spara exempelformer med önskade stilar i en mall‑presentation eller en .POTX‑mallfil. När du skapar en ny presentation, öppna mallen, klona de stylade former du behöver och återapplicera deras formatering där det krävs.